winform下重画ListBox
Windows Forms是由Win32 API封装的开发组件,最初是为了替代mfc,但却没有体现与Model View Controller架构对应的特色,进而在.net framework 3.0中推出了wpf,富控件数据显示方面,利用模板功能轻松实现。
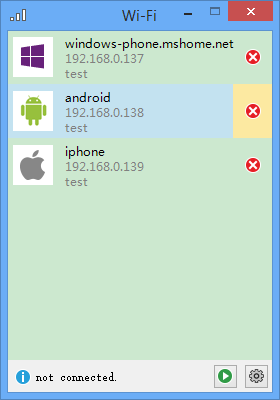
在winform下要想自定义一些用户控件,就需要运用的2D绘画类。下图我们为ListBox重新排列了数据显示方式,并为每一个item加入了删除按钮。
首先我们设计一个承载数据的类ListBoxItem。
 public class ListBoxItem : IDisposable

 {

     public Guid Id { get; set; }

     public string Name { get; set; }

     public string IP { get; set; }

     public string Mac { get; set; }

     [System.ComponentModel.DefaultValue(typeof(System.Drawing.Image), "null")]

     public System.Drawing.Image Image { get; set; }

     public bool IsFocus { get; set; }

     public ListBoxItem() { }

     public ListBoxItem(Guid id, string name, string ip, string mac, System.Drawing.Image image)

     {

         this.Id = id;

         this.Name = name;

         this.IP = ip;

         this.Mac = mac;

         this.Image = image;

         this.IsFocus = false;

     }

     public void Dispose()

     {

         this.Image = null;

     }

 }
然后我们再为ListBox写一个用于展现数据的数据源ListBoxItemCollection,这里实现了迭代和集合操作接口,可以根据需要扩展数据操作方法。
[System.ComponentModel.ListBindable(false)]

public class ListBoxItemCollection : IList, ICollection, IEnumerable

{

    private UserListBox m_owner;

    public ListBoxItemCollection(UserListBox owner)

    {

        this.m_owner = owner;

    }

    internal UserListBox Owner

    {

        get { return this.m_owner; }

    }

    #region  override

    public ListBoxItem this[int index]

    {

        get { return Owner.OldItemSource[index] as ListBoxItem; }

        set { Owner.OldItemSource[index] = value; }

    }

    public int Count

    {

        get { return Owner.OldItemSource.Count; }

    }

    public bool IsReadOnly

    {

        get { return Owner.OldItemSource.IsReadOnly; }

    }

    public int Add(ListBoxItem item)

    {

        if (item == null)

        {

            throw new ArgumentException("item is null");

        }

        return Owner.OldItemSource.Add(item);

    }

    public void AddRange(ListBoxItem[] items)

    {

        Owner.OldItemSource.AddRange(items);

    }

    public void Clear()

    {

        if (Owner.OldItemSource.Count > )

        {

            Owner.OldItemSource.Clear();

        }

    }

    public bool Contains(ListBoxItem item)

    {

        bool rst = false;

        foreach (ListBoxItem oldItem in Owner.OldItemSource)

        {

            if (oldItem.Id == item.Id)

            {

                rst = true;

                break;

            }

        }

        return rst;

    }

    public void CopyTo(ListBoxItem[] destination, int arrayIndex)

    {

        Owner.OldItemSource.CopyTo(destination, arrayIndex);

    }

    public int IndexOf(ListBoxItem item)

    {

        return Owner.OldItemSource.IndexOf(item);

    }

    public void Insert(int index, ListBoxItem item)

    {

        if (item == null)

        {

            throw new ArgumentException("item is null");

        }

        Owner.OldItemSource.Insert(index, item);

    }

    public void Remove(ListBoxItem item)

    {

        Owner.OldItemSource.Remove(item);

    }

    public void RemoveAt(int index)

    {

        Owner.OldItemSource.RemoveAt(index);

    }

    public IEnumerator GetEnumerator()

    {

        return Owner.OldItemSource.GetEnumerator();

    }

    int IList.Add(object value)

    {

        if (!(value is ListBoxItem))

        {

            throw new ArgumentException();

        }

        return Add(value as ListBoxItem);

    }

    void IList.Clear()

    {

        Clear();

    }

    bool IList.Contains(object value)

    {

        return Contains(value as ListBoxItem);

    }

    int IList.IndexOf(object value)

    {

        return IndexOf(value as ListBoxItem);

    }

    void IList.Insert(int index, object value)

    {

        if (!(value is ListBoxItem))

        {

            throw new ArgumentException();

        }

        Insert(index, value as ListBoxItem);

    }

    bool IList.IsFixedSize

    {

        get { return false; }

    }

    bool IList.IsReadOnly

    {

        get { return IsReadOnly; }

    }

    void IList.Remove(object value)

    {

        Remove(value as ListBoxItem);

    }

    void IList.RemoveAt(int index)

    {

        RemoveAt(index);

    }

    object IList.this[int index]

    {

        get { return this[index]; }

        set

        {

            if (!(value is ListBoxItem))

            {

                throw new ArgumentException();

            }

            this[index] = value as ListBoxItem;

        }

    }

    void ICollection.CopyTo(Array array, int index)

    {

        CopyTo((ListBoxItem[])array, index);

    }

    int ICollection.Count

    {

        get { return Count; }

    }

    bool ICollection.IsSynchronized

    {

        get { return false; }

    }

    object ICollection.SyncRoot

    {

        get { return false; }

    }

    IEnumerator IEnumerable.GetEnumerator()

    {

        return GetEnumerator();

    }

    #endregion

    #region  extention

    public ListBoxItem FindByMac(string mac)

    {

        foreach (ListBoxItem item in Owner.OldItemSource)

        {

            if (item.Mac == mac)

            {

                return item;

            }

        }

        return null;

    }

    #endregion

}
下面可以为工程new一个新项——自定义控件,命名为UserListBox。
这里有几个地方要说明一下,首先在默认构造函数里面的参数:
DrawMode.OwnerDrawVariable启用控件重绘功能。
DoubleBuffer开启后避免复杂绘画造成窗体闪烁,这个缓冲的原理是将绘画操作放在内存里操作,完成后才会复制到图形界面上,进而避免的闪烁。
OnPaint进行了重写,这个方法是根据pc屏幕分辨率刷新频率来执行的,会不断的重复执行,进而持久化图形界面。
Invalidate方法,会立即刷新UI。
Item上的按钮事件,是通过ListBox的click事件,取到鼠标的在界面上的定位,调用相对应的方法。
 public partial class UserListBox : ListBox

 {

     public ListBoxItem mouseItem;

     private ListBoxItemCollection m_Items;

     public UserListBox() : base()

     {

         InitializeComponent();

         m_Items = new ListBoxItemCollection(this);

         base.DrawMode = DrawMode.OwnerDrawVariable;

         this.SetStyle(ControlStyles.UserPaint, true);

         this.SetStyle(ControlStyles.DoubleBuffer, true); // 双缓冲

         this.SetStyle(ControlStyles.OptimizedDoubleBuffer, true); // 双缓冲

         this.SetStyle(ControlStyles.ResizeRedraw, true); // 调整大小时重绘

         this.SetStyle(ControlStyles.AllPaintingInWmPaint, true); // 禁止擦除背景.

         this.SetStyle(ControlStyles.SupportsTransparentBackColor, true); // 开启控件透明

     }

     public new ListBoxItemCollection Items

     {

         get { return m_Items; }

     }

     internal ListBox.ObjectCollection OldItemSource

     {

         get { return base.Items; }

     }

     protected override void OnPaint(PaintEventArgs e)

     {

         Graphics g = e.Graphics;

         // you can set SeletedItem background

         if (this.Focused && this.SelectedItem != null)

         {

         }

         for (int i = ; i < Items.Count; i++)

         {

             Rectangle bounds = this.GetItemRectangle(i);

             if (mouseItem == Items[i])

             {

                 Color leftColor = Color.FromArgb(, , , );

                 using (SolidBrush brush = new SolidBrush(leftColor))

                 {

                     g.FillRectangle(brush, new Rectangle(bounds.X, bounds.Y, bounds.Width, bounds.Height));

                 }

                 Color rightColor = Color.FromArgb(, , );

                 using (SolidBrush brush = new SolidBrush(rightColor))

                 {

                     g.FillRectangle(brush, new Rectangle(bounds.Width - , bounds.Y, , bounds.Height));

                 }

             }

             int fontLeft = bounds.Left +  + ;

             System.Drawing.Font font = new System.Drawing.Font("微软雅黑", );

             g.DrawString(Items[i].Name, font, new SolidBrush(this.ForeColor), fontLeft, bounds.Top + );

             g.DrawString(Items[i].IP, font, new SolidBrush(Color.FromArgb(, , )), fontLeft, bounds.Top + );

             g.DrawString(Items[i].Mac, font, new SolidBrush(Color.FromArgb(, , )), fontLeft, bounds.Top + );

             if (Items[i].Image != null)

             {

                 g.InterpolationMode = System.Drawing.Drawing2D.InterpolationMode.HighQualityBilinear;

                 g.DrawImage(Items[i].Image, new Rectangle(bounds.X + , (bounds.Height - ) /  + bounds.Top, , ));

             }

             g.DrawImage(Properties.Resources.error, new Rectangle(bounds.Width - , (bounds.Height - ) /  + bounds.Top, , ));

         }

         base.OnPaint(e);

     }

     protected override void OnMeasureItem(MeasureItemEventArgs e)

     {

         base.OnMeasureItem(e);

         if (Items.Count > )

         {

             ListBoxItem item = Items[e.Index];

             e.ItemHeight = ;

         }

     }

     protected override void OnSelectedIndexChanged(EventArgs e)

     {

         base.OnSelectedIndexChanged(e);

     }

     protected override void OnMouseMove(MouseEventArgs e)

     {

         base.OnMouseMove(e);

         for (int i = ; i < Items.Count; i++)

         {

             Rectangle bounds = this.GetItemRectangle(i);

             Rectangle deleteBounds = new Rectangle(bounds.Width - , (bounds.Height - ) /  + bounds.Top, , );

             if (bounds.Contains(e.X, e.Y))

             {

                 if (Items[i] != mouseItem)

                 {

                     mouseItem = Items[i];

                 }

                 if (deleteBounds.Contains(e.X, e.Y))

                 {

                     mouseItem.IsFocus = true;

                     this.Cursor = Cursors.Hand;

                 }

                 else

                 {

                     mouseItem.IsFocus = false;

                     this.Cursor = Cursors.Arrow;

                 }

                 this.Invalidate();

                 break;

             }

         }

     }

     protected override void OnMouseClick(MouseEventArgs e)

     {

         base.OnMouseClick(e);

         if (mouseItem.IsFocus)

         {

             ListBoxItem deleteItem = mouseItem;

             if(MessageBox.Show("confirm to delete", "", MessageBoxButtons.OKCancel) == DialogResult.OK)

             {

                 this.Items.Remove(deleteItem);

             }

         }

     }

     protected override void OnMouseLeave(EventArgs e)

     {

         base.OnMouseLeave(e);

         this.mouseItem = null;

         this.Invalidate();

     }

 }
winform下重画ListBox的更多相关文章
- Winform重画ComboBox背景色
//返回hWnd参数所指定的窗口的设备环境. [System.Runtime.InteropServices.DllImport("user32.dll")] static ext ...
- C# LIstbox 解决WinForm下ListBox控件“设置DataSource属性后无法修改项集合”的问题
解决WinForm下ListBox控件“设置DataSource属性后无法修改项集合”的问题 分类: winform2008-05-24 02:33 2592人阅读 评论(11) 收藏 举报 winf ...
- 解决WinForm下ListBox控件“设置DataSource属性后无法修改项集合”
解决WinForm下ListBox控件“设置DataSource属性后无法修改项集合” 最近更新: 2013-2-15 587 很少写WinForm程序第一次使用ListBox控件就遇到了比 ...
- WinForm中重绘TabControl选项卡标题
最近开发WinForm频繁使用了TabControl控件,这个控件的选项卡没有BackgroundImage这个属性,那么如何为其各个选项卡添加背景图片呢?(这里说的是每个TabPage的头部,也就是 ...
- 分享在winform下实现左右布局多窗口界面
在web页面上我们可以通过frameset,iframe嵌套框架很容易实现各种导航+内容的布局界面,而在winform.WPF中实现其实也很容易,我这里就分享一个:在winform下实现左右布局多窗口 ...
- WinForm下的loading框实现
前言:在项目使用C/S模式情况下,由于需要经常进行数据的刷新,如果直接进行刷新,会有一个等待控件重画的过程,非常的不友好,因此在这里添加一个loading框进行等待显示. 实现:在经过多方面查询资料, ...
- WinForm下的loading框的实现
前言:在项目使用C/S模式情况下,由于需要经常进行数据的刷新,如果直接进行刷新,会有一个等待控件重画的过程,非常的不友好,因此在这里添加一个loading框进行等待显示. 实现:在经过多方面查询资料, ...
- 在winform下实现左右布局多窗口界面的方法(一)
在web页面上我们可以通过frameset,iframe嵌套框架很容易实现各种导航+内容的布局界面,而在winform.WPF中实现其实也很容易,通过本文给大家介绍在winform下实现左右布局多窗口 ...
- 重画GoogleClusterTrace数据
由于项目计划书写作需要,重画了Qi Zhang, Mohamed Faten Zhani, Raouf Boutaba, Joseph L. Hellerstein, Dynamic Heteroge ...
随机推荐
- 【译】RabbitMQ:"Hello World"
简介 RabbitMQ是一个消息代理.从本质上讲,它从消息生产者处接收消息,然后传递给消息的消费者.它在消息的生产者和消费者之间根据你指定的规则对消息进行路由.缓存和持久化. RabbitMQ通常使用 ...
- 解决KDE桌面环境下Eclipse崩溃的问题--让Eclipse使用特定的GTK2主题运行
最近在Kubuntu14.04上安装Eclipse,由于Ubuntu软件中心中的版本太老(3.8),而且会自动安装OpenJDK,于是到官网下载最新的4.4版.(Luna,代号很有亲切感有木有,女神万 ...
- Spark Streaming
Spark Streaming Spark Streaming 是Spark为了用户实现流式计算的模型. 数据源包括Kafka,Flume,HDFS等. DStream 离散化流(discretize ...
- 更改Windows系统时间同步频率【windows 7,windows 8,win10】
Windows系统默认的时间同步间隔是7天,如果我们需要修改同步的时间间隔(同步频率),我们可以通过修改注册表来手动修改它的自动同步间隔以提高同步次数,保证时钟的精度,windows7,Windows ...
- WINDOWS的NTP配置
将下面内容复制到记事本,保存成ntp.bat net stop w32Time REG ADD HKLM\SYSTEM\CurrentControlSet\Services\W32Time\TimeP ...
- Linux ps命令详解与示例说明
ps:要对进程进行监测和控制,首先必须要了解当前进程的情况,也就是需要查看当前进程,而ps命令就是最基本同时也是非常强大的进程查看命令.使用该命令可以确定有哪些进程正在运行和运行的状态.进程是否结 ...
- 剑指offer题目31-40
面试题31:连续字数组的最大和 public class Solution { public int FindGreatestSumOfSubArray(int[] array) { int len ...
- Eclipse+Mingw+Boost 环境搭建
一.安装CDT插件 Eclipse是用Java的swt开发的,所以需要java虚拟机才能运行,jdk的配置方法网上一大堆,这里就不细说了.安装CDT的方法简单提一下,到Help->Eclipse ...
- vim不用鼠标复制粘贴
第一种方法(只能复制行): 在当前行3yy(表示复制3行,多行同理),然后鼠标移到需要粘贴的位置,按p,即可粘贴 第二种方法(无限制): 按v进入visual模式,移动光标(推荐使用hjkl,用熟后比 ...
- c# 线程信号量 Mutex
using System; using System.Collections.Generic; using System.Linq; using System.Text; using System.T ...