【Android UI设计与开发】6.底部菜单栏(三)使用Fragment+PopupWindow仿QQ空间最新版底部菜单栏
直接看栗子吧,效果基本实现,界面微调和弹窗的优化,去做的话会很耗时说,暂时就酱紫了。上传效果动态图太大了,直接手机截图的效果图如下:
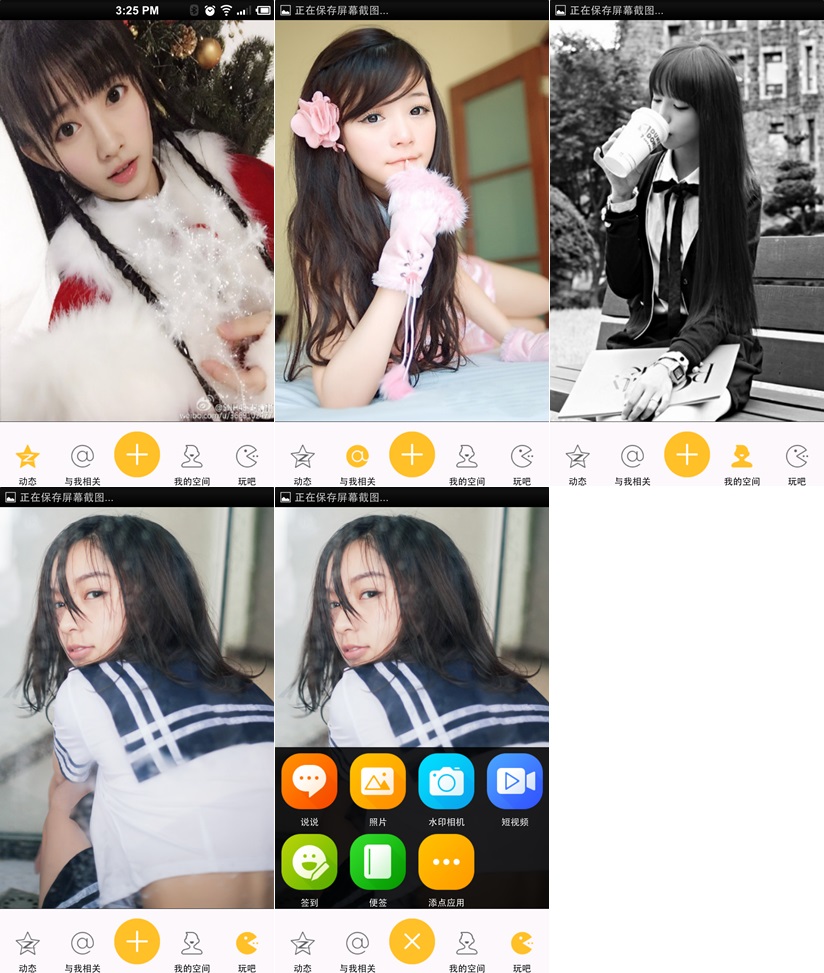
至于代码的实现主要就是自定义的菜单栏,和用 PopupWindow 实现弹窗了。仔细看代码很好懂的。
1.主界面布局代码如下:
<RelativeLayout xmlns:android="http://schemas.android.com/apk/res/android"

    xmlns:tools="http://schemas.android.com/tools"

    android:layout_width="fill_parent"

    android:layout_height="fill_parent" >

    <FrameLayout

        android:id="@+id/frame_content"

        android:layout_width="match_parent"

        android:layout_height="match_parent"

        android:layout_above="@+id/frameMenu"

        android:layout_alignParentTop="true" >

    </FrameLayout>

    <FrameLayout

        android:id="@+id/frameMenu"

        android:layout_width="match_parent"

        android:layout_height="wrap_content"

        android:layout_alignParentBottom="true" >

        <LinearLayout

            android:layout_width="match_parent"

            android:layout_height="match_parent"

            android:background="@color/skin_tabbar_bg"

            android:orientation="horizontal" >

            <!-- 动态 -->

            <FrameLayout

                android:id="@+id/layout_at"

                android:layout_width="fill_parent"

                android:layout_height="wrap_content"

                android:layout_weight="1" >

                <ImageView

                    android:id="@+id/image_at"

                    android:layout_width="wrap_content"

                    android:layout_height="wrap_content"

                    android:layout_gravity="top|center"

                    android:src="@drawable/skin_tabbar_icon_auth_select" />

                <TextView

                    android:layout_width="wrap_content"

                    android:layout_height="wrap_content"

                    android:layout_gravity="bottom|center"

                    android:text="@string/skin_tabbar_icon_auth"

                    android:textColor="@android:color/black"

                    android:textSize="12sp" />

            </FrameLayout>

            <!-- 与我相关 -->

            <FrameLayout

                android:id="@+id/layout_auth"

                android:layout_width="fill_parent"

                android:layout_height="wrap_content"

                android:layout_weight="1" >

                <ImageView

                    android:id="@+id/image_auth"

                    android:layout_width="wrap_content"

                    android:layout_height="wrap_content"

                    android:layout_gravity="top|center"

                    android:src="@drawable/skin_tabbar_icon_at_select" />

                <TextView

                    android:layout_width="wrap_content"

                    android:layout_height="wrap_content"

                    android:layout_gravity="bottom|center"

                    android:text="@string/skin_tabbar_icon_at"

                    android:textColor="@android:color/black"

                    android:textSize="12sp" />

            </FrameLayout>

            <!-- 留白 -->

            <FrameLayout

                android:layout_width="fill_parent"

                android:layout_height="wrap_content"

                android:layout_weight="1" >

            </FrameLayout>

            <!-- 我的空间 -->

            <FrameLayout

                android:id="@+id/layout_space"

                android:layout_width="fill_parent"

                android:layout_height="wrap_content"

                android:layout_weight="1" >

                <ImageView

                    android:id="@+id/image_space"

                    android:layout_width="wrap_content"

                    android:layout_height="wrap_content"

                    android:layout_gravity="top|center"

                    android:src="@drawable/skin_tabbar_icon_space_select" />

                <TextView

                    android:layout_width="wrap_content"

                    android:layout_height="wrap_content"

                    android:layout_gravity="bottom|center"

                    android:text="@string/skin_tabbar_icon_space"

                    android:textColor="@android:color/black"

                    android:textSize="12sp" />

            </FrameLayout>

            <!-- 玩吧 -->

            <FrameLayout

                android:id="@+id/layout_more"

                android:layout_width="fill_parent"

                android:layout_height="wrap_content"

                android:layout_weight="1" >

                <ImageView

                    android:id="@+id/image_more"

                    android:layout_width="wrap_content"

                    android:layout_height="wrap_content"

                    android:layout_gravity="top|center"

                    android:src="@drawable/skin_tabbar_icon_more_select" />

                <TextView

                    android:layout_width="wrap_content"

                    android:layout_height="wrap_content"

                    android:layout_gravity="bottom|center"

                    android:text="@string/skin_tabbar_icon_more"

                    android:textColor="@android:color/black"

                    android:textSize="12sp" />

            </FrameLayout>

        </LinearLayout>

        <LinearLayout

            android:layout_width="match_parent"

            android:layout_height="1px"

            android:background="@android:color/black" >

        </LinearLayout>

    </FrameLayout>

    <!-- 中间按钮背景 -->

    <ImageView

        android:id="@+id/toggle_btn"

        android:layout_width="wrap_content"

        android:layout_height="wrap_content"

        android:layout_alignParentBottom="true"

        android:layout_alignTop="@+id/frameMenu"

        android:layout_centerInParent="true"

        android:src="@drawable/skin_tabbar_btn" />

    <!-- 中间按钮 -->

    <ImageView

        android:id="@+id/plus_btn"

        android:layout_width="wrap_content"

        android:layout_height="wrap_content"

        android:layout_alignParentBottom="true"

        android:layout_alignTop="@+id/frameMenu"

        android:layout_centerInParent="true"

        android:src="@drawable/skin_tabbar_icon_select" />

</RelativeLayout>
activity_main.xml
2.弹窗布局,就是几个图标的显示,比较简单的,可以看代码
3.然后就是主界面逻辑代码了,菜单栏按钮事件控制页面的显示,可以图标的选中状态,已经弹窗的实现,代码如下:
package com.yanis.yc_ui_qzone;

import android.content.Context;

import android.graphics.drawable.BitmapDrawable;

import android.os.Bundle;

import android.support.v4.app.FragmentActivity;

import android.support.v4.app.FragmentTransaction;

import android.util.DisplayMetrics;

import android.view.LayoutInflater;

import android.view.MotionEvent;

import android.view.View;

import android.view.View.OnClickListener;

import android.view.View.OnTouchListener;

import android.widget.FrameLayout;

import android.widget.ImageView;

import android.widget.LinearLayout;

import android.widget.PopupWindow;

import android.widget.PopupWindow.OnDismissListener;

public class MainActivity extends FragmentActivity implements OnClickListener {

    // 定义Fragment页面

    private FragmentAt fragmentAt;

    private FragmentAuth fragmentAuth;

    private FragmentSpace fragmentSpace;

    private FragmentMore fragmentMore;

    // 定义布局对象

    private FrameLayout atFl, authFl, spaceFl, moreFl;

    // 定义图片组件对象

    private ImageView atIv, authIv, spaceIv, moreIv;

    // 定义按钮图片组件

    private ImageView toggleImageView, plusImageView;

    // 定义PopupWindow

    private PopupWindow popWindow;

    // 获取手机屏幕分辨率的类

    private DisplayMetrics dm;

    @Override

    protected void onCreate(Bundle savedInstanceState) {

        super.onCreate(savedInstanceState);

        setContentView(R.layout.activity_main);

        initView();

        initData();

        // 初始化默认为选中点击了“动态”按钮

        clickAtBtn();

    }

    /**

     * 初始化组件

     */

    private void initView() {

        // 实例化布局对象

        atFl = (FrameLayout) findViewById(R.id.layout_at);

        authFl = (FrameLayout) findViewById(R.id.layout_auth);

        spaceFl = (FrameLayout) findViewById(R.id.layout_space);

        moreFl = (FrameLayout) findViewById(R.id.layout_more);

        // 实例化图片组件对象

        atIv = (ImageView) findViewById(R.id.image_at);

        authIv = (ImageView) findViewById(R.id.image_space);

        spaceIv = (ImageView) findViewById(R.id.image_space);

        moreIv = (ImageView) findViewById(R.id.image_more);

        // 实例化按钮图片组件

        toggleImageView = (ImageView) findViewById(R.id.toggle_btn);

        plusImageView = (ImageView) findViewById(R.id.plus_btn);

    }

    /**

     * 初始化数据

     */

    private void initData() {

        // 给布局对象设置监听

        atFl.setOnClickListener(this);

        authFl.setOnClickListener(this);

        spaceFl.setOnClickListener(this);

        moreFl.setOnClickListener(this);

        // 给按钮图片设置监听

        toggleImageView.setOnClickListener(this);

    }

    /**

     * 点击事件

     */

    @Override

    public void onClick(View v) {

        switch (v.getId()) {

        // 点击动态按钮

        case R.id.layout_at:

            clickAtBtn();

            break;

        // 点击与我相关按钮

        case R.id.layout_auth:

            clickAuthBtn();

            break;

        // 点击我的空间按钮

        case R.id.layout_space:

            clickSpaceBtn();

            break;

        // 点击更多按钮

        case R.id.layout_more:

            clickMoreBtn();

            break;

        // 点击中间按钮

        case R.id.toggle_btn:

            clickToggleBtn();

            break;

        }

    }

    /**

     * 点击了“动态”按钮

     */

    private void clickAtBtn() {

        // 实例化Fragment页面

        fragmentAt = new FragmentAt();

        // 得到Fragment事务管理器

        FragmentTransaction fragmentTransaction = this

                .getSupportFragmentManager().beginTransaction();

        // 替换当前的页面

        fragmentTransaction.replace(R.id.frame_content, fragmentAt);

        // 事务管理提交

        fragmentTransaction.commit();

        // 改变选中状态

        atFl.setSelected(true);

        atIv.setSelected(true);

        authFl.setSelected(false);

        authIv.setSelected(false);

        spaceFl.setSelected(false);

        spaceIv.setSelected(false);

        moreFl.setSelected(false);

        moreIv.setSelected(false);

    }

    /**

     * 点击了“与我相关”按钮

     */

    private void clickAuthBtn() {

        // 实例化Fragment页面

        fragmentAuth = new FragmentAuth();

        // 得到Fragment事务管理器

        FragmentTransaction fragmentTransaction = this

                .getSupportFragmentManager().beginTransaction();

        // 替换当前的页面

        fragmentTransaction.replace(R.id.frame_content, fragmentAuth);

        // 事务管理提交

        fragmentTransaction.commit();

        atFl.setSelected(false);

        atIv.setSelected(false);

        authFl.setSelected(true);

        authIv.setSelected(true);

        spaceFl.setSelected(false);

        spaceIv.setSelected(false);

        moreFl.setSelected(false);

        moreIv.setSelected(false);

    }

    /**

     * 点击了“我的空间”按钮

     */

    private void clickSpaceBtn() {

        // 实例化Fragment页面

        fragmentSpace = new FragmentSpace();

        // 得到Fragment事务管理器

        FragmentTransaction fragmentTransaction = this

                .getSupportFragmentManager().beginTransaction();

        // 替换当前的页面

        fragmentTransaction.replace(R.id.frame_content, fragmentSpace);

        // 事务管理提交

        fragmentTransaction.commit();

        atFl.setSelected(false);

        atIv.setSelected(false);

        authFl.setSelected(false);

        authIv.setSelected(false);

        spaceFl.setSelected(true);

        spaceIv.setSelected(true);

        moreFl.setSelected(false);

        moreIv.setSelected(false);

    }

    /**

     * 点击了“更多”按钮

     */

    private void clickMoreBtn() {

        // 实例化Fragment页面

        fragmentMore = new FragmentMore();

        // 得到Fragment事务管理器

        FragmentTransaction fragmentTransaction = this

                .getSupportFragmentManager().beginTransaction();

        // 替换当前的页面

        fragmentTransaction.replace(R.id.frame_content, fragmentMore);

        // 事务管理提交

        fragmentTransaction.commit();

        atFl.setSelected(false);

        atIv.setSelected(false);

        authFl.setSelected(false);

        authIv.setSelected(false);

        spaceFl.setSelected(false);

        spaceIv.setSelected(false);

        moreFl.setSelected(true);

        moreIv.setSelected(true);

    }

    /**

     * 点击了中间按钮

     */

    private void clickToggleBtn() {

        showPopupWindow(toggleImageView);

        // 改变按钮显示的图片为按下时的状态

        plusImageView.setSelected(true);

    }

    /**

     * 改变显示的按钮图片为正常状态

     */

    private void changeButtonImage() {

        plusImageView.setSelected(false);

    }

    /**

     * 显示PopupWindow弹出菜单

     */

    private void showPopupWindow(View parent) {

        if (popWindow == null) {

            LayoutInflater layoutInflater = (LayoutInflater) getSystemService(Context.LAYOUT_INFLATER_SERVICE);

            View view = layoutInflater.inflate(R.layout.popwindow_layout, null);

            dm = new DisplayMetrics();

            getWindowManager().getDefaultDisplay().getMetrics(dm);

            // 创建一个PopuWidow对象

            popWindow = new PopupWindow(view, dm.widthPixels, LinearLayout.LayoutParams.WRAP_CONTENT);

        }

        // 使其聚集 ,要想监听菜单里控件的事件就必须要调用此方法

        popWindow.setFocusable(true);

        // 设置允许在外点击消失

        popWindow.setOutsideTouchable(true);

        // 设置背景,这个是为了点击“返回Back”也能使其消失,并且并不会影响你的背景

        popWindow.setBackgroundDrawable(new BitmapDrawable());

        // PopupWindow的显示及位置设置

        // popWindow.showAtLocation(parent, Gravity.FILL, 0, 0);

        popWindow.showAsDropDown(parent, 0,0);

        popWindow.setOnDismissListener(new OnDismissListener() {

            @Override

            public void onDismiss() {

                // 改变显示的按钮图片为正常状态

                changeButtonImage();

            }

        });

        // 监听触屏事件

        popWindow.setTouchInterceptor(new OnTouchListener() {

            public boolean onTouch(View view, MotionEvent event) {

                // 改变显示的按钮图片为正常状态

                changeButtonImage();

                popWindow.dismiss();

                return false;

            }

        });

    }

}
MainActivity
4.其他的请看源代码吧 o(∩_∩)o
源代码地址:https://github.com/YeXiaoChao/Yc_ui_fragment_qzone
【Android UI设计与开发】6.底部菜单栏(三)使用Fragment+PopupWindow仿QQ空间最新版底部菜单栏的更多相关文章
- 【Android UI设计与开发】第05期:引导界面(五)实现应用程序只启动一次引导界面
[Android UI设计与开发]第05期:引导界面(五)实现应用程序只启动一次引导界面 jingqing 发表于 2013-7-11 14:42:02 浏览(229501) 这篇文章算是对整个引导界 ...
- 【转】【Android UI设计与开发】之详解ActionBar的使用,androidactionbar
原文网址:http://www.bkjia.com/Androidjc/895966.html [Android UI设计与开发]之详解ActionBar的使用,androidactionbar 详解 ...
- 【Android UI设计与开发】第02期:引导界面(二)使用ViewPager实现欢迎引导页面
本系列文章都会以一个程序的实例开发为主线来进行讲解,以求达到一个循序渐进的学习效果,这样更能加深大家对于程序为什么要这样写的用意,理论加上实际的应用才能达到事半功倍的效果,不是吗? 最下方有源码的下载 ...
- 【Android UI设计与开发】5.底部菜单栏(二)使用Fragment实现底部菜单栏
既然 Fragment 取代了TabActivity,当然 TabActivity 的能实现的菜单栏,Fragment 当然也能实现.主要其实就是通过菜单栏的点击事件切换 Fragment 的显示和隐 ...
- 【转】【Android UI设计与开发】第07期:底部菜单栏(二)Fragment的详细介绍和使用方法
原始地址:http://blog.csdn.net/yangyu20121224/article/category/1431917/1 由于TabActivity在Android4.0以后已经被完全弃 ...
- 【Android UI设计与开发】7.底部菜单栏(四)PopupWindow 实现显示仿腾讯新闻底部弹出菜单
前一篇文章中有用到 PopupWindow 来实现弹窗的功能.简单介绍以下吧. 官方文档是这样解释的:这就是一个弹出窗口,可以用来显示一个任意视图.出现的弹出窗口是一个浮动容器的当前活动. 1.首先来 ...
- 【Android UI设计与开发】9:滑动菜单栏(一)开源项目SlidingMenu的使用和示例
一.SlidingMenu简介 相信大家对SlidingMenu都不陌生了,它是一种比较新的设置界面或配置界面的效果,在主界面左滑或者右滑出现设置界面效果,能方便的进行各种操作.很多优秀的应用都采用了 ...
- 【Android UI设计与开发】8.顶部标题栏(一)ActionBar 奥义·详解
一.ActionBar介绍 在Android 3.0中除了我们重点讲解的Fragment外,Action Bar也是一个非常重要的交互元素,Action Bar取代了传统的tittle bar和men ...
- 【Android UI设计与开发】第01期:引导界面(一)ViewPager介绍和使用详解
做Android开发加起来差不多也有一年多的时间了,总是想写点自己在开发中的心得体会与大家一起交流分享.共同进步,刚开始写也不知该如何下手,仔细想了一下,既然是刚开始写,那就从一个软件给人最直观的感受 ...
随机推荐
- fibonacci数列的和取余(2)
Maybe ACMers of HIT are always fond of fibonacci numbers, because it is so beautiful. Don't you thin ...
- Servlet-中文乱码
背景 从Tomcat5.x开始,GET,POST方法提交信息,Tomcat采用不同的方式来处理编码. 对于GET请求,Tomcat不会考虑使用request.setCharacterEncoding( ...
- http get post
使用java代码模拟http请求 package ftp; import java.io.BufferedReader; import java.io.IOException; import java ...
- NLog在.NET Core Console Apps中的简单应用
什么是NLog? NLog is a free logging platform for .NET with rich log routing and management capabilities. ...
- 什么是CSR证书申请文件?
CSR是Cerificate Signing Request的英文缩写,即证书请求文件,在多方之间在互联网上安全分享数据的公钥基础架构PKI系统中,CSR文件必须在申请和购买SSL证书之前创建.也 ...
- 常用Keytool 命令
常用Keytool 命令Keytool 是一个JAVA环境下的安全钥匙与证书的管理工具.它管理一个存储了私有钥匙和验证相应公共钥匙的与它们相关联的X.509 证书链的keystore(相当一个数据库, ...
- Follow me to learn what is repository pattern
Introduction Creating a generic repository pattern in an mvc application with entity framework is th ...
- Bootstrap 我的学习记录3 导航条理解
以下理论内容copy自Bootstrap中文网 (一个不错的bootstrap学习网站) 导航条 默认样式的导航条 导航条是在您的应用或网站中作为导航页头的响应式基础组件.它们在移动设备上可以折叠(并 ...
- JS-取出字符串中重复次数最多的字符并输出
/** 取出字符串中重复字数最多的字符 */ var words = 'sdfghjkfastgbyhnvdstyaujskgfdfhlaa'; //创建字符串 var word, //单个字符 le ...
- sqlserver允许远程连接的配置
如果无法通过IP地址远程连接你服务器上的SQL Server服务器,可以参考下面的内容进行设置 在进行下述设置之前,应该确保你的网络已经安装设置完毕,服务器已经正常连接到网络中. 1.单击Window ...