WPF气泡样式弹窗效果
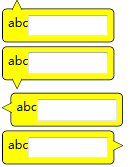
页面设计需求,做了一个气泡形状的弹出框,效果如下:
设计思路如下:
1. 使用Path绘制气泡的尖尖,将这个放到顶层;
2. 在用border绘制长方形框,将这个放到底层,并且设置Margin值,使得Path图层和border看起来衔接在一起。
代码如下:
 <Window x:Class="BubblePanelTest.MainWindow"

         xmlns="http://schemas.microsoft.com/winfx/2006/xaml/presentation"

         xmlns:x="http://schemas.microsoft.com/winfx/2006/xaml"

         Title="MainWindow" Height="350" Width="525">

     <Window.Resources>

         <Style TargetType="Label" x:Key="TopBubblePanel">

             <Setter Property="Template">

                 <Setter.Value>

                     <ControlTemplate TargetType="{x:Type Label}">

                         <Grid>

                             <Border CornerRadius="4" BorderBrush="Black" BorderThickness="1" VerticalAlignment="Top"  Background="Yellow" HorizontalAlignment="Left" Margin="0,8.5,0,0" Padding="5">

                                 <ContentPresenter />

                             </Border>

                             <Canvas Width="10" Height="10" HorizontalAlignment="Left" VerticalAlignment="Top" Margin="10,0,0,0" Background="Transparent">

                                 <Path Stroke="Black" StrokeThickness="0.5" Fill="Yellow">

                                     <Path.Data>

                                         <PathGeometry Figures="M 0,10

                                   L 0,10,5,0

                                   L 5,0,10,10

                                   "/>

                                     </Path.Data>

                                 </Path>

                             </Canvas>

                         </Grid>

                     </ControlTemplate>

                 </Setter.Value>

             </Setter>

         </Style>

         <Style TargetType="Label" x:Key="BottomBubblePanel">

             <Setter Property="Template">

                 <Setter.Value>

                     <ControlTemplate TargetType="{x:Type Label}">

                         <Grid>

                             <Border CornerRadius="4" BorderBrush="Black" BorderThickness="1" VerticalAlignment="Bottom" Margin="0,0,0,8.5" Background="Yellow" HorizontalAlignment="Left" Padding="5">

                                 <ContentPresenter />

                             </Border>

                             <Canvas Width="10" Height="10" HorizontalAlignment="Left" VerticalAlignment="Bottom" Margin="10,0,0,0" Background="Transparent">

                                 <Path Stroke="Black" StrokeThickness="0.5" Fill="Yellow">

                                     <Path.Data>

                                         <PathGeometry Figures="M 0,0

                                   L 0,0,5,10

                                   L 5,10,10,0

                                   "/>

                                     </Path.Data>

                                 </Path>

                             </Canvas>

                         </Grid>

                     </ControlTemplate>

                 </Setter.Value>

             </Setter>

         </Style>

         <Style TargetType="Label" x:Key="LeftBubblePanel">

             <Setter Property="Template">

                 <Setter.Value>

                     <ControlTemplate TargetType="{x:Type Label}">

                         <Grid>

                             <Border CornerRadius="4" BorderBrush="Black" BorderThickness="1" VerticalAlignment="Top" Margin="8.5,0,0,0" Background="Yellow" HorizontalAlignment="Left" Padding="5">

                                 <ContentPresenter />

                             </Border>

                             <Canvas Width="10" Height="10" HorizontalAlignment="Left" VerticalAlignment="Top" Margin="0,10,0,0" Background="Transparent">

                                 <Path Stroke="Black" StrokeThickness="0.5" Fill="Yellow">

                                     <Path.Data>

                                         <PathGeometry Figures="M 10,0

                                   L 10,0,0,5

                                   L 0,5,10,10

                                   "/>

                                     </Path.Data>

                                 </Path>

                             </Canvas>

                         </Grid>

                     </ControlTemplate>

                 </Setter.Value>

             </Setter>

         </Style>

         <Style TargetType="Label" x:Key="RightBubblePanel">

             <Setter Property="Template">

                 <Setter.Value>

                     <ControlTemplate TargetType="{x:Type Label}">

                         <Grid HorizontalAlignment="Left">

                             <Border CornerRadius="4" BorderBrush="Black" BorderThickness="1" HorizontalAlignment="Right" VerticalAlignment="Top" Margin="0,0,8.5,0" Background="Yellow" Padding="5">

                                 <ContentPresenter />

                             </Border>

                             <Canvas Width="10" Height="10" HorizontalAlignment="Right" VerticalAlignment="Top" Margin="0,10,0,0" Background="Transparent">

                                 <Path Stroke="Black" StrokeThickness="0.5" Fill="Yellow">

                                     <Path.Data>

                                         <PathGeometry Figures="M 0,0

                                   L 0,0,10,5

                                   L 10,5,0,10

                                   "/>

                                     </Path.Data>

                                 </Path>

                             </Canvas>

                         </Grid>

                     </ControlTemplate>

                 </Setter.Value>

             </Setter>

         </Style>

     </Window.Resources>

     <StackPanel>

         <Label Style="{StaticResource TopBubblePanel}" Tag="Top" Margin="2">

             <StackPanel>

                 <StackPanel Orientation="Horizontal">

                     <TextBlock Text="abc" />

                     <TextBox Width="80"/>

                 </StackPanel>

             </StackPanel>

         </Label>

         <Label Style="{StaticResource BottomBubblePanel}" Tag="Top" Margin="2">

             <StackPanel>

                 <StackPanel Orientation="Horizontal">

                     <TextBlock Text="abc" />

                     <TextBox Width="80"/>

                 </StackPanel>

             </StackPanel>

         </Label>

         <Label Style="{StaticResource LeftBubblePanel}" Tag="Top" Margin="2">

             <StackPanel>

                 <StackPanel Orientation="Horizontal">

                     <TextBlock Text="abc" />

                     <TextBox Width="80"/>

                 </StackPanel>

             </StackPanel>

         </Label>

         <Label Style="{StaticResource RightBubblePanel}" Tag="Top" Margin="2">

             <StackPanel>

                 <StackPanel Orientation="Horizontal">

                     <TextBlock Text="abc" />

                     <TextBox Width="80"/>

                 </StackPanel>

             </StackPanel>

         </Label>

         <StackPanel Orientation="Horizontal" Margin="0,30,0,0">

             <Button Name="btnTestPopup1" Width="100" Height="30" Content="Bottom" Click="btnTestPopup1_Click" />

             <Button Name="btnTestPopup2" Width="100" Height="30" Content="Top" Click="btnTestPopup2_Click" />

             <Button Name="btnTestPopup3" Width="100" Height="30" Content="Right" Click="btnTestPopup3_Click" />

             <Button Name="btnTestPopup4" Width="100" Height="30" Content="Left" Click="btnTestPopup4_Click" />

         </StackPanel>

         <Popup Name="pop1" AllowsTransparency="True" StaysOpen="False" PopupAnimation="Slide" PlacementTarget="{Binding ElementName=btnTestPopup1}" Placement="Bottom" >

             <Label Style="{StaticResource TopBubblePanel}" Tag="Top">

                 <StackPanel>

                     <StackPanel Orientation="Horizontal">

                         <TextBlock Text="abc" />

                         <TextBox Width="80" Name="txtTest1" />

                     </StackPanel>

                     <StackPanel Orientation="Horizontal" HorizontalAlignment="Right">

                         <Button Content="确定" Click="btnOK1_Click" Width="50" Height="25" Margin="5" />

                         <Button Content="取消" Click="btnCancel1_Click"  Width="50" Height="25" Margin="5"/>

                     </StackPanel>

                 </StackPanel>

             </Label>

         </Popup>

         <Popup Name="pop2" AllowsTransparency="True" StaysOpen="False" PopupAnimation="Fade"  PlacementTarget="{Binding ElementName=btnTestPopup2}" Placement="Top" >

             <Label Style="{StaticResource BottomBubblePanel}" Tag="Top">

                 <StackPanel>

                     <StackPanel Orientation="Horizontal">

                         <TextBlock Text="abc" />

                         <TextBox Width="80" Name="txtTest2" />

                     </StackPanel>

                     <StackPanel Orientation="Horizontal" HorizontalAlignment="Right">

                         <Button Content="确定" Click="btnOK2_Click"  Width="50" Height="25" Margin="5"/>

                         <Button Content="取消" Click="btnCancel2_Click"  Width="50" Height="25" Margin="5"/>

                     </StackPanel>

                 </StackPanel>

             </Label>

         </Popup>

         <Popup Name="pop3" AllowsTransparency="True" StaysOpen="False" PopupAnimation="Scroll"  PlacementTarget="{Binding ElementName=btnTestPopup3}" Placement="Right" >

             <Label Style="{StaticResource LeftBubblePanel}" Tag="Top">

                 <StackPanel>

                     <StackPanel Orientation="Horizontal">

                         <TextBlock Text="abc" />

                         <TextBox Width="80" Name="txtTest3" />

                     </StackPanel>

                     <StackPanel Orientation="Horizontal" HorizontalAlignment="Right">

                         <Button Content="确定" Click="btnOK2_Click"  Width="50" Height="25" Margin="5"/>

                         <Button Content="取消" Click="btnCancel3_Click"  Width="50" Height="25" Margin="5"/>

                     </StackPanel>

                 </StackPanel>

             </Label>

         </Popup>

         <Popup Name="pop4" AllowsTransparency="True" StaysOpen="False" PopupAnimation="None" PlacementTarget="{Binding ElementName=btnTestPopup4}" Placement="Left" >

             <Label Style="{StaticResource RightBubblePanel}" Tag="Top">

                 <StackPanel>

                     <StackPanel Orientation="Horizontal">

                         <TextBlock Text="abc" />

                         <TextBox Width="80" Name="txtTest4" />

                     </StackPanel>

                     <StackPanel Orientation="Horizontal" HorizontalAlignment="Right">

                         <Button Content="确定" Click="btnOK4_Click"  Width="50" Height="25" Margin="5"/>

                         <Button Content="取消" Click="btnCancel4_Click"  Width="50" Height="25" Margin="5"/>

                     </StackPanel>

                 </StackPanel>

             </Label>

         </Popup>

     </StackPanel>

 </Window>
后台代码,很简单,就是控制pupup显示或隐藏
 private void btnTestPopup1_Click(object sender, RoutedEventArgs e)

         {

             pop1.IsOpen = true;

         }

         private void btnOK1_Click(object sender, RoutedEventArgs e)

         {

             pop1.IsOpen = false;

         }

         private void btnCancel1_Click(object sender, RoutedEventArgs e)

         {

             pop1.IsOpen = false;

         }

         private void btnTestPopup2_Click(object sender, RoutedEventArgs e)

         {

             pop2.IsOpen = true;

         }

         private void btnOK2_Click(object sender, RoutedEventArgs e)

         {

             pop2.IsOpen = false;

         }

         private void btnCancel2_Click(object sender, RoutedEventArgs e)

         {

             pop2.IsOpen = false;

         }

         private void btnTestPopup3_Click(object sender, RoutedEventArgs e)

         {

             pop3.IsOpen = true;

         }

         private void btnOK3_Click(object sender, RoutedEventArgs e)

         {

             pop3.IsOpen = false;

         }

         private void btnCancel3_Click(object sender, RoutedEventArgs e)

         {

             pop3.IsOpen = false;

         }

         private void btnTestPopup4_Click(object sender, RoutedEventArgs e)

         {

             pop4.IsOpen = true;

         }

         private void btnOK4_Click(object sender, RoutedEventArgs e)

         {

             pop4.IsOpen = false;

         }

         private void btnCancel4_Click(object sender, RoutedEventArgs e)

         {

             pop4.IsOpen = false;

         }
如有问题,还忘大家拍砖。
WPF气泡样式弹窗效果的更多相关文章
- 用CSS3动画特效实现弹窗效果
提示:如果大家觉得本篇实现的弹窗效果有用,可持续关注.接下会添加更多效果并且封装成插件,这样使用就方便了.效果查看: https://heavis.github.io/hidialog/index.h ...
- 求助 WPF ListViewItem样式问题
求助 WPF ListViewItem样式问题 .NET 开发 > Windows Presentation Foundation Вопрос 0 Нужно войти <Style ...
- WPF DataGrid 样式设置
隔行换色,鼠标单击,悬浮样式都有,其具体效果如图 1 所示. 图 1 WPF DataGrid 样式设置效果图 其中: 界面设计代码下所示 ? + 查看代码 1 2 3 4 5 6 7 8 9 10 ...
- WPF DataGrid 样式分享
原文:WPF DataGrid 样式分享 隔行换色,鼠标单击,悬浮样式都有 先看效果: 代码: <DataGrid AutoGenerateColumns="False" N ...
- uni-app自定义Modal弹窗组件|仿ios、微信弹窗效果
介绍 uniapp自定义弹窗组件uniPop,基于uni-app开发的自定义模态弹窗|msg信息框|alert对话框|confirm确认框|toast弱提示框 支持多种动画效果.多弹窗类型ios/an ...
- wpf 菜单样式和绑定树形数据
前言 在wpf开发中,经常会使用到Menu和ContentMenu.但是原生的样式比较简陋,对于比较追求界面美好的人来说是十分不友好的.那么,这就涉及到对Menu的样式修改了.与此同时,我们还希望Me ...
- 16种基于 CSS3 & SVG 的创意的弹窗效果
在去年,我给大家分享了<基于 CSS3 的精美模态窗口效果>,而今天我要与大家分享一些新鲜的想法.风格和趋势变化,要求更加适合现代UI的不同的效果.这组新模态窗口效果包含了一些微妙的动画, ...
- SharePoint 2013 弹窗效果之URL打开方式(一)
在SharePoint中想做一个弹出效果其实很简单,仅仅在js中使用SharePoint Modal Dialog, 以下做一个简单的例子:很多情况下我们会通过linkButton弹出一个详细页面,那 ...
- WPF GroupBox 样式分享
原文:WPF GroupBox 样式分享 默认样式 GroupBox 样式分享" title="WPF GroupBox 样式分享"> 添加样式后 GroupBox ...
随机推荐
- spring事务源码分析结合mybatis源码(一)
最近想提升,苦逼程序猿,想了想还是拿最熟悉,之前也一直想看但没看的spring源码来看吧,正好最近在弄事务这部分的东西,就看了下,同时写下随笔记录下,以备后查. spring tx源码分析 这里只分析 ...
- C++设计模式——外观模式
前言 在实际开发时,面对一个大的系统,总是会将一个大的系统分成若干个子系统,等子系统完成之后,再分别调用对应的子系统来完成对应的整体功能,这样有利于降低系统的复杂性:最终进行实现某个具体的功能时,我们 ...
- python学习第20天
python中的继承 单继承 多继承
- 解决 RecyclerView 在Android Studio已经导入情况下还无法实例引用问题
系统:Windows 10 IDE::android studio 1. 问题:RecyclerView 在Android Studio已经导入情况下还无法实例引用问题 由于RecyclerView是 ...
- 一次lr异常Error: C interpreter run time error: Action.c (17): Error -- memory violation : Exception ACCESS_VIOLATION received问题分析
今天qq群里人问我一个问题 人家的原始问题如下: 问题是为啥通过lr_save_string取不到参数值 由于别的问题,我也需要调试,但是没有环境,只能模拟场景,如下 他想将token变量换成lr中的 ...
- Python学习(三十九)—— Django之Form组件
一.构建一个表单 假设你想在你的网站上创建一个简单的表单,以获得用户的名字.你需要类似这样的模板: <form action="/your-name/" method=&qu ...
- sql语法总结
1.创建表 . 创建时间 default current_imestamp(6) 更新时间 default current_timestamp(6) on update current_timest ...
- JavaEE 之 后台验证+拦截器
1.Validator后台验证 a.在web.xml中配置 <listener> <listener-class>org.springframework.web.context ...
- Android 常见问题解决
1.Android 启动Activity后阻止EditText自动获取焦点 在EditText中添加如下属性即可 <LinearLayout android:focusable="tr ...
- JavaScript异步加载的三种方式——async和defer、动态创建script
一.script标签的位置 传统的做法是:所有script元素都放在head元素中,必须等到全部js代码都被下载.解析.执行完毕后,才能开始呈现网页的内容(浏览器在遇到<body>标签时才 ...