Docker: 企业级镜像仓库Harbor部署(http)
Harbor离线安装包下载地址:https://github.com/goharbor/harbor
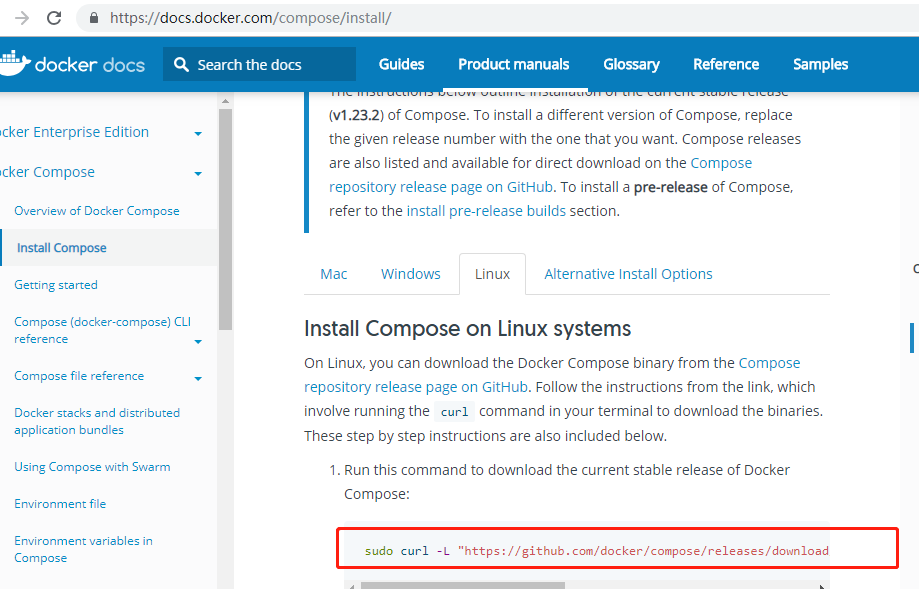
Docker compose(安装harbor需要用到docker compose)下载地址:https://docs.docker.com/compose/install/
Docker compose是单机容器编排工具
以下是操作过程
[root@ ~]# ls

anaconda-ks.cfg  dockerfile_.zip  nginx  nginx.tar  php  tomcat  wordpress  wordpress-4.9.-zh_CN.tar.gz

#使用xshell 将docker-compose-Linux-x86_64、harbor-offline-installer-v1.6.1.tgz放进宿主机
[root@ ~]# rz -E

rz waiting to receive.

[root@ ~]# rz -E

rz waiting to receive.

[root@ ~]# ls

anaconda-ks.cfg              harbor-offline-installer-v1.6.1.tgz  php        wordpress-4.9.-zh_CN.tar.gz

docker-compose-Linux-x86_64  nginx                                tomcat

dockerfile_.zip              nginx.tar                            wordpress

[root@ ~]# tar xvf harbor-offline-installer-v1.6.1.tgz

harbor/common/templates/

harbor/common/templates/nginx/

harbor/common/templates/nginx/nginx.https.conf

harbor/common/templates/nginx/notary.server.conf

harbor/common/templates/nginx/nginx.http.conf

harbor/common/templates/nginx/notary.upstream.conf

harbor/common/templates/ui/

harbor/common/templates/ui/env

harbor/common/templates/ui/private_key.pem

harbor/common/templates/ui/app.conf

harbor/common/templates/notary/

harbor/common/templates/notary/notary-signer.crt

harbor/common/templates/notary/signer-config.json

harbor/common/templates/notary/notary-signer-ca.crt

harbor/common/templates/notary/signer_env

harbor/common/templates/notary/server_env

harbor/common/templates/notary/signer-config.postgres.json

harbor/common/templates/notary/server-config.json

harbor/common/templates/notary/notary-signer.key

harbor/common/templates/notary/server-config.postgres.json

harbor/common/templates/adminserver/

harbor/common/templates/adminserver/env

harbor/common/templates/chartserver/

harbor/common/templates/chartserver/env

harbor/common/templates/db/

harbor/common/templates/db/env

harbor/common/templates/registry/

harbor/common/templates/registry/root.crt

harbor/common/templates/registry/config.yml

harbor/common/templates/registry/config_ha.yml

harbor/common/templates/registryctl/

harbor/common/templates/registryctl/env

harbor/common/templates/registryctl/config.yml

harbor/common/templates/log/

harbor/common/templates/log/logrotate.conf

harbor/common/templates/jobservice/

harbor/common/templates/jobservice/env

harbor/common/templates/jobservice/config.yml

harbor/common/templates/clair/

harbor/common/templates/clair/postgres_env

harbor/common/templates/clair/config.yaml

harbor/common/templates/clair/postgresql-init.d/

harbor/common/templates/clair/postgresql-init.d/README.md

harbor/common/templates/clair/clair_env

harbor/harbor.v1.6.1.tar.gz

harbor/prepare

harbor/NOTICE

harbor/LICENSE

harbor/install.sh

harbor/harbor.cfg

harbor/docker-compose.yml

harbor/open_source_license

harbor/ha/

harbor/ha/sample/

harbor/ha/sample/active_active/

harbor/ha/sample/active_active/keepalived_active_active.conf

harbor/ha/sample/active_active/check.sh

harbor/ha/sample/active_standby/

harbor/ha/sample/active_standby/keepalived_active_standby.conf

harbor/ha/sample/active_standby/check_harbor.sh

harbor/ha/initial-registry.sql

harbor/ha/docker-compose.tpl

harbor/ha/docker-compose.clair.yml

harbor/ha/docker-compose.clair.tpl

harbor/ha/docker-compose.yml

harbor/docker-compose.notary.yml

harbor/docker-compose.clair.yml

harbor/docker-compose.chartmuseum.yml

[root@ ~]# ls

anaconda-ks.cfg              harbor                               nginx.tar  wordpress

docker-compose-Linux-x86_64  harbor-offline-installer-v1.6.1.tgz  php        wordpress-4.9.-zh_CN.tar.gz

dockerfile_.zip              nginx                                tomcat

#将docker-compose-Linux-x86_64移动到 /usr/bin/docker-compose

[root@ ~]# mv docker-compose-Linux-x86_64 /usr/bin/docker-compose

#加上可执行权限

[root@ ~]# chmod +x /usr/bin/docker-compose

\[root@ ~]# cd harbor

[root@ harbor]# ls

common                          docker-compose.notary.yml  harbor.cfg            LICENSE              prepare

docker-compose.chartmuseum.yml  docker-compose.yml         harbor.v1.6.1.tar.gz  NOTICE

docker-compose.clair.yml        ha                         install.sh            open_source_license
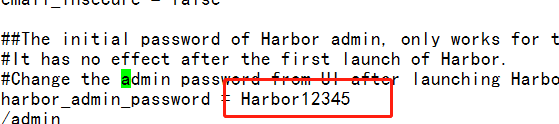
修改harbor.cfg文件,配置访问harbor的地址,这里配置成harbor主机的ip.如果这台机器有域名,也可以配置域名。
vi harbor.cfg

默认访问harbor前台界面的用户名是admin,默认密码在harbor.cfg文件中
#安装harbor准备
[root@ harbor]# ./prepare
loaded secret from file: /data/secretkey
Generated configuration file: ./common/config/nginx/nginx.conf
Generated configuration file: ./common/config/adminserver/env
Generated configuration file: ./common/config/ui/env
Generated configuration file: ./common/config/registry/config.yml
Generated configuration file: ./common/config/db/env
Generated configuration file: ./common/config/jobservice/env
Generated configuration file: ./common/config/jobservice/config.yml
Generated configuration file: ./common/config/log/logrotate.conf
Generated configuration file: ./common/config/registryctl/env
Generated configuration file: ./common/config/ui/app.conf
Generated certificate, key file: ./common/config/ui/private_key.pem, cert file: ./common/config/registry/root.crt
The configuration files are ready, please use docker-compose to start the service.
#安装harbor
[root@ harbor]# ./install.sh [Step ]: checking installation environment ... Note: docker version: 18.09. Note: docker-compose version: 1.23. [Step ]: loading Harbor images ... Loaded image: goharbor/harbor-log:v1.6.1 Loaded image: goharbor/harbor-jobservice:v1.6.1 Loaded image: goharbor/redis-photon:v1.6.1 Loaded image: goharbor/nginx-photon:v1.6.1 Loaded image: goharbor/harbor-migrator:v1.6.1 Loaded image: goharbor/chartmuseum-photon:v0.7.1-v1.6.1 Loaded image: goharbor/harbor-ui:v1.6.1 Loaded image: goharbor/harbor-db:v1.6.1 Loaded image: goharbor/registry-photon:v2.6.2-v1.6.1 Loaded image: goharbor/notary-server-photon:v0.5.1-v1.6.1 Loaded image: goharbor/notary-signer-photon:v0.5.1-v1.6.1 Loaded image: goharbor/clair-photon:v2.0.6-v1.6.1 Loaded image: goharbor/harbor-adminserver:v1.6.1 [Step ]: preparing environment ...
Clearing the configuration file: ./common/config/adminserver/env
Clearing the configuration file: ./common/config/ui/env
Clearing the configuration file: ./common/config/ui/app.conf
Clearing the configuration file: ./common/config/ui/private_key.pem
Clearing the configuration file: ./common/config/db/env
Clearing the configuration file: ./common/config/jobservice/env
Clearing the configuration file: ./common/config/jobservice/config.yml
Clearing the configuration file: ./common/config/registry/config.yml
Clearing the configuration file: ./common/config/registry/root.crt
Clearing the configuration file: ./common/config/registryctl/env
Clearing the configuration file: ./common/config/registryctl/config.yml
Clearing the configuration file: ./common/config/nginx/nginx.conf
Clearing the configuration file: ./common/config/log/logrotate.conf
loaded secret from file: /data/secretkey
Generated configuration file: ./common/config/nginx/nginx.conf
Generated configuration file: ./common/config/adminserver/env
Generated configuration file: ./common/config/ui/env
Generated configuration file: ./common/config/registry/config.yml
Generated configuration file: ./common/config/db/env
Generated configuration file: ./common/config/jobservice/env
Generated configuration file: ./common/config/jobservice/config.yml
Generated configuration file: ./common/config/log/logrotate.conf
Generated configuration file: ./common/config/registryctl/env
Generated configuration file: ./common/config/ui/app.conf
Generated certificate, key file: ./common/config/ui/private_key.pem, cert file: ./common/config/registry/root.crt
The configuration files are ready, please use docker-compose to start the service. [Step ]: checking existing instance of Harbor ... [Step ]: starting Harbor ...
Creating network "harbor_harbor" with the default driver
Creating harbor-log ...
Creating registry ...
Creating harbor-adminserver ...
Creating harbor-db ...
Creating redis ...
Creating harbor-ui ...
Creating harbor-jobservice ...
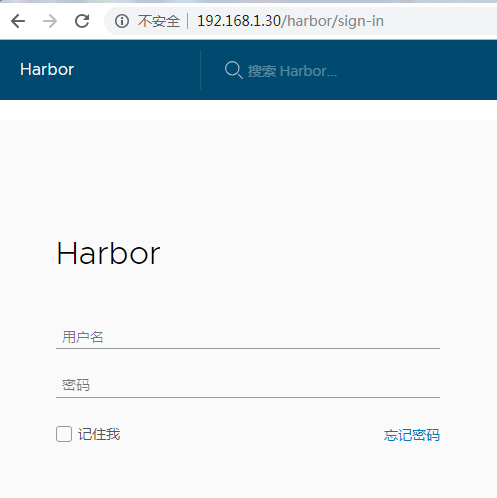
Creating nginx ... ✔ ----Harbor has been installed and started successfully.---- Now you should be able to visit the admin portal at http://192.168.1.30.
For more details, please visit https://github.com/goharbor/harbor . #查看启动容器的状态(install.sh文件里,执行了docker-compose配置文件,作用是启动容器)
[root@ harbor]# docker-compose ps
Name Command State Ports
-----------------------------------------------------------------------------------------------------------------
harbor-adminserver /harbor/start.sh Up (health: starting)
harbor-db /entrypoint.sh postgres Up (health: starting) /tcp
harbor-jobservice /harbor/start.sh Up
harbor-log /bin/sh -c /usr/local/bin/ ... Up (health: starting) 127.0.0.1:->/tcp
harbor-ui /harbor/start.sh Up (health: starting)
nginx nginx -g daemon off; Up (health: starting) 0.0.0.0:->/tcp,
0.0.0.0:->/tcp,
0.0.0.0:->/tcp
redis docker-entrypoint.sh redis ... Up /tcp
registry /entrypoint.sh /etc/regist ... Up (health: starting) /tcp
现在可以通过 http://192.168.1.30 来访问harbor了
作者: 梅梅~
出处: https://www.cnblogs.com/keeptesting
关于作者:专注软件测试,测试运维相关工作,请多多赐教!
本文版权归作者和博客园共有,欢迎转载,但未经作者同意必须保留此段声明,且在文章页面明显位置给出, 原文链接 欢迎沟通交流加微信联系。 微信:yangguangkg20140901 暗号:博客园.
Docker: 企业级镜像仓库Harbor部署(http)的更多相关文章
- Docker: 企业级镜像仓库Harbor的使用
上一节,演示了Harbor的安装部署 这次我们来讲解 Harbor的使用. 我们需要了解到: 1. 如何推镜像到镜像仓库 2. 如何从镜像仓库拉取镜像 3. 如何运行从私有仓库拉取的镜像 # 查看 h ...
- docker企业级镜像仓库Harbor管理
Harbor概述 Harbor是由VMWare公司开源的容器镜像仓库.事实上,Harbor是在Docker Registry上进行了相应的企业级扩展,从而获得了更加广泛的应用,这些新的企业级特性包括: ...
- Docker 企业级镜像仓库 Harbor 的搭建与维护
目录 一.什么是 Harbor 二.Harbor 安装 2.1.Harbor 安装环境 2.2.Harbor安装 2.3 配置HTTPS 三.Harbor 的使用 3.1.登录Harbor并使用 3. ...
- Docker企业级镜像仓库harbor(vmware 中国团队)
第一步:安装docker和docker-compose 第二步:下载harbor-offline-installer-v1.3.0.tgz 第三步:上传到/opt,并解压 第四步:修改harbor.c ...
- docker企业级镜像仓库harbor
第一步:安装docker和docker-compose 第二步:下载harbor-offine-installer-v1.5.1.tgz 第三步:上传到/opt,并解压 第四步:修改harbor.cf ...
- 企业级Docker镜像仓库Harbor部署与使用
yum install docker 官网地址:https://docs.docker.com/compose/install/ 运行此命令以下载Docker Compose的当前稳定版本 1 sud ...
- docker 镜像仓库 Harbor 部署 以及 跨数据复制
docker 镜像仓库 Harbor 部署 跨数据复制 Harbor 是 Vmwar 公司开源的 企业级的 Docker Registry 管理项目 它主要 提供 Dcoker Registry 管理 ...
- 企业级镜像仓库harbor搭建
企业级镜像仓库harbor搭建 一. Harbor概述 VMware公司最近开源了企业级Registry项目Harbor,其的目标是帮助用户迅速搭建一个企业级的Docker registry 服 ...
- 企业级镜像仓库 harbor
企业级镜像仓库 harbor 前言 a. 本文主要为 Docker的视频教程 笔记. b. 环境为 CentOS 7.0 云服务器 c. 上一篇:跨 Docker 宿主机网络 overlay 类型 h ...
随机推荐
- SpringCloud(5)---Feign服务调用
SpringCloud(5)---Feign服务调用 上一篇写了通过Ribbon进行服务调用,这篇其它都一样,唯一不一样的就是通过Feign进行服务调用. 注册中心和商品微服务不变,和上篇博客一样,具 ...
- Python爬虫入门教程 33-100 《海王》评论数据抓取 scrapy
1. 海王评论数据爬取前分析 海王上映了,然后口碑炸了,对咱来说,多了一个可爬可分析的电影,美哉~ 摘录一个评论 零点场刚看完,温导的电影一直很不错,无论是速7,电锯惊魂还是招魂都很棒.打斗和音效方面 ...
- linux(centos)搭建.net core 运行环境
总的来说,非常简单,我记录一下: 1.打开https://www.microsoft.com/net/download?initial-os=linux 这里"Instal .NET C ...
- 深入理解C#中的IDisposable接口
写在前面 在开始之前,我们需要明确什么是C#(或者说.NET)中的资源,打码的时候我们经常说释放资源,那么到底什么是资源,简单来讲,C#中的每一种类型都是一种资源,而资源又分为托管资源和非托管资源,那 ...
- Mybatis动态SQL简单了解 Mybatis简介(四)
动态SQL概况 MyBatis 的强大特性之一便是它的动态 SQL 在Java开发中经常遇到条件判断,比如: if(x>0){ //执行一些逻辑........ } Mybatis应用中,S ...
- linux集群自动化搭建(生成密钥对+分发公钥+远程批量执行脚本)
之前介绍过ansible的使用,通过ssh授权批量控制服务器集群 但是生成密钥和分发公钥的时候都是需要确认密码的,这一步也是可以自动化的,利用ssh + expect + scp就可以实现,其实只用这 ...
- MVC Scaffolding SmartCode-Engine 更新
概述 通过扩展visual studio.net scaffolding组件,添加了一套功能完善的代码模板,包括Controller,Model,View,Businessd等各种功能的代码,配合En ...
- js内存深入学习(一)
一. 内存空间储存 某些情况下,调用堆栈中函数调用的数量超出了调用堆栈的实际大小,浏览器会抛出一个错误终止运行.这个就涉及到内存问题了. 1. 数据结构类型 栈: 后进先出(LIFO)的数据结构 堆 ...
- SpringBoot集成rabbitmq(一)
前言 Rabbitmq是一个开源的消息代理软件,是AMQP协议的实现.核心作用就是创建消息队列,异步发送和接收消息.通常用来在高并发中处理削峰填谷.延迟处理.解耦系统之间的强耦合.处理秒杀订单. 入 ...
- 练习使用 __attribute__ 属性(仿照内核)
上一篇文章分析了内核中各种 initcall 的调用过程,在这个基础上大概掌握了内核中使用的这种方法,于是参考内核及网友的文章自己动手写了下,记录在这个随笔中. 源代码如下: #include < ...