LNMP的搭建
一、下载安装MySQL
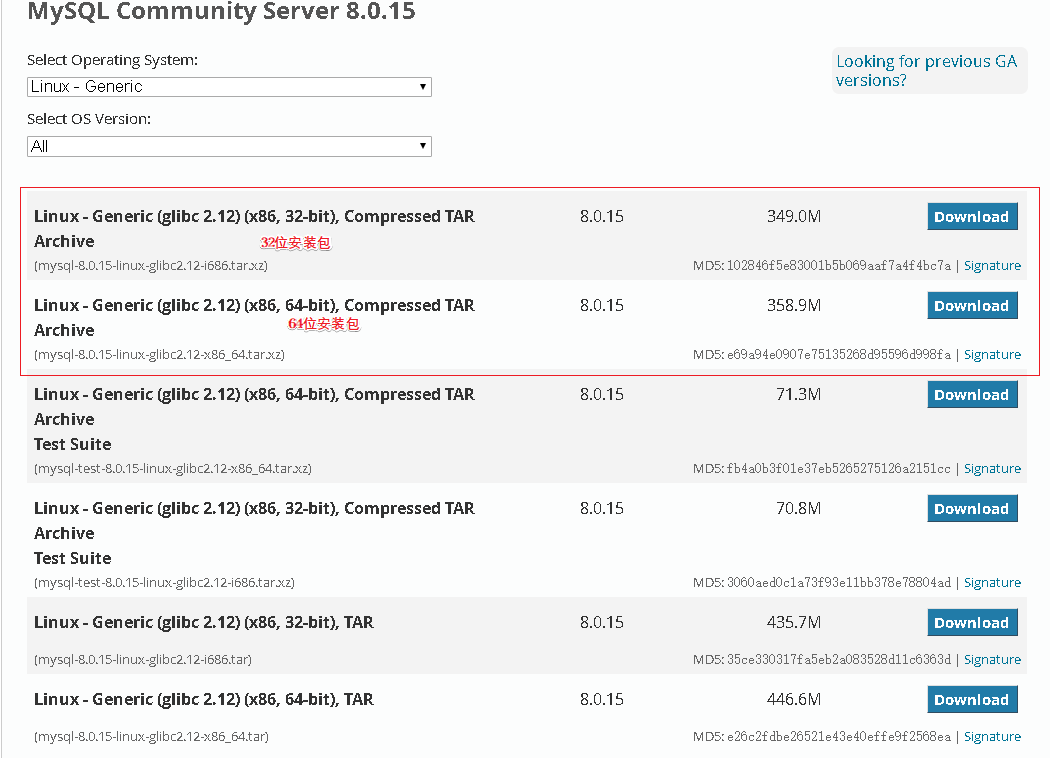
1.1:下载地址:https://dev.mysql.com/downloads/mysql/
1.2:安装后
1.2.1:解压:tar -xf mysql-8.0.15-linux-glibc2.12-x86_64.tar.xz
1.2.2:重命名:mv mysql-8.0.15-linux-glibc2.12-x86_64 mysql-8.0.15
1.2.3:创建软连接:ln -n mysql-8.0.15 mysql
1.2.4:创建mysql用户和组
groupadd mysql # 创建组
useradd -r -g mysql mysql # 创建用户
1.2.5:更改MySQL文件的属组合属主
chown -R mysql:mysql
1.2.6:初始化数据库
/application/mysql/bin/mysqld –initialize –user=mysql –basedir=/application/mysql –datadir=/application/mysql/data
1.2.7:创建配置文件
①touch /application/mysql/super_file/my-default.cnf /etc/my.cnf
②修改配置文件
[root@redhat ~]#vim /etc/my.cnf

[mysqld]

#skip-grant-tables

basedir = /application/mysql

datadir = /application/mysql/data

port =

socket = /tmp/mysql.sock

character-set-server=utf8

sql_mode=NO_ENGINE_SUBSTITUTION,STRICT_TRANS_TABLES
1.2.8:/application/mysql/super)file/mysql.server 文件是MySQL的启动脚本,将里边的文件路径做下修改,该文件可以直接启动,可以做以下配置
cp /application/mysql/support-files/mysql.server /etc/init.d/mysqld # 复制启动脚本
sed -i 's@/usr/local/mysql@/application/mysql@g' /etc/init.d/mysqld # 修改配置文件里边的路径,因为文件中默认配置的MySQL路径为/usr/local/mysql
chmod +x /etc/init.d/mysqld # 添加执行权限
chkconfig --add mysqld # 添加系统服务
systemctl start mysqld # 启动MySQL
1.3:登录MySQL,修改密码
1.3.1:修改密码
①添加MySQL的环境变量:echo PATH=${PATH}:/application/mysql/bin/ >> /etc/profile
②进入数据库:mysql -uroot -p,如果你记得初始化的时候生成的密码,那么你现在就可以登录了,如果你不知道,请修改配置文件/etc/my.cnf,将#skip-grant-tables前边的井号去除即可
③修改密码
use mysql;     //切换数据库

update user set authentication_string='' where user='root'    //将密码清空

ALTER user 'root'@'localhost' IDENTIFIED BY 'dongdaxuan';    //我修改的密码是"dongdaxuan",请自己更改密码
1.4:使用Navicat连接,请转至:MySql 8.0 版本使用navicat连不上解决
二、安装依赖包
2.1:使用yum安装基本依赖包
yum -y install zlib-devel libxml2-devel libjpeg-turbo-devel libiconv-devel freetype-devel libpng-devel gd.devel libcurl-devel libxslt-devel libxslt-devel
yum groupinstall "Development Tools" "Server Platform Development" -y
2.2:上述安装中会提示没有包libiconv-devel 、和gd.devel
2.2.1:安装libiconv-devel
①下载地址:https://ftp.gnu.org/pub/gnu/libiconv/
②编译安装
tar xf libiconv-1.15.tar.gz

cd libiconv-1.15/

./configure --prefix=/usr/local/libiconv

make && make install
2.2.1:安装gd.devel
①下载地址:https://www.lanzous.com/i3nz6he
②tar xf gd-devel.tar.gz
③yum install gd-devel-2.0.35-26.el7.x86_64.rpm
2.3:安装libmcrypt库
2.3.1:这是一个使用动态的模块化得libmcrypto。libmcrypto对于在程序运行时添加移除算法是有用的
2.3.2:安装
①下载:https://www.lanzous.com/i3nzbif
②:安装
[root@redhat application]#tar -xf libmcrypt.tar.gz

yum install libmcrypt-devel-2.5.-.el7.x86_64.rpm libmcrypt-2.5.-.el7.x86_64.rpm
2.4:安装mhash加密扩展库
2.4.1:mhash是基于离散数学原理不可逆向的PHP加密方式扩展库,其在默认情况下不会开启。可以用于创建校验值、信息摘要、消息认证码、以及无需原文的关键信息保存等。它为PHP提供了多种散列算法,如md5、sha1、gost等。可以通过MHASH_hashname()查看其支持的算法有哪些。
需要注意:
- 该扩展不能提供最新的散列算法
- 该扩展结果原则上运算不可逆
2.4.2:安装
①下载:https://www.lanzous.com/i3nzcha
②安装:
tar -xf mhash.tar.gz

yum install mhash-0.9.9.9-.el7.x86_64.rpm
2.5:安装mcrypt加密扩展库
2.5.1:mcrtpt介绍
PHP程序员在编写代码程序时,除了要保证代码的高性能之外,还有一点是非常重要的,那就是程序的安全保障,PHP除了自己自带的加密算法,还有功能更全面的php扩展库mcrypt和mhash。其中,mcrypt可以实现加密解密功能,就是将明文加密,也可以将密文解密还愿。
mycrpt是PHP重要的加密支持扩展库,默认不开启,支持20多种加密和8种加密模式,具体可以通过algorithms()和mcrypt_list_modes()显示
2.5.2:安装
①下载:https://www.lanzous.com/i3nzikj
②安装,(切记安装此文件的时候请确保上边的libmcrypt和mhash已经安装成功,因为本软件需要依赖他们
tar -xf mcrypt.tar.gz

yum install mcrypt-2.6.-.el7.x86_64.rpm
三、安装php
3.1:下载php:https://www.php.net/downloads.php
3.2:安装
①解压缩:tar xf php-7.3.4.tar.xz
②进入到目录,然后开始预编译[root@redhat application]#cd php-7.3./
[root@redhat php-7.3.4]#./configure --prefix=/application/php-7.3.4 --with-iconv-dir=/usr/local/libiconv --with-config-file-path=/application/php-7.3.4/etc --with-zlib-dir --with-freetype-dir --enable-mbstring --with-libxml-dir --enable-xml --enable-soap --enable-short-tags --enable-static --enable-calendar --with-curl --with-zlib --with-gd --with-pdo-sqlite --with-pdo-mysql --with-mysqli --with-mysql-sock --enable-mysqlnd --disable-rpath --enable-inline-optimization --with-bz2 --with-zlib --enable-sockets --enable-sysvsem --enable-sysvshm --enable-pcntl --enable-mbregex --enable-exif --enable-bcmath --enable-shmop --with-mhash --enable-zip --with-pcre-regex --with-jpeg-dir --with-png-dir --with-openssl --enable-ftp --with-kerberos --with-gettext --with-xmlrpc --with-xsl --enable-fpm --with-fpm-user=php --with-fpm-group=php --with-fpm-systemd --disable-fileinfo
[root@redhat php-7.3.4]#ln -s /application/mysql/lib/libmysqlclient.so.21 /usr/lib64/
[root@redhat php-7.3.4]#touch ext/phar/phar.phar
[root@redhat php-7.3.4]#make
[root@redhat php-7.3.4]#make install
[root@redhat php-7.3.4]#/usr/src/php-7.3.4/build/shtool install -c ext/phar/phar.phar /application/php-7.3.4/bin
[root@redhat php-7.3.4]#ln -s -f phar.phar /application/php-7.3.4/bin/phar
root@redhat php-7.3.4]#ln -s -f phar.phar /application/php-7.3.4/bin/phar
[root@redhat php-7.3.4]#ln -s /application/php-7.3.4/ /application/php
③报错问题
报错 Cannot find OpenSSL's <evp.h>

 执行 yum install openssl openssl-devel

报错 Please reinstall the libcurl distribution

 执行 yum -y install curl-devel

错误 jpeglib.h not found

 执行 yum install libjpeg.x86_64 libpng.x86_64 freetype.x86_64 libjpeg-devel.x86_64 libpng-devel.x86_64 freetype-devel.x86_64 -y

 和执行 yum install libjpeg-devel

错误:checking for BZip2 in default path... not found configure: error: Please reinstall the BZip2 distribution 这是bzip2软件包没有安装

 执行 yum install bzip2-devel.x86_64 -y

错误:configure: error: xpm.h not found.

 执行 yum install libXpm-devel

错误: Unable to locate gmp.h

 执行 yum install gmp-devel

错误:Unable to detect ICU prefix or /usr//bin/icu-config failed. Please verify ICU install prefix and make sure icu-config works

 执行 yum install -y icu libicu libicu-devel

错误:mcrypt.h not found. Please reinstall libmcrypt.

 执行 yum install php-mcrypt libmcrypt libmcrypt-devel

错误: configure: error: Cannot find libpq-fe.h. Please specify correct PostgreSQL installation path

 执行 yum install postgresql-devel

错误: configure: error: xslt-config not found. Please reinstall the libxslt >= 1.1. distribution

 执行 yum install libxslt-devel

错误:checking for libzip... not found

configure: error: Please reinstall the libzip distribution

    执行 ()移除旧的libzip:

  yum remove libzip

()安装新版本:

  curl-O https://libzip.org/download/libzip-1.5.1.tar.gz

  tar -zxvf libzip-1.5..tar.gz

  cd libzip-1.5.

  mkdir build

  cd build

  cmake ..

  make && make install
  cp /usr/local/lib/libzip/include/zipconf.h /usr/local/include/zipconf.h
四、配置PHP引擎配置文件php.ini
4.1:复制php.ini文件,和创建php.fpm.conf
[root@redhat php-7.3.]#cp php.ini-production /application/php/lib/php.ini

[root@redhat php-7.3.]#cd /application/php/etc/

[root@redhat etc]#cp php-fpm.conf.default php-fpm.conf
[root@redhat ~]#cd /application/php/etc/php-fpm.d/
[root@redhat ~]#chown nginx: /application/php -R
[root@redhat ~]# vim /application/php/etc/php-fpm.d/www.conf
user = nginx  # 修改user
group = nginx  # 修改组
4.2:[root@redhat ~]#/application/php/sbin/php-fpm 启动
[root@redhat ~]#ss -tunl # 查看是否启动
tcp LISTEN 0 128 127.0.0.1:9000 *:* # 已经启动了9000端口
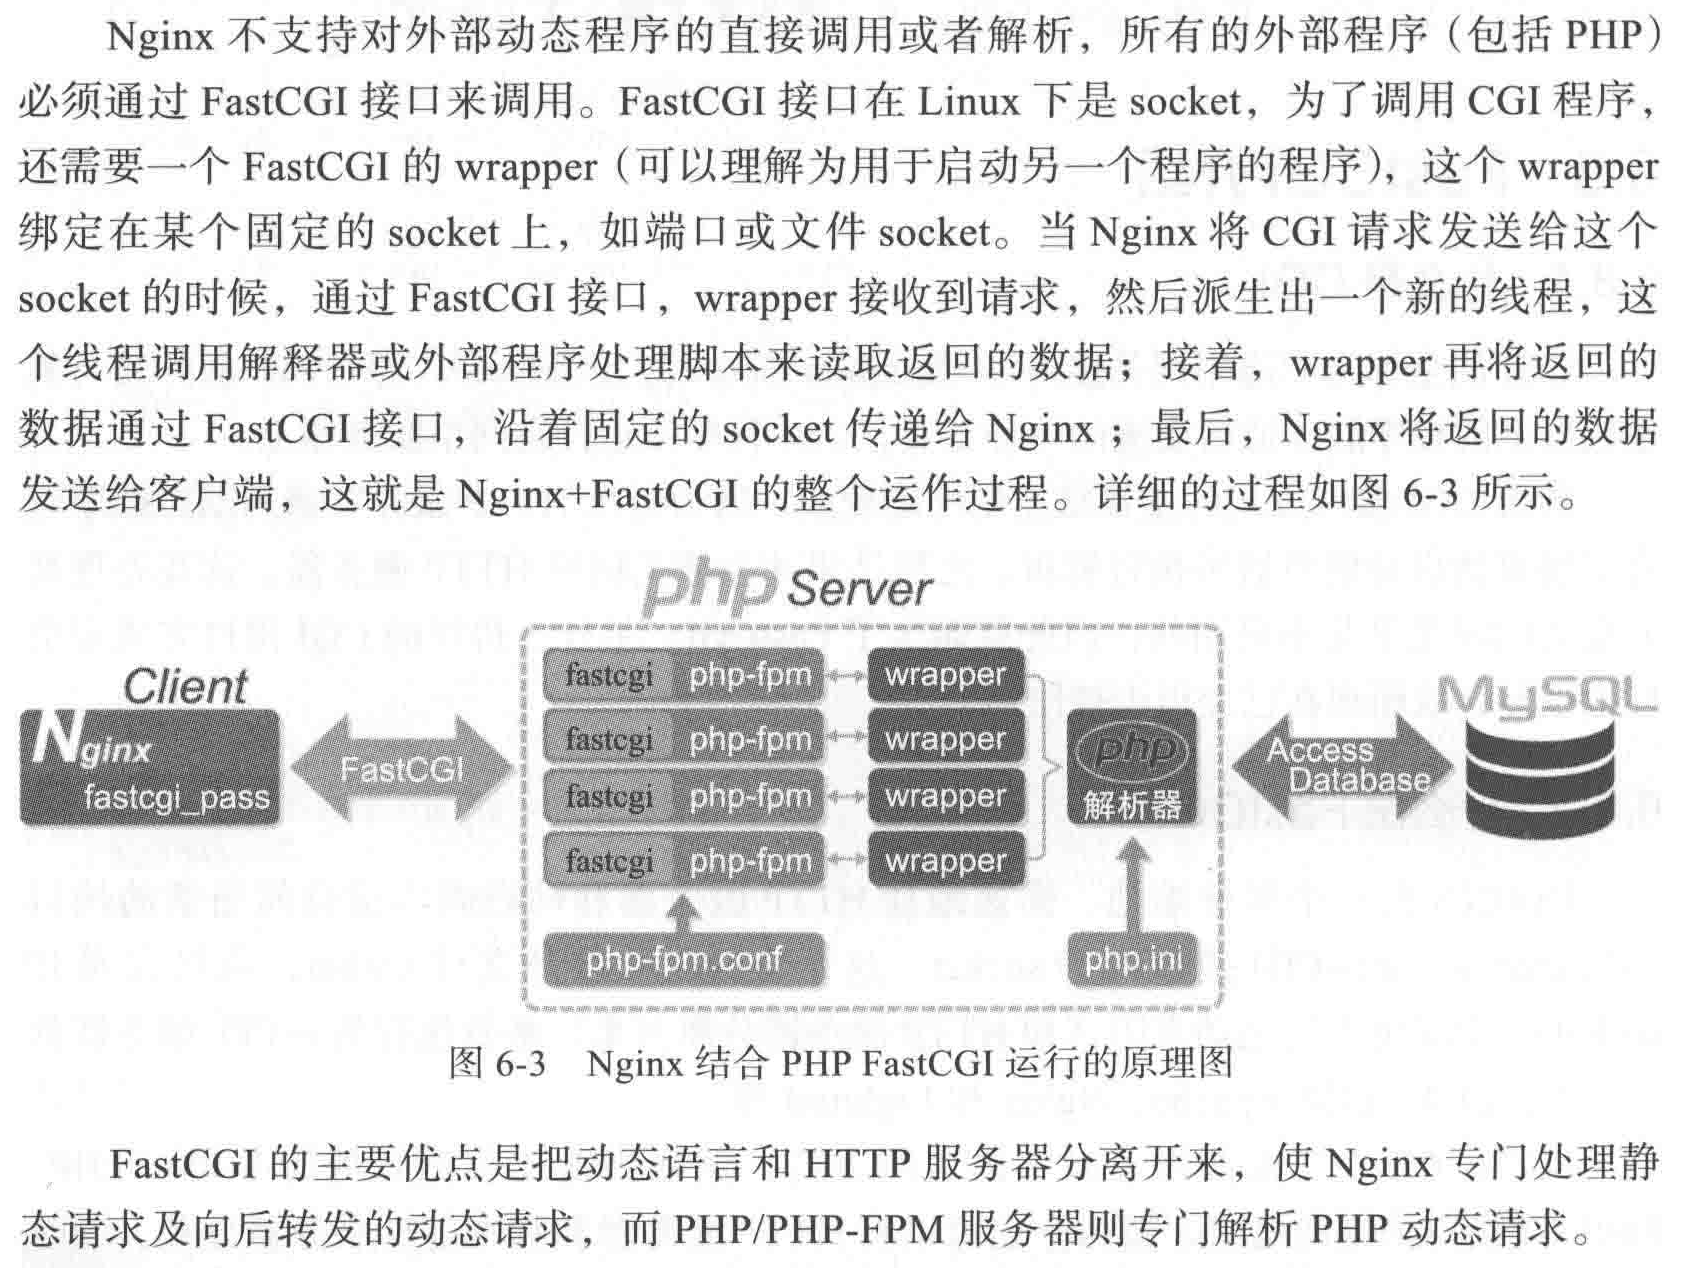
五、Nginx通过fastcgi连接php、数据库
5.1:fastcgi
5.2:连接php
5.2.1:配置
[root@redhat ~]#vim /usr/local/nginx/conf/extra/N1.conf         //编辑虚拟主机文件

location ~ .*\.(php|php5)?$ {        //匹配所有php结尾的访问

                fastcgi_pass 127.0.0.1:;

                fastcgi_index index.php;

                include fastcgi.conf;

        }
[root@redhat ~]#/usr/local/nginx/sbin/nginx -t //检查语法
nginx: the configuration file /usr/local/nginx-1.10.1/conf/nginx.conf syntax is ok
nginx: configuration file /usr/local/nginx-1.10.1/conf/nginx.conf test is successful
[root@redhat ~]#/usr/local/nginx/sbin/nginx -s reload //重新启动
[root@redhat ~]#echo -e "<?php\nphpinfo();\n?> /var/www/html/www/index.php //php函数,用于查看php
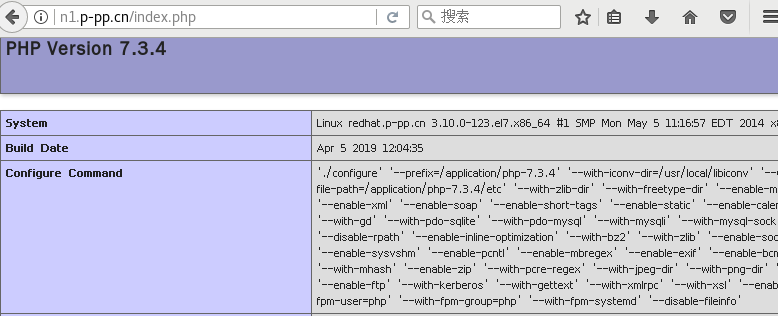
5.2.2:验证是php是否连接成功,如图所示,就是成功连接
5.3:连接数据库,本测试方式适用于7.0以上版本
[root@redhat ~]#vim /var/www/html/www/index.php

<?php

$link_id=mysqli_connect('localhost:3306','root','dongdaxuan') or mysql_error();

if($link_id) {

        echo "mysql succesful by QQ:920506213";

} else {

        echo mysql_error();

}

?>
浏览器进行访问,出现以下信息就是连接成功

5.4:部署一个blog程序服务
5.4.1:Wordpress下载:https://www.lanzous.com/i3oqwlg
5.4.2:配置Wordpress步骤
①切换目录:[root@redhat ~]#cd /var/www/html/blog/
②解压:[root@redhat blog]#tar -xf latest-zh_CN.tar.gz
③将解压的文件中的所有文件移至blog目录下:[root@redhat blog]#mv wordpress/* ./
5.4.3:配置blog虚拟主机文件
[root@redhat blog]#vim /usr/local/nginx/conf/extra/blog.conf

server {

        listen ;

        server_name blog.p-pp.cn;

        root /var/www/html/blog;

        location / {

                index index.html index.php;

        }

        location ~ .*\.(php|php5) {        //添加了这个location

                fastcgi_pass 127.0.0.1:;

                fastcgi_index index.php;

                include fastcgi.conf;

        }

}
[root@redhat ~]#/usr/local/nginx/sbin/nginx -t    //检查语法
nginx: the configuration file /usr/local/nginx-1.10.1/conf/nginx.conf syntax is ok
nginx: configuration file /usr/local/nginx-1.10.1/conf/nginx.conf test is successful
[root@redhat ~]#/usr/local/nginx/sbin/nginx -s reload  //重新启动
5.4.4:在数据库中创建Wordpress的专用数据库
[root@redhat blog]#mysql -uroot -p

mysql> create database wordpress;
5.4.5:浏览器访问然后一步一步配置即可(/var/www/html/blog这个文件夹需要有nginx用户的写入权限)!!!!!!
LNMP的搭建的更多相关文章
- LNMP平台搭建---MySQL安装篇
在前两篇中,安装了一个基本的Web服务器,但是只能提供静态网页查看,要做成动态网站,就必须要数据库或其他编程语言支持了,这里先介绍MySQL数据库的安装. MySQL是一个开源的数据库,在互联网行业应 ...
- LNMP环境搭建
LNMP环境搭建 Linux + Nginx + MySQL + PHP PHP是一种脚本语言,当前中国乃至世界上使用PHP语言开发的网站非常普遍 Nginx是一个web服务软件,和apache是一类 ...
- LNMP平台搭建---Nginx安装篇
在上一篇博文<LNMP平台搭建---Linux系统安装篇>中,我们安装了CentOS版本的Linux操作系统,现在,我们来安装一个Web服务器,大标题写着LNMP,其中的N就是Nginx, ...
- LNMP平台搭建---Linux系统安装篇
在互联网网站开发领域,有一个名词,大家一定不陌生,那就是LAMP,经典的Web服务器环境,由Linux+Apache+MySQL+PHP组成,,后来,一个名叫Nginx的Web服务器开源出来了,因其更 ...
- 阿里云(ECS)Centos服务器LNMP环境搭建
阿里云( ECS ) Centos7 服务器 LNMP 环境搭建 前言 第一次接触阿里云是大四的时候,当时在校外公司做兼职,关于智能家居项目的,话说当时俺就只有一个月左右的 php 后台开发经验(还是 ...
- LNMP系统服务搭建过程详解
和LAMP不同的是LNMP中的N指的是Nginx(类似于Apache的一种web服务软件)其他都一样.目前这种环境应用的也是非常之多.Nginx设计的初衷是提供一种快速高效多并发的web服务软件.在静 ...
- (三)、LNMP的搭建,并制作rpm包
中小型规模网站集群架构:yum仓库搭建 : 矮哥linux运维群:93324526 编译的三条命令的规则 ./configure 就是在本地创建了一个Makefile文件 (也就是指定一下各种配置参数 ...
- 企业级LNMP架构搭建实例(基于Centos6.x)
1.1 部署LNMP架构说明 1.1.1 LNMP架构内容 01.部署linux系统 02.部署nginx网站服务 03.部署mysql数据库服务 04.部署php动态解析服务 1.1.2 配置LNM ...
- LNMP环境搭建:Nginx安装、测试与域名配置
Nginx作为一款优秀的Web Server软件同时也是一款优秀的负载均衡或前端反向代理.缓存服务软件 2.编译安装Nginx (1)安装Nginx依赖函数库pcre pcre为“perl兼容正则表达 ...
- lnmp架构搭建实例
lamp->lnmp nginx survey.netcraft.net 查看各大网站使用的web服务器,使用下面的命令 # curl -I www.sina.com 结论:现在大型网站几乎统一 ...
随机推荐
- C# string 常用功能的方法扩展
#region Usings using System; using System.Text; using System.Data; using System.Data.SqlClient; usin ...
- Linux Centos 删除除某(多)个文件之外的所有文件
好久没有写东西了.通常我们通过rm -rf *可以直接强制删除当前文件夹里面的所有内容,但是有些时候我们需要保留一些文件,就比如,网站转移更新需要保留程序压缩包等就需要用到在linux centos ...
- js选中变色,不选中鼠标放上变色
<head> <meta http-equiv="Content-Type" content="text/html; charset=utf-8&quo ...
- CentOS 7 配置DHCP
DHCP(Dynamic Host Configuration Protocol,动态主机配置协议)是一个局域网的网络协议,使用UDP协议工作, 主要有两个用途:给内部网络或网络服务供应商自动分配IP ...
- Django框架详细介绍---认证系统
在web开发中通常设计网站的登录认证.注册等功能,Django恰好内置了功能完善的用户认证系统 1.auth模块 from django.contrib import auth 模块源码 import ...
- pgrep
优势:可以只显示进程号 pgrep -l 显示进程名
- 前端好用js库
1.pubsub-js: PubSubJS is a topic-based publish/subscribe library written in JavaScript. 评价:做发布订阅超级简单 ...
- CAN双机通讯调试小结(SJA1000与MCP2515通讯)
2011-12-07 21:36:02. 效果图: 1,51的SJA1000自收自发测试完成,见上一篇小结. 2,SJA1000自测完成后,再自测MCP2515就非常容易.主要是设置工作模式为回环模式 ...
- 基于zigbee协议的空中下载技术(OTA)
首先镜像服务器的解释: 镜像服务器(Mirror server)与主服务器的服务内容都是一样的,只是放在一个不同的地方,分担主机的负载. 简单来说就是和照镜子似的,能看,但不是原版的.在网上内容完全相 ...
- JS,JQuery小知识
http://blog.163.com/wumingli456@126/blog/static/28896414201112252456459/?suggestedreading&wumii