tensorflow+ssd_mobilenet实现目标检测的训练
本文在Ubuntu下使用tensorflow的object detection API来训练自己的数据集。所用模型为ssd_mobilenet,也可以使用其他的模型。当然也可以在windows下训练,代码上没有多大差别,主要是配置环境那里,比较麻烦(windows和linux下都一样麻烦)。
一、配置环境
1. 在GitHub上下载所需的models文件,地址:https://github.com/tensorflow/models。
2. 安装pillow、lxml。Jupyter Notebook和matplotlib这两个我就不说了,肯定早就装好了。
pip install pillow

pip install lxml
3. 编译protobuf,object detection API是使用protobuf来训练模型和配置参数,所以得先编译protobuf,下载地址:https://github.com/google/protobuf/releases
windows的配置参考:https://blog.csdn.net/dy_guox/article/details/79081499
Ubuntu下的配置为:
下载地址 https://github.com/google/protobuf/releases
下载protobuf-all-3.7.0.tar.gz
命令如下:
tar zxvf protobuf-all-3.7.0.tar.gz

cd protobuf-3.7.0/

./autogen.sh

./configure --prefix=/usr/local/protobuf

make
make check 出现错误,不过没事
修改配置文件
(1)vim /etc/profile,添加
export PATH=$PATH:/usr/local/protobuf/bin/
export PKG_CONFIG_PATH=/usr/local/protobuf/lib/pkgconfig/
保存执行source /etc/profile
vim ~/.profile,添加
export PATH=$PATH:/usr/local/protobuf/bin/
export PKG_CONFIG_PATH=/usr/local/protobuf/lib/pkgconfig/ 否则会出现登陆用户找不到protoc命令
(2)配置动态链接库
vim /etc/ld.so.conf 在新的一行添加
/usr/local/protobuf/lib
执行命令 sudo ldconfig
安装完成
执行protoc --version,会出现当前libporoto的版本信息
libprotoc 2.6.1
二、在Ubuntu内先制作好自己的VOC数据集。制作过程如下:
在Ubuntu内制作自己的VOC数据集
三、将样本数据转换为TFRecord格式
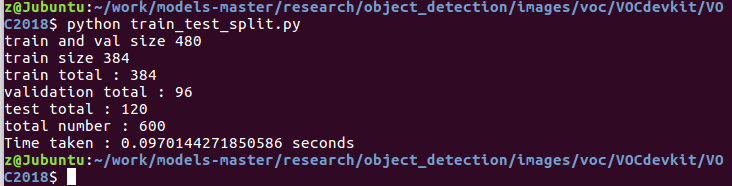
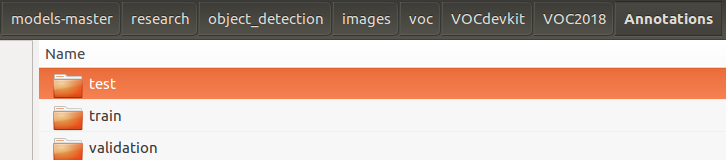
1. 新建 train_test_split.py 把xml文件数据集分为了train、test、validation三部分,并存储在Annotations文件夹中,训练验证集占80%,测试集占20%。训练集占训练验证集的80%。代码如下:
import os

import random

import time

import shutil

xmlfilepath=r'./Annotations'

saveBasePath=r"./Annotations"

trainval_percent=0.8

train_percent=0.8

total_xml = os.listdir(xmlfilepath)

num=len(total_xml)

list=range(num)

tv=int(num*trainval_percent)

tr=int(tv*train_percent)

trainval= random.sample(list,tv)

train=random.sample(trainval,tr)

print("train and val size",tv)

print("train size",tr)

start = time.time()

test_num=0

val_num=0

train_num=0

for i in list:

    name=total_xml[i]

    if i in trainval:  #train and val set

        if i in train:

            directory="train"

            train_num += 1

            xml_path = os.path.join(os.getcwd(), 'Annotations/{}'.format(directory))

            if(not os.path.exists(xml_path)):

                os.mkdir(xml_path)

            filePath=os.path.join(xmlfilepath,name)

            newfile=os.path.join(saveBasePath,os.path.join(directory,name))

            shutil.copyfile(filePath, newfile)

        else:

            directory="validation"

            xml_path = os.path.join(os.getcwd(), 'Annotations/{}'.format(directory))

            if(not os.path.exists(xml_path)):

                os.mkdir(xml_path)

            val_num += 1

            filePath=os.path.join(xmlfilepath,name)

            newfile=os.path.join(saveBasePath,os.path.join(directory,name))

            shutil.copyfile(filePath, newfile)

    else:

        directory="test"

        xml_path = os.path.join(os.getcwd(), 'Annotations/{}'.format(directory))

        if(not os.path.exists(xml_path)):

                os.mkdir(xml_path)

        test_num += 1

        filePath=os.path.join(xmlfilepath,name)

        newfile=os.path.join(saveBasePath,os.path.join(directory,name))

        shutil.copyfile(filePath, newfile)

end = time.time()

seconds=end-start

print("train total : "+str(train_num))

print("validation total : "+str(val_num))

print("test total : "+str(test_num))

total_num=train_num+val_num+test_num

print("total number : "+str(total_num))

print( "Time taken : {0} seconds".format(seconds))
2. 把xml转换成csv文件,xml_to_csv.py 将生成的csv文件放在 object_detection/data/
import os

import glob

import pandas as pd

import xml.etree.ElementTree as ET

def xml_to_csv(path):

    xml_list = []

    for xml_file in glob.glob(path + '/*.xml'):

        tree = ET.parse(xml_file)

        root = tree.getroot()

        print(root.find('filename').text)

        for member in root.findall('object'):

            value = (root.find('filename').text,

                int(root.find('size')[0].text),   #width

                int(root.find('size')[1].text),   #height

                member[0].text,

                int(member[4][0].text),

                int(float(member[4][1].text)),

                int(member[4][2].text),

                int(member[4][3].text)

                )

            xml_list.append(value)

    column_name = ['filename', 'width', 'height', 'class', 'xmin', 'ymin', 'xmax', 'ymax']

    xml_df = pd.DataFrame(xml_list, columns=column_name)

    return xml_df

def main():

    for directory in ['train','test','validation']:

        xml_path = os.path.join(os.getcwd(), 'Annotations/{}'.format(directory))

        xml_df = xml_to_csv(xml_path)

        # xml_df.to_csv('whsyxt.csv', index=None)

        xml_df.to_csv('/home/z/work/models-master/research/object_detection/data/trafficlight_{}_labels.csv'.format(directory), index=None)

        print('Successfully converted xml to csv.')

main()

3. 生成tfrecord文件,generate_tfrecord.py
#!/usr/bin/env python3

# -*- coding: utf-8 -*-

"""

Created on Tue Mar  5 15:28:55 2019

@author: z

"""

"""

Usage:

  # From tensorflow/models/

  # Create train data:

  python generate_tfrecord.py --csv_input=data/tv_vehicle_labels.csv  --output_path=train.record

  # Create test data:

  python generate_tfrecord.py --csv_input=data/test_labels.csv  --output_path=test.record

"""

import os

import io

import pandas as pd

import tensorflow as tf

from PIL import Image

from object_detection.utils import dataset_util

from collections import namedtuple, OrderedDict

os.chdir('/home/z/work/models-master/research/')

flags = tf.app.flags

flags.DEFINE_string('csv_input', '', 'Path to the CSV input')

flags.DEFINE_string('output_path', '', 'Path to output TFRecord')

FLAGS = flags.FLAGS

# TO-DO replace this with label map

def class_text_to_int(row_label):

        # 你的所有类别

    if row_label == 'red pedestrian':

            return 1

    else:

        return None

def split(df, group):

    data = namedtuple('data', ['filename', 'object'])

    gb = df.groupby(group)

    return [data(filename, gb.get_group(x)) for filename, x in zip(gb.groups.keys(), gb.groups)]

def create_tf_example(group, path):

    with tf.gfile.GFile(os.path.join(path, '{}'.format(group.filename)), 'rb') as fid:

        encoded_jpg = fid.read()

    encoded_jpg_io = io.BytesIO(encoded_jpg)

    image = Image.open(encoded_jpg_io)

    width, height = image.size

    filename = group.filename.encode('utf8')

    image_format = b'jpg'

    xmins = []

    xmaxs = []

    ymins = []

    ymaxs = []

    classes_text = []

    classes = []

    for index, row in group.object.iterrows():

        xmins.append(row['xmin'] / width)

        xmaxs.append(row['xmax'] / width)

        ymins.append(row['ymin'] / height)

        ymaxs.append(row['ymax'] / height)

        classes_text.append(row['class'].encode('utf8'))

        classes.append(class_text_to_int(row['class']))

    tf_example = tf.train.Example(features=tf.train.Features(feature={

        'image/height': dataset_util.int64_feature(height),

        'image/width': dataset_util.int64_feature(width),

        'image/filename': dataset_util.bytes_feature(filename),

        'image/source_id': dataset_util.bytes_feature(filename),

        'image/encoded': dataset_util.bytes_feature(encoded_jpg),

        'image/format': dataset_util.bytes_feature(image_format),

        'image/object/bbox/xmin': dataset_util.float_list_feature(xmins),

        'image/object/bbox/xmax': dataset_util.float_list_feature(xmaxs),

        'image/object/bbox/ymin': dataset_util.float_list_feature(ymins),

        'image/object/bbox/ymax': dataset_util.float_list_feature(ymaxs),

        'image/object/class/text': dataset_util.bytes_list_feature(classes_text),

        'image/object/class/label': dataset_util.int64_list_feature(classes),

    }))

    return tf_example

def main(_):

    writer = tf.python_io.TFRecordWriter(FLAGS.output_path)

    path = os.path.join(os.getcwd(), 'object_detection/images/voc/VOCdevkit/VOC2018/JPEGImages/')

    examples = pd.read_csv(FLAGS.csv_input)

    grouped = split(examples, 'filename')

    num = 0

    for group in grouped:

        num += 1

        tf_example = create_tf_example(group, path)

        writer.write(tf_example.SerializeToString())

        if (num % 100 == 0):    # 每完成100个转换,打印一次

            print(num)

    writer.close()

    output_path = os.path.join(os.getcwd(), FLAGS.output_path)

    print('Successfully created the TFRecords: {}'.format(output_path))

if __name__ == '__main__':

    tf.app.run()
主要是在 row_label 这里要添加上你标注的类别,字符串 row_label 应于labelImg中标注的名称相同。同样 path 为图片的路径。
cd /home/z/work/models-master/research

python generate_tfrecord.py --csv_input=object_detection/data/trafficlight_train_labels.csv --output_path=object_detection/data/
trafficlight_train.tfrecord
generate_tfrecord.py 需要在research目录下,也就是object_detection的上级目录,因为在脚本中使用了 object_detection.utils,如果在 object_detection 下执行命令会报错(No module named object_detection)。
其实这句命令很好理解,其实就是根据脚本中提供的图片路径,找到图片所在。至于是哪些图片?由csv文件来决定。csv文件主要就是记录图片的名称、类别、以及标记框的坐标。如下图所示:

类似的,我们可以输入如下命令,将验证集和测试集也转换为tfrecord格式。
python generate_tfrecord.py --csv_input=object_detection/data/trafficlight_validation_labels.csv --output_path=object_detection/data/

trafficlight_validation.tfrecord
python generate_tfrecord.py --csv_input=object_detection/data/trafficlight_test_labels.csv --output_path=object_detection/data/

trafficlight_test.tfrecord
四、训练
1. 在object_detection/data文件夹下创建标签分类的配置文件(label_map.txt),需要检测几种目标,将创建几个id,代码如下:
item {

  id: 1    # id 从1开始编号

  name: 'red pedestrian'

}

item {

  id: 2

  name: 'green pedestrian'

}
2. 配置管道配置文件,找到object_detection/samples/config/ssd_mobilenet_v1_coco.config,复制到data文件夹下。修改后的代码如下:
# SSD with Mobilenet v1 configuration for MSCOCO Dataset.

# Users should configure the fine_tune_checkpoint field in the train config as

# well as the label_map_path and input_path fields in the train_input_reader and

# eval_input_reader. Search for "PATH_TO_BE_CONFIGURED" to find the fields that

# should be configured.

model {

  ssd {

    num_classes: 17

    box_coder {

      faster_rcnn_box_coder {

        y_scale: 10.0

        x_scale: 10.0

        height_scale: 5.0

        width_scale: 5.0

      }

    }

    matcher {

      argmax_matcher {

        matched_threshold: 0.5

        unmatched_threshold: 0.5

        ignore_thresholds: false

        negatives_lower_than_unmatched: true

        force_match_for_each_row: true

      }

    }

    similarity_calculator {

      iou_similarity {

      }

    }

    anchor_generator {

      ssd_anchor_generator {

        num_layers: 6

        min_scale: 0.2

        max_scale: 0.95

        aspect_ratios: 1.0

        aspect_ratios: 2.0

        aspect_ratios: 0.5

        aspect_ratios: 3.0

        aspect_ratios: 0.3333

      }

    }

    image_resizer {

      fixed_shape_resizer {

        height: 300

        width: 300

      }

    }

    box_predictor {

      convolutional_box_predictor {

        min_depth: 0

        max_depth: 0

        num_layers_before_predictor: 0

        use_dropout: false

        dropout_keep_probability: 0.8

        kernel_size: 1

        box_code_size: 4

        apply_sigmoid_to_scores: false

        conv_hyperparams {

          activation: RELU_6,

          regularizer {

            l2_regularizer {

              weight: 0.00004

            }

          }

          initializer {

            truncated_normal_initializer {

              stddev: 0.03

              mean: 0.0

            }

          }

          batch_norm {

            train: true,

            scale: true,

            center: true,

            decay: 0.9997,

            epsilon: 0.001,

          }

        }

      }

    }

    feature_extractor {

      type: 'ssd_mobilenet_v1'

      min_depth: 16

      depth_multiplier: 1.0

      conv_hyperparams {

        activation: RELU_6,

        regularizer {

          l2_regularizer {

            weight: 0.00004

          }

        }

        initializer {

          truncated_normal_initializer {

            stddev: 0.03

            mean: 0.0

          }

        }

        batch_norm {

          train: true,

          scale: true,

          center: true,

          decay: 0.9997,

          epsilon: 0.001,

        }

      }

    }

    loss {

      classification_loss {

        weighted_sigmoid {

        }

      }

      localization_loss {

        weighted_smooth_l1 {

        }

      }

      hard_example_miner {

        num_hard_examples: 3000

        iou_threshold: 0.99

        loss_type: CLASSIFICATION

        max_negatives_per_positive: 3

        min_negatives_per_image: 0

      }

      classification_weight: 1.0

      localization_weight: 1.0

    }

    normalize_loss_by_num_matches: true

    post_processing {

      batch_non_max_suppression {

        score_threshold: 1e-8

        iou_threshold: 0.6

        max_detections_per_class: 100

        max_total_detections: 100

      }

      score_converter: SIGMOID

    }

  }

}

train_config: {

  batch_size: 2

  optimizer {

    rms_prop_optimizer: {

      learning_rate: {

        exponential_decay_learning_rate {

          initial_learning_rate: 0.00001

          decay_steps: 800720

          decay_factor: 0.95

        }

      }

      momentum_optimizer_value: 0.9

      decay: 0.9

      epsilon: 1.0

    }

  }

  # Note: The below line limits the training process to 200K steps, which we

  # empirically found to be sufficient enough to train the pets dataset. This

  # effectively bypasses the learning rate schedule (the learning rate will

  # never decay). Remove the below line to train indefinitely.

  num_steps: 6000

  data_augmentation_options {

    random_horizontal_flip {

    }

  }

  data_augmentation_options {

    ssd_random_crop {

    }

  }

}

train_input_reader: {

  tf_record_input_reader {

    input_path: "data/trafficlight_train.tfrecord"

  }

  label_map_path: "data/trafficlight_label_map.pbtxt"

}

eval_config: {

  num_examples: 8000

  # Note: The below line limits the evaluation process to 10 evaluations.

  # Remove the below line to evaluate indefinitely.

  max_evals: 10

}

eval_input_reader: {

  tf_record_input_reader {

    input_path: "data/trafficlight_validation.tfrecord"

  }

  label_map_path: "data/trafficlight_label_map.pbtxt"

  shuffle: false

  num_readers: 1

}
可以修改的有好几处,在代码中都标红了。建议还是将配置文件看一下。主要包括:标注的类别数目、batch_size(建议设置小一点)、学习率和退化率、训练的总步数、训练集和验证集的tfrecord的路径、label_map的路径
3. 开始训练
python train.py --logtostderr --train_dir=training/ --pipeline_config_path=data/ssd_mobilenet_v1_coco.config
参考地址:
https://www.cnblogs.com/White-xzx/p/9503203.html
tensorflow+ssd_mobilenet实现目标检测的训练的更多相关文章
- 第三十二节,使用谷歌Object Detection API进行目标检测、训练新的模型(使用VOC 2012数据集)
前面已经介绍了几种经典的目标检测算法,光学习理论不实践的效果并不大,这里我们使用谷歌的开源框架来实现目标检测.至于为什么不去自己实现呢?主要是因为自己实现比较麻烦,而且调参比较麻烦,我们直接利用别人的 ...
- gluoncv 目标检测,训练自己的数据集
https://gluon-cv.mxnet.io/build/examples_datasets/detection_custom.html 官方提供两种方案,一种是lst文件,一种是xml文件(v ...
- 【TensorFlow】基于ssd_mobilenet模型实现目标检测
最近工作的项目使用了TensorFlow中的目标检测技术,通过训练自己的样本集得到模型来识别游戏中的物体,在这里总结下. 本文介绍在Windows系统下,使用TensorFlow的object det ...
- 腾讯推出超强少样本目标检测算法,公开千类少样本检测训练集FSOD | CVPR 2020
论文提出了新的少样本目标检测算法,创新点包括Attention-RPN.多关系检测器以及对比训练策略,另外还构建了包含1000类的少样本检测数据集FSOD,在FSOD上训练得到的论文模型能够直接迁移到 ...
- 第三十四节,目标检测之谷歌Object Detection API源码解析
我们在第三十二节,使用谷歌Object Detection API进行目标检测.训练新的模型(使用VOC 2012数据集)那一节我们介绍了如何使用谷歌Object Detection API进行目标检 ...
- 目标检测之R-CNN系列
Object Detection,在给定的图像中,找到目标图像的位置,并标注出来. 或者是,图像中有那些目标,目标的位置在那.这个目标,是限定在数据集中包含的目标种类,比如数据集中有两种目标:狗,猫. ...
- 目标检测-yolo2
转载自:http://blog.csdn.net/qq_34784753/article/details/78825493 对于现在的最好的检测系统来说,yolo_v1 的问题主要出现在两方面,也就是 ...
- 目标检测 的标注数据 .xml 转为 tfrecord 的格式用于 TensorFlow 训练
将目标检测 的标注数据 .xml 转为 tfrecord 的格式用于 TensorFlow 训练. import xml.etree.ElementTree as ET import numpy as ...
- tensorflow目标检测API之训练自己的数据集
1.训练文件的配置 将生成的csv和record文件都放在新建的mydata文件夹下,并打开object_detection文件夹下的data文件夹,复制一个后缀为.pbtxt的文件到mtdata文件 ...
随机推荐
- 使用Sublime Text 3进行Markdown编辑+实时预览
使用Sublime Text 3进行Markdown编辑+实时预览 安装软件包管理器 打开Sublime Text 3 同时按下 ctrl+` ,窗口底部出现一个小控制台 复制以下代码,粘贴到控制台的 ...
- leetcode-884两句话中的不常见单词
''' 给定两个句子 A 和 B . (句子是一串由空格分隔的单词.每个单词仅由小写字母组成.) 如果一个单词在其中一个句子中只出现一次,在另一个句子中却没有出现,那么这个单词就是不常见的. 返回所有 ...
- 洛谷P1880 石子合并(环形石子合并 区间DP)
题目描述 在一个圆形操场的四周摆放N堆石子,现要将石子有次序地合并成一堆.规定每次只能选相邻的2堆合并成新的一堆,并将新的一堆的石子数,记为该次合并的得分. 试设计出1个算法,计算出将N堆石子合并成1 ...
- vim命令编辑Host文件
用vim命令打开Host文件 [root@localhost /]# vim /etc/hosts 按"i"键,进入编辑模式按"Esc"键,退出编辑模式 按&q ...
- 关于Oracle.ManagedDataAccess数据库表加字段后,必须重启的问题
关于Oracle.ManagedDataAccess数据库表加字段后,必须重启的问题,解决方法如下:在数据库连接字串中,增加一个参数:Metadata Pooling=false如“Data Sour ...
- TensorFlow深度学习,一篇文章就够了
http://blog.jobbole.com/105602/ 作者: 陈迪豪,就职小米科技,深度学习工程师,TensorFlow代码提交者. TensorFlow深度学习框架 Google不仅是大数 ...
- beego框架返回json数据
一.routers路由 package routers import ( "mybeego/controllers" "github.com/astaxie/beego& ...
- Spring MVC -- Spring框架入门(IoC和DI)
Spring MVC是Spring框架中用于Web应用开发的一个模块.Spring MVC的MVC是Model-View-Controller的缩写.它是一个广泛应用于图像化用户交互开发中的设计模式, ...
- zkclient中包引用不对,导致NoSuchMethodError
nidonglin commented on 31 Oct 2014 Exception in thread "main" java.lang.NoSuchMethodError: ...
- POJ - 3616 Milking Time (动态规划)
Bessie is such a hard-working cow. In fact, she is so focused on maximizing her productivity that sh ...