小白的python之路10/29 文件归档
一打包解包文件
[root@localhost ~]# cd /test/
[root@localhost test]# touch a.txt b.txt c.txt
[root@localhost test]# ls
a.txt b.txt c.txt
#1.打包过程
#c表示创建,v表示过程信息,f表示文件名, test.tar表示打包后的文件名,文件后缀无意义
[root@localhost test]# tar cvf test.tar a.txt b.txt c.txt
a.txt
b.txt
c.txt
[root@localhost test]# ls
a.txt b.txt c.txt test.tar
#2查看过程t表示查看,f指定哪个文件
[root@localhost test]# tar -tf test.tar
a.txt
b.txt
c.txt
[root@localhost test]# ls
a.txt b.txt c.txt test.tar
[root@localhost test]# rm -rf a.txt b.txt c.txt
[root@localhost test]# ls
test.tar
#3 x表示解包 f表示指定文件
[root@localhost test]# tar xvf test.tar
a.txt
b.txt
c.txt
[root@localhost test]# ls
a.txt b.txt c.txt test.tar
[root@localhost test]# mkdir /bak
[root@localhost test]# ls /bak
[root@localhost test]# ls
a.txt b.txt c.txt test.tar
#4 大c表示指定路径(绝对路径)
[root@localhost test]# tar xvf /test/test.tar -C /bak
a.txt
b.txt
c.txt
[root@localhost test]# ls /bak
a.txt b.txt c.txt
#二 压缩文件的压缩和解压
#vim写入信息
[root@localhost test]# vim a.txt
#查看文件信息 文件大小59
[root@localhost test]# ll a.txt
-rw-r--r-- 1 root root 10月 29 20:51 a.txt
#压缩文件gzip 文件大小39
[root@localhost test]# gzip a.txt
[root@localhost test]# ll
总用量 4
-rw-r--r-- 1 root root 10月 29 20:51 a.txt.gz
[root@localhost test]# ll a.txt.gz
-rw-r--r-- 1 root root 10月 29 20:51 a.txt.gz
#解压文件
[root@localhost test]# gunzip a.txt
[root@localhost test]# ls
a.txt
[root@localhost test]# touch b.txt c.txt d.txt
[root@localhost test]# ls
a.txt b.txt c.txt d.txt
#打包
[root@localhost test]# tar cvf test.tar a.txt b.txt c.txt d.txt
a.txt
b.txt
c.txt
d.txt
[root@localhost test]# ls
a.txt b.txt c.txt d.txt test.tar
#压缩
[root@localhost test]# gzip test.tar
[root@localhost test]# ls
a.txt b.txt c.txt d.txt test.tar.gz
#打包时压缩
[root@localhost test]# 10月 29 21:14 test1.tar.gz
[root@localhost test]# ll -l test.tar.gz
-rw-r--r-- 1 root root 10月 29 21:00 test.tar.gz
[root@localhost test]# ls
a.txt b.txt c.txt d.txt test1.tar.gz test.tar.gz
[root@localhost test]# touch e.txt
[root@localhost test]# bzip2 e.txt
[root@localhost test]# ls
a.txt b.txt c.txt d.txt e.txt.bz2 test1.tar.gz test.tar.gz
#压缩文件bz2
[root@localhost test]# tar cvjf test2.tar.bz2 a.txt b.txt c.txt
a.txt
b.txt
c.txt
#2种归档文件无论是bzip2还是gzip解压都一样
[root@localhost test]# mkdir /test1
[root@localhost test]# mkdir /test2
[root@localhost test]# tar xf test1.tar.gz -C /test1/
#解压后包中信息
[root@localhost test]# ls /test1/
a.txt b.txt c.txt d.txt
[root@localhost test]# tar xf test2.tar.bz2 -C /test2/
[root@localhost test]# ls /test2
a.txt b.txt c.txt
#bz2比gz压缩更小 但是bz2速度慢,过程久
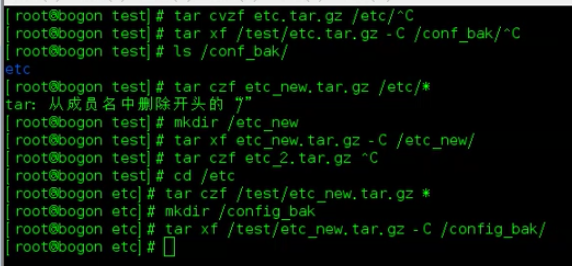
eg:对目录/etc/下文件夹的压缩
[root@localhost test]# tar cvzf etc.tar.gz /etc/
[root@localhost test]# ls
a.txt c.txt etc.tar.gz test1.tar.gz test.tar.gz
b.txt d.txt e.txt.bz2 test2.tar.bz2
mkdir /conf_bak
打包目录,结果中有目录名存在 tar cvzf test.tar.gz /etc
cd /etc
tar cvzf test,tar,gz*
补充
>将左边输出到右面eg:cat /etc/passwd > /tmp/passswd.bak
less随意浏览文件less /tmp/passswd.bak
Ctrl+c强制中断进程 CTRL + D 保存退出
useradd 用户 -del mkdir 文件夹 rm
小白的python之路10/29 文件归档的更多相关文章
- 小白的python之路10/31&11/1文件操作系统
文件操作系统的介绍 ext4的superblock块是超级快,innode 块是专门存放文件信息的, block count将硬盘做成block块,对操作系统而言写在block块上就可了,eg:文件1 ...
- 小白的python之路10/30磁盘分区
总结:fdisk mkfs mount 1.磁盘分区 硬盘分区有三种,主磁盘分区.扩展磁盘分区.逻辑分区. 一个硬盘主分区至少有1个,最多4个,扩展分区可以没有,最多1个.且主分区+扩展分区总共 ...
- 小白的python之路10/30 vim编辑器
1.vim进入命令行之后的编辑过程
- 小白的python之路10/22 day1
一.操作系统 操作系统就是一个协调.管理和控制计算机硬件资源和软件资源的控制程序.操作系统所处的位置如下图
- 小白的Python之路 day1
Python之路,Day1 - Python基础1 本节内容 Python介绍 发展史 Python 2 or 3? 一. Python介绍 python的创始人为吉多·范罗苏姆(Guido van ...
- 小白学习Python之路---开发环境的搭建
本节内容 1.Python的介绍 2.发展史 3.安装Python 4.搭建开发环境 5.Hello World程序 一.Python的介绍 Python的创始人为荷兰人吉多·范罗苏姆(Guido v ...
- NO.3:自学python之路------集合、文件操作、函数
引言 本来计划每周完成一篇Python的自学博客,由于上一篇到这一篇遇到了过年.开学等杂事,导致托更到现在.现在又是一个新的学期,春天也越来越近了(冷到感冒).好了,闲话就说这么多.开始本周的自学Py ...
- 小白学 Python 数据分析(10):Pandas (九)数据运算
人生苦短,我用 Python 前文传送门: 小白学 Python 数据分析(1):数据分析基础 小白学 Python 数据分析(2):Pandas (一)概述 小白学 Python 数据分析(3):P ...
- 小白的Python之路 day1 变量
Python之路,Day1 - Python基础1 变量 变量用于存储在计算机程序中引用和操作的信息.它们还提供了一种用描述性名称标记数据的方法,这样我们的程序就能更清晰地被读者和我们自己理解.将变量 ...
随机推荐
- LeetCode 整数反转
给出一个 32 位的有符号整数,你需要将这个整数中每位上的数字进行反转. 示例 1: 输入: 123 输出: 321 示例 2: 输入: -123 输出: -321 示例 3: 输入: 120 输出: ...
- 【题解】Luogu P4436 [HNOI/AHOI2018]游戏
原题传送门 \(n^2\)过百万在HNOI/AHOI2018中真的成功了qwqwq 先将没门分格的地方连起来,枚举每一个块,看向左向右最多能走多远,最坏复杂度\(O(n^2)\),但出题人竟然没卡(建 ...
- MySQL高性能优化规范建议,速度收藏
数据库命令规范 •所有数据库对象名称必须使用小写字母并用下划线分割•所有数据库对象名称禁止使用 MySQL 保留关键字(如果表名中包含关键字查询时,需要将其用单引号括起来)•数据库对象的命名要能做到见 ...
- day07数据类型的相互转化,字符编码
复习 ''' 1.深浅拷贝 ls = [1, 'a', [10]] 值拷贝:直接赋值 ls1 = ls, ls中的任何值发生改变,ls1中的值都会随之改变 浅拷贝:通过copy()方法 ls2 = l ...
- 【我的前端自学之路】【HTML5】.html和.htm的区别
以下为自学笔记内容,仅供参考. 转发请保留原文链接:https://www.cnblogs.com/it-dennis/p/10508171.html .htm 和 .html 的区别 .htm 和 ...
- 多邻国学英语 tips
来源: https://www.cnblogs.com/daysme整理了一分多邻国学英语中的相关语法文档. 地方 null 现在完成时 null 反身代词 浓缩的精华:反身代词就是 “XX 自己” ...
- MySQL卸载安装8.0.*
一.卸载 1. 本人安装目录在C盘Program Files文件中(删除MySQL文件夹) 2. 找到C盘Program Data隐藏文件夹中的MySQL并删除(删除提示MySQL在运行的话可以去任务 ...
- stylus入门学习笔记
title: stylus入门学习笔记 date: 2018-09-06 17:35:28 tags: [stylus] description: 学习到 vue, 有人推荐使用 stylus 这个 ...
- JQuery 数组获取和删除元素
<script> var target = []; target [0] = "aaa000"; target [1] = "bbb111"; ta ...
- windows平台 python生成 pyd文件
Python的文件类型介绍: .py python的源代码文件 .pyc Python源代码import后,编译生成的字节码 .pyo Python源代码编译优化生成的字节 ...
