Android中将布局文件/View添加至窗口过程分析 ---- 从setContentView()谈起
本文主要内容是讲解一个视图View或者一个ViewGroup对象是如何添加至应用程序窗口中的。下文中提到的窗口可泛指我们能看到的界面,包括一个Activity呈现的界面(我们可以将之理解为应用程序窗口),一个Dialog,一个Toast,一个Menu菜单等。
首先对相关类的作用进行一下简单介绍:
Window 类 位于 /frameworks/base/core/java/android/view/Window.java
说明:该类是一个抽象类,提供了绘制窗口的一组通用API。可以将之理解为一个载体,各种View在这个载体上显示。
源文件(部分)如下:
public abstract class Window {

    //...

    //指定Activity窗口的风格类型

    public static final int FEATURE_NO_TITLE = 1;

    public static final int FEATURE_INDETERMINATE_PROGRESS = 5;

    //设置布局文件

    public abstract void setContentView(int layoutResID);

    public abstract void setContentView(View view);

    //请求指定Activity窗口的风格类型

    public boolean requestFeature(int featureId) {

        final int flag = 1<<featureId;

        mFeatures |= flag;

        mLocalFeatures |= mContainer != null ? (flag&~mContainer.mFeatures) : flag;

        return (mFeatures&flag) != 0;

    }

    //...

}
PhoneWindow类 位于/frameworks/policies/base/phone/com/android/internal/policy/impl/PhoneWindow.java
说明: 该类继承于Window类,是Window类的具体实现,即我们可以通过该类具体去绘制窗口。并且,该类内部包含了
一个DecorView对象,该DectorView对象是所有应用窗口(Activity界面)的根View。 简而言之,PhoneWindow类是
把一个FrameLayout类即DecorView对象进行一定的包装,将它作为应用窗口的根View,并提供一组通用的窗口操作
接口。
源文件(部分)如下:
public class PhoneWindow extends Window implements MenuBuilder.Callback {
//...
// This is the top-level view of the window, containing the window decor.
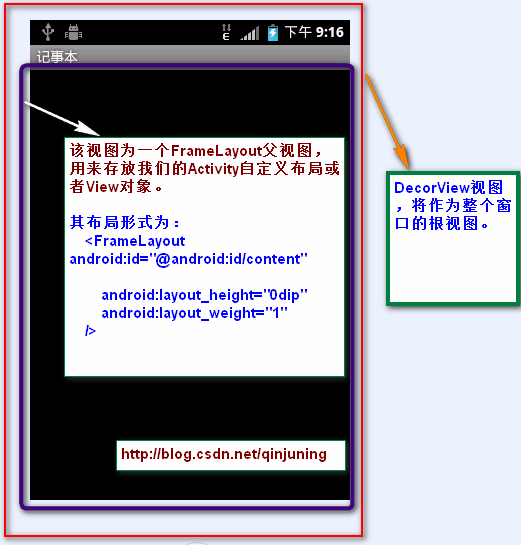
private DecorView mDecor; //该对象是所有应用窗口的根视图 , 是FrameLayout的子类
//该对象是Activity布局文件的父视图,一般来说是一个FrameLayout型的ViewGroup
// 同时也是DecorView对象的一个子视图
// This is the view in which the window contents are placed. It is either
// mDecor itself, or a child of mDecor where the contents go.
private ViewGroup mContentParent;
//设置标题
@Override
public void setTitle(CharSequence title) {
if (mTitleView != null) {
mTitleView.setText(title);
}
mTitle = title;
}
//设置背景图片
@Override
public final void setBackgroundDrawable(Drawable drawable) {
if (drawable != mBackgroundDrawable || mBackgroundResource != 0) {
mBackgroundResource = 0;
mBackgroundDrawable = drawable;
if (mDecor != null) {
mDecor.setWindowBackground(drawable);
}
}
}
//...
}
DecorView类 该类是PhoneWindow类的内部类
说明: 该类是一个FrameLayout的子类,并且是PhoneWindow的子类,该类就是对普通的FrameLayout进行功能的扩展,
更确切点可以说是修饰(Decor的英文全称是Decoration,即“修饰”的意思),比如说添加TitleBar(标题栏),以及
TitleBar上的滚动条等 。最重要的一点是,它是所有应用窗口的根View 。
如下所示 :
(DecorView 根视图结构 )

(DecorView 根视图形式)
源文件(部分)如下:
private final class DecorView extends FrameLayout {

    //...

    //触摸事件处理

    @Override

    public boolean onTouchEvent(MotionEvent event) {

        return onInterceptTouchEvent(event);

    }

    //...

}
打个不恰当比喻吧,Window类相当于一幅画(抽象概念,什么画我们未知) ,PhoneWindow为一副齐白石先生的山水画
(具体概念,我们知道了是谁的、什么性质的画),DecorView则为该山水画的具体内容(有山、有水、有树,各种界面)。
DecorView呈现在PhoneWindow上。
当系统(一般是ActivityManagerService)配置好启动一个Activity的相关参数(包括Activity对象和Window对象信息)后,
就会回调Activity的onCreate()方法,在其中我们通过设置setContentView()方法类设置该Activity的显示界面,整个调用链
由此铺垫开来。setContentView()的三个构造方法调用流程本质上是一样的,我们就分析setContentView(intresId)方法。
Step 1 、Activity.setContentView(intresId) 该方法在Activity类中
该方法只是简单的回调Window对象,具体为PhoneWindow对象的setContentView()方法实现 。
public void setContentView(int layoutResID) {

    getWindow().setContentView(layoutResID);

}

public Window getWindow() {

    return mWindow;   //Window对象,本质上是一个PhoneWindow对象

}
Step 2 、PhoneWindow.setContentView()
该方法在PhoneWindow类中
@Override

public void setContentView(int layoutResID) {

    //是否是第一次调用setContentView方法, 如果是第一次调用,则mDecor和mContentParent对象都为空

    if (mContentParent == null) {

        installDecor();

    } else {

        mContentParent.removeAllViews();

    }

    mLayoutInflater.inflate(layoutResID, mContentParent);

    final Callback cb = getCallback();

    if (cb != null) {

        cb.onContentChanged();

    }

}
该方法根据首先判断是否已经由setContentView()了获取mContentParent即View对象, 即是否是第一次调用该
PhoneWindow对象setContentView()方法。如果是第一次调用,则调用installDecor()方法,否则,移除该mContentParent内
所有的所有子View。最后将我们的资源文件通过LayoutInflater对象转换为View树,并且添加至mContentParent视图中。
PS:因此,在应用程序里,我们可以多次调用setContentView()来显示我们的界面。
Step 3、 PhoneWindow. installDecor() 该方法在PhoneWindow类中
private void installDecor() {

    if (mDecor == null) {

        //mDecor为空,则创建一个Decor对象

        mDecor = generateDecor();

        mDecor.setDescendantFocusability(ViewGroup.FOCUS_AFTER_DESCENDANTS);

        mDecor.setIsRootNamespace(true);

    }

    if (mContentParent == null) {

        //generateLayout()方法会根据窗口的风格修饰,选择对应的修饰布局文件

        //并且将id为content(android:id="@+id/content")的FrameLayout赋值给mContentParent

        mContentParent = generateLayout(mDecor);

        //...

}
首先、该方法首先判断mDecor对象是否为空,如果不为空,则调用generateDecor()创建一个DecorView(该类是
FrameLayout子类,即一个ViewGroup视图) ;
generateDecor()方法原型为:
protected DecorView generateDecor() {

    return new DecorView(getContext(), -1);

}
其次、继续判断mContentParent对象是否为空,如果不为空,则调用generateLayout()方法去创建mContentParent对象。
generateLayout()方法如下:
protected ViewGroup generateLayout(DecorView decor) {

    // Apply data from current theme.

    //...1、根据requestFreature()和Activity节点的android:theme="" 设置好 features值

    //2 根据设定好的 features值,即特定风格属性,选择不同的窗口修饰布局文件

    int layoutResource;  //窗口修饰布局文件

    int features = getLocalFeatures();

    // System.out.println("Features: 0x" + Integer.toHexString(features));

    if ((features & ((1 << FEATURE_LEFT_ICON) | (1 << FEATURE_RIGHT_ICON))) != 0) {

        if (mIsFloating) {

            layoutResource = com.android.internal.R.layout.dialog_title_icons;

        } else {

            layoutResource = com.android.internal.R.layout.screen_title_icons;

        }

        // System.out.println("Title Icons!");

    } else if ((features & ((1 << FEATURE_PROGRESS) | (1 << FEATURE_INDETERMINATE_PROGRESS))) != 0) {

        // Special case for a window with only a progress bar (and title).

        // XXX Need to have a no-title version of embedded windows.

        layoutResource = com.android.internal.R.layout.screen_progress;

        // System.out.println("Progress!");

    }

    //...

    //3 选定了窗口修饰布局文件 ,添加至DecorView对象里,并且指定mcontentParent值

    View in = mLayoutInflater.inflate(layoutResource, null);

    decor.addView(in, new ViewGroup.LayoutParams(MATCH_PARENT, MATCH_PARENT));

    ViewGroup contentParent = (ViewGroup)findViewById(ID_ANDROID_CONTENT);

    if (contentParent == null) {

        throw new RuntimeException("Window couldn't find content container view");

    }

    if ((features & (1 << FEATURE_INDETERMINATE_PROGRESS)) != 0) {

        ProgressBar progress = getCircularProgressBar(false);

        if (progress != null) {

            progress.setIndeterminate(true);

        }

    }

    //...

    return contentParent;

}
该方法会做如下事情:
1、根据窗口的风格修饰类型为该窗口选择不同的窗口布局文件(根视图)。这些窗口修饰布局文件指定一个用来存放
Activity自定义布局文件的ViewGroup视图,一般为FrameLayout 其id 为: android:id="@android:id/content"。
例如窗口修饰类型包括FullScreen(全屏)、NoTitleBar(不含标题栏)等。选定窗口修饰类型有两种:
①、指定requestFeature()指定窗口修饰符,PhoneWindow对象调用getLocalFeature()方法获取值;
②、为我们的Activity配置相应属性,即android:theme=“”,PhoneWindow对象调用getWindowStyle()方法
获取值。
举例如下,隐藏标题栏有如下方法:requestWindowFeature(Window.FEATURE_NO_TITLE);
或者 为Activity配置xml属性:android:theme=”@android:style/Theme.NoTitleBar”。
PS:因此,在Activity中必须在setContentView之前调用requestFeature()方法。
确定好窗口风格之后,选定该风格对应的布局文件,这些布局文件位于 frameworks/base/core/res/layout/ ,
典型的窗口布局文件有:
R.layout.dialog_titile_icons                          R.layout.screen_title_icons

          R.layout.screen_progress                             R.layout.dialog_custom_title

          R.layout.dialog_title

          R.layout.screen_title         // 最常用的Activity窗口修饰布局文件

          R.layout.screen_simple    //全屏的Activity窗口布局文件
分析Activity最常用的一种窗口布局文件,R.layout.screen_title :
<!--

This is an optimized layout for a screen, with the minimum set of features

enabled.

-->

<LinearLayout xmlns:android="http://schemas.android.com/apk/res/android"

    android:orientation="vertical"

    android:fitsSystemWindows="true">

    <FrameLayout

        android:layout_width="match_parent"

        android:layout_height="?android:attr/windowTitleSize"

        style="?android:attr/windowTitleBackgroundStyle">

        <TextView android:id="@android:id/title"

            style="?android:attr/windowTitleStyle"

            android:background="@null"

            android:fadingEdge="horizontal"

            android:gravity="center_vertical"

            android:layout_width="match_parent"

            android:layout_height="match_parent" />

    </FrameLayout>

    <FrameLayout android:id="@android:id/content"

        android:layout_width="match_parent"

        android:layout_height="0dip"

        android:layout_weight="1"

        android:foregroundGravity="fill_horizontal|top"

        android:foreground="?android:attr/windowContentOverlay" />

</LinearLayout>
该布局文件很简单,一个LinearLayout下包含了两个子FrameLayout视图,第一个FrameLayout用来显示标题栏(TitleBar),
该TextView 视图id为title(android:id="@android:id/title");第二个FrameLayout用来显示我们Activity的布局文件的父视图,
该FrameLayoutid为content(android:id="@android:id/content") 。
全屏的窗口布局文件 R.layout.screen_simple:
<--This is an optimized layout for a screen, with the minimum set of features

enabled.

-->

<FrameLayout xmlns:android="http://schemas.android.com/apk/res/android"

    android:id="@android:id/content"

    android:fitsSystemWindows="true"

    android:foregroundInsidePadding="false"

    android:foregroundGravity="fill_horizontal|top"

    android:foreground="?android:attr/windowContentOverlay" />
该布局文件只有一个FrameLayout,用来显示我们Activity的布局文件,该FrameLayoutid为
android:id="@android:id/content"
2、前面一步我们确定窗口修饰布局文件后,mDecor做为根视图将该窗口布局对应的视图添加进去,并且获取id为content
的View,将其赋值给mContentParent对象,即我们前面中提到的第二个FrameLayout。
At Last、产生了mDecor和mContentParent对象后,就将我们的Activity布局文件直接添加至mContentParent父视图中即可。
我们再次回到 Step 2 中PhoneWindow.setContentView() 该方法在PhoneWindow类中
@Override

public void setContentView(int layoutResID) {

    if (mContentParent == null) {

        installDecor();

    } else {

        mContentParent.removeAllViews();

    }

    mLayoutInflater.inflate(layoutResID, mContentParent);

    final Callback cb = getCallback();

    if (cb != null) {

        cb.onContentChanged();

    }

}
整个过程主要是如何把Activity的布局文件添加至窗口里,上面的过程可以概括为:
1、创建一个DecorView对象,该对象将作为整个应用窗口的根视图
2、创建不同的窗口修饰布局文件,并且获取Activity的布局文件该存放的地方,由该窗口修饰布局文件内id为content的
FrameLayout指定 。
3、将Activity的布局文件添加至id为content的FrameLayout内。
最后,当AMS(ActivityManagerService)准备resume一个Activity时,会回调该Activity的handleResumeActivity()方法,
该方法会调用Activity的makeVisible方法 ,显示我们刚才创建的mDecor 视图族。
//系统resume一个Activity时,调用此方法

final void handleResumeActivity(IBinder token, boolean clearHide, boolean isForward) {

    ActivityRecord r = performResumeActivity(token, clearHide);

    //...

     if (r.activity.mVisibleFromClient) {

         r.activity.makeVisible();

     }

}
handleResumeActivity()方法原型如下: 位于ActivityThread类中
void makeVisible() {

    if (!mWindowAdded) {

        ViewManager wm = getWindowManager();   // 获取WindowManager对象

        wm.addView(mDecor, getWindow().getAttributes());

        mWindowAdded = true;

    }

    mDecor.setVisibility(View.VISIBLE); //使其处于显示状况

}
接下来就是,如何把我们已经创建好的窗口通知给WindowManagerService ,以便它能够把这个窗口显示在屏幕上。
关于这方面内容大家可以去看邓凡平老师的这篇博客《Android深入浅出之Surface[1]》
转自:http://blog.csdn.net/qinjuning/article/details/7226787
Android中将布局文件/View添加至窗口过程分析 ---- 从setContentView()谈起的更多相关文章
- Android中将布局文件转成bitmap
在实践中发现,有些需要打印的小票高度小于屏幕的高度,而有些小票内容过多高度高于屏幕高度. 小于屏幕高度的布局文件转成bitmap较为容易,高于屏幕高度的布局文件转成长图bitmap较为复杂. 一.小于 ...
- Android -- Layout布局文件里的android:layout_height等属性为什么会不起作用?
有的时候,我们配置好的布局文件,在加载完成添加到我们的Activity中后发现,并没有安装我们设置的属性来布局,比如我们设置了android:layout_marginTop="100dip ...
- Android Layout布局文件里的android:layout_height等属性不起作用
有的时候,我们配置好的布局文件,在加载完成添加到我们的Activity中后发现,并没有安装我们设置的属性 来布局,比为我们设置了android:layout_marginTop="100di ...
- Android中布局文件中使用onClick属性
安卓开发中,布局文件中的控件有一个属性,是onClick,例如: <Button android:id="@+id/button1" ...
- Android无布局文件下自定义通知栏notification的 icon
在开发项目一个与通知栏有关的功能时,由于自己的项目是基于插件形式的所以无法引入系统可用的布局文件,这样无法自定义布局,造成无法自定义通知栏的icon. 在网上也有一种不用布局文件更换icon的方法,但 ...
- Xamarin.Android之布局文件智能提示问题
一.前言 看到有人问关于xamarin.android的布局没智能提示问题(VS 2015),当然,写布局这东西没提示这是一件相对痛苦的事 ,所以这里就提供一个解决的方案! 二.解决方案 想要智能提示 ...
- android横屏布局文件设置
一.AndroidManifest.xml配置 1.在AndroidManifest.xml的activity(需要禁止转向的activity)配置中加入 android:screenOrient ...
- 如何把android中布局文件(.xml)与相关的类(.java)进行关联?
eg:把一个布局文件名为page1.xml与MainActivity.java(工程自动生成)进行 1.在存放使用资源的res文件夹下的layout文件夹内新建一个XML布局文件,如命名为:page1 ...
- android studio布局文件/XML怎么代码补全
android studio中的布局文件代码补全方式是打第一个字母就提示了,而java代码有时候要按快捷键. 布局文件的话呢,要写在标签开始处才提示,在标签闭合处有时候不提示,有时候在内容里也会有不提 ...
随机推荐
- CodeForces 569A 第八次比赛 C题
Description Little Lesha loves listening to music via his smartphone. But the smartphone doesn't hav ...
- DB2查看用户表与指定用户表表结构
1.在dos中查看用户表 1.1查看表 DB2 LIST TABLES FOR USER 1.2 查看表结构 DB2 describe table A 2.在DB2连接工具中(这里以SQLdbx为例子 ...
- 11G ORACLE RAC DBCA 无法识别asm磁盘组
ASM磁盘无法识别几种现象: 1) gi家目录或者其子目录权限错误 2)asm磁盘的权限错误 3)asm实例未启动或者asm磁盘组没有mount上 4)asm磁盘组资源没有在线 5)oracle用户的 ...
- 应用程序域(Application Domain)
应用程序域为隔离正在运行的应用程序提供了一种灵活而安全的方法. 应用程序域通常由运行时宿主创建和操作. 有时,您可能希望应用程序以编程方式与应用程序域交互,例如想在不停止应用程序运行的情况下卸载某个组 ...
- Redis 五:配置主从复制功能
redis的主从复制事实上是非常简单的一件事情,甚至比mysql的配置还简单,因为基本不需要在主服务器上做任何操作 我们在同一台服务器上开不同的端口进行测试操作(安装部分就不说啦,前面的文章有::) ...
- Android-----第三方 ImageLoader 的简单配置和使用
ImageLoader 的简单使用配置,最好是将配置信息放到application里面,这样我们就不需要每次使用都需要配置了 1.首先我们得有一个包 2.简单的配置信息 //显示图片的配置 Displ ...
- bzoj 1269 [AHOI2006]文本编辑器editor
原题链接:http://www.lydsy.com/JudgeOnline/problem.php?id=1269 伸展树的运用,如下: #include<cstdio> #include ...
- ECMAScript5
张鑫旭:ECMAScript5介绍 淘宝整理的es5-safe /********* It provides the following methods: Function.prototype.bin ...
- Swift 1.2 正式发布 - 带来很多重大改进
Swift 1.2 随着 Xcode 6.3 Beta 正式发布了.这次的 beta 发布包含了对 Swift 编译器显著的改进.还有对 Swift 语言本身的新特性的增加.这篇文章介绍下主要部分. ...
- 12.Warning (15714): Some pins have incomplete I/O assignments. Refer to the I/O Assignment Warnings report for details
解释:对于一些管脚,缺少了部分描述,需要再添加一些设置,比如current strength,slew rate等: 措施:打开pin plannel界面,在current strength和slew ...