[转]NopCommerce之视图设计
本文转自:http://blog.csdn.net/hygx/article/details/7324452
Designer's Guide
Contents
- Overview 概述
- Installing / Applying theme in nopCommerce 安装保存主题
- Creating / Writing your own theme (using current / default theme) 开发自己的主题文件(使用已有的或默认的皮肤主题)。
- Understanding Layout / Design 了解、设计布局
- Customizing nopCommerce Themes 商城主题客户化订制。
- Widgets 工具插件
- Tips and Tricks 要诀技巧
- Contributing a Theme 主题贡献捐赠。
Overview概述:
What is a theme?什么是主题
A theme is a collection of property settings that allow you to define the look of pages and controls, and then apply the look consistently across pages in a Web application, across an entire Web application, or across all Web applications on a server.
Themes are made up of a set of elements: skins, cascading style sheets (CSS), images, and other resources. At a minimum, a theme will contain skins. Themes are defined in special directories in your Web site or on your Web server.
A theme can also include a cascading style sheet (.CSS file). When you put a .CSS file in the theme folder, the style sheet is applied automatically as part of the theme. You define a style sheet using the file name extension .CSS in the theme folder. (Source: http://msdn.microsoft.com)
Definition of a nopCommerce theme 系统已有的主题
A nopCommerce theme is basically used for having a consistent layout and appearance across all pages or an entire website. nopCommerce theme consists of several supporting files, including style sheets for page appearance and supporting images.
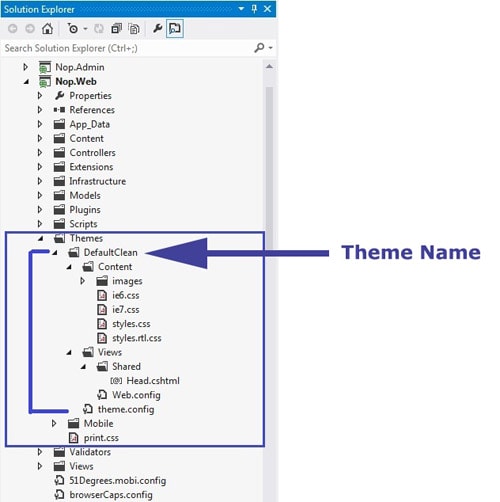
The file structure of a nopCommerce theme is as follows:
Location of theme(s) in nopCommerce
In your nopCommerce root folder/Themes/... HERE you will see the list of all themes installed.
See figure below:
Installing / Applying theme in nopCommerce安装保存主题
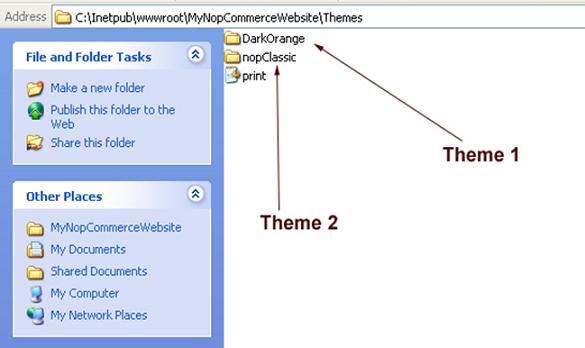
Let's assume you just downloaded a new theme which is in a zip file.
Now, extract the contents of your zip file and copy it under "Themes" folder like shown in the figure below:
现在,提取压缩文件内容复制到主题文件夹内如下图示:
(Make sure all the files/folders inside the Your_Theme_Name folder are in proper order – You can match it with the first figure above)
确保所有的文件和文件夹都在新建的主题文件夹内,可以和已有的主题文件对比下。

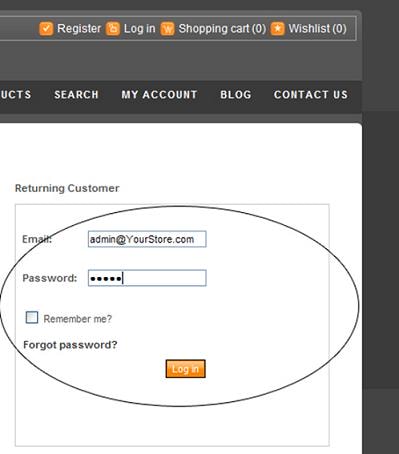
Now login to your website using admin credentials:
现在用管理员身份登录到你的网站
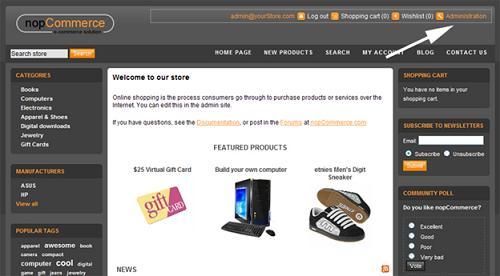
Go to the admin section (www.yourdomain.com/admin):
到后台管理区。
Go to Configuration > Settings > General And Miscellaneous settings
到 配置 -》设定-》一般与杂项设定
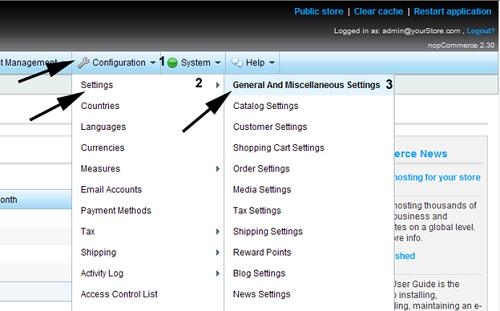
Go to 1st tab "Store Information" > See 4th option: "Store theme" - Select new theme from dropdown and SAVE
到第一个 表 “商城信息” 看第四个选项 商城主题 ,在下拉列表中选择新主题 并保存。
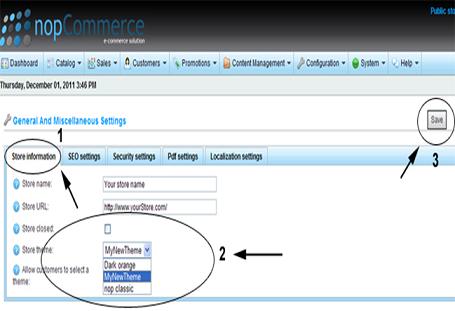
Now, go to public store > you should be able to see the new theme on your website. 现在可以去前台,可以看到新主题已经生效。
Creating / Writing your own theme (using current / default theme) 创建自己的主题
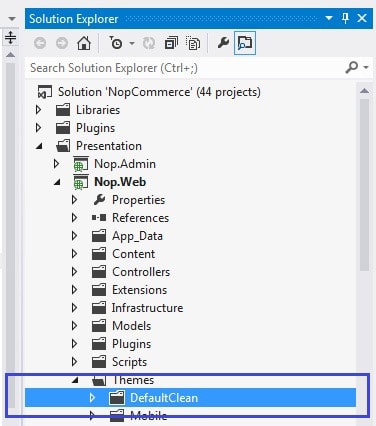
Open your nopCommerce solution or website (web version) in Visual Studio - Go to this location:
- If using sourcecode: \Nop.Web\Themes\
- If using web version: \[Project Root]\Themes\
Select any default / current theme
Now, Right click on the theme > select COPY
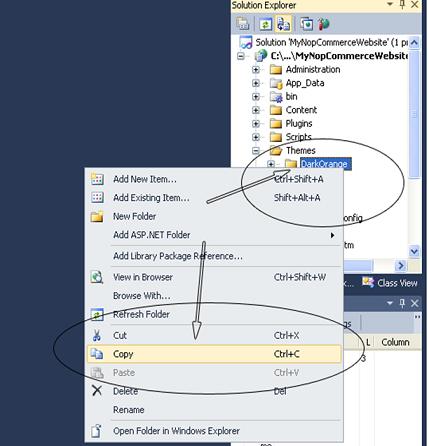
Now select "Theme" folder > right click > PASTE
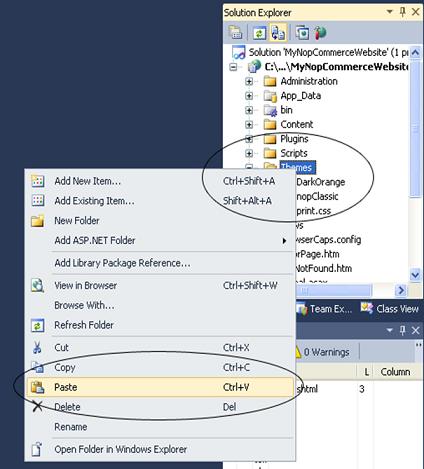
You will get something like "Copy of default/current theme"
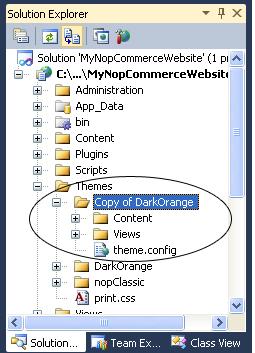
Rename it - whatever you like to be the name of your new theme – For an instance, let's say: MyNewTestTheme

Now inside your New theme folder "MyNewTestTheme" > open "theme.config" - Change the current / existing theme name with your new theme name "MyNewTestTheme"
<?xml version="1.0" encoding="utf-8" ?>

<Theme title="MyNewTestTheme"

       previewImageUrl="~/Themes/MyNewTestTheme/preview.png"

       previewText="This is the 'MyNewTestTheme' site theme.">

</Theme>
Like this:

Now inside your new theme folder "MyNewTestTheme" > View > Shared > open "Head.chtml" - Change the current / existing theme name with your new theme name "MyNewTestTheme"
@using Nop.Core

@using Nop.Core.Infrastructure

@using Nop.Web.Framework;

@{

    var supportRtl = EngineContext.Current.Resolve<IWorkContext>().WorkingLanguage.Rtl;

}

@if (supportRtl)

{

    //this theme supports RTL

    <link href="@Html.ResolveUrl("~/Themes/MyNewTestTheme/Content/styles.rtl.css")" rel="stylesheet" type="text/css" />

}

else

{

    <link href="@Html.ResolveUrl("~/Themes/MyNewTestTheme/Content/styles.css")" rel="stylesheet" type="text/css" />

}
Like this:
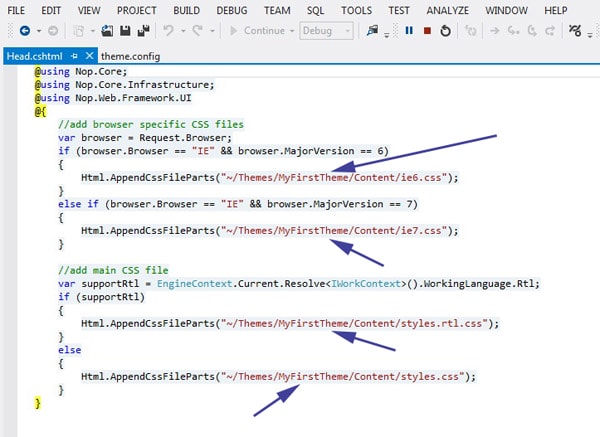
Now, inside your new theme folder "MyNewTestTheme" > Content > Images add your new images in "images” directory and start updating / customizing your style.css according to your requirements.
If you would like to test the changes > Go to Admin section > Apply your new theme > Save change and preview your public store.
Understanding Layout / Design布局设计
What are layouts? Every web developer / designer wants to maintain a consistent look and feel across all of the pages within the website. Back in the days, the concept of "Master Pages" was introduced in ASP.NET 2.0 which helps in maintaining a consistent look of the website by mapping it with .aspx pages.
Razor also supports this similar concept with a feature called "Layouts". Basically, it allows you to define a common site template and then inherit its look and feel across all the views/pages on your website.
In nopCommerce, there are 3 different kinds of layouts:
- _ColumnsOne.cshtml
- _ColumnsTwo.cshtml
- _ColumnsThree.cshtml
All these 3 layouts are inherited from one main layout called: _Root.cshtml. The location of all these layouts in nopCommerce is as follows: nopCommerce root directory/Views/Shared/... . If you are using source code version then: \Presentation\Nop.Web\Views\Shared\...
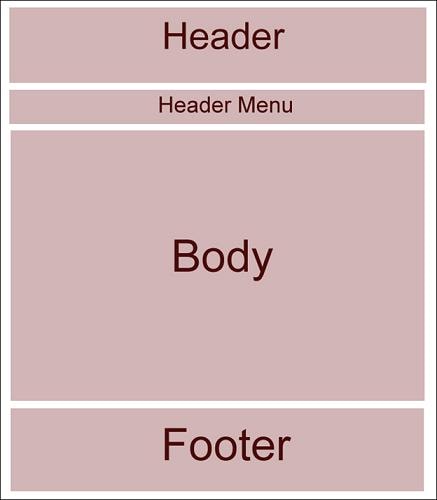
Layout of _Root.cshtml
Layout of _Root.cshtml (in respect of css class)
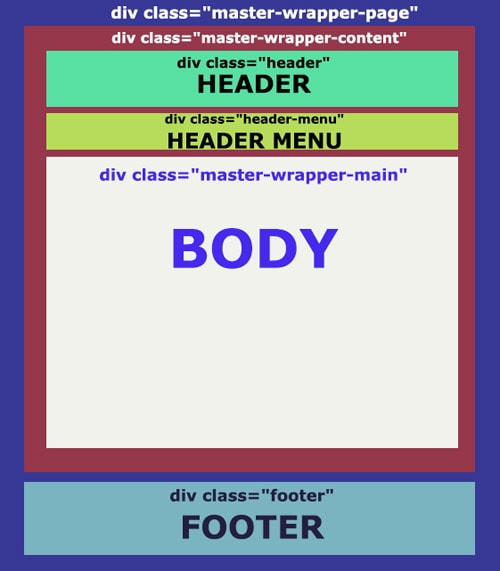
Now the following 3 layouts override the body of _Root.cshtml:
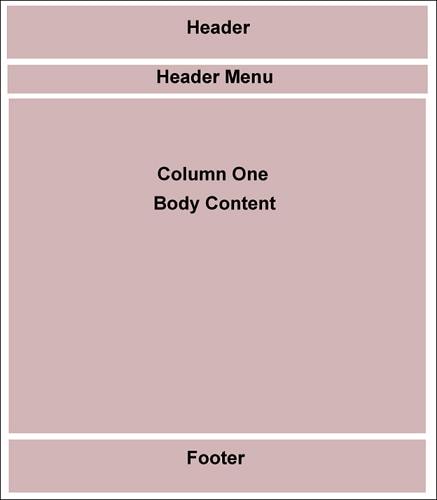
_ColumnsOne.cshtml
In this case, there is no change in the layout of the body, so the structure remains pretty much the same as _Root.cshtml:
_ColumnsTwo.cshtml
In this case, there are 2 columns in the body structure:
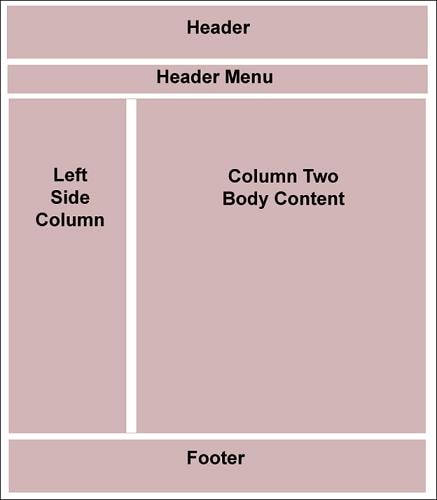
_ColumnTwo.cshml Layout (Content Blocks)
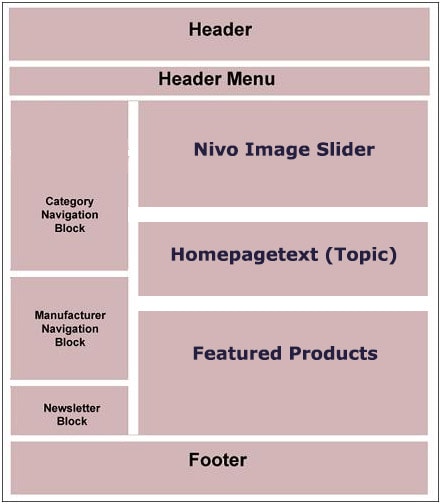
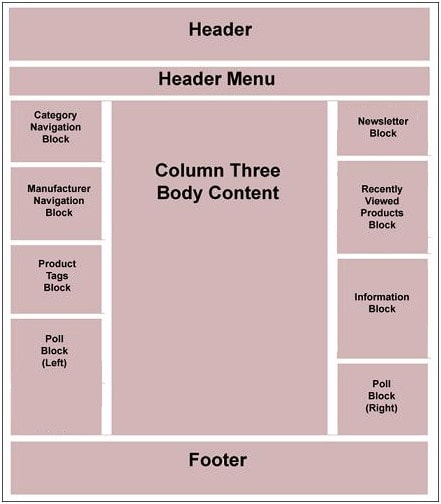
_ColumnsThree.cshml Layout
In this case, there are 3 columns in the body structure:

_ColumnThree.cshml Layout (Content Blocks)
Customizing nopCommerce Themes 客户订制主题
Uploading your store logo
In order to upload your store logo in a nopCommerce website, there are basically 2 methods:
First Method
- Go to nopCommerce root folder /Themes/YOUR THEME/Content/images/
- Look for logo.gif image file
- Replace the logo.gif with your store logo and name it as logo.gif (with same width:225px and height:60px)
Second Method
- Save your store logo in this location : nopCommerce root folder/Themes/YOUR THEME/Content/images/
- Go to nopCommerce root folder/Themes/YOUR THEME/Content/
- Open style sheet: style.css
- Look for the css class "a.logo" and you will find this:
a.logo{background:url(images/logo.gif);display:block;width:225px;height:60px;text-decoration:none;}In the above mentioned css code: logo.gif is the name of the store logo image file
- Change logo.gif with YourLogo.gif/jpg/png (and specify the width and height of your new logo)
- Save changes to your style sheet (style.css) and preview your public store
Important: You might have to refresh the browser or delete history or cookies of your browser in order to see the changes (new store logo).
How to change a layout 如何改变布局
If you would like to customize / make changes in the base layout (i.e. _Root.cshtml) of your nopCommerce website. Please look for this css code in your style.css
.master-wrapper-page{margin:10px auto;width:960px;}

.master-wrapper-content{float:left;width:960px;margin:15px 0 0;text-align:left;background:#555 url(images/bg_container.gif) repeat-x;}
If you would like to customize / make changes in the layout of _ColumnOne.cshtml. Please look for this css code in your style.css
/* one column master page */

.master-wrapper-center-1{float:left;width:960px;background:url(images/bg_maincolumn_1.gif) no-repeat left top #FFF;display:inline;}

.master-wrapper-cph-1{float:left;width:940px;color:#000;min-height:600px;padding:10px;}
If you would like to customize / make changes in the layout of _ColumnTwo.cshtml. Please look for this css code in your style.css
/* two column master page */

.master-wrapper-side-2{float:left;width:180px;margin:0 0 0 10px;font-family:arial, helvetica, sans-serif;display:inline;}

.master-wrapper-center-2{float:left;width:760px;margin:0 0 0 10px;background:url(images/bg_maincolumn_2.gif) no-repeat left top #FFF;display:inline;}

.master-wrapper-cph-2{float:left;width:740px;color:#000;min-height:600px;padding:10px;}
If you would like to customize /make changes in the layout of _ColumnThree.cshtml. Please look for this css code in your style.css
/* three column master page */
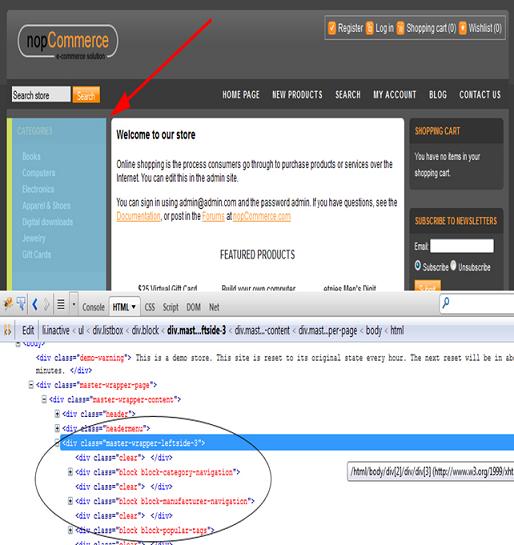
.master-wrapper-leftside-3{float:left;width:180px;margin:0 0 0 10px;font-family:arial, helvetica, sans-serif;display:inline;}
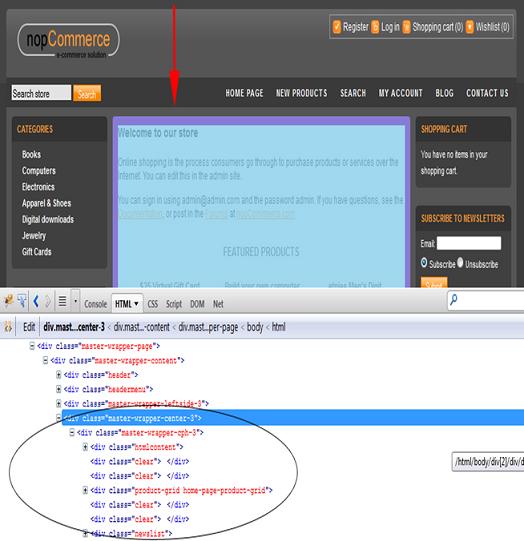
.master-wrapper-center-3{float:left;width:560px;margin:0 0 0 10px;background:url(images/bg_maincolumn_3.gif) no-repeat left top #FFF;display:inline;}
.master-wrapper-cph-3{float:left;width:540px;color:#000;min-height:600px;padding:10px;}
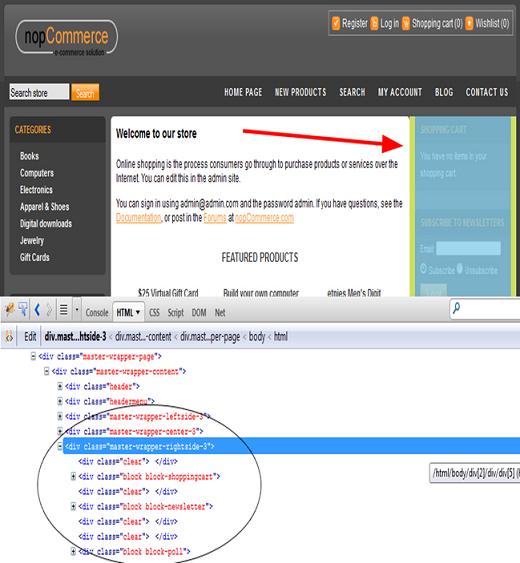
.master-wrapper-rightside-3{float:right;width:180px;margin:0 10px;font-family:arial, helvetica, sans-serif;display:inline;}
.master-wrapper-fluid-content{height:1%;margin:0;overflow:hidden;padding:0;}
.master-wrapper-fluid-content-inner{overflow:hidden;width:100%;padding:0 10px;}
.master-wrapper-fluid-content-left .master-wrapper-fluid-content-sidebar{float:left;overflow:hidden;padding-right:20px;margin-left:10px;width:180px;font-family:arial, helvetica, sans-serif;}
.master-wrapper-fluid-content-right .master-wrapper-fluid-content-sidebar{float:right;overflow:hidden;padding-left:20px;margin-right:10px;width:180px;font-family:arial, helvetica, sans-serif;}
3) Overview of important CSS classes of your nopCommerce website that you can easily find in your theme style sheet (style.css)
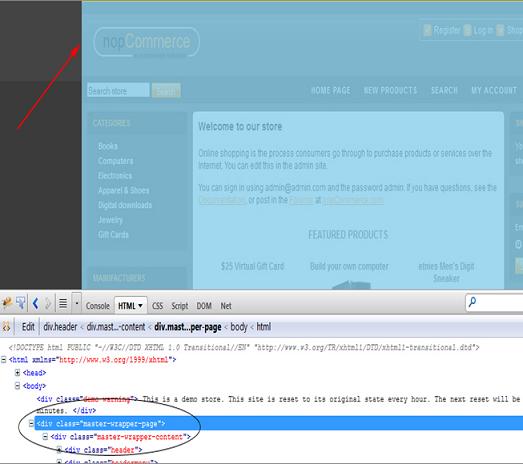
master-wrapper-page
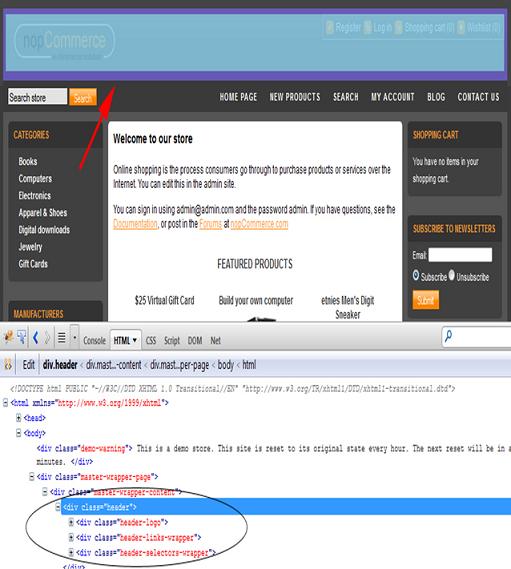
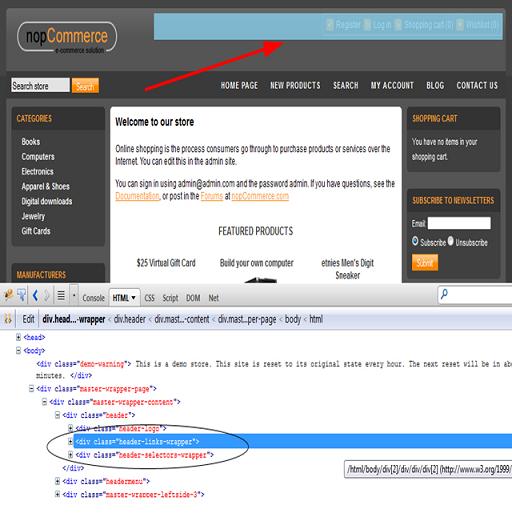
header
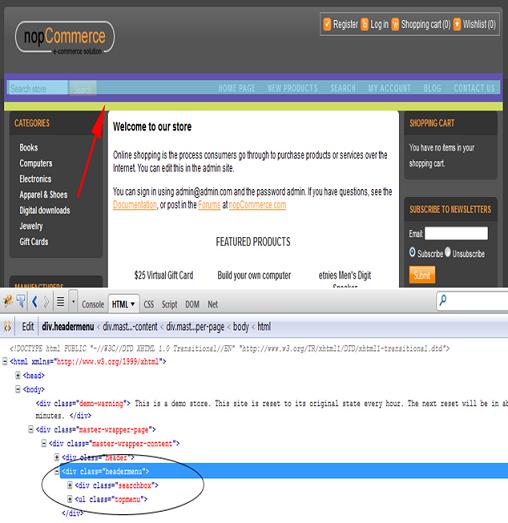
headermenu
header-links-wrapper
master-wrapper-leftside-3
master-wrapper-rightside-3
master-wrapper-center-3
Widgets
A widget is a stand-alone application that can be embedded into third party sites by any user on a page. It's a small application that can be installed and executed within a web page by an end user. (Wikipedia).
In nopCommerce, a widget plugin allows you to embed 3rd party code / application in public store in certain areas (for example, head tag, after body tag, left column block and right column block).
Currently, default nopCommerce installation allows the store admin to embed two widget plugins:
- Live person (Chat) Widget
- Google Analytics Widget
Live person (Chat) Widget
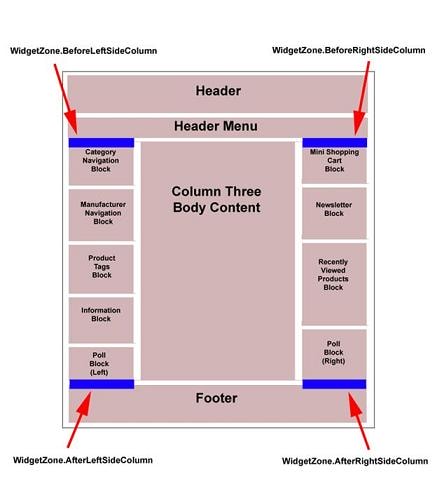
Allows store owner to provide live chat support on the website (public store). This widget block can be rendered at 4 different zones:
- WidgetZone.BeforeLeftSideColumn
- WidgetZone.AfterLeftSideColumn
- WidgetZone.BeforeRightSideColumn
- WidgetZone.AfterRightSideColumn
Useful Information: We can also create a lot of other widgets like: Facebook or Twitter Like button, Google + button etc. If a store owner is not making use of "Live Chat" widget then it can be renamed and could be used for other 3rd party widgets like: Facebook or Twitter Like button, Google + button etc.
Google Analytics Widget
Google Analytics is a free website stats tool from Google. It keeps track of statistics about the visitors and ecommerce conversion on your website. This widget block can be rendered at:
- HTML Header tag
- After <body> end HTML tag.
Tips and Tricks 要诀技巧
- One of the major issues in web development / designing is that different browsers use different default values for various CSS properties. While customizing or creating your own them – Always make sure that your styling is compatible with all the browsers. Test your website in major browsers like IE, Mozilla, Opera, Safari and Chrome.
- 一个重要的问题是,不同的浏览器,有不同CSS解析(属性赋值),使得我们在创建主题要确保他们完全适合所有浏览器,在自己的网站测试比如IE,火狐,Opera,Safari ,谷歌浏览器等。
- While working with CSS style sheets, if you don't see any change on your website – Do not panic. Try deleting history and cookies of your browser and then try again by refreshing your page.
- 当更改CSS样式表后,如果没有发现网站的任何变化,不要惊慌,尝试删除浏览器历史和COOKIES, 然后再刷新页面测试。
- Make sure you understand the difference between: id and classes. You can apply classes to multiple elements, while ids refer to only one element.
- 确保你理解ID和CLASSES的不同,你可以让CLASSES 对应多个元素,而ID指向的仅仅是一个元素,
- Make use of Firebug Add-on plug-in offered by Mozilla. It is a very useful tool which allows you to edit, debug, and monitor CSS, HTML, and JavaScript live in any web page. You can download it from here: http://getfirebug.com/
- 利用火狐浏览器提供的Firebug插件可以测试编辑监控CSS/HTML JAVASCRIPT 等任何页面。可以点击上面网址下载 http://getfirebug.com/。
- CSS style sheets does not allow you to start the name of your ids and classes with a number or other non-alphabetical character.
- CSS样式表不允许以数字或字母字符开头命名。
- Do not limit yourself to span and div tags only. There are a lot of other / better features offers by CSS to style a page.
- 不要仅局限于SPAN 和DIV 标签。还有很多其他CSS提供的好的有特色的标签来设计页面。
Contributing a Theme 捐献主题。
nopCommerce is supported by a very active community. So, any kind of contribution is highly appreciated.
You can now share your theme with other users by Extensions section of nopCommerce website.
Just go to My account page, then "Your contributions and extensions" tab. Click "Upload a new extension" button in order to upload a new theme.
[转]NopCommerce之视图设计的更多相关文章
- BITED-Windows8应用开发学习札记之二:Win8应用常用视图设计
感觉自我表述能力有欠缺,技术也不够硬,所以之后的Windows8应用开发学习札记的文章就偏向于一些我认为较难的地方和重点了多有抱歉. 上节课是入门,这节课就已经开始进行视图设计了. Windows应用 ...
- 微信小程序开发系列二:微信小程序的视图设计
大家如果跟着我第一篇文章 微信小程序开发系列一:微信小程序的申请和开发环境的搭建 一起动手,那么微信小程序的开发环境一定搭好了.效果就是能把该小程序的体验版以二维码的方式发送给其他朋友使用. 这个系列 ...
- 第十章 Odoo 12开发之后台视图 - 设计用户界面
本文将学习如何为用户创建图形化界面来与图书应用交互.我们将了解不同视图类型和小组件(widgets)之间的差别,以及如何使用它们来提供更优的用户体验. 本文主要内容有: 菜单项 窗口操作(Window ...
- 潭州课堂25班:Ph201805201 django 项目 第八课 注册功能分析,图片验证码视图设计 (课堂笔记)
1,用户名 是否已注册 2,手机号 是否被注册 3,图形验证码 4,短信验证码, 5,验证成功后,向后台提交数据:用户名,密码,手机号,短信验证 要写这五个视图, 获取图形验证码,请求方式:g ...
- Odoo10学习笔记三:模型(结构化的应用数据)、视图(用户界面设计)
转载请注明原文地址:https://www.cnblogs.com/ygj0930/p/11189263.html 一:模型 [Odoo中,一切皆模型,连视图都是模型.Odoo将各种数据,如:权限数据 ...
- SAP CRM 复用视图
在设计任何视图或组件的时候,我们需要以可复用的方式来设计它.UI组件设计的主要目标即可复用. 例如:几乎每个事务都要处理合作伙伴(客户).如果我们想要在Web UI显示那些合作伙伴,需要设计一个视图. ...
- Apple、Google、Microsoft的用户体验设计原则
轻巧的Apple 注重设计过程: 在设计过程中引入用户交互的5个目标: 了解您的目标客户 分析用户的工作流 构造原型系统 观察用户测试 制定观察用户准则 做出设计决定 避免功能泛滥 80% 方案 优秀 ...
- mysql之对视图的操作
1. 为什么要使用视图? 为了提高复杂SQL语句的复用性和表操作的安全性,MySQL数据库管理系统提供了视图特性.所谓视图,本质上是一种虚拟表,在物理上是不存在的,其内容与真实的表相似,包含一系列带有 ...
- SQL Server 索引视图 聚簇索引
创建示例: 朋友的网站速度慢,让我帮忙看下,他用的SQL Server里面 有一个文章表里面有30多万条记录 还有一个用户表里面也差不多17万记录 偏偏当初设计的时候没有冗余字段 很多帖子信息需要JO ...
随机推荐
- jQuery ajax序列化函数
参数序列化$.param() 举例: <!DOCTYPE html> <html> <head> <script src="https://ajax ...
- 使用diskpart命令修复U盘分区
前段时间在论坛上讨论封装PE到u盘里热闹的,就想自己也封装一个,随便下载了一个WIN7的PE封装后发现还不错,本来就是做测试用的,测试完了就想把u盘在恢复成以前的样子,可是发现恢复并不是这么容易 如下 ...
- hex2bin
typedef BYTE unsigned char; </pre><pre code_snippet_id="1639451" snippet_file_nam ...
- Android Studio 生成APK出现的「前言不允许有内容」错误
Build-Generate Signed APK的时候发现提示「前言不允许有内容」.发现提示的是Android.mk.xxxjni.c存在问题. 解决方法是,把/main/res中的,包括/jni目 ...
- 快速沃尔什变换(FWT)学习笔记 + 洛谷P4717 [模板]
FWT求解的是一类问题:\( a[i] = \sum\limits_{j\bigoplus k=i}^{} b[j]*c[k] \) 其中,\( \bigoplus \) 可以是 or,and,xor ...
- TX1 Gsteramer 环境配置
安装命令: sudo add-apt-repository universe sudo add-apt-repository multiverse sudo apt-get update -tools ...
- GMap.NET 显示GIF图标的定制
利用System.Drawing.ImageAnimator类实现GIF图标显示 public class GMapMarkerImage : GMapMarker { private Image i ...
- 蓝桥杯校内选拔赛/POJ 数独(深搜)
Sudoku Time Limit: 2000MS Memory Limit: 65536K Total Submissions: 14530 Accepted: 7178 Special ...
- CSS:CSS 合法颜色值
ylbtech-CSS:CSS 合法颜色值 1.返回顶部 1. CSS 颜色 可以用以下方法来规定 CSS 中的颜色: 十六进制色 RGB 颜色 RGBA 颜色 HSL 颜色 HSLA 颜色 预定义/ ...
- docker容器firewalld端口转发规则
docker容器firewalld端口转发规则 1.配置firewalld端口转发,要先打开端口转发,则需要先 #firewall-cmd --zone=public --add-maspuerade ...