体验SRCNN和FSRCNN两种图像超分网络应用
摘要:图像超分即超分辨率,将图像从模糊的状态变清晰。
本文分享自华为云社区《图像超分实验:SRCNN/FSRCNN》,作者:zstar。
图像超分即超分辨率,将图像从模糊的状态变清晰。本文对BSDS500数据集进行超分实验。
1.实验目标
输入大小为h×w的图像X,输出为一个sh×sw的图像 Y,s为放大倍数。
2.数据集简介
本次实验采用的是 BSDS500 数据集,其中训练集包含 200 张图像,验证集包含 100 张图像,测试集包含 200 张图像。
数据集来源:https://download.csdn.net/download/weixin_42028424/11045313
3.数据预处理
数据预处理包含两个步骤:
(1)将图片转换成YCbCr模式
由于RGB颜色模式色调、色度、饱和度三者混在一起难以分开,因此将其转换成 YcbCr 颜色模式,Y是指亮度分量,Cb表示 RGB输入信号蓝色部分与 RGB 信号亮度值之间的差异,Cr 表示 RGB 输入信号红色部分与 RGB 信号亮度值之间的差异。
(2)将图片裁剪成 300×300 的正方形
由于后面采用的神经网路输入图片要求长宽一致,而 BSDS500 数据集中的图片长宽并不一致,因此需要对其进行裁剪。这里采用的方式是先定位到每个图片中心,然后以图片中心为基准,向四个方向拓展 150 个像素,从而将图片裁剪成 300×300 的正方形。
相关代码:
def is_image_file(filename):

    return any(filename.endswith(extension) for extension in [".png", ".jpg", ".jpeg"])

def load_img(filepath):

    img = Image.open(filepath).convert('YCbCr')

    y, _, _ = img.split()

    return y

CROP_SIZE = 300

class DatasetFromFolder(Dataset):

    def __init__(self, image_dir, zoom_factor):

        super(DatasetFromFolder, self).__init__()

        self.image_filenames = [join(image_dir, x)

                                for x in listdir(image_dir) if is_image_file(x)]

        crop_size = CROP_SIZE - (CROP_SIZE % zoom_factor)

        # 从图片中心裁剪成300*300

        self.input_transform = transforms.Compose([transforms.CenterCrop(crop_size),

                                                   transforms.Resize(

                                                       crop_size // zoom_factor),

                                                   transforms.Resize(

                                                       crop_size, interpolation=Image.BICUBIC),

                                                   # BICUBIC 双三次插值

                                                   transforms.ToTensor()])

        self.target_transform = transforms.Compose(

            [transforms.CenterCrop(crop_size), transforms.ToTensor()])

    def __getitem__(self, index):

        input = load_img(self.image_filenames[index])

        target = input.copy()

        input = self.input_transform(input)

        target = self.target_transform(target)

        return input, target

    def __len__(self):

        return len(self.image_filenames)
4.网络结构
本次实验尝试了SRCNN和FSRCNN两个网络。
4.1 SRCNN
SRCNN 由 2014 年 Chao Dong 等人提出,是深度学习在图像超分领域的开篇之作。其网络结构如下图所示:
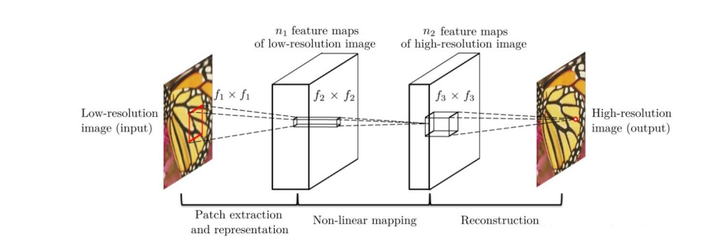
该网络对于一个低分辨率图像,先使用双三次插值将其放大到目标大小,再通过三层卷积网络做非线性映射,得到的结果作为高分辨率图像输出。
作者对于这三层卷积层的解释:
(1)特征块提取和表示:此操作从低分辨率图像Y中提取重叠特征块,并将每个特征块表示为一个高维向量。这些向量包括一组特征图,其数量等于向量的维数。
(2)非线性映射:该操作将每个高维向量非线性映射到另一个高维向量。每个映射向量在概念上都是高分辨率特征块的表示。这些向量同样包括另一组特征图。
(3)重建:该操作聚合上述高分辨率patch-wise(介于像素级别和图像级别的区域)表示,生成最终的高分辨率图像。
各层结构:
- 输入:处理后的低分辨率图像
- 卷积层 1:采用 9×9 的卷积核
- 卷积层 2:采用 1×1 的卷积核
- 卷积层 3:采用 5×5 的卷积核
- 输出:高分辨率图像
模型结构代码:
class SRCNN(nn.Module):

    def __init__(self, upscale_factor):

        super(SRCNN, self).__init__()

        self.relu = nn.ReLU()

        self.conv1 = nn.Conv2d(1, 64, kernel_size=5, stride=1, padding=2)

        self.conv2 = nn.Conv2d(64, 64, kernel_size=3, stride=1, padding=1)

        self.conv3 = nn.Conv2d(64, 32, kernel_size=3, stride=1, padding=1)

        self.conv4 = nn.Conv2d(32, upscale_factor ** 2,

                               kernel_size=3, stride=1, padding=1)

        self.pixel_shuffle = nn.PixelShuffle(upscale_factor)

        self._initialize_weights()

    def _initialize_weights(self):

        init.orthogonal_(self.conv1.weight, init.calculate_gain('relu'))

        init.orthogonal_(self.conv2.weight, init.calculate_gain('relu'))

        init.orthogonal_(self.conv3.weight, init.calculate_gain('relu'))

        init.orthogonal_(self.conv4.weight)

    def forward(self, x):

        x = self.conv1(x)

        x = self.relu(x)

        x = self.conv2(x)

        x = self.relu(x)

        x = self.conv3(x)

        x = self.relu(x)

        x = self.conv4(x)

        x = self.pixel_shuffle(x)

        return x
4.2 FSRCNN
FSRCNN 由 2016 年 Chao Dong 等人提出,与 SRCNN 是相同作者。其网络结构如下图所示:
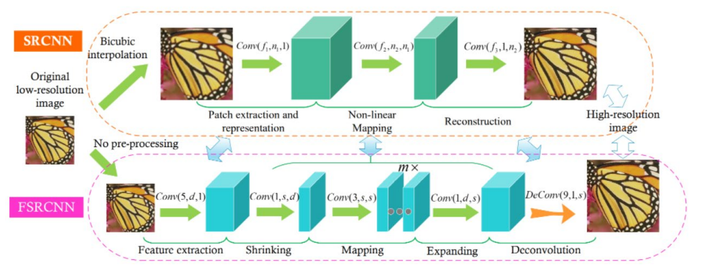
FSRCNN在SRCNN基础上做了如下改变:
1.FSRCNN直接采用低分辨的图像作为输入,不同于SRCNN需要先对低分辨率的图像进行双三次插值然后作为输入;
2.FSRCNN在网络的最后采用反卷积层实现上采样;
3.FSRCNN中没有非线性映射,相应地出现了收缩、映射和扩展;
4.FSRCNN选择更小尺寸的滤波器和更深的网络结构。
各层结构:
- 输入层:FSRCNN不使用bicubic插值来对输入图像做上采样,它直接进入特征提取层
- 特征提取层:采用1 × d × ( 5 × 5 )的卷积层提取
- 收缩层:采用d × s × ( 1 × 1 ) 的卷积层去减少通道数,来减少模型复杂度
- 映射层:采用s × s × ( 3 × 3 ) 卷积层去增加模型非线性度来实现LR → SR 的映射
- 扩张层:该层和收缩层是对称的,采用s × d × ( 1 × 1 ) 卷积层去增加重建的表现力
- 反卷积层:s × 1 × ( 9 × 9 )
- 输出层:输出HR图像
模型结构代码:
class FSRCNN(nn.Module):

    def __init__(self, scale_factor, num_channels=1, d=56, s=12, m=4):

        super(FSRCNN, self).__init__()

        self.first_part = nn.Sequential(

            nn.Conv2d(num_channels, d, kernel_size=5, padding=5//2),

            nn.PReLU(d)

        )

        self.mid_part = [nn.Conv2d(d, s, kernel_size=1), nn.PReLU(s)]

        for _ in range(m):

            self.mid_part.extend([nn.Conv2d(s, s, kernel_size=3, padding=3//2), nn.PReLU(s)])

        self.mid_part.extend([nn.Conv2d(s, d, kernel_size=1), nn.PReLU(d)])

        self.mid_part = nn.Sequential(*self.mid_part)

        self.last_part = nn.ConvTranspose2d(d, num_channels, kernel_size=9, stride=scale_factor, padding=9//2,

                                            output_padding=scale_factor-1)

        self._initialize_weights()

    def _initialize_weights(self):

        for m in self.first_part:

            if isinstance(m, nn.Conv2d):

                nn.init.normal_(m.weight.data, mean=0.0, std=math.sqrt(2/(m.out_channels*m.weight.data[0][0].numel())))

                nn.init.zeros_(m.bias.data)

        for m in self.mid_part:

            if isinstance(m, nn.Conv2d):

                nn.init.normal_(m.weight.data, mean=0.0, std=math.sqrt(2/(m.out_channels*m.weight.data[0][0].numel())))

                nn.init.zeros_(m.bias.data)

        nn.init.normal_(self.last_part.weight.data, mean=0.0, std=0.001)

        nn.init.zeros_(self.last_part.bias.data)

    def forward(self, x):

        x = self.first_part(x)

        x = self.mid_part(x)

        x = self.last_part(x)

        return x
5.评估指标
本次实验尝试了 PSNR 和 SSIM 两个指标。
5.1 PSNR
PSNR(Peak Signal to Noise Ratio)为峰值信噪比,计算公式如下:
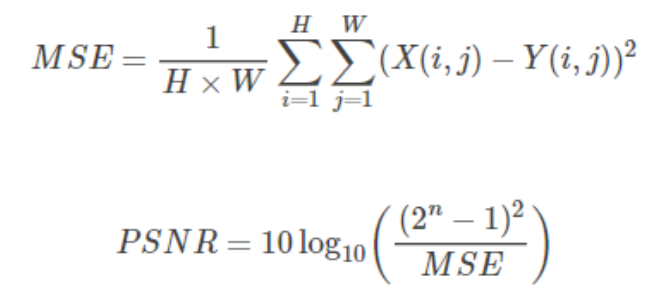
其中,n为每像素的比特数。
PSNR 的单位是dB,数值越大表示失真越小,一般认为 PSNR 在 38 以上的时候,人眼就无法区分两幅图片了。
相关代码:
def psnr(loss):

    return 10 * log10(1 / loss.item())
5.2 SSIM
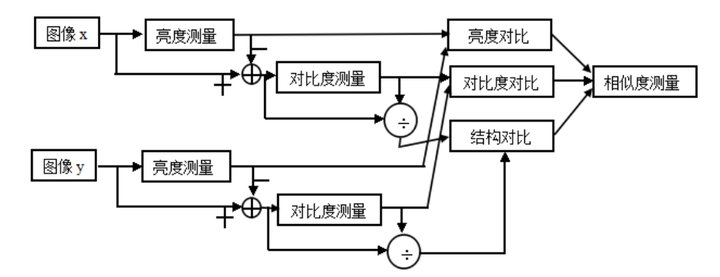
SSIM(Structural Similarity)为结构相似性,由三个对比模块组成:亮度、对比度、结构。
亮度对比函数
图像的平均灰度计算公式:

亮度对比函数计算公式:

对比度对比函数
图像的标准差计算公式:

对比度对比函数计算公式:

结构对比函数
结构对比函数计算公式:
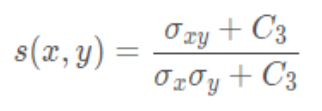
综合上述三个部分,得到 SSIM 计算公式:

其中,\alphaα,\betaβ,\gammaγ > 0,用来调整这三个模块的重要性。
SSIM 函数的值域为[0, 1], 值越大说明图像失真越小,两幅图像越相似。
相关代码:
由于pytorch没有类似tensorflow类似tf.image.ssim这样计算SSIM的接口,因此根据公式进行自定义函数用来计算
"""

计算ssim函数

"""

# 计算一维的高斯分布向量

def gaussian(window_size, sigma):

    gauss = torch.Tensor(

        [exp(-(x - window_size//2)**2/float(2*sigma**2)) for x in range(window_size)])

    return gauss/gauss.sum()

# 创建高斯核,通过两个一维高斯分布向量进行矩阵乘法得到

# 可以设定channel参数拓展为3通道

def create_window(window_size, channel=1):

    _1D_window = gaussian(window_size, 1.5).unsqueeze(1)

    _2D_window = _1D_window.mm(

        _1D_window.t()).float().unsqueeze(0).unsqueeze(0)

    window = _2D_window.expand(

        channel, 1, window_size, window_size).contiguous()

    return window

# 计算SSIM

# 直接使用SSIM的公式,但是在计算均值时,不是直接求像素平均值,而是采用归一化的高斯核卷积来代替。

# 在计算方差和协方差时用到了公式Var(X)=E[X^2]-E[X]^2, cov(X,Y)=E[XY]-E[X]E[Y].

def ssim(img1, img2, window_size=11, window=None, size_average=True, full=False, val_range=None):

    # Value range can be different from 255. Other common ranges are 1 (sigmoid) and 2 (tanh).

    if val_range is None:

        if torch.max(img1) > 128:

            max_val = 255

        else:

            max_val = 1

        if torch.min(img1) < -0.5:

            min_val = -1

        else:

            min_val = 0

        L = max_val - min_val

    else:

        L = val_range

    padd = 0

    (_, channel, height, width) = img1.size()

    if window is None:

        real_size = min(window_size, height, width)

        window = create_window(real_size, channel=channel).to(img1.device)

    mu1 = F.conv2d(img1, window, padding=padd, groups=channel)

    mu2 = F.conv2d(img2, window, padding=padd, groups=channel)

    mu1_sq = mu1.pow(2)

    mu2_sq = mu2.pow(2)

    mu1_mu2 = mu1 * mu2

    sigma1_sq = F.conv2d(img1 * img1, window, padding=padd,

                         groups=channel) - mu1_sq

    sigma2_sq = F.conv2d(img2 * img2, window, padding=padd,

                         groups=channel) - mu2_sq

    sigma12 = F.conv2d(img1 * img2, window, padding=padd,

                       groups=channel) - mu1_mu2

    C1 = (0.01 * L) ** 2

    C2 = (0.03 * L) ** 2

    v1 = 2.0 * sigma12 + C2

    v2 = sigma1_sq + sigma2_sq + C2

    cs = torch.mean(v1 / v2)  # contrast sensitivity

    ssim_map = ((2 * mu1_mu2 + C1) * v1) / ((mu1_sq + mu2_sq + C1) * v2)

    if size_average:

        ret = ssim_map.mean()

    else:

        ret = ssim_map.mean(1).mean(1).mean(1)

    if full:

        return ret, cs

    return ret

class SSIM(torch.nn.Module):

    def __init__(self, window_size=11, size_average=True, val_range=None):

        super(SSIM, self).__init__()

        self.window_size = window_size

        self.size_average = size_average

        self.val_range = val_range

        # Assume 1 channel for SSIM

        self.channel = 1

        self.window = create_window(window_size)

    def forward(self, img1, img2):

        (_, channel, _, _) = img1.size()

        if channel == self.channel and self.window.dtype == img1.dtype:

            window = self.window

        else:

            window = create_window(self.window_size, channel).to(

                img1.device).type(img1.dtype)

            self.window = window

            self.channel = channel

        return ssim(img1, img2, window=window, window_size=self.window_size, size_average=self.size_average)
6.模型训练/测试
设定 epoch 为 500 次,保存验证集上 PSNR 最高的模型。两个模型在测试集上的表现如下表所示:

从结果可以发现,FSRCNN 的 PSNR 比 SRCNN 低,但 FSRCNN 的 SSIM 比 SRCNN 高,说明 PSNR 和 SSIM 并不存在完全正相关的关系。
训练/验证代码:
model = FSRCNN(1).to(device)

criterion = nn.MSELoss()

optimizer = optim.Adam(model.parameters(), lr=1e-2)

scheduler = MultiStepLR(optimizer, milestones=[50, 75, 100], gamma=0.1)

best_psnr = 0.0

for epoch in range(nb_epochs):

    # Train

    epoch_loss = 0

    for iteration, batch in enumerate(trainloader):

        input, target = batch[0].to(device), batch[1].to(device)

        optimizer.zero_grad()

        out = model(input)

        loss = criterion(out, target)

        loss.backward()

        optimizer.step()

        epoch_loss += loss.item()

    print(f"Epoch {epoch}. Training loss: {epoch_loss / len(trainloader)}")

    # Val

    sum_psnr = 0.0

    sum_ssim = 0.0

    with torch.no_grad():

        for batch in valloader:

            input, target = batch[0].to(device), batch[1].to(device)

            out = model(input)

            loss = criterion(out, target)

            pr = psnr(loss)

            sm = ssim(input, out)

            sum_psnr += pr

            sum_ssim += sm

    print(f"Average PSNR: {sum_psnr / len(valloader)} dB.")

    print(f"Average SSIM: {sum_ssim / len(valloader)} ")

    avg_psnr = sum_psnr / len(valloader)

    if avg_psnr >= best_psnr:

        best_psnr = avg_psnr

        torch.save(model, r"best_model_FSRCNN.pth")

    scheduler.step()
测试代码:
BATCH_SIZE = 4

model_path = "best_model_FSRCNN.pth"

testset = DatasetFromFolder(r"./data/images/test", zoom_factor)

testloader = DataLoader(dataset=testset, batch_size=BATCH_SIZE,

                        shuffle=False, num_workers=NUM_WORKERS)

sum_psnr = 0.0

sum_ssim = 0.0

model = torch.load(model_path).to(device)

criterion = nn.MSELoss()

with torch.no_grad():

    for batch in testloader:

        input, target = batch[0].to(device), batch[1].to(device)

        out = model(input)

        loss = criterion(out, target)

        pr = psnr(loss)

        sm = ssim(input, out)

        sum_psnr += pr

        sum_ssim += sm

print(f"Test Average PSNR: {sum_psnr / len(testloader)} dB")

print(f"Test Average SSIM: {sum_ssim / len(testloader)} ")
7.实图测试
为了直观感受两个模型的效果,我用自己拍摄的图进行实图测试,效果如下:
s=1(放大倍数=1)

当放大倍数=1时,SRCNN的超分结果比FSRCNN的超分效果要更好一些,这和两个模型平均 PSNR 的数值相吻合。
s=2(放大倍数=2)

当放大倍数=2时,SRCNN 的超分结果和 FSRCNN 的超分效果相差不大。
相关代码:
# 参数设置

zoom_factor = 1

model = "best_model_SRCNN.pth"

model2 = "best_model_FSRCNN.pth"

image = "tree.png"

cuda = 'store_true'

device = torch.device("cuda:0" if torch.cuda.is_available() else "cpu")

# 读取图片

img = Image.open(image).convert('YCbCr')

img = img.resize((int(img.size[0] * zoom_factor), int(img.size[1] * zoom_factor)), Image.BICUBIC)

y, cb, cr = img.split()

img_to_tensor = transforms.ToTensor()

input = img_to_tensor(y).view(1, -1, y.size[1], y.size[0]).to(device)

# 输出图片

model = torch.load(model).to(device)

out = model(input).cpu()

out_img_y = out[0].detach().numpy()

out_img_y *= 255.0

out_img_y = out_img_y.clip(0, 255)

out_img_y = Image.fromarray(np.uint8(out_img_y[0]), mode='L')

out_img = Image.merge('YCbCr', [out_img_y, cb, cr]).convert('RGB')

model2 = torch.load(model2).to(device)

out2 = model2(input).cpu()

out_img_y2 = out2[0].detach().numpy()

out_img_y2 *= 255.0

out_img_y2 = out_img_y2.clip(0, 255)

out_img_y2 = Image.fromarray(np.uint8(out_img_y2[0]), mode='L')

out_img2 = Image.merge('YCbCr', [out_img_y2, cb, cr]).convert('RGB')

# 绘图显示

fig, ax = plt.subplots(1, 3, figsize=(20, 20))

ax[0].imshow(img)

ax[0].set_title("原图")

ax[1].imshow(out_img)

ax[1].set_title("SRCNN恢复结果")

ax[2].imshow(out_img2)

ax[2].set_title("FSRCNN恢复结果")

plt.show()

fig.savefig(r"tree2.png")
体验SRCNN和FSRCNN两种图像超分网络应用的更多相关文章
- HMS Core机器学习服务图像超分能力,基于深度学习提升新闻阅读体验
在移动端阅读资讯时,人们对高分辨率.高质量的图像要求越来越高.但受限于网络流量.存储.图片源等诸多因素,用户无法便捷获得高质量图片.移动端显示设备的高分辨率图片获得问题亟待解决.不久前,HMS Cor ...
- ACNet:用于图像超分的非对称卷积网络
编辑:Happy 首发:AIWalker Paper:https://arxiv.org/abs/2103.13634 Code:https://github.com/hellloxiaotian/A ...
- OpenCV IplImage FlyCapture2 Image Conversion 两种图像类的相互转化
OpenCV的IplImag和 FlyCapture2 的 Image是两种常见的图片格式,在实际的应用中,我们通常要混合使用OpenCV和FlyCapture2这两个SDK,所以这两种图片格式之间的 ...
- Selector、shape详解,注意这两种图像资源都以XML方式存放在drawable不带分辨率的文件夹中
Selector.shape详解(一) Selector的结构描述: <?xml version="1.0" encoding="utf-8"?> ...
- FlyCapture2 fc2Image OpenCV IplImage Conversion 两种图像格式之间的转换
fc2Image是FlyCapture SDK的C语言库中的图片格式,由于在Windows上的MinGW无法编译FlyCapture2的C++库,只能使用C语言库,所以当我们在同时使用OpenCV的图 ...
- [SDK2.2]SQL Azure (13) Azure的两种关系型数据库服务:SQL Azure与SQL Server VM的不同
<Windows Azure Platform 系列文章目录> 如果熟悉Windows Azure平台的用户不难发现,对于SQL Server数据库来说,微软提供了两种服务,分别是: -W ...
- 简介C#读取XML的两种方式
简介C#读取XML的两种方式 作者: 字体:[增加 减小] 类型:转载 时间:2013-03-03 在程序中访问进而操作XML文件一般有两种模型,分别是使用DOM(文档对象模型)和流模型,使用DOM的 ...
- js的两种数据类型
js中的数据类型总体来说分为两种,他们分别是: 1 值类型(基本类型):数值型(Number),字符类型(String),布尔值型(Boolean),null 和 underfined 2 引用类型( ...
- Azure的两种关系型数据库服务:SQL Azure与SQL Server VM的不同
Azure的两种关系型数据库服务:SQL Azure与SQL Server VM的不同 <Windows Azure Platform 系列文章目录> 如果熟悉Windows Azure平 ...
随机推荐
- HashSet与TreeSet的区别
HashSet元素唯一,无序,依靠hashcode(),toString()实现元素的唯一性 TreeSet元素唯一,有序,依靠bTo实现比较,即继承Comparable类并重写compareTo(O ...
- SpringBoot详解
1.Hello,World! 1.1.SpringBoot简介 回顾什么是Spring Spring是一个开源框架,2003 年兴起的一个轻量级的Java 开发框架,作者:Rod Johnson . ...
- Git在项目中使用技巧
1.常用的命令 mkdir 文件夹名 创建文件夹 clear 清楚屏幕 ls或者ll 将当前目录下的子文件和子目录平铺在控制台 find 目录名 将对应目录下的子孙文件或子孙目录平铺在控制台 rm 文 ...
- CentOS 并没有死,Rocky Linux 让其重生
点击上方"开源Linux",选择"设为星标" 回复"学习"获取独家整理的学习资料! 近日,CentOS 官方发文称CentOS Stream ...
- Nvidia Triton使用教程:从青铜到王者
1 相关预备知识 模型:包含了大量参数的一个网络(参数+结构),体积10MB-10GB不等 模型格式:相同的模型可以有不同的存储格式(可类比音视频文件),目前主流有torch.tf.onnx和trt, ...
- 手把手教你 bash中给变量赋值时 ' 和 " 和 ` 和 $() 的使用
1.赋值指令 var='变量内容' var="变量内容" var=`command` var=$(command) var=变量内容 2.格式要求 =两边不能有空白字符 错误示例 ...
- 聊聊C#中的Visitor模式
写在前面 Visitor模式在日常工作中出场比较少,如果统计大家不熟悉的模式,那么它榜上有名的可能性非常大.使用频率少,再加上很多文章提到Visitor模式都着重于它克服语言单分派的特点上面,而对何时 ...
- ASCII&Base64
ASCII https://zh.wikipedia.org/wiki/ASCII American Standard Code for Information Interchange,美国信息交换标 ...
- linux篇-centos7安装DHCP服务器
1检查防火墙和selinux(关闭) 关闭防火墙和selinux,这边不多说 2检查DHCP状态 3安装DHCP软件包 4把系统默认的样例复制 5修改配置文件 option domain-name & ...
- 什么!Sentinel流控规则可以这样玩?
项目源码地址:公众号回复 sentinel,即可免费获取源码 前言 上一篇文章中,我们讲解了关于sentinel基本介绍以及流控规则中直接和快速失败的效果,有兴趣的可以去看上一篇文章,今天,我们给大家 ...
