Flutter 实战(一):列表项内容可自定义的列表组件
前言
本篇文的目的是熟练掌握 Flutter 组件的封装,并且使用回调函数实现主要功能。
本组件的设计灵感来源于 Element 组件库的 table 组件。
正题
定义回调函数
在此之前,必须要了解在 Dart 中如何定义回调函数。
回调函数必须使用typedef关键字声明:
typedef OnCreated = void Function(String e);
注意:函数的别名声明的位置最好在类之外。
在 Person 类中的 create 函数里创建回调函数:
class Person {void create(String e, OnCreated callback) {callback(e);}}
在main函数使用 create 方法:
void main() {Person().create('hello world!', (e) { print(e); });}
创建列表组件
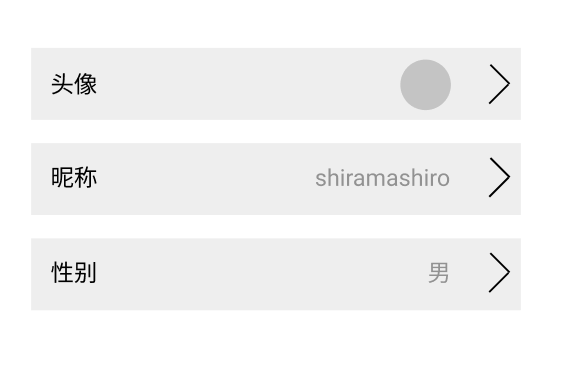
通过本篇文章实现如图所示的列表组件:

创建 StatefulWidget
将组件命名为 ActionableList,由于列表的项中间部分的内容可能随着用户修改而修改,所以定义为 StatefulWidget。
class ActionableList extends StatefulWidget {const ActionableList({Key? key}) : super(key: key);@overrideState<ActionableList> createState() => _ActionableListState();}class _ActionableListState extends State<ActionableList> {@overrideWidget build(BuildContext context) {return Column();}}
ActionableListTemplate
列表组件下有许多项,每一项的布局是左中右,左边为 Text 组件,中间为 Widget 类型的组件,右边为 Icon 组件,整个列表的项是可以被点击的。
ActionableListTemplate 的用作是约束以什么结构来渲染列表的每一项。
class ActionableListTemplate {final String label;final String middle;final IconData icon;ActionableListTemplate({required this.label,required this.middle,this.icon = Icons.arrow_forward_ios});}
使用 ActionableList 组件时必须传递数组,其中项为 ActionableListTemplate:
class ActionableList extends StatefulWidget {final List<ActionableListTemplate> template;const ActionableList({Key? key, required this.template}) : super(key: key);}
构建 ActionableList 的界面
实现 ActionableList 的 UI,在 build 函数中,为了时代码更有阅读性,每一个步骤抽取到一个函数中:
第一步,创建列表的一个项:
Widget _createItem(String label, Widget middle, IconData icon) {return InkWell(child: Padding(child: Row(children: [Text(label,style: TextStyle(color: widget.labelColor),),Expanded(child: middle),Icon(icon),],),),);}
第二步,创建列表:
List<Widget> _createList() {List<Widget> list = [];for (int i = 0; i < widget.template.length; i++) {list.add(_createItem(widget.template[i].label, widget.template[i].middle, widget.template[i].icon));}return list;}
build 函数只需要调用 _createList 函数创建一个列表即可:
@overrideWidget build(BuildContext context) {return Column(children: _createList(),);}
使用 ActionableList
class _UserCenterSliceState extends State<UserCenterSlice> {@overrideWidget build(BuildContext context) {return Scaffold(body: ActionableList(template: [ActionableListTemplate(label: '头像',middle: Avatar(url: 'assets/images/icon')),ActionableListTemplate(label: '昵称',content: Text('shiramashiro')),ActionableListTemplate(label: '性别',content: Text('男'),),],);}}
缺陷分析
虽然 ActionableListTemplate 的 content 属性可以插入各式各样的 Widget,但是这些 Widget 内的字符串、数值等数据无法根据业务需求而灵活地变更。一般,这些数据都是来源于请求得来的 JSON 格式数据。
请看下面给出的简单例子:
假如有一个 JSON 数据,其中一个字段为 hobbies,有的用户有三个、有的用户有四个等等情况,数据不是死的,而是灵活的。
final jsonData = {hobbies: [ '打篮球', '看小说', '编程' ]}....ActionableListTemplate(label: '兴趣',content: Row(children: [ Text('打篮球'), Text('看小说'), Text('编程') ])),
也可以在使用组件的时候,专门写一个函数对该字段进行循环。也是可以的,但是不优雅,不“好看”。
改进思路
更好的方式就是,把请求过来的数据直接交给 ActionableList 管理。首先,ActionableList 肯定是要通过 ActionableListTemplate 构建列表;其次,在 content 字段这里,可以更加灵活一点,比如 A 页面使用了列表组件,利用回调函数把对应的字段返回到 A 页面这一层面中,在 A 页面里写逻辑、写函数、写 Widget 等等。
改造
添加新的属性
在类中为其构造函数添加一个参数:
class ActionableList extends StatefulWidget {...final Map<dynamic, dynamic> data;const ActionableList({Key? key, required this.data, ...}) : super(key: key);@overrideState<ActionableList> createState() => _ActionableListState();}
添加回调函数
在类外部定义一个回调函数,返回类型为 Widget,并且接收一个 dynamic 类型的参数,这个参数可以被外部获得:
typedef Created = Widget Function(dynamic e);
修改属性
ActionableListTemplate 添加属性,并将原本的 content 属性改名为 String 类型的 filed 属性:
class ActionableListTemplate {...final String field; // 原本是 Widget 类型,现在是 String 类型。...final Created created; // created 将作为回调函数返回 filed 对应的 JSON 数据。ActionableListTemplate({...required this.field,...required this.created,});}
修改 _createItem
在 _createItem 函数中添加一个参数:
Widget _createItems(...String filed,...Created created, // 新增参数) {Widget middle = created(filed); // 把 filed 属性传给 created 回调函数,在外部可以通过回调函数取到该值。...return (...Expanded(child: middle),);}
created 回调函数在往外传递数据时,也将得到一个 Widget 类型的变量,然后将其插入到 Expanded(child: middle) 中。
效果示范
第一步,提供一个 Map 类型的数据:
Map<String, dynamic> data = {'uname': '椎名白白','sex': '男','avatar': 'assets/images/95893409_p0.jpg'};@overrideWidget build(BuildContext context) {return Scaffold(body: ActionableList(data: data,template: [ActionableListTemplate(label: '头像',field: 'avatar',created: (e) => Avatar(url: e, size: 50), // e 就是 data['avatar']),ActionableListTemplate(label: '昵称',field: 'uname',created: (e) => Text(e), // e 就是 data['uname']),ActionableListTemplate(label: '性别',field: 'sex',created: (e) => Text(e),),],),);}

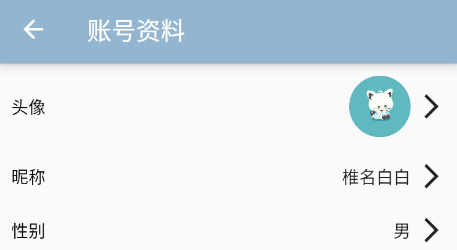
效果就是,提供一个 JSON 格式数据给 ActionableList,然后为 ActionableListTemplate 指定一个 filed 属性,其对应这 JSON 的每一个字段。最后,如何构造列表项中间的 Widget,由 A 页面这里提供,也就是在 created 回调函数里构建,并且能够把对应的值给插入到任何位置。
完整示例
actionable_list.dart:
import 'package:flutter/material.dart';typedef OnTap = void Function();typedef Created = Widget Function(dynamic e);class ActionableListTemplate {final String label;final String field;final IconData icon;final OnTap onTap;final Created created;ActionableListTemplate({required this.label,required this.field,this.icon = Icons.arrow_forward_ios,required this.onTap,required this.created,});}class ActionableList extends StatefulWidget {final Map<dynamic, dynamic> data;final List<ActionableListTemplate> template;final double top;final double left;final double right;final double bottom;final Color labelColor;const ActionableList({Key? key,required this.data,required this.template,this.top = 10,this.right = 10,this.left = 10,this.bottom = 10,this.labelColor = Colors.black,}) : super(key: key);@overrideState<ActionableList> createState() => _ActionableListState();}class _ActionableListState extends State<ActionableList> {Widget _createItems(String label,String filed,IconData icon,OnTap onTap,Created created,) {Widget middle = created(filed);return InkWell(onTap: onTap,child: Padding(padding: EdgeInsets.only(left: widget.left,top: widget.top,right: widget.right,bottom: widget.bottom,),child: Row(crossAxisAlignment: CrossAxisAlignment.center,children: [Text(label,style: TextStyle(color: widget.labelColor,),),Expanded(child: Padding(padding: const EdgeInsets.only(right: 5),child: Row(mainAxisAlignment: MainAxisAlignment.end,children: [middle],),),),Icon(icon),],),),);}List<Widget> _createList() {List<Widget> list = [];for (int i = 0; i < widget.data.length; i++) {list.add(_createItems(widget.template[i].label,widget.data[widget.template[i].field],widget.template[i].icon,widget.template[i].onTap,widget.template[i].created,),);}return list;}@overrideWidget build(BuildContext context) {return Column(children: _createList(),);}}
user_center_slice.dart:
import 'package:flutter/material.dart';import 'package:qingyuo_mobile/components/actionable_list.dart';import 'package:qingyuo_mobile/components/avatar.dart';class UserCenterSlice extends StatefulWidget {const UserCenterSlice({Key? key}) : super(key: key);@overrideState<UserCenterSlice> createState() => _UserCenterSliceState();}class _UserCenterSliceState extends State<UserCenterSlice> {Map<String, dynamic> data = {'uname': '椎名白白','sex': '男','signature': 'Time tick away, dream faded away!','uid': '7021686','avatar': 'assets/images/95893409_p0.jpg'};@overrideWidget build(BuildContext context) {return Scaffold(appBar: AppBar(backgroundColor: const Color.fromRGBO(147, 181, 207, 6),title: const Text("账号资料"),),body: ActionableList(data: data,template: [ActionableListTemplate(label: '头像',field: 'avatar',onTap: () {},created: (e) => Avatar(url: e, size: 50),),ActionableListTemplate(label: '昵称',field: 'uname',onTap: () {},created: (e) => Text(e),),ActionableListTemplate(label: '性别',field: 'sex',onTap: () {},created: (e) => Text(e),),ActionableListTemplate(label: '个性签名',field: 'signature',onTap: () {},created: (e) => Text(e),),ActionableListTemplate(label: 'UID',field: 'uid',onTap: () {},created: (e) => Text(e),)],),);}}
Flutter 实战(一):列表项内容可自定义的列表组件的更多相关文章
- 复制SharePoint列表项(SPListItem)到另一个列表
从理论上讲,有一个简单到难以置信的解决办法:SPListItem提供了一个CopyTo(destinationUrl)方法(可参考MSDN).不幸的是,这个方法似乎用不了.至少对我的情况(一个带附件的 ...
- 【Flutter 实战】一文学会20多个动画组件
老孟导读:此篇文章是 Flutter 动画系列文章第三篇,后续还有动画序列.过度动画.转场动画.自定义动画等. Flutter 系统提供了20多个动画组件,只要你把前面[动画核心](文末有链接)的文章 ...
- phpcms 列表项 内容项
根据上一篇内容继续 首页替换完成后 接下来替换列表页 首先把列表的静态网页放入相应模板的content文件夹下,并改名为 list.html 并且创建栏目时选择下面一项 同样,头尾去掉,利用{temp ...
- Flutter实战视频-移动电商-17.首页_楼层组件的编写技巧
17.首页_楼层组件的编写技巧 博客地址: https://jspang.com/post/FlutterShop.html#toc-b50 楼层的效果: 标题 stlessW快速生成: 接收一个St ...
- Python3基础 把一个列表中内容给另外一个列表,形成两个独立的列表
镇场诗:---大梦谁觉,水月中建博客.百千磨难,才知世事无常.---今持佛语,技术无量愿学.愿尽所学,铸一良心博客.------------------------------------------ ...
- Flutter 目录结构介绍、入口、自定义 Widget、MaterialApp 组件、Scaffold 组件
Flutter 目录结构介绍 文件夹 作用 android android 平台相关代码 ios ios 平台相关代码 lib flutter 相关代码,我们主要编写的代 码就在这个文件夹 test ...
- Swift - 列表项尾部附件点击响应(感叹号,箭头等)
列表单元格尾部可以添加各种样式的附件,如感叹号,三角箭头等.而且点击内容区域与点击附件的这两个响应事件是不同的,这样可以方便我们实现不同的功能(比如点击内容则查看详情,点击感叹号则编辑) 1 2 3 ...
- CSS中列表项list样式
CSS列表属性 属性 描述 list-style-属性 用于把所有用于列表的属性设置于一个声明中. list-style-image 将图象设置为列表项标志. list-style-position ...
- SharePoint 2010 列表项事件接收器 ItemAdded 的使用方法
列表项事件处理器是继承于Microsoft.SharePoint.SPItemEventReceiver的类,Microsoft.SharePoint.SPItemEventReceiver类提供了许 ...
随机推荐
- CentOS 7.0 使用 yum 安装 MariaDB
CentOS 7.0 使用 yum 安装 MariaDB 与 MariaDB 的简单配置 1.安装MariaDB 安装命令 yum -y install mariadb mariadb-serve ...
- MyBatis - SqlSessionFactory 与 SqlSession
SqlSessionFactory SqlSessionFactory是创建SqlSession的工厂,一般使用单例模式,不需要重复创建. SqlSession SqlSession是直接与数据库直接 ...
- python基础学习8
python基础学习8 内容概要 字典的内置方法 元组的内置方法 集合的内置方法 垃圾回收机制 内容详情 字典的内置方法 一.类型转换 res = dict(name='jason', pwd=123 ...
- Docker容器安装RabbitMQ
Docker容器安装RabbitMQ 准备资料 erlang的rpm安装包 https://github.com/rabbitmq/erlang-rpm/releases rabbitmq的rpm安装 ...
- CLOSE_WAIT过多解决方法
背景:windows server 现象:CLOSE_WAIT过多(几百个),导致端口被占用光了,其他服务无法运行 原因:由于KeepLive在Windows操作系统下默认是7200秒,也就是2个小时 ...
- SAP Web Dynpro - 教程
SAP Web Dynpro是一种标准的SAP UI技术,用于使用图形工具和与ABAP工作台集成的开发环境来开发Web应用程序. 图形工具的使用减少了实施工作,并有助于维护ABAP工作台中的组件. 本 ...
- Redis基础与性能调优
Redis是一个开源的,基于内存的结构化数据存储媒介,可以作为数据库.缓存服务或消息服务使用. Redis支持多种数据结构,包括字符串.哈希表.链表.集合.有序集合.位图.Hyperloglogs等. ...
- leetcode题解#3:无重复字符的最长子串
leetcode题解:无重复字符的最长子串 题目 给定一个字符串,请你找出其中不含有重复字符的 最长子串 的长度. 示例 1: 输入: s = "abcabcbb"输出: 3 解释 ...
- Flink1.13.1源码解析-Application on yarn(一)
本篇文章讲述 Flink Application On Yarn 提交模式下,从命令提交到 AM 容器创建 1.脚本入口 flink run-application -t yarn-applicati ...
- vscode的安装、切换为中文简体、集成sass
VScode设置中文 打开vscode ,按快捷键"Ctrl+Shift+P" 输入configure language,回车 选择安装其他语言 (默认是英文的) 选择简体中安装( ...
