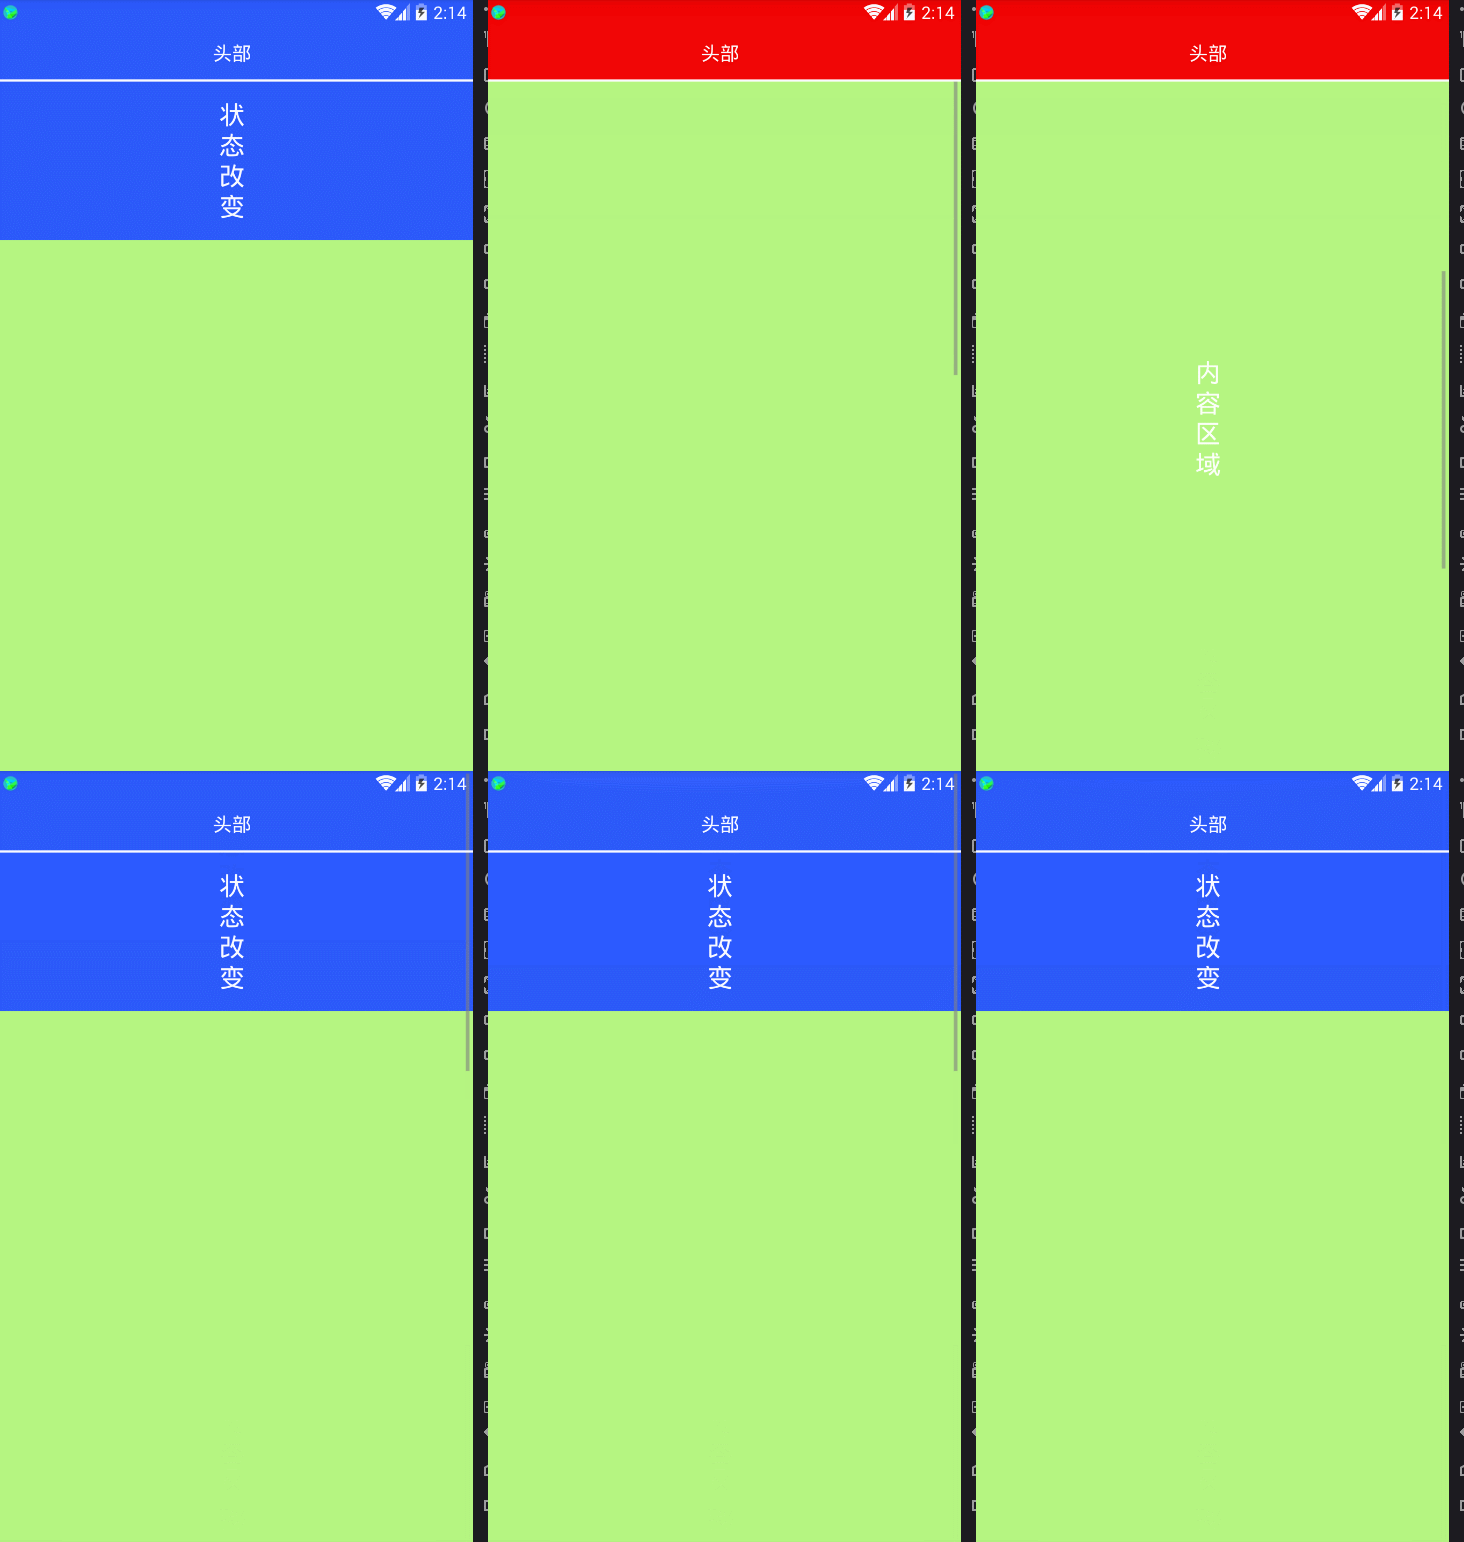
android 上下滑动标题栏和状态栏改变颜色实现
import android.content.Context;

import android.util.AttributeSet;

import android.widget.ScrollView;

public class MyScrollView extends ScrollView {

    private OnScrollistener onScrollistener;

    public OnScrollistener getOnScrollistener() {

        return onScrollistener;

    }

    public void setOnScrollistener(OnScrollistener onScrollistener) {

        this.onScrollistener = onScrollistener;

    }

    public MyScrollView(Context context, AttributeSet attrs, int defStyle) {

        super(context, attrs, defStyle);

    }

    public MyScrollView(Context context, AttributeSet attrs) {

        super(context, attrs);

    }

    public MyScrollView(Context context) {

        super(context);

    }

    public interface OnScrollistener {

        void onScroll(int startY, int endY);

    }

    @Override

    protected void onScrollChanged(int l, int t, int oldl, int oldt) {

        onScrollistener.onScroll(oldt, t);

        super.onScrollChanged(l, t, oldl, oldt);

    }

}
import android.app.Activity;

import android.graphics.Color;

import android.os.Build;

import android.os.Bundle;

import android.support.v7.app.AppCompatActivity;

import android.util.Log;

import android.view.View;

import android.view.ViewGroup;

import android.view.Window;

import android.view.WindowManager;

import android.widget.LinearLayout;

public class MainActivity extends AppCompatActivity {

    private View titleLine;

    private View titleLine1;

    private LinearLayout title;

    private LinearLayout top;

    private MyScrollView scrollView;

    @Override

    protected void onCreate(Bundle savedInstanceState) {

        super.onCreate(savedInstanceState);

        setContentView(R.layout.activity_main);

        initView();

    }

    private void initView() {

        setTranslucentStatus(this, true);

        title = (LinearLayout) findViewById(R.id.ll_title);

        title.getBackground().mutate().setAlpha(0);

        top = (LinearLayout) findViewById(R.id.ll_title_top);

        titleLine1 = findViewById(R.id.v_title_line_1);

        titleLine = findViewById(R.id.v_title_line);

        scrollView = (MyScrollView) findViewById(R.id.sv_content);

        // 设置状态栏高度

        int statusBarHeight = this.getResources().getDimensionPixelSize(this.getResources().getIdentifier("status_bar_height", "dimen", "android"));

        LinearLayout.LayoutParams params = new LinearLayout.LayoutParams(ViewGroup.LayoutParams.MATCH_PARENT, statusBarHeight);

        titleLine.setLayoutParams(params);

        titleLine1.setLayoutParams(params);

        // 设置滑动

        scrollView.setOnScrollistener(new MyScrollView.OnScrollistener() {

            @Override

            public void onScroll(int startY, int endY) {

                //根据scrollview滑动更改标题栏透明度

                changeAphla(startY, endY);

            }

        });

    }

    /**

     * 根据内容窗体的移动改变标题栏背景透明度

     *

     * @param startY scrollview开始滑动的y坐标(相对值)

     * @param endY   scrollview结束滑动的y坐标(相对值)

     */

    private void changeAphla(int startY, int endY) {

        //获取标题高度

        int titleHeight = title.getMeasuredHeight();

        //获取背景高度

        int backHeight = top.getMeasuredHeight();

        //获取控件的绝对位置坐标

        int[] location = new int[2];

        top.getLocationInWindow(location);

        //从屏幕顶部到控件顶部的坐标位置Y

        int currentY = location[1];

        //表示回到原位(滑动到顶部)

        if (currentY >= 0) {

            title.getBackground().mutate().setAlpha(0);

        }

        Log.e("zpan", "=titleHeight=" + titleHeight + "=backHeight=" + backHeight + "=currentY=" + currentY);

        //颜色透明度改变

        if (currentY < titleHeight && currentY >= -(backHeight - titleHeight)) {

            //计算出滚动过程中改变的透明值

            double y = Math.abs(currentY) * 1.0;

            double height = (backHeight - titleHeight) * 1.0;

            int changeValue = (int) (y / height * 255);

            Log.e("zpan", "changeValue=" + changeValue);

            //判断是向上还是向下

            if (endY > startY) {    //向上;透明度值增加,实际透明度减小

                title.getBackground().mutate().setAlpha(changeValue);

            } else if (endY < startY) {     //向下;透明度值减小,实际透明度增加

                title.getBackground().mutate().setAlpha(changeValue);

            }

        }

        //红色背景移除屏幕

        if (currentY < -(backHeight - titleHeight)) {

            title.getBackground().mutate().setAlpha(255);

        }

    }

    /**

     * 设置状态栏透明

     *

     * @param activity

     * @param on

     */

    public void setTranslucentStatus(Activity activity, boolean on) {

        Window win = activity.getWindow();

        if (Build.VERSION.SDK_INT >= Build.VERSION_CODES.LOLLIPOP) {

            win.clearFlags(WindowManager.LayoutParams.FLAG_TRANSLUCENT_STATUS

                    | WindowManager.LayoutParams.FLAG_TRANSLUCENT_NAVIGATION);

            win.getDecorView().setSystemUiVisibility(View.SYSTEM_UI_FLAG_LAYOUT_FULLSCREEN

//                    | View.SYSTEM_UI_FLAG_LAYOUT_HIDE_NAVIGATION //保证华为虚拟键盘能显示

                    | View.SYSTEM_UI_FLAG_LAYOUT_STABLE);

            win.addFlags(WindowManager.LayoutParams.FLAG_DRAWS_SYSTEM_BAR_BACKGROUNDS);

            win.setStatusBarColor(Color.TRANSPARENT);

//            win.setNavigationBarColor(Color.TRANSPARENT); //保证华为虚拟键盘是系统色

        }

        if (Build.VERSION.SDK_INT >= Build.VERSION_CODES.KITKAT && Build.VERSION.SDK_INT < Build.VERSION_CODES.LOLLIPOP) {

            WindowManager.LayoutParams winParams = win.getAttributes();

            final int bits = WindowManager.LayoutParams.FLAG_TRANSLUCENT_STATUS;

            if (on) {

                winParams.flags |= bits;

            } else {

                winParams.flags &= ~bits;

            }

            win.setAttributes(winParams);

        }

    }

}
布局:
<?xml version="1.0" encoding="utf-8"?>

<RelativeLayout xmlns:android="http://schemas.android.com/apk/res/android"

    android:layout_width="match_parent"

    android:layout_height="match_parent">

    <com.loaderman.flutterdemo.MyScrollView

        android:id="@+id/sv_content"

        android:layout_width="match_parent"

        android:layout_height="match_parent"

        android:fillViewport="true">

        <LinearLayout

            android:layout_width="match_parent"

            android:layout_height="match_parent"

            android:orientation="vertical">

            <LinearLayout

                android:id="@+id/ll_title_top"

                android:layout_width="match_parent"

                android:layout_height="wrap_content"

                android:orientation="vertical"

                android:background="#2c5aff">

                <View

                    android:id="@+id/v_title_line"

                    android:layout_width="match_parent"

                    android:layout_height="0dp"/>

                <View

                    android:layout_width="match_parent"

                    android:layout_height="50dp"/>

                <TextView

                    android:layout_width="match_parent"

                    android:layout_height="150dp"

                    android:gravity="center"

                    android:text="状\n态\n改\n变"

                    android:textColor="#ffffff"

                    android:textSize="24sp"/>

            </LinearLayout>

            <TextView

                android:layout_width="match_parent"

                android:layout_height="1600dp"

                android:gravity="center"

                android:background="#b5f581"

                android:text="内\n容\n区\n域"

                android:textColor="#ffffff"

                android:textSize="24sp"/>

        </LinearLayout>

    </com.loaderman.flutterdemo.MyScrollView>

    <LinearLayout

        android:id="@+id/ll_title"

        android:layout_width="match_parent"

        android:layout_height="wrap_content"

        android:orientation="vertical"

        android:background="#f10303">

        <View

            android:id="@+id/v_title_line_1"

            android:layout_width="match_parent"

            android:layout_height="0dp"/>

        <TextView

            android:layout_width="match_parent"

            android:layout_height="50dp"

            android:gravity="center"

            android:text="头部"

            android:textColor="#ffffff"

            android:textSize="18sp"/>

        <View

            android:layout_width="match_parent"

            android:layout_height="2dp"

            android:background="#fff"/>

    </LinearLayout>

</RelativeLayout>
效果:

android 上下滑动标题栏和状态栏改变颜色实现的更多相关文章
- Android——Activity去除标题栏和状态栏
一.在代码中设置 public void onCreate(Bundle savedInstanceState) { super.onCreate(savedInstanceState); //去 ...
- Android Activity去除标题栏和状态栏
一.在代码中设置public void onCreate(Bundle savedInstanceState) { super.onCreate(savedInstanceState); //去除ti ...
- Android 关于expandableListView childrenView 点击改变颜色
1.点击后改变颜色并保持颜色改变状态: <?xml version="1.0" encoding="utf-8"?> <selector xm ...
- 72、android状态栏一体化,状态栏改变颜色
只能在4.4以上版本使用. <LinearLayout xmlns:android="http://schemas.android.com/apk/res/android&q ...
- Android中隐藏标题栏和状态栏
http://www.cnblogs.com/zhuguangwei/archive/2011/01/18/1938276.html 一.隐藏标题栏 //隐藏标题栏 this.requestWindo ...
- Android学习第八弹之改变状态栏的颜色使其与APP风格一体化
公众号:smart_android 作者:耿广龙|loonggg 点击"阅读原文",可查看更多内容和干货 导语:沉浸式状态栏,改变状态栏的颜色使之与APP风格一体化是不是感觉很漂亮 ...
- Android开发技巧——设置系统状态栏颜色
开门见山,先来三张效果图: 然后我们再来讲如何实现以及如何快速地实现. 如何实现 实现设置系统状态栏颜色需要至少在Android 4.4.2(API 19)以上.这是因为,在这个版本以下,没有任何的A ...
- android中自定义view---实现竖直方向的文字功能,文字方向朝上,同时提供接口,判断当前touch的是哪个字符,并改变颜色
android自定义view,实现竖直方向的文字功能,文字方向朝上,同时提供接口,判断当前touch的是哪个字符,并改变颜色. 由于时间比较仓促,因此没有对代码进行过多的优化,功能远远不如androi ...
- Android系统更改状态栏字体颜色
随着时代的发展,Android的状态栏都不是乌黑一片了,在Android4.4之后我们可以修改状态栏的颜色或者让我们自己的View延伸到状态栏下面.我们可以进行更多的定制化了,然而有的时候我们使用的是 ...
随机推荐
- Manjaro安装mysql-5.7折腾小记
安装前准备: 现在Arch官方源是MariaDB,所以得从mysql官网下载,地址:https://www.mysql.com/downloads/ 选择一个合适的版本下载: 下载下来先将压缩文件解压 ...
- Jenkins企业应用
一,CI/CD,DevOps介绍 持续集成(Continuous Integration,CI): 代码合并,构建,部署,测试都在一起,不断地执行这个过程,并对结果反馈 持续交付(Continuous ...
- centos 安装ELK
准备安装环境 由于本人的centos是通过虚拟机来进行安装的,为了本地电脑能够访问centos系统中的端口,则需要把防火墙进行关闭,通过以下方式进行关闭防火墙. # vi /etc/sysconfig ...
- python3 wordcloud词云
wordclou:根据文本生成词云 一.词云设置 wc=WordCloud(width=400, height=200, #画布长.宽,默认(400,200)像素 margin=1, #字与字之间的距 ...
- MyBatis_动态sql_foreach_mysql下foreach批量插入的两种方式
方法1: 笔记要点出错分析与总结工程组织数据库组织0.重新修改Bean类 修改1.定义接口 //批量插入 public void addEmps(@Param("emps") ...
- tomcat 处理HTTP请求
一.Tomcat是什么?Tomcat是一个Web应用服务器,同时也是一个Servlet/JSP容器.Tomcat作为Servlet容器,负责处理客户端请求,把请求传送给Servlet,并将Servle ...
- 有关Django的smallDemo
注: 电脑为Mac,Python解释器为3.5.4 数据库使用的是pymysql模块代替mysqldb 功能: 运行服务器,在login登录界面输入用户名和密码,post到服务器, 通过数据库判断用户 ...
- h5css3弹性盒子
弹性盒子: 老:display:box: 新:display:flex: 方向:flex-direction: 横向正方向 row/横向反方向 row-reverse/纵向正方向 column/纵向反 ...
- PHP读取文件内容的方法
下面我们就为大家详细介绍PHP读取文件内容的两种方法. 第一种方法:fread函数 <?php $file=fopen('1.txt','rb+'); echo fread($file,file ...
- Linux 内存分配失败(关于overcommit_memory)
1.问题现象和分析:测试时发现当系统中空闲内存还有很多时,就报内存分配失败了,所有进程都报内存分配失败:sshd@localhost:/var/log>free tota ...
