用BIO手写实现Redis客户端的探究(拒绝Jedis)
在Redis的使用过程中,大多数人都是使用现成的客户端,如Jedis,Redisson,Lettuce。因此本文研究用BIO的方式手写Redis客户端尝试,对遇到的问题进行探究及总结。
如何从架构角度思考架构分层?
Redis通讯协议RESP是怎么回事?
如何基于BIO实现Redis客户端?
Redis客户端通讯线程安全问题如何解决?
一、Jedis客户端如何进行架构分层
要进行远程访问,如下图所示:
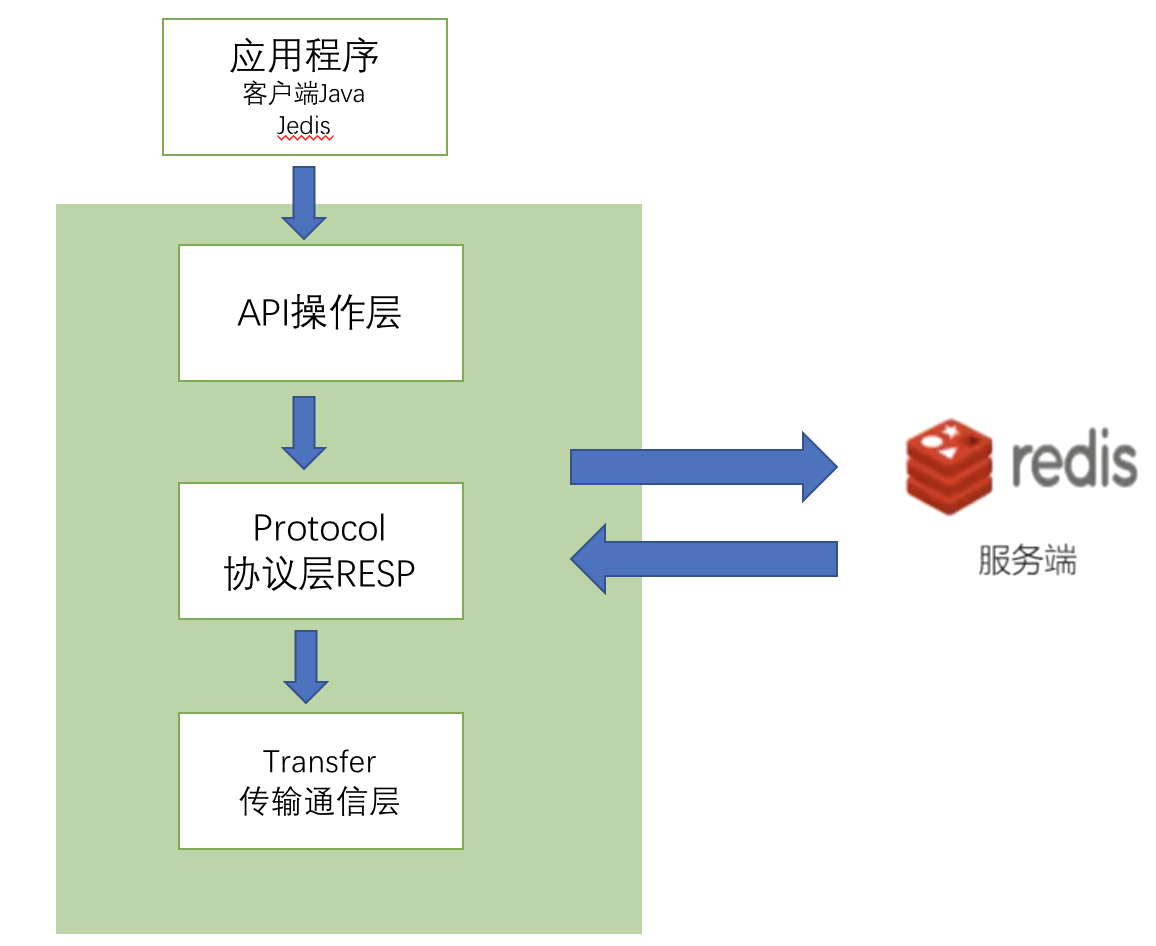
- 我们在Java应用程序的客户端通过访问包装的API进行Redis访问,API使我们直接可以看懂的调用入口;
- 然后API是对Redis通信协议的包装,通过对协议的包装,实现我们对Redis访问协议的透明使用;
- 协议是按照一定规则组装的数据,并不能直接用于网络IO,所以必须进行序列化和反序列化,这样才能进行远程Redis的请求调用以及返回数据的处理。
二、传输层通信
基于远程访问,我们可以使用BIO的Socket进行通信,首先定义一个Connection,Connection类包含了建立BIO连接的远程地址host,端口port,套接字Socket以及输入输出流。
此类一个Connection的构造方法,一个Connection的初始化方法,以及请求发送方法。
public class Connection {

    private String host;

    private int port;

    private Socket socket;

    private InputStream inputStream;

    private OutputStream outputStream;

    public Connection(String host, int port) {

        this.host = host;

        this.port = port;

    }

    public boolean isConnection() {

        if (socket != null && !socket.isClosed() && !socket.isBound() && socket.isConnected()) {

            return true;

        }

        try {

            socket = new Socket(host, port);

            inputStream = socket.getInputStream();

            outputStream = socket.getOutputStream();

        } catch (IOException e) {

            e.printStackTrace();

            return false;

        }

        return true;

    }

    public String sendCommand(byte[] command) {

        if (isConnection()) {

            try {

                outputStream.write(command);

                int length = 0;

                byte[] response = new byte[1024];

                while ((length = inputStream.read(response)) > 0) {

                    return new String(response, 0, length);

                }

            } catch (IOException e) {

                e.printStackTrace();

            }

        }

        return null;

    }

}
有了连接类后就可以发送BIO请求,然后就构建Connection进行请求发送测试:
public class MainTest {

    public static void main(String[] args) {

        String command = "set ant 123456";

        Connection connection = new Connection("localhost", 6379);

        System.out.println(connection.sendCommand(command.getBytes()));

  }

}
发现结果如下图,请求调用后没有返回,但是main方法也没有结束,通过debug可以知道是因为inputStream.read(response))这一句代码是阻塞调用,因为一直没返回结果,因此main方法阻塞,如下图:
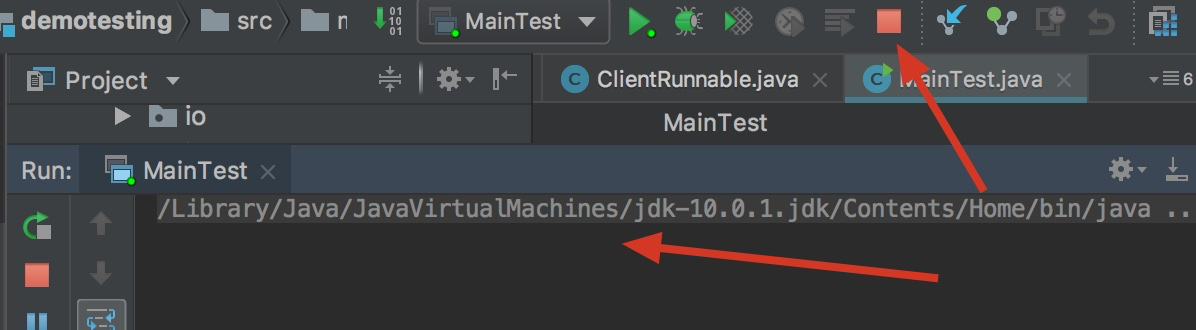
实际上的原因是因为任何请求都是基于协议,发送了请求command = "set ant 123456"后,由于并未遵循Redis的任何访问协议,因此Redis无法识别请求并做出返回。
三、协议层包装
我们先进行抓包测试,看看Jedis客户端传给服务端的到底是些什么内容,我们自己手写一个假的服务端,然后用Jedis发送请求,我们的伪服务端会接受到请求,伪服务端如下所示:
public class Hack {

   public static void main(String[] args) throws Exception {

      ServerSocket serverSocket = new ServerSocket(10000);

      Socket socket = serverSocket.accept();

      byte[] b=new byte[1024];

      socket.getInputStream().read(b);

      System.out.println(new String(b));

   }

}
然后用一个客户端进行调用:
public class Test {

   public static void main(String[] args) {

      Jedis jedis = new Jedis("redis://localhost:10000");

      jedis.set("monkey", "2019");

      System.out.println(jedis.get("monkey"));

   }

}
在伪服务端可以接收到请求:
*3

$3

SET

$6

monkey

$4

2019
可以看到请求是根据一定规则进行了包装,这就是Redis的RESP协议。RESP协议是在Redis 1.2中引入的,但是它成为Redis 2.0中与Redis服务器通信的标准方法。RESP实际上是支持以下数据类型的序列化协议:简单字符串,错误,整数,大容量字符串和数组。
RESP在Redis中用作请求-响应协议的方式如下:
- 客户端将命令作为大容量字符串的RESP数组发送到Redis服务器。
- 服务器根据命令实现以RESP类型之一进行回复。
在RESP中,某些数据的类型取决于第一个字节:
- 对于简单字符串,答复的第一个字节为“ +”
- 对于错误,回复的第一个字节为“-”
- 对于整数,答复的第一个字节为“:”
- 对于批量字符串,答复的第一个字节为“ $”
- 对于数组,回复的第一个字节为“
*”
另外,RESP可以使用Bulk Strings或Array的特殊变体来表示Null值,如稍后指定。在RESP中,协议的不同部分始终以“ \ r \ n”(CRLF)终止。详情请查看https://redis.io/topics/protocol
我们知道了Redis的RESP规则,那么我们就可以定义一个协议类Protocol,来实现请求的包装(本示例未完全实现RESP协议内容,仅实现简单的SET、GET请求以及内容的解析):
public class Protocol {

    public static final String DOLLER="$";

    public static final String ALLERSTIC="*";

    public static final String CRLF="\r\n";


  // 如SET请求 set ant 7777

  // *3\r\n        长度为3的数组

  // $3\r\n        第一个字符串长度为3

  // SET\r\n       第一个字符串为SET

  // $6\r\n        第二个字符串长度为6

  // monkey\r\n       第二个字符串为ant

  // $4\r\n        第三个字符串长度为4

  // 2019\r\n      第三个字符串为2019

    public static byte[] buildRespByte(Command command, byte[]... bytes){

        StringBuilder stringBuilder = new StringBuilder();

        stringBuilder.append(ALLERSTIC).append(bytes.length+1).append(CRLF);

     // 封装方法SET、GET
     stringBuilder.append(DOLLER).append(command.name().length()).append(CRLF);

        stringBuilder.append(command.name()).append(CRLF);

        // 封装参数

        for(byte[] arg:bytes){

            stringBuilder.append(DOLLER).append(arg.length).append(CRLF);

            stringBuilder.append(new String(arg) ).append(CRLF);

        }

        return stringBuilder.toString().getBytes();

    }

    public enum Command{

        SET,GET

    }

}
此时我们就可以进行调用:
public class MainTest {

    public static void main(String[] args) {

        Connection connection = new Connection("localhost",6379);

        System.out.println(connection.sendCommand(Protocol.buildRespByte(Protocol.Command.SET, "monkey".getBytes(), "2019".getBytes())));

        System.out.println(connection.sendCommand(Protocol.buildRespByte(Protocol.Command.GET, "monkey".getBytes())));

    }

}
然后得到返回结果为:
+OK

$4

2019
四、API包装
如上述调用方式,我们直接组装Connection以及入参进行调用是极其不友好的,因此我们创建一个Clientset和get方法进行封装,然后暴露出调用API:
public class Client {

    private Connection connection;

    public SelfRedisClient(String host, int ip) {

        connection = new Connection(host, ip);

    }

    public String set(String key, String value) {

        String result = connection.sendCommand(

                Protocol.buildRespByte(Protocol.Command.SET, key.getBytes(), value.getBytes()));

        return result;

    }

    public String get(String key) {

        String result = connection.sendCommand(

                Protocol.buildRespByte(Protocol.Command.GET, key.getBytes()));

        return result;

    }

}
然后调用Main方法:
public class MainTest {

    public static void main(String[] args) {

        Client client = new Client("localhost", 6379);

        System.out.println(client.set("ant", "123456"));

        System.out.println(client.get("ant"));

    }

}
可以看出结果正常返回,当然我们未对返回结果使用协议解析, 不过这样使用API调用方式已经得到了极大的简化:

五、使用多线程对Redis进行请求
上面的示例是在单线程的访问情况下进行的测试,那么在多线程情况下会如何呢。接下来我们构建一个线程池,使用多线程对Redis进行请求尝试,构建一个ClientRunnable方法如下:
public class ClientRunnable implements Runnable {

    private Client client;

    private String value;

    public ClientRunnable(Client client, String value) {

        this.client = client;

        this.value = value;

    }

    @Override

    public void run() {

        client.set("ant", value);

    }

}
main方法如下:
public class MainTest {

    public static void main(String[] args) {

        Client client = new client("localhost", 6379);

        ExecutorService pool = Executors.newCachedThreadPool();

        for(int i=0;i<20;i++){

            pool.execute(new ClientRunnable(client,"value"+i));

        }

    }

}
并在set方法中增加输出到控制台:
public String set(String key, String value) {

    String result = connection.sendCommand(

            Protocol.buildRespByte(Protocol.Command.SET, key.getBytes(), value.getBytes()));

    System.out.println("Thread name: " + Thread.currentThread().getName() + "[result]: "

            + result.replace("\r\n", "") + " [value]: " + value);

    return result;

}
查看结果如下:
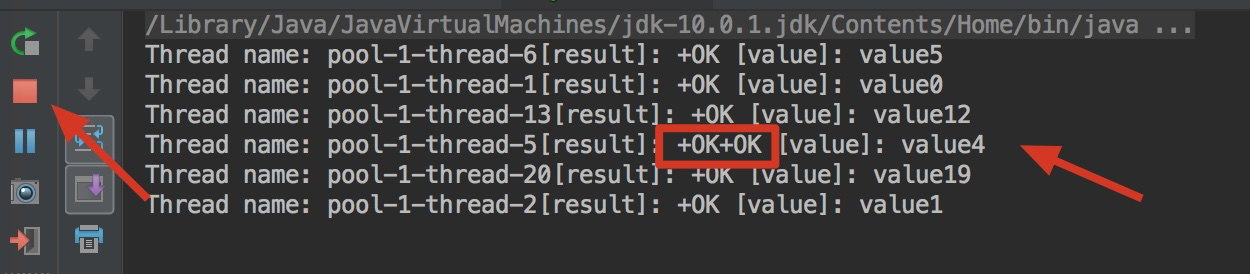
发现不但返回结果一次出现了两个甚至多个Redis服务其返回的OK,而且main方法还未执行结束。为什么呢,因为在多线程下Socket是线程不安全的,当多个线程访问Socket的时候,同时发送了请求,然后请求的返回结果会累积,然后被一个线程完全获取的情况,其余发送了请求的线程将一直阻塞等待返回,可是已经被先来的线程截取了流,因此程序无法继续运行。

因此现在就需要一个线程池来管理Connection,每个线程使用一个单独的Connection,对于没有拿到Connection的线程就在阻塞队列等待,直到有线程完成调用,并将Connection释放回线程池,被阻塞的线程才继续进行调用。如下图:
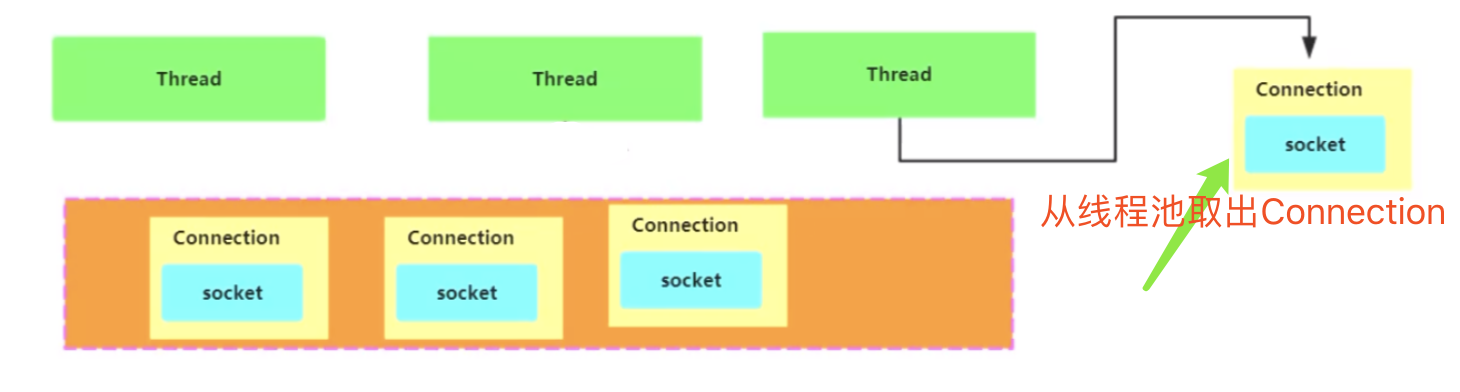
六、实现Connection的线程池管理
首先实现一个阻塞队列用于管理特定数量的Connection,当有Connection使用时就返回Connection,用完Connection后就进行归还。
public class RedisClientPool {

    private LinkedBlockingQueue<SelfRedisClient> linkedBlockingQueue;

    public RedisClientPool(String host,int port ,int connectionCount){

        this.linkedBlockingQueue = new LinkedBlockingQueue<SelfRedisClient>(connectionCount);

        for(int i=0;i<connectionCount;i++){

            Client client = new Client(host,port);

            linkedBlockingQueue.add(client);

        }

    }

    public Client getClient(){

        try{

            return linkedBlockingQueue.take();

        }catch (InterruptedException e){

            e.printStackTrace();

        }

        return null;

    }

    public void returnClient(Client client) {

        if(client != null){

            linkedBlockingQueue.add(client);

        }

    }

}
修改ClientRunnable方法,改为从线程池获取Connection进行请求调用:
public class ClientRunnable implements Runnable {

    private RedisClientPool redisClientPool;

    private String value;

    public ClientRunnable(RedisClientPool redisClientPool, String value) {

        this.redisClientPool = redisClientPool;

        this.value = value;

    }

    @Override

    public void run() {

        // 执行前先去管理Connection的阻塞队列中获取封装了Connection的SelfRedisClient

        Client client = redisClientPool.getClient();

        client.set("ant", value);

        // 使用完后进行归还client

        redisClientPool.returnClient(client);

    }

}
使用Main方法进行请求调用:
public class MainTest {

    public static void main(String[] args) {

        RedisClientPool redisClientPool = new RedisClientPool("localhost",6379,5);

        ExecutorService executorService = Executors.newCachedThreadPool();

        for(int i=0;i<10;i++){

            executorService.execute(new ClientRunnable(redisClientPool,"value"+i));

        }

    }

}
查看执行结果:

可以知道成功返回了所有的请求调用,最后也是线程9成功将value值修改为value8。
因此,可以发现使用一个阻塞队列对Connection资源进行管理不仅近能节省Connection的创建和回收时间,在本例中更核心的功能是实现了线程不安全资源的管理。
用BIO手写实现Redis客户端的探究(拒绝Jedis)的更多相关文章
- 学习T-io框架,从写一个Redis客户端开始
前言 了解T-io框架有些日子了,并且还将它应用于实战,例如 tio-websocket-server,tio-http-server等.但是由于上述两个server已经封装好,直接应用就可以.所 ...
- Redis客户端之Spring整合Jedis,ShardedJedisPool集群配置
Jedis设计 Jedis作为推荐的java语言redis客户端,其抽象封装为三部分: 对象池设计:Pool,JedisPool,GenericObjectPool,BasePoolableObjec ...
- Redis客户端开发包:Jedis学习-高级应用
事务 Jedis中事务的写法是将redis操作写在事物代码块中,如下所示,multi与exec之间为具体的事务. jedis.watch (key1, key2, ...); Transaction ...
- Redis客户端开发包:Jedis学习-入门
添加Jedis依赖 我们可以使用以下三种方式来添加Jedis依赖. 1.下载jar文件 从http://search.maven.org/下载最近的jedis包和Apache Commons Pool ...
- Redis客户端之Spring整合Jedis
1.下载相关jar包,并引入工程: jedis-2.4.2.jar commons-pool2-2.0.jar 2.将以下XML配置引入spring <bean id="shard ...
- 用C、python手写redis客户端,兼容redis集群 (-MOVED和-ASK),快速搭建redis集群
想没想过,自己写一个redis客户端,是不是很难呢? 其实,并不是特别难. 首先,要知道redis服务端用的通信协议,建议直接去官网看,博客啥的其实也是从官网摘抄的,或者从其他博客抄的(忽略). 协议 ...
- C基础 带你手写 redis adlist 双向链表
引言 - 导航栏目 有些朋友可能对 redis 充满着数不尽的求知欲, 也许是 redis 属于工作, 交流(面试)的大头戏, 不得不 ... 而自己当下对于 redis 只是停留在会用层面, 细节层 ...
- 使用java语言基于SMTP协议手写邮件客户端
使用java语言基于SMTP协议手写邮件客户端 1. 说明 电子邮件是互联网上常见的应用,他是互联网早期的产品,直至今日依然受到广大用户的喜爱(在中国可能因为文化背景不同,电子邮件只在办公的时候常用) ...
- spring整合redis客户端及缓存接口设计(转)
一.写在前面 缓存作为系统性能优化的一大杀手锏,几乎在每个系统或多或少的用到缓存.有的使用本地内存作为缓存,有的使用本地硬盘作为缓存,有的使用缓存服务器.但是无论使用哪种缓存,接口中的方法都是差不多. ...
随机推荐
- linux系统执行.exe文件
首先要了解一下Wine: Wine (“Wine Is Not an Emulator” 的首字母缩写)是一个能够在多种 POSIX-compliant 操作系统(诸如 Linux,Mac OSX 及 ...
- osg include lib -computer1
E:\\OpenSceneGraph\\OpenSceneGraph_3_6_install\\lib E:\\OpenSceneGraph\\3rdParty\\v140-x64\\lib Open ...
- 零基础学Python-第二章 :Python基础语法-06.变量的定义和常用操作
网络带宽计算器的原理 输出的内容用print 引入变量,在前面写一个变量,是一个有意义的单词.把123这个数值赋值给变量a 下面的代码可读性 要比上面高很多. 变量其他需要掌握的知识点 一般这样是用做 ...
- 论H5嵌入APP的联合登录的解决方案
什么是联合登录 因为公司产品的发展,会与第三方的一些商户进行对接,商户APP提供入口,进入我们的H5页,从而提供服务. 而商户希望用户在其APP进行账户登录后,进入H5页不再进行登录,所以我们的H5需 ...
- oracle归档空间
select GROUP_NUMBER, NAME, STATE, TOTAL_MB-FREE_MB as USED_MB, FREE_MB, USABLE_FILE_MB from v$asm_di ...
- web端自动化——selenium Page Object设计模式
Page Object设计模式的优点如下: ① 减少代码的重复. ② 提高测试用例的可读性. ③ 提高测试用例的可维护性,特别是针对UI频繁变化的项目. 当为Web页面编写测试时,需 ...
- mac 上更改环境变量
第一次配置Mac的环境变量,到网上转了一圈才找到正确方法. 打开终端,新建.bash_profile文件在~/目录下(如果电脑里已经有了这个文件,跳过这一步) touch ~/.bash_profil ...
- confluence6.14.1linux安装破解
一.简介 Confluence为团队提供一个协作环境.在这里,团队成员齐心协力,各擅其能,协同地编写文档和管理项目.从此打破不同团队.不同部门以及个人之间信息孤岛的僵局,Confluence真正实现了 ...
- Jenkins控制台乱码修改
原文地址:https://www.jianshu.com/p/8b9df45df401 方案一. 设置jenkins所在服务器环境变量,右键我的电脑→属性→高级系统设置→环境变量,添加JAVA_TOO ...
- rsync同步本地和服务器之间的文件
同步本地文件到服务器 rsync -zvrtopg --progress --delete test -e 'ssh -p 6665' yueyao@172.16.0.99:/media/sdb/us ...