Vue学习笔记-使用ElementUI
ElementUI官方地址:https://element.eleme.cn/2.11/#/zh-CN
1.初期准备
首先我们准备几个基本的样式文件:normalize.css 和 base.css
normalize.css:一个CSS RESET(样式重置)的文件,下载地址:https://necolas.github.io/normalize.css/,具体可以搜索 "reset.css和normalize.css"
base.css:根据项目或个人需求定义的一些基本样式,这里我们只简单定义一下
(一般我们将静态资源文件放在 /src/assets目录中)
*{

    outline: none;

}

html,

body {

  margin:;

  padding:;

  width: 100%;

  height: 100%;

}

textarea {

    resize: none !important;

}

input[type="text"]:disabled {

    background: 0 0!important;

    color: #c2c2c2;

    cursor: not-allowed;

    user-select: none;

}

.hidden {

    display: none;

}

.unselect {

    -moz-user-select: none;

    -webkit-user-select: none;

    -ms-user-select: none;

    -khtml-user-select: none;

    user-select: none;

}

#app {

  padding: 0px;

  margin: 0px;

  height: 100%;

}

#el-aside{

    width: 220px !important;

}

.el-menu.el-menu-vertical-demo{

    border-bottom: none;

    height: 100%;

}

.el-menu.el-menu-vertical-demo > li{

    text-align: left;

}
2.快速搭建
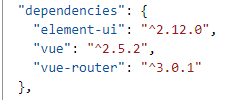
引入依赖命令:cnpm i element-ui -S
再package.json文件中可以看到引入依赖的信息,表示引入依赖成功
接下来要在 main.js 中全局引入 Element,代码如下
import Vue from 'vue';

import App from './App';

import router from './router';

import ElementUI from 'element-ui';

import 'element-ui/lib/theme-chalk/index.css';

import './assets/css/normalize.css';

import './assets/css/base.css';

Vue.config.productionTip = false;

Vue.use(ElementUI);

new Vue({

  el: '#app',

  router,

  components: { App },

  template: '<App/>'

});
2.使用Container容器布局
根据官方提供案例,修改 App.vue 文件
<template>

  <el-container id="app">

    <el-header>Header</el-header>

    <el-container>

      <el-aside width="200px">Aside</el-aside>

      <el-main>Main</el-main>

    </el-container>

    <el-footer>Footer</el-footer>

  </el-container>

</template>

<script>

export default {

  name: 'App'

};

</script>

<style>

.el-header,

.el-footer {

  background-color: #b3c0d1;

  color: #333;

  text-align: center;

  line-height: 60px;

}

.el-aside {

  background-color: #d3dce6;

  color: #333;

  text-align: center;

  line-height: 200px;

}

.el-main {

  background-color: #e9eef3;

  color: #333;

  text-align: center;

  line-height: 160px;

}

body > .el-container {

  margin-bottom: 40px;

}

.el-container:nth-child(5) .el-aside,

.el-container:nth-child(6) .el-aside {

  line-height: 260px;

}

.el-container:nth-child(7) .el-aside {

  line-height: 320px;

}

</style>
3.实现导航栏
修改 App.vue 文件
<template>

  <el-container id="app">

    <el-header>Header</el-header>

    <el-container>

      <el-aside id="el-aside">

        <el-menu default-active="1" class="el-menu-vertical-demo" background-color="#545c64" text-color="#fff" active-text-color="#ffd04b">

          <el-menu-item index="1">

            <i class="el-icon-menu"></i>

            <span>处理中心</span>

          </el-menu-item>

          <el-submenu index="2">

            <template slot="title">

              <i class="el-icon-s-unfold"></i>

              <span>我的工作台</span>

            </template>

            <el-menu-item index="2-1">

              <i class="el-icon-arrow-right"></i>

              <span>选项1</span>

            </el-menu-item>

            <el-menu-item index="2-2">

              <i class="el-icon-arrow-right"></i>

              <span>选项2</span></el-menu-item>

            <el-menu-item index="2-3">

              <i class="el-icon-arrow-right"></i>

              <span>选项3</span>

            </el-menu-item>

          </el-submenu>

          <el-menu-item index="3">

            <i class="el-icon-message-solid"></i>

            <span>消息中心</span>

          </el-menu-item>

        </el-menu>

      </el-aside>

      <el-main>Main</el-main>

    </el-container>

    <el-footer>Footer</el-footer>

  </el-container>

</template>

<script>

export default {

  name: 'App'

};

</script>

<style>

.el-header,

.el-footer {

  background-color: #b3c0d1;

  color: #333;

  text-align: center;

  line-height: 60px;

}

.el-aside {

  background-color: #d3dce6;

  color: #333;

  text-align: center;

  line-height: 200px;

}

.el-main {

  background-color: #e9eef3;

  color: #333;

  text-align: center;

  line-height: 160px;

}

body > .el-container {

  margin-bottom: 40px;

}

.el-container:nth-child(5) .el-aside,

.el-container:nth-child(6) .el-aside {

  line-height: 260px;

}

.el-container:nth-child(7) .el-aside {

  line-height: 320px;

}

</style>
实现效果图

Vue学习笔记-使用ElementUI的更多相关文章
- Vue学习笔记-2
前言 本文非vue教程,仅为学习vue过程中的个人理解与笔记,有说的不正确的地方欢迎指正讨论 1.computed计算属性函数中不能使用vm变量 在计算属性的函数中,不能使用Vue构造函数返回的vm变 ...
- Vue学习笔记-1
前言 本文不是Vue.js的教程,只是一边看官网Vue的教程文档一边记录并总结学习过程中遇到的一些问题和思考的笔记. 1.vue和avalon一样,都不支持VM初始时不存在的属性 而在Angular里 ...
- vue 学习笔记(二)
最近公司赶项目,一直也没时间看 vue,之前看下的都快忘得差不多了.哈哈哈,来一起回顾一下vue 学习笔记(一)后,继续向下看嘛. #表单输入绑定 基础用法 v-model 会忽略所有表单元素的 va ...
- vue学习笔记之:为何data是一个方法
vue学习笔记之:为何data是一个方法 在vue开发中,我们可以发现,data中的属性值是在function中return出来的.可为何data必须是一个函数呢?我们先看官方的解释: 当一个组件被定 ...
- vue学习笔记(八)组件校验&通信
前言 在上一章博客的内容中vue学习笔记(七)组件我们初步的认识了组件,并学会了如何定义局部组件和全局组件,上一篇内容仅仅只是对组件一个简单的入门,并没有深入的了解组件当中的其它机制,本篇博客将会带大 ...
- vue学习笔记(九)vue-cli中的组件通信
前言 在上一篇博客vue学习笔记(八)组件校验&通信中,我们学会了vue中组件的校验和父组件向子组件传递信息以及子组件通知父组件(父子组件通信),上一篇博客也提到那是对组件内容的刚刚开始,而本 ...
- vue学习笔记(十)路由
前言 在上一篇博客vue学习笔记(九)vue-cli中的组件通信内容中,我们学习组件通信的相关内容和进行了一些组件通信的小练习,相信大家已经掌握了vue-cli中的组件通信,而本篇博客将会带你更上一层 ...
- AntDesign vue学习笔记(七)Form 读写与图片上传
AntDesign Form使用布局相比传统Jquery有点繁琐 (一)先读写一个简单的input为例 <a-form :form="form" layout="v ...
- Vue学习笔记十三:Vue+Bootstrap+vue-resource从接口获取数据库数据
目录 前言 SpringBoot提供后端接口 Entity类 JPA操作接口 配置文件 数据库表自动映射,添加数据 写提供数据的接口 跨域问题 前端修改 效果图 待续 前言 Vue学习笔记九的列表案例 ...
随机推荐
- JavaScriptBreak 语句 continue 语句
break 语句用于跳出循环. continue 用于跳过循环中的一个迭代. Break 语句 我们已经在本教程之前的章节中见到过 break 语句.它用于跳出 switch() 语句. break ...
- sql —— having
在 SQL 中增加 HAVING 子句原因是,WHERE 关键字无法与聚合函数一起使用.HAVING 子句可以让我们筛选分组后的各组数据. 原表: 我们可以对上面数据根据性别这个字段进行分组查询,分别 ...
- mybatis分页插件pageHelper简单实用
工作的框架spring springmvc mybatis3 首先使用分页插件必须先引入maven依赖,在pom.xml中添加如下 <!-- 分页助手 --> <dependency ...
- Gym - 101617D_Jumping Haybales(BFS)
Sample Input 4 2 .### #... .#.. #.#. 3 1 .#. .#. .#. Sample Output 4 -1 题意:给一个n*n的图,每次最多能跳k个格子,只能向南( ...
- 2018-2-13-WPF-只允许打开一个实例
title author date CreateTime categories WPF 只允许打开一个实例 lindexi 2018-2-13 17:23:3 +0800 2018-2-13 17:2 ...
- 「BZOJ1005」[HNOI2008] 明明的烦恼
「BZOJ1005」[HNOI2008] 明明的烦恼 先放几个prufer序列的结论: Prufer序列是一种对有标号无根树的编码,长度为节点数-2. 具体存在无根树转化为prufer序列和prufe ...
- [ZJOI2007] 小Q的矩阵游戏 (模板—Dinic)
B. 矩阵游戏 题目描述 小Q是一个非常聪明的孩子,除了国际象棋,他还很喜欢玩一个电脑益智游戏——矩阵游戏.矩阵游戏在一个N*N黑白方阵进行(如同国际象棋一般,只是颜色是随意的).每次可以对该矩阵进行 ...
- JVM参数详细列表
-client :设置JVM使用client模式,特点启动较快(神机不明显(I5/8G/SSD)) -server :设置JVM使用server模式.64位JDK默认启动该模式 -agentlib:l ...
- 关于==和equals的探索
在我的概念之中,==在对比两个基本数据类型的时候,对比的是两者的值是否相同.而在对比两个引用数据类型的时候,比较的是两者的内存地址是否相同. 而equals方法,我一直认为这个方法是对比两个引用数据类 ...
- Layer(Web弹窗)
Layer弹窗的用法: <script src="jQuery的路径"></script> <!-- 你必须先引入jQuery1.8或以上版本 --& ...