Python - 利用flask搭建一个共享服务器
零、概述
我利用flask搭建了一个简易的共享服务器,分享给大家
一、python代码
import os

import time

from flask import Flask,render_template,url_for,redirect,send_from_directory

# 共享文件夹的根目录

rootdir = r'C:\Users\Administrator\Downloads\zlkt'

app = Flask(__name__)

@app.route('/doc/')

@app.route('/doc/<subdir>/')

def document(subdir=''):

    if subdir == '':

        # 名字为空,切换到根目录

        os.chdir(rootdir)

    else:

        fullname = rootdir + os.sep + subdir

        #  如果是文件,则下载

        if os.path.isfile(fullname):

            return redirect(url_for('downloader', fullname=fullname))

        #  如果是目录,切换到该目录下面

        else:

            os.chdir(fullname)

    current_dir = os.getcwd()

    current_list = os.listdir(current_dir)

    contents = []

    for i in sorted(current_list):

        fullpath = current_dir + os.sep + i

        # 如果是目录,在后面添加一个sep

        if os.path.isdir(fullpath):

            extra = os.sep

        else:

            extra = ''

        content = {}

        content['filename'] = i + extra

        content['mtime'] = time.strftime('%Y-%m-%d %H:%M:%S', time.localtime(os.stat(fullpath).st_mtime))

        content['size'] = str(round(os.path.getsize(fullpath) / 1024)) + 'k'

        contents.append(content)

    return render_template('test.html', contents=contents, subdir=subdir, ossep=os.sep)

@app.route('/download/<fullname>')

def downloader(fullname):

    filename = fullname.split(os.sep)[-1]

    dirpath = fullname[:-len(filename)]

    return send_from_directory(dirpath, filename, as_attachment=True)

if __name__ == '__main__':

    app.run()
二、html代码
<!DOCTYPE html>

<html lang="en">

<head>

    <meta charset="UTF-8">

    <title>文档管理</title>

    <link rel="stylesheet" href="https://cdn.jsdelivr.net/npm/bootstrap@3.3.7/dist/css/bootstrap.min.css"

       integrity="sha384-BVYiiSIFeK1dGmJRAkycuHAHRg32OmUcww7on3RYdg4Va+PmSTsz/K68vbdEjh4u"

       crossorigin="anonymous">

    <link rel="stylesheet" href="https://cdn.jsdelivr.net/npm/bootstrap@3.3.7/dist/css/bootstrap-theme.min.css"

       integrity="sha384-rHyoN1iRsVXV4nD0JutlnGaslCJuC7uwjduW9SVrLvRYooPp2bWYgmgJQIXwl/Sp"

       crossorigin="anonymous">

    <script src="https://cdn.jsdelivr.net/npm/bootstrap@3.3.7/dist/js/bootstrap.min.js"

       integrity="sha384-Tc5IQib027qvyjSMfHjOMaLkfuWVxZxUPnCJA7l2mCWNIpG9mGCD8wGNIcPD7Txa"

       crossorigin="anonymous"></script>

    <style type="text/css">

         .big-border {

        background: #fff;

        width: 1400px;

        margin: 0 auto;

        padding: 10px;

        }

        body {

            background: #f3f3f3;

        }

        .page-title {

            text-align: center;

        }

    </style>

</head>

<body>

  <div class="big-border">

    <h3 class="page-title">文档管理</h3>

    <hr>

    <h4>当前目录 {{ossep+subdir}}</h4>

    <hr>

    <table width="600px">

      <thead>

        <tr>

          <th>文件或目录名</th>

          <th>修改时间</th>

          <th>大小</th>

        </tr>

      </thead>

      <tbody>

        {% if subdir %}

        <tr>

          <td><a href="../">..{{ossep}}</a></td>

          <td></td>

          <td></td>

        </tr>

        {% endif %}

        {% for i in contents %}

        <tr>

          <td><a href="{{ url_for('document', subdir=subdir+i.filename) }}">{{ i.filename }}</a></td>

          <td>{{ i.mtime }}</td>

          <td>{{ i.size }}</td>

          </tr>

        {% endfor %}

      </tbody>

    </table>

    <hr>

  </div>

</body>

</html>
三、使用
1. 更改python代码中的rootdir,这里需要填你所共享的文件夹
2. render_template('test.html', ...),我将html命名为test.html,所以这里就是render_template('test.html', ...),你如果命名了其它名字,这里记得改一下
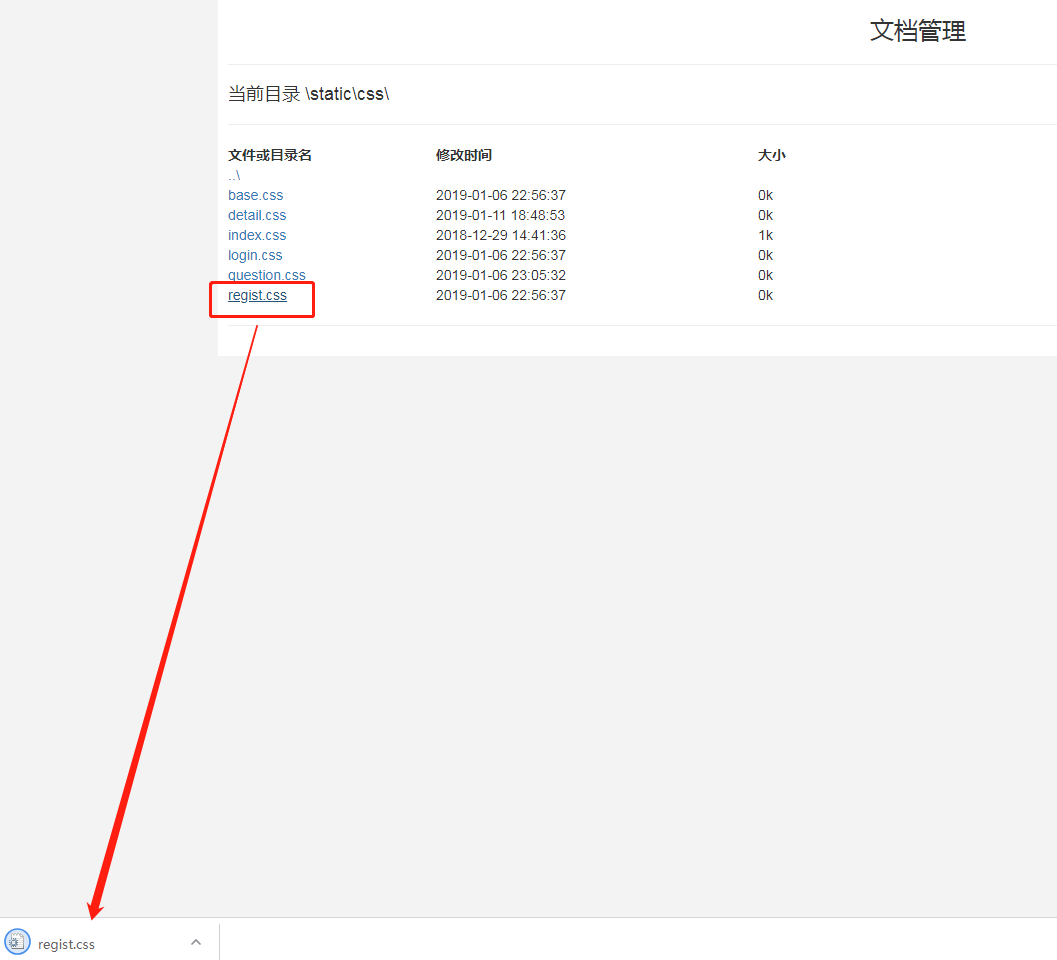
四、最后效果
运行脚本之后,用浏览器打开 http://127.0.0.1:5000/doc/,显示效果如下图
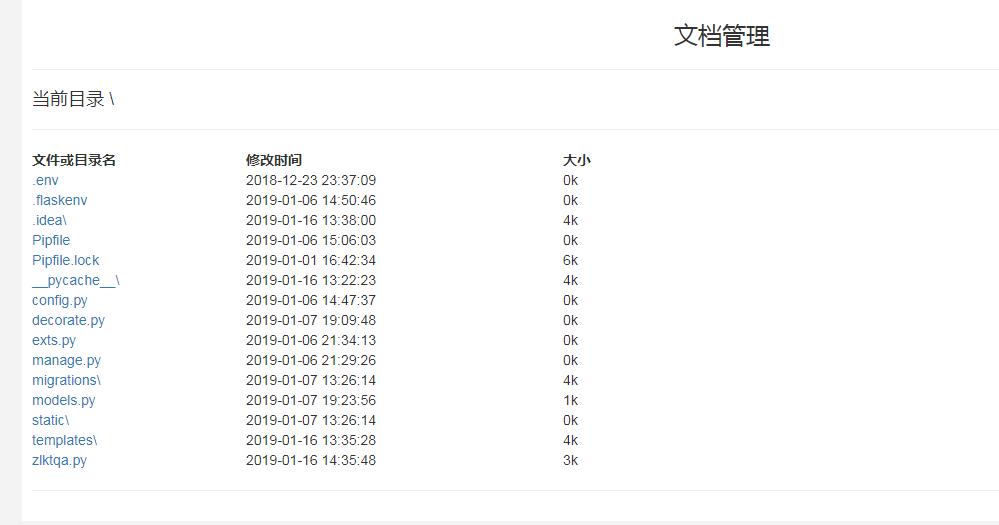
最后欢迎大家使用,和我交流。
Python - 利用flask搭建一个共享服务器的更多相关文章
- Python Flask搭建一个视频网站实战视频教程
点击了解更多Python课程>>> Python Flask搭建一个视频网站实战视频教程 第1章 课程介绍 第2章 预备开发环境 第3章 项目分析.建立目录及模型规划 第4章 建立前 ...
- 从零开始用 Flask 搭建一个网站(一)
前言 笔者之前未接触过 Python,只是略懂一点前端,所以说从零开始也相差无几吧.Flask 是一个轻量级的基于 Python 的框架,但是扩展性非常良好(Github 上 22000 多个 sta ...
- 从零开始用 Flask 搭建一个网站(三)
从零开始用 Flask 搭建一个网站(二) 介绍了有关于数据库的运用,接下来我们在完善一下数据在前端以及前端到后端之间的交互.本节涉及到前端,因此也会讲解一下 jinja2 模板.jQuery.aja ...
- 从零开始用 Flask 搭建一个网站(二)
从零开始用 Flask 搭建一个网站(一) 介绍了如何搭建 Python 环境,以及 Flask 应用基本项目结构.我们要搭建的网站是管理第三方集成的控制台,类似于 Slack. 本篇主要讲解数据如何 ...
- 使用python的Flask实现一个RESTful API服务器端
使用python的Flask实现一个RESTful API服务器端 最近这些年,REST已经成为web services和APIs的标准架构,很多APP的架构基本上是使用RESTful的形式了. 本文 ...
- 从零开始用 Flask 搭建一个网站(四)
前言 从零开始用 Flask 搭建一个网站(三) 介绍了网页前端与后端.前端与前端之间数据的交流.本节主要介绍一下如何应用 Flask-OAuthlib, 使用 Flask-OAuthlib 就可以轻 ...
- 利用 nodeJS 搭建一个简单的Web服务器(转)
下面的代码演示如何利用 nodeJS 搭建一个简单的Web服务器: 1. 文件 WebServer.js: //-------------------------------------------- ...
- 使用python的Flask实现一个RESTful API服务器端[翻译]
最近这些年,REST已经成为web services和APIs的标准架构,很多APP的架构基本上是使用RESTful的形式了. 本文将会使用python的Flask框架轻松实现一个RESTful的服务 ...
- 转:使用python的Flask实现一个RESTful API服务器端
提示:可以学习一下flask框架中对于密码进行校验的部分.封装了太多操作. 最近这些年,REST已经成为web services和APIs的标准架构,很多APP的架构基本上是使用RESTful的形式了 ...
随机推荐
- 关于Linux 虚拟机如何才能ping 通外网
需要虚拟机能够联网.以前都是用桥接模式让虚拟机跟主机通信,这几天查了好多资料,都没有写得很详细,自己捣鼓了很久,把步骤写下来吧. 虚拟机操作步骤: 点击虚拟机的“菜单栏”上的“编辑”,再点击“虚拟网络 ...
- 不修改加密文件名的勒索软件TeslaCrypt 4.0
不修改加密文件名的勒索软件TeslaCrypt 4.0 安天安全研究与应急处理中心(Antiy CERT)近期发现勒索软件TeslaCrypt的最新变种TeslaCrypt 4.0,它具有多种特性,例 ...
- Web下文件上传下载的路径问题
工程结构
- SpringMVC的JSON数据交互(七)-@Response,@RestController,@RequestBody用法
1.@RequestBody (自动将请求的数据封装为对象) 作用: @RequestBody注解用于读取http请求的内容(字符串),通过springmvc提供的HttpMessageConve ...
- yum和rpm的区别
rpm是由红帽公司开发的软件包管理方式,使用rpm我们可以方便的进行软件的安装.查询.卸载.升级等工作.但是rpm软件包之间的依赖性问题往往会很繁琐,尤其是软件由多个rpm包组成时.Yum(全称为 Y ...
- SRS服务器搭建,ffmpeg 本地推流,srs从本地拉流
参考: https://github.com/ossrs/srs/wiki/v2_CN_SampleFFMPEG git clone https://github.com/ossrs/srs cd s ...
- CentOS 6.5下快速搭建ftp服务器[转]
CentOS 6.5下快速搭建ftp服务器 1.用root 进入系统 2.使用命令 rpm -qa|grep vsftpd 查看系统是否安装了ftp,若安装了vsftp,使用这个命令会在屏幕上显示vs ...
- 使用SpringSecurity保护方法应用
(1)pom添加依赖 <dependency> <groupId>org.springframework.security</groupId> <artifa ...
- SIFT feature
转载:http://www.cnblogs.com/wangguchangqing/p/4853263.html 1.SIFT概述 SIFT的全称是Scale Invariant Feature Tr ...
- Redis消息通知(任务队列和发布订阅模式)
Redis学习笔记(十)消息通知(任务队列和发布订阅模式) 1. 任务队列 1.1 任务队列的特点 任务队列:顾名思义,就是“传递消息的队列”.与任务队列进行交互的实体有两类,一类是生产者(produ ...