[Node.js] 08 - Web Server and REST API
有了 [Node.js] 07 - Html and Http 作为基础,再继续下面的内容。
顺便再介绍一个:adminlit

REST API
Ref: REST API 最佳入门指南
Ref: RPC vs RESTful【思考】
Ref: WEB开发中,使用JSON-RPC好,还是RESTful API好?【思考】
REST是Representational State Transfer的缩写,描述创建HTTP API的标准方法。
他发现这四种常用的行为(查看(view),创建(create),编辑(edit)和删除(delete))都可以直接映射到HTTP 中已实现的GET, POST, PUT 和 DELETE方法。
HTTP 中的8中不同的方法:GET,POST,PUT,DELETE, OPTIONS, HEAD, TRACE,CONNECT
大多数情况下,当你在使用你的浏览器的点点看看的时候,其实只用到HTTP的GET方法。GET方法是在你向因特网请求资源的时候才会用到的。
当你提交一个表单时,你就会经常用到POST方法来回传数据到网站上。
至于其他的几种方法,某些浏览器可能根本就没有去完全实现它们。但是,如果是供我们使用的话,就没什么问题。
问题是:我们有很多要选择去帮助描述这四大行为的HTTP方法,我们将会用到那些已经知道如何去使用这些不同的HTTP方法的客户端类库。
【感觉也没说什么】
Node.js RESTful API
REST即表述性状态传递(英文:Representational State Transfer,简称REST)是Roy Fielding博士在2000年他的博士论文中提出来的一种软件架构风格。
表述性状态转移是一组架构约束条件和原则。满足这些约束条件和原则的应用程序或设计就是RESTful。【什么该做,什么不该做】
参见:RESTful 架构详解
举例说明:
需要注意的是,REST是设计风格而不是标准。REST通常基于使用HTTP,URI,和XML(标准通用标记语言下的一个子集)以及HTML(标准通用标记语言下的一个应用)这些现有的广泛流行的协议和标准。
(1) REST 通常使用 JSON 数据格式。
{

   "user1" : {

      "name" : "mahesh",

      "password" : "password1",

      "profession" : "teacher",

      "id": 1

   },

   "user2" : {

      "name" : "suresh",

      "password" : "password2",

      "profession" : "librarian",

      "id": 2

   },

   "user3" : {

      "name" : "ramesh",

      "password" : "password3",

      "profession" : "clerk",

      "id": 3

   }

}
(2) 基于以上数据,我们创建以下 RESTful API:
回想:(查看(view),创建(create),编辑(edit)和删除(delete))都可以直接映射到HTTP 中已实现的GET, POST, PUT 和 DELETE方法。
Node.js 路由
我们要为路由提供请求的 URL 和其他需要的 GET 及 POST 参数,随后路由需要根据这些数据来执行相应的代码。因此,我们需要查看 HTTP 请求,从中提取出请求的 URL 以及 GET/POST 参数。
我们需要的所有数据都会包含在request 对象中,该对象作为 onRequest() 回调函数的第一个参数传递。
解析这些数据: url 和 querystring 模块。
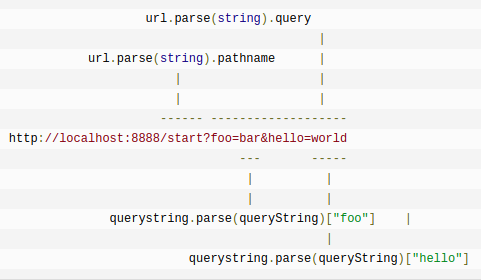
- 一段服务端代码,获得请求后的处理过程
var http = require("http");

var url  = require("url");  // 解析协议的模块

function start() {

  // 定义了一个处理request的方法

  function onRequest(request, response) {

    var pathname = url.parse(request.url).pathname;

    console.log("Request for " + pathname + " received.");

    route(pathname);  // ----> 可以做一个if...else来判断,封装在另一个文件中

    response.writeHead(200, {"Content-Type": "text/plain"});

    response.write("Hello World");

    response.end();

  }

  http.createServer(onRequest).listen(8888);

  console.log("Server has started.");

}

exports.start = start;
router.js 的文件
function route(pathname) {

  console.log("About to route a request for " + pathname);

}

exports.route = route;
- 这是一个if...else的例子
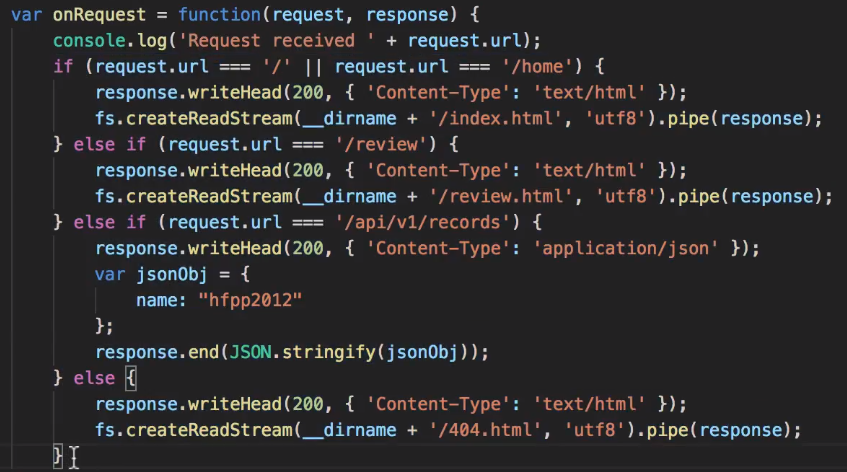
- 路由封装
From: 轻松学 Node.js - 基础篇 #14 web 服务器 part 6 重构路由代码
这部分也算是以上的一个总结,功能分离的一个小例子。
app.js - 使用的地方
var server  = require('./server');

var router  = require('./router');

var handler = require('./handler');

var handle = {};

handle["/"]               = handler.home;

handle['/home']           = handler.home;

handle['/review']         = handler.review;

handle['/api/v1/records'] = handler.api_records;

server.startServer(router.route, handle);  // 粘贴函数
server.js - 黏贴函数的实现
var http = require('http');

var fs   = require('fs');

function startServer(route, handle) {


    var onRequest = function(request, response) {

        console.log('Request received ' + request.url);
        /*  */

        route(handle, request.url, response);  // ---> 外壳要执行具体路由功能

    }

    var server = http.createServer(onRequest);

    server.listen(3000, '127.0.0.1');

    console.log('Server started on localhost port 3000');

}

module.exports.startServer = startServer;
router.js - 路由执行函数
var fs = require('fs');

function route(handle, pathname, response) {

    console.log('Routing a request for ' + pathname);

    if (typeof handle[pathname] === 'function') {

        handle[pathname](response);

    } else {

        response.writeHead(200, { 'Content-Type': 'text/html' });

        fs.createReadStream(__dirname + '/404.html', 'utf8').pipe(response);

    }

}

module.exports.route = route;
handler.js - 路由时的Index
var fs = require('fs');

function home(response) {

    response.writeHead(200, { 'Content-Type': 'text/html' });

    fs.createReadStream(__dirname + '/index.html', 'utf8').pipe(response);

}

function review(response) {

    response.writeHead(200, { 'Content-Type': 'text/html' });

    fs.createReadStream(__dirname + '/review.html', 'utf8').pipe(response);

}

function api_records(response) {

    response.writeHead(200, { 'Content-Type': 'application/json' });

    var jsonObj = {

        name: "hfpp2012"

    };

    response.end(JSON.stringify(jsonObj));

}

module.exports = {

    home: home,

    review: review,

    api_records: api_records

}
GET / POST 请求
服务器都需要跟用户的浏览器打交道,如表单提交。
var http = require('http');

var url  = require('url' );

var util = require('util');

http.createServer(function(req, res){

    res.writeHead(200, {'Content-Type': 'text/plain; charset=utf-8'});

    res.end(util.inspect( url.parse(req.url, true) ));  // util.inspect: 将任意对象转换 为字符串的方法
}).listen(3000);
- Server 获取 URL 的参数:
var http = require('http');

var url  = require('url ');

var util = require('util');

http.createServer(function(req, res){

    res.writeHead(200, {'Content-Type': 'text/plain'});

    // 解析 url 参数

    var params = url.parse(req.url, true).query;

    // 写返回结果,之后传给浏览器

    res.write("网站名:" + params.name);

    res.write("\n");

    res.write("网站 URL:" + params.url);

    res.end();

}).listen(3000);
- Server 获取 POST 请求内容
POST 请求的内容全部的都在请求体中,http.ServerRequest 并没有一个属性内容为请求体,原因是等待请求体传输可能是一件耗时的工作。
比如上传文件,而很多时候我们可能并不需要理会请求体的内容,恶意的POST请求会大大消耗服务器的资源,所以 node.js 默认是不会解析请求体的,当你需要的时候,需要手动来做。
var http        = require('http');

var querystring = require('querystring');

http.createServer( function(req, res) {

    // 定义了一个post变量,用于暂存请求体的信息

    var post = '';

    // 通过req的data事件监听函数,每当接受到请求体的数据,就累加到post变量中

    req.on('data', function(chunk){

        post += chunk;

    });

    // 在end事件触发后,通过querystring.parse将post解析为真正的POST请求格式,然后向客户端返回。

    req.on('end', function(){        // --> 接收包的最后部分 接收完毕

        post = querystring.parse(post);

        res.end(util.inspect(post));  // --> 接收完毕,那就稍加处理下这里是即刻回应客户端

    });

}).listen(3000);
- 表单 通过 POST 提交并输出数据:
var http        = require('http');

var querystring = require('querystring');

----------------------------------------------------------------------------------

var postHTML =

  '<html><head><meta charset="utf-8"><title>菜鸟教程 Node.js 实例</title></head>' +

  '<body>' +

  '<form method="post">' +

  '网站名: <input name="name"><br>' +

  '网站 URL: <input name="url"><br>' +

  '<input type="submit">' +

  '</form>' +

  '</body></html>';

----------------------------------------------------------------------------------

http.createServer(function (req, res) {

  var body = "";

  req.on('data', function (chunk) {

    body += chunk;

  });

  req.on('end', function () {

    // 解析参数

    body = querystring.parse(body);

    // 设置响应头部信息及编码

    res.writeHead(200, {'Content-Type': 'text/html; charset=utf8'});

    if(body.name && body.url) { // 输出提交的数据

        res.write("网站名:" + body.name);

        res.write("<br>");

        res.write("网站 URL:" + body.url);

    } else {  // 输出表单

        res.write(postHTML);

    }

    res.end();

  });

}).listen(3000);
- 以下应该是:相对于“路由封装”代码例子的有变化的部分。
server.js
var http        = require('http');

var fs          = require('fs');

var url         = require('url');

var querystring = require('querystring');

function startServer(route, handle) {

    var onRequest = function(request, response) {

        var pathname = url.parse(request.url).pathname;

        console.log('Request received ' + pathname);

        var data = [];

        request.on("error", function(err) {

            console.error(err);

        }).on("data", function(chunk) {

            data.push(chunk);

        }).on('end', function() {
       -----------------------------------------------------------------

            if (request.method === "POST") {    // ---->

                if (data.length > 1e6) {

                    request.connection.destroy();

                }

                data = Buffer.concat(data).toString();

                route(handle, pathname, response, querystring.parse(data));

            } else {

                var params = url.parse(request.url, true).query;

                route(handle, pathname, response, params);

            }
            -----------------------------------------------------------------

        });

    }

    var server = http.createServer(onRequest);

    server.listen(3000, '127.0.0.1');

    console.log('Server started on localhost port 3000');

}

module.exports.startServer = startServer;
handler.js
var fs = require('fs');

function home(response) {

    response.writeHead(200, { 'Content-Type': 'text/html' });

    fs.createReadStream(__dirname + '/index.html', 'utf8').pipe(response);

}

function review(response) {

    response.writeHead(200, { 'Content-Type': 'text/html' });

    fs.createReadStream(__dirname + '/review.html', 'utf8').pipe(response);

}

function api_records(response, params) {

    response.writeHead(200, { 'Content-Type': 'application/json' });

    response.end(JSON.stringify(params));

}
/**
function api_records(response) {
response.writeHead(200, { 'Content-Type': 'application/json' });
var jsonObj = {
name: "hfpp2012"
};
response.end(JSON.stringify(jsonObj));
}
**/
module.exports = {

    home: home,

    review: review,

    api_records: api_records

}
index.html
<!DOCTYPE html>

<html lang="en">

<head>

    <meta charset="UTF-8">

    <meta name="viewport" content="width=device-width, initial-scale=1.0">

    <meta http-equiv="X-UA-Compatible" content="ie=edge">

    <title>hfpp2012</title>

</head>

<body>

    <form action="/api/v1/records" method="post">

        name: <input type="text" name="name" /> age: <input type="text" name="age" />

        <input type="submit" value="Submit">

    </form>

</body>

</html>
Web 模块
目前最主流的三个Web服务器是Apache、Nginx、IIS。
* Client - 客户端,一般指浏览器,浏览器可以通过 HTTP 协议向服务器请求数据。
* Server - 服务端,一般指 Web 服务器,可以接收客户端请求,并向客户端发送响应数据。
* Business - 业务层, 通过 Web 服务器处理应用程序,如与数据库交互,逻辑运算,调用外部程序等。
* Data - 数据层,一般由数据库组成。
- 使用 Node 创建 Web 服务器
http 模块主要用于搭建 HTTP 服务端和客户端。
服务器:返回一个简单的页面 index.html 文件
<!DOCTYPE html>

<html>

<head>

   <meta charset="utf-8">

   <title>菜鸟教程(runoob.com)</title>

</head>

<body>

    <h1>我的第一个标题</h1>

    <p>我的第一个段落。</p>

</body>

</html>
Server code:
var http = require('http');

var fs   = require('fs');

var url  = require('url');

// 创建服务器

http.createServer( function (request, response) {

   // 解析请求,包括文件名

   var pathname = url.parse(request.url).pathname;

   // 输出请求的文件名

   console.log("Request for " + pathname + " received.");

   // 从文件系统中读取请求的文件内容,客户端给出请求的文件index.html路径

   fs.readFile(pathname.substr(1), function (err, data) {

      if (err) {

         console.log(err);

         // HTTP 状态码: 404 : NOT FOUND

         // Content Type: text/plain

         response.writeHead(404, {'Content-Type': 'text/html'});

      }else{

         // HTTP 状态码: 200 : OK

         // Content Type: text/plain

         response.writeHead(200, {'Content-Type': 'text/html'});

         // 响应文件内容

         response.write(data.toString());

      }

      //  发送响应数据

      response.end();

   });

}).listen(8080);

// 控制台会输出以下信息

console.log('Server running at http://127.0.0.1:8080/');
浏览器:请求 index.html 文件
var http = require('http');

// 用于请求的选项

var options = {

   host: 'localhost',

   port: '8080',

   path: '/index.html'

};

// 处理响应的回调函数

var callback = function(response) {

   // 不断更新数据

   var body = '';

   response.on('data', function(data) {

      body += data;

   });

   response.on('end', function() {

      // 数据接收完成

      console.log(body);

   });

}

// 向服务端发送请求

var req = http.request(options, callback);

req.end();
运行代码
$ node server.js

Server running at http://127.0.0.1:8080/

$ node  client.js

<!DOCTYPE html>

<html>

<head>

<meta charset="utf-8">

<title>菜鸟教程(runoob.com)</title>

</head>

<body>

    <h1>我的第一个标题</h1>

    <p>我的第一个段落。</p>

</body>

</html>
- Web 服务器支持JSON
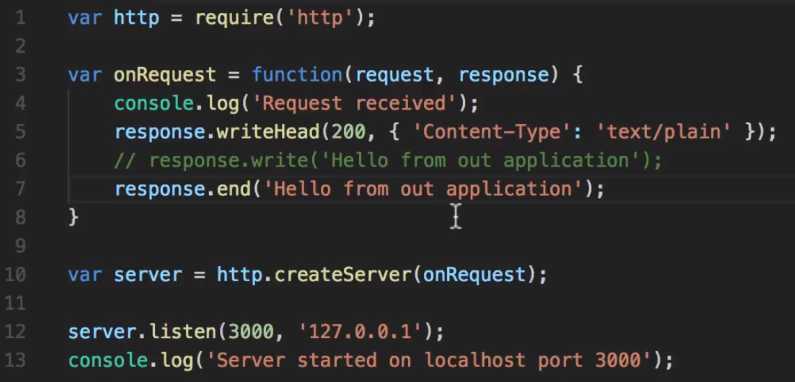
对比可见,改变了response.end参数的内容,即是支持了JSON。

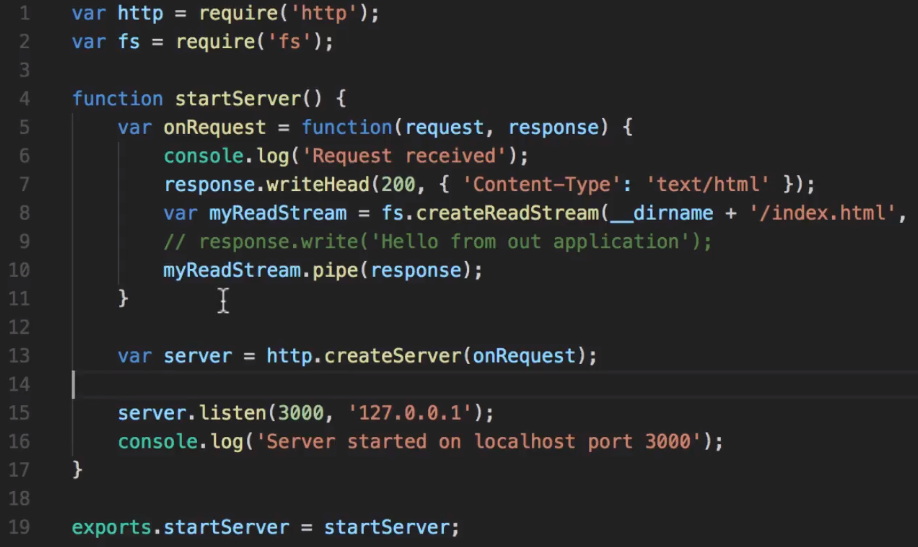
- Web 服务器直接支持html文件或流
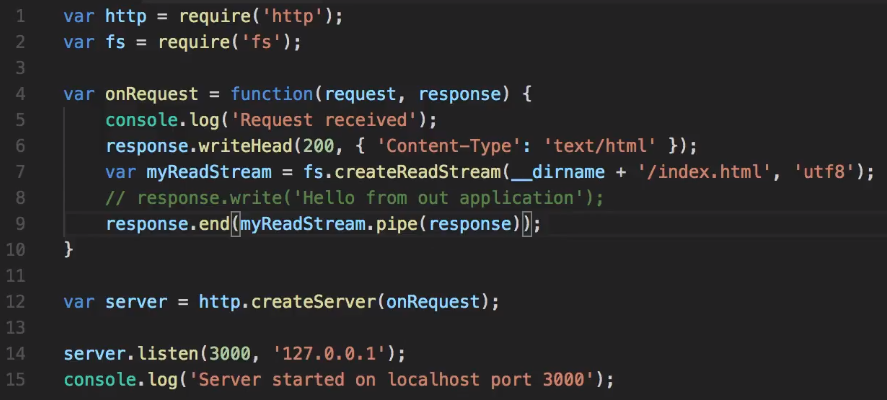
- 封装在一个函数,在另一个文件调用
Node.js Express 框架
其实还是nodejs提供的原本的request和response对象:
req.app:当callback为外部文件时,用req.app访问express的实例

req.baseUrl:获取路由当前安装的URL路径

req.body / req.cookies:获得「请求主体」/ Cookies

req.fresh / req.stale:判断请求是否还「新鲜」

req.hostname / req.ip:获取主机名和IP地址

req.originalUrl:获取原始请求URL

req.params:获取路由的parameters

req.path:获取请求路径

req.protocol:获取协议类型

req.query:获取URL的查询参数串

req.route:获取当前匹配的路由

req.subdomains:获取子域名

req.accepts():检查可接受的请求的文档类型

req.acceptsCharsets / req.acceptsEncodings / req.acceptsLanguages:返回指定字符集的第一个可接受字符编码

req.get():获取指定的HTTP请求头

req.is():判断请求头Content-Type的MIME类型
request属性
res.app:同req.app一样

res.append():追加指定HTTP头

res.set()在res.append()后将重置之前设置的头

res.cookie(name,value [,option]):设置Cookie

opition: domain / expires / httpOnly / maxAge / path / secure / signed

res.clearCookie():清除Cookie

res.download():传送指定路径的文件

res.get():返回指定的HTTP头

res.json():传送JSON响应

res.jsonp():传送JSONP响应

res.location():只设置响应的Location HTTP头,不设置状态码或者close response

res.redirect():设置响应的Location HTTP头,并且设置状态码302

res.render(view,[locals],callback):渲染一个view,同时向callback传递渲染后的字符串,如果在渲染过程中有错误发生next(err)将会被自动调用。callback将会被传入一个可能发生的错误以及渲染后的页面,这样就不会自动输出了。

res.send():传送HTTP响应

res.sendFile(path [,options] [,fn]):传送指定路径的文件 -会自动根据文件extension设定Content-Type

res.set():设置HTTP头,传入object可以一次设置多个头

res.status():设置HTTP状态码

res.type():设置Content-Type的MIME类型
response属性
Switch请求各种资源
路由决定了由哪个指定脚本去响应客户端请求。
超级简单的hello world,扩展有点小功能(switch)的服务器。
例如:在浏览器中访问 http://127.0.0.1:8081/list_user。
var express = require('express');

var app     = express();

//  主页输出 "Hello World"

app.get('/', function (req, res) {

   console.log("主页 GET 请求");

   res.send('Hello GET');

})

//  POST 请求

app.post('/', function (req, res) {

   console.log("主页 POST 请求");

   res.send('Hello POST');

})

//  /del_user 页面响应

app.get('/del_user', function (req, res) {

   console.log("/del_user 响应 DELETE 请求");

   res.send('删除页面');

})

//  /list_user 页面 GET 请求

app.get('/list_user', function (req, res) {

   console.log("/list_user GET 请求");

   res.send('用户列表页面');

})

// 对页面 abcd, abxcd, ab123cd, 等响应 GET 请求

app.get('/ab*cd', function(req, res) {

   console.log("/ab*cd GET 请求");

   res.send('正则匹配');

})

var server = app.listen(8081, function () {

  var host = server.address().address

  var port = server.address().port

  console.log("应用实例,访问地址为 http://%s:%s", host, port)

})
如果获得的是静态文件
诸如:图片, CSS,JavaScript 等。
我们可以到 public/images 目录下放些图片,如下所示:
node_modules

server.js

public/

public/images

public/images/logo.png
Server coding:
var express = require('express');

var app     = express();

app.use( express.static('public') );

app.get('/', function (req, res) {

   res.send('Hello World');

})


var server = app.listen(8081, function () {

  var host = server.address().address

  var port = server.address().port

  console.log("应用实例,访问地址为 http://%s:%s", host, port)

})
在浏览器中访问
http://127.0.0.1:8081/images/logo.png
GET 方法
process_get 路由器来处理输入
(1) 浏览器访问 http://127.0.0.1:8081/index.htm
(2) 找到index.htm文件
app.use(express.static('public'));

app.get('/index.htm', function (req, res) {

   res.sendFile( __dirname + "/" + "index.htm" );

})
(3) 用户获得index.htm 文件代码,然后点击按钮,触发action。
<html>

<body>

  <form action="http://127.0.0.1:8081/process_get" method="GET">

    First Name: <input type="text" name="first_name">  <br>

    Last Name:  <input type="text" name="last_name">

    <input type="submit" value="Submit">

  </form>

</body>

</html>
(4) 变量赋值后返回给client新的页面。
app.get('/process_get', function (req, res) {

   // 输出 JSON 格式

   var response = {

       "first_name":req.query.first_name,

       "last_name" :req.query.last_name

   };

   console.log(response);

   res.end(JSON.stringify(response));

})
POST 方法
(3) 不同的路由函数结果。
<html>

<body>

  <form action="http://127.0.0.1:8081/process_post" method="POST">

    First Name: <input type="text" name="first_name">  <br>

    Last Name:  <input type="text" name="last_name">

    <input type="submit" value="Submit">

  </form>

</body>

</html>
(4) 执行成为了app.post(...)
app.post('/process_post', urlencodedParser, function (req, res) {

   // 输出 JSON 格式

   var response = {

       "first_name":req.body.first_name,

       "last_name":req.body.last_name

   };

   console.log(response);

   res.end(JSON.stringify(response));

})
文件上传
<html>

<head>

  <title>文件上传表单</title>

</head>

<body>

  <h3>文件上传:</h3>

  选择一个文件上传: <br />

  <form action="/file_upload" method="post"enctype="multipart/form-data">

    <input type="file" name="image" size="50" />

    <br />

    <input type="submit" value="上传文件" />

  </form>

</body>

</html>
服务器代码:
var express = require('express');

var app     = express();

var fs      = require("fs");

var bodyParser = require('body-parser');

var multer     = require('multer');

app.use(express.static('public'));

app.use(bodyParser.urlencoded({ extended: false }));

app.use(multer({ dest: '/tmp/'}).array('image'));

app.get('/index.htm', function (req, res) {

   res.sendFile( __dirname + "/" + "index.htm" );

})

app.post('/file_upload', function (req, res) {

   console.log(req.files[0]);  // 上传的文件信息

   var des_file = __dirname + "/" + req.files[0].originalname;

   fs.readFile( req.files[0].path, function (err, data) {

        fs.writeFile(des_file, data, function (err) {

         if( err ){

              console.log( err );

         }else{

               response = {

                   message:'File uploaded successfully',

                   filename:req.files[0].originalname

              };

          }

          console.log( response );

          res.end( JSON.stringify( response ) );

       });

   });

})

var server = app.listen(8081, function () {

  var host = server.address().address

  var port = server.address().port

  console.log("应用实例,访问地址为 http://%s:%s", host, port)

})
Cookie 管理
使用中间件向 Node.js 服务器发送 cookie 信息,以下代码输出了客户端发送的 cookie 信息:
// express_cookie.js 文件

var express      = require('express')

var cookieParser = require('cookie-parser')

var util = require('util');

var app = express()

app.use(cookieParser())

app.get('/', function(req, res) {

    console.log("Cookies: " + util.inspect(req.cookies));

})

app.listen(8081)
[Node.js] 08 - Web Server and REST API的更多相关文章
- Node.js学习 - Web Server
Client - 客户端,一般指浏览器,浏览器可以通过 HTTP 协议向服务器请求数据. Server - 服务端,一般指 Web 服务器,可以接收客户端请求,并向客户端发送响应数据. Busines ...
- 7个Node.js的Web框架
NodeJS也就是Node,是众所周知的使用javascript构建Web应用框架,它启动一个服务器非常简单,如下: var http = require('http'); http.createSe ...
- 快速使用node.js进行web开发
首先关于node.js的学习,这里推荐一本比较好的教程,nodejs web开发指南,该书通俗易懂地将node.js语言特性讲解完之后,又从一个项目角度带领读者使用node.js学习web开发.相信这 ...
- 使用 Node.js 搭建 Web 服务器
使用Node.js搭建Web服务器是学习Node.js比较全面的入门教程,因为实现Web服务器需要用到几个比较重要的模块:http模块.文件系统.url解析模块.路径解析模块.以及301重定向技术等, ...
- koa : Express出品的下一代基于Node.js的web框架
https://www.liaoxuefeng.com/wiki/001434446689867b27157e896e74d51a89c25cc8b43bdb3000/001434501579966a ...
- node.js之web开发 koa入门
用Node.js开发Web服务器端,有几个显著的优势: 速度快,非常快!这得益于Node.js天生是异步的. 常见的Web框架包括:Express,Sails.js,koa,Meteor,DerbyJ ...
- Node.js学习笔记——Node.js开发Web后台服务
一.简介 Node.js 是一个基于Google Chrome V8 引擎的 JavaScript 运行环境.Node.js 使用了一个事件驱动.非阻塞式 I/O 的模型,使其轻量又高效.Node.j ...
- Beaglebone Black– 智能家居控制系统 LAS - 网页服务器 Node.js 、Web Service、页面 和 TCP 请求转 UDP 发送
上一篇,纯粹玩 ESP8266,写入了 init.lua 能收发 UDP.这次拿 BBB 开刀,用 BBB host 一个 web server ,用于与用户交互,数据来自 ESP8266 的 UDP ...
- Express 4.x Node.js的Web框架
为了防止无良网站的爬虫抓取文章,特此标识,转载请注明文章出处.LaplaceDemon/SJQ. http://www.cnblogs.com/shijiaqi1066/p/3821150.html ...
随机推荐
- phpstorm破解
由于JetBrains系列新版本注册激活发生了变化,所以原来的激活方式已经不能在使用. 只能用新的方式来破解了.此方式支持所有系列的新版版.包括IDEA15,PHPSTORM10,WEBSTORM11 ...
- python 爬虫不停换代理
内网看到的一个小技巧,卧槽,感觉真TM厉害 函数均放到main函数内即可 def get_proxy(): url="http://www.xicidaili.com" req=u ...
- STL——配接器、常用算法使用
学习STL,必然会用到它里面的适配器和一些常用的算法.它们都是STL中的重要组成部分. 适配器 在STL里可以用一些容器适配得到适配器.例如其中的stack和queue就是由双端队列deque容器适配 ...
- 数据结构C语言版--单链表的基本功能实现
/* * 构造一个链式存储的线性表(当输入9999时,结束构造过程),然后输出该线性表 * 并统计该线性链表的长度 . *注:new和delete是C++的运算符 malloc和free是C++/C的 ...
- iphone程序适配ipad可以用下面的宏进行尺寸改写
//判断是否为iPad #define ISIPAD [[[UIDevice currentDevice].model substringToIndex:4] isEqualToString:@&qu ...
- 在iOS端如何使用Charles用作http调试
转:http://blog.csdn.net/messageloop3/article/details/9966727 在iOS端如何使用Charles用作http调试 After noticing ...
- Java SPI机制学习笔记
最近在阅读框架源代码时,常常看到 SPI 的子包, 忍不住查了下: Service Provider Interface : 服务提供接口. JavaSPI 实际上是“基于接口的编程+策略模式+配置文 ...
- centos7安装postgres-10
目录 安装 下载yum repo 安装server和客户端 初始化db 启动Postgres 设置开机启动 修改data目录 停止服务 迁移data目录 重启 连接测试 修改允许远程其他IP连接 前一 ...
- 手机 https 抓包---Charles篇
原文出处: Lu尼玛的想疗院 作为一名现代前端,除了要掌握html,css,js 以及一系列乱七八糟框架之外,还得懂得如何抓包改包.当然,常规的网站或者自主开发的我们往往使用 chrome或者 fir ...
- Uploadify导致Chrome频繁崩溃Crash
上传功能是工作中经常会遇到的问题,应该作为开发标配的技能每个人都会. 我选用的是Uploadify 3.1.2进行上传,使用方法参考之前的一篇文章, 今天记录下一个我遇到的很神奇的bug chrome ...

