iOS开发UI篇—UITableview控件基本使用
iOS开发UI篇—UITableview控件基本使用
一、一个简单的英雄展示程序
NJHero.h文件代码(字典转模型)
 #import <Foundation/Foundation.h>

 @interface NJHero : NSObject

 /**

  *  头像

  */

 @property (nonatomic, copy) NSString *icon;

 /**

  *  名称

  */

 @property (nonatomic, copy) NSString *name;

 /**

  *  描述

  */

 @property (nonatomic, copy) NSString *intro;

 - (instancetype)initWithDict:(NSDictionary *)dict;

 + (instancetype)heroWithDict:(NSDictionary *)dict;

 @end
NJViewController.m文件代码
 #import "NJViewController.h"

 #import "NJHero.h"

 @interface NJViewController ()<UITableViewDataSource, UITableViewDelegate>

 /**

  *  保存所有的英雄数据

  */

 @property (nonatomic, strong) NSArray *heros;

 @property (weak, nonatomic) IBOutlet UITableView *tableView;

 @end

 @implementation NJViewController

 #pragma mark - 懒加载

 - (NSArray *)heros

 {

     if (_heros == nil) {

         // 1.获得全路径

         NSString *fullPath =  [[NSBundle mainBundle] pathForResource:@"heros" ofType:@"plist"];

         // 2.更具全路径加载数据

         NSArray *dictArray = [NSArray arrayWithContentsOfFile:fullPath];

         // 3.字典转模型

         NSMutableArray *models = [NSMutableArray arrayWithCapacity:dictArray.count];

         for (NSDictionary *dict in dictArray) {

             NJHero *hero = [NJHero heroWithDict:dict];

             [models addObject:hero];

         }

         // 4.赋值数据

         _heros = [models copy];

     }

     // 4.返回数据

     return _heros;

 }

 - (void)viewDidLoad

 {

     [super viewDidLoad];

     // 设置Cell的高度

     // 当每一行的cell高度一致的时候使用属性设置cell的高度

     self.tableView.rowHeight = ;

     self.tableView.delegate = self;

 }

 #pragma mark - UITableViewDataSource

 // 返回多少组

 - (NSInteger)numberOfSectionsInTableView:(UITableView *)tableView

 {

     return ;

 }

 // 返回每一组有多少行

 - (NSInteger) tableView:(UITableView *)tableView numberOfRowsInSection:(NSInteger)section

 {

     return self.heros.count;

 }

 // 返回哪一组的哪一行显示什么内容

 - (UITableViewCell *)tableView:(UITableView *)tableView cellForRowAtIndexPath:(NSIndexPath *)indexPath

 {

     // 1.创建CELL

     UITableViewCell *cell = [[UITableViewCell alloc] initWithStyle:UITableViewCellStyleSubtitle reuseIdentifier:nil];

     // 2.设置数据

     // 2.1取出对应行的模型

     NJHero *hero = self.heros[indexPath.row];

     // 2.2赋值对应的数据

     cell.textLabel.text = hero.name;

     cell.detailTextLabel.text = hero.intro;

     cell.imageView.image = [UIImage imageNamed:hero.icon];

     // 3.返回cell

     return cell;

 }

 #pragma mark - UITableViewDelegate

 /*

 // 当每一行的cell的高度不一致的时候就使用代理方法设置cell的高度

 - (CGFloat)tableView:(UITableView *)tableView heightForRowAtIndexPath:(NSIndexPath *)indexPath

 {

     if (1 == indexPath.row) {

         return 180;

     }

     return 44;

 }

  */

 #pragma mark - 控制状态栏是否显示

 /**

  *   返回YES代表隐藏状态栏, NO相反

  */

 - (BOOL)prefersStatusBarHidden

 {

     return YES;

 }

 @end
实现效果:

代码注意点:
(1)在字典转模型的代码处用下面的代码,为可变数组分配dictArray.count个存储空间,可以提高程序的性能
NSMutableArray *models = [NSMutableArrayarrayWithCapacity:dictArray.count];
(2)设置cell的高度
有三种办法可以设置cell的高度
1) 可以在初始加载方法中设置,self.tableView.rowHeight = 60;这适用于当每一行的cell高度一致的时候,使用属性设置cell的高度。
2)在storyboard中设置,适用于高度一致
3)当每一行的cell的高度不一致的时候就使用代理方法设置cell的高度
- (CGFloat)tableView:(UITableView *)tableView heightForRowAtIndexPath:(NSIndexPath *)indexPath
{
if (1 == indexPath.row) {
return 180;
}
return 44;
}
二、cell的一些属性
代码示例:
 #import "NJViewController.h"

 #import "NJHero.h"

 @interface NJViewController ()<UITableViewDataSource, UITableViewDelegate>

 /**

  *  保存所有的英雄数据

  */

 @property (nonatomic, strong) NSArray *heros;

 @property (weak, nonatomic) IBOutlet UITableView *tableView;

 @end

 @implementation NJViewController

 #pragma mark - 懒加载

 - (NSArray *)heros

 {

     if (_heros == nil) {

         // 1.获得全路径

         NSString *fullPath =  [[NSBundle mainBundle] pathForResource:@"heros" ofType:@"plist"];

         // 2.更具全路径加载数据

         NSArray *dictArray = [NSArray arrayWithContentsOfFile:fullPath];

         // 3.字典转模型

         NSMutableArray *models = [NSMutableArray arrayWithCapacity:dictArray.count];

         for (NSDictionary *dict in dictArray) {

             NJHero *hero = [NJHero heroWithDict:dict];

             [models addObject:hero];

         }

         // 4.赋值数据

         _heros = [models copy];

     }

     // 4.返回数据

     return _heros;

 }

 - (void)viewDidLoad

 {

     [super viewDidLoad];

     // 设置Cell的高度

     // 当每一行的cell高度一致的时候使用属性设置cell的高度

     self.tableView.rowHeight = ;

     self.tableView.delegate = self;

 }

 #pragma mark - UITableViewDataSource

 // 返回多少组

 - (NSInteger)numberOfSectionsInTableView:(UITableView *)tableView

 {

     return ;

 }

 // 返回每一组有多少行

 - (NSInteger) tableView:(UITableView *)tableView numberOfRowsInSection:(NSInteger)section

 {

     return self.heros.count;

 }

 // 返回哪一组的哪一行显示什么内容

 - (UITableViewCell *)tableView:(UITableView *)tableView cellForRowAtIndexPath:(NSIndexPath *)indexPath

 {

     // 1.创建CELL

     UITableViewCell *cell = [[UITableViewCell alloc] initWithStyle:UITableViewCellStyleSubtitle reuseIdentifier:nil];

     // 2.设置数据

     // 2.1取出对应行的模型

     NJHero *hero = self.heros[indexPath.row];

     // 2.2赋值对应的数据

     cell.textLabel.text = hero.name;

     cell.detailTextLabel.text = hero.intro;

     cell.imageView.image = [UIImage imageNamed:hero.icon];

     // 2.3设置cell的辅助视图

     // cell.accessoryType =  UITableViewCellAccessoryDisclosureIndicator;

     if ( == indexPath.row) {

         cell.accessoryView = [UIButton buttonWithType:UIButtonTypeContactAdd];

     }else

     {

         cell.accessoryView = [[UISwitch alloc] init];

     }

 //    UIButton *btn = [[UIButton alloc] init];

 //    btn.backgroundColor = [UIColor redColor];

 //    cell.accessoryView = btn;

     // 2.4设置cell的背景颜色

     cell.backgroundColor = [UIColor blueColor];

     // 设置默认状态的背景

 //    UIView *view = [[UIView alloc] init];

 //    view.backgroundColor = [UIColor blueColor];

 //    cell.backgroundView = view;

     UIImageView *iv = [[UIImageView alloc] initWithImage:[UIImage imageNamed:@"buttondelete"]];

     cell.backgroundView = iv;

     // 设置选中状态的背景

     UIView *view2 = [[UIView alloc] init];

     view2.backgroundColor = [UIColor purpleColor];

     cell.selectedBackgroundView = view2;

     // 3.返回cell

     return cell;

 }

 #pragma mark - 控制状态栏是否显示

 /**

  *   返回YES代表隐藏状态栏, NO相反

  */

 - (BOOL)prefersStatusBarHidden

 {

     return YES;

 }

 @end
实现效果:

cell的一些属性:
(1)设置cell的辅助视图,设置cell.accessoryView(系统提供了枚举型,也可以自定义@父类指针指向子类对象);
(2)设置cell的背景颜色,有两种方式可以设置cell的背景颜色:
通过backgroundColor 和 backgroundView都可以设置cell的背景。但是backgroundView 的优先级比 backgroundColor的高,所以如果同时设置了backgroundColor和backgroundView, 那么backgroundView会盖住backgroundColor
示例:cell.backgroundColor = [UIColorblueColor];
(3)设置cell默认状态的背景
示例1:
UIView *view = [[UIView alloc] init];
view.backgroundColor = [UIColor blueColor];
cell.backgroundView = view;
示例2:
UIImageView *iv = [[UIImageViewalloc] initWithImage:[UIImageimageNamed:@"buttondelete"]];
cell.backgroundView = iv;(父类指针指向子类对象,可以使用图片用简单的操作设置绚丽的效果)
(4)设置cell选中状态的背景
示例:
UIView *view2 = [[UIView alloc] init];
view2.backgroundColor = [UIColorpurpleColor];
cell.selectedBackgroundView = view2;
三、tableview的一些属性
代码示例:
 #import "NJViewController.h"

 @interface NJViewController ()<UITableViewDataSource>

 @end

 @implementation NJViewController

 - (void)viewDidLoad

 {

     [super viewDidLoad];

     // 1.创建tableview

     UITableView *tableview = [[UITableView alloc] init];

     tableview.frame = self.view.bounds;

     // 2.设置数据源

     tableview.dataSource =self;

     // 3.添加tableview到view

     [self.view addSubview:tableview];

     // 4.设置分割线样式

     // tableview.separatorStyle = UITableViewCellSeparatorStyleNone;

     // 5.设置分割线颜色

      接收的参数是颜色的比例值

     tableview.separatorColor = [UIColor colorWithRed:/255.0 green:/255.0 blue:/255.0 alpha:/255.0];

     // 设置tableview的头部视图

     tableview.tableHeaderView = [UIButton buttonWithType:UIButtonTypeContactAdd];

     tableview.tableFooterView = [[UISwitch alloc] init];

 }

 - (NSInteger)numberOfSectionsInTableView:(UITableView *)tableView

 {

     return ;

 }

 - (NSInteger)tableView:(UITableView *)tableView numberOfRowsInSection:(NSInteger)section

 {

     return ;

 }

 - (UITableViewCell *)tableView:(UITableView *)tableView cellForRowAtIndexPath:(NSIndexPath *)indexPath

 {

     // 1.创建cell

     UITableViewCell *cell = [[UITableViewCell alloc] initWithStyle:UITableViewCellStyleDefault reuseIdentifier:nil];

     // 2.设置cell的数据

     cell.textLabel.text = [NSString stringWithFormat:@"%d", indexPath.row ];

     // 3.返回cell

     return cell;

 }

 - (BOOL)prefersStatusBarHidden

 {

     return YES;

 }

 @end
实现效果:
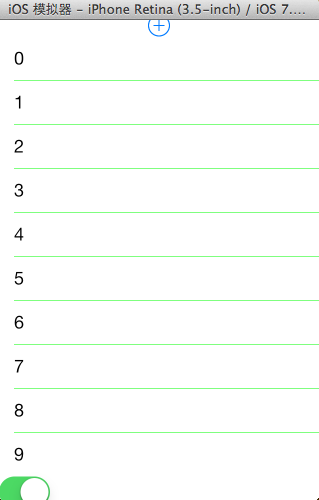
tableview的一些属性:
(1)设置分割样式(tableview.separatorStyle),这是个枚举类型
(2)设置分割线的颜色,可以直接使用系统给出的颜色,如果系统给定的颜色不能满足需求时,也可以自定义。
补充:颜色分为24位和32位的,如下
24bit颜色
R 8bit 0 ~ 255
G 8bit 0 ~ 255
B 8bit 0 ~ 255
32bit颜色
A 8bit 0 ~ 255(tou)
R 8bit
G 8bit
B 8bit
#ff ff ff 白色
#00 00 00 黑色
#ff 00 00 红色
#255 00 00
设置为自定义颜色的实例:tableview.separatorColor = [UIColorcolorWithRed:0/255.0green:255/255.0blue:0/255.0alpha:255/255.0];
//接收的参数是颜色的比例值
(3)设置顶部和底部视图
tableview.tableHeaderView //顶部
tableview.tableFooterView //底部
iOS开发UI篇—UITableview控件基本使用的更多相关文章
- iOS开发UI篇—UITableview控件简单介绍
iOS开发UI篇—UITableview控件简单介绍 一.基本介绍 在众多移动应⽤用中,能看到各式各样的表格数据 . 在iOS中,要实现表格数据展示,最常用的做法就是使用UITableView,UIT ...
- iOS开发UI篇—UITableview控件使用小结
iOS开发UI篇—UITableview控件使用小结 一.UITableview的使用步骤 UITableview的使用就只有简单的三个步骤: 1.告诉一共有多少组数据 方法:- (NSInteger ...
- iOS开发UI篇—UIScrollView控件实现图片缩放功能
iOS开发UI篇—UIScrollView控件实现图片缩放功能 一.缩放 1.简单说明: 有些时候,我们可能要对某些内容进行手势缩放,如下图所示 UIScrollView不仅能滚动显示大量内容,还能对 ...
- iOS开发UI篇—UIScrollView控件介绍
iOS开发UI篇—UIScrollView控件介绍 一.知识点简单介绍 1.UIScrollView控件是什么? (1)移动设备的屏幕⼤大⼩小是极其有限的,因此直接展⽰示在⽤用户眼前的内容也相当有限 ...
- iOS开发UI篇—UIScrollView控件实现图片轮播
iOS开发UI篇—UIScrollView控件实现图片轮播 一.实现效果 实现图片的自动轮播 二.实现代码 storyboard中布局 代码: #import "YYV ...
- 【转】 iOS开发UI篇—UIScrollView控件实现图片轮播
原文:http://www.cnblogs.com/wendingding/p/3763527.html iOS开发UI篇—UIScrollView控件实现图片轮播 一.实现效果 实现图片的自动轮播 ...
- iOS开发-UI (一)常用控件
从这里开始是UI篇 知识点: 1.常用IOS基本控件 2.UITouch ======================= 常用基本控件 1.UISegmentedControl:分段控制器 1)创建方 ...
- iOS开发UI篇—实现UItableview控件数据刷新
iOS开发UI篇—实现UItableview控件数据刷新 一.项目文件结构和plist文件 二.实现效果 1.说明:这是一个英雄展示界面,点击选中行,可以修改改行英雄的名称(完成数据刷新的操作). 运 ...
- iOS开发UI篇—Date Picker和UITool Bar控件简单介绍
iOS开发UI篇—Date Picker和UITool Bar控件简单介绍 一.Date Picker控件 1.简单介绍: Date Picker显示时间的控件 有默认宽高,不用设置数据源和代理 如何 ...
随机推荐
- JDBC-java访问数据库
定义:JDBC是一个独立于数据库管理系统的,通用的SQL数据库存取和操作的公共接口 (由JAVA类和接口组成,接口由各数据库厂家负责实现) 使用方法: 1.加载驱动 Class.forName(&qu ...
- Python 进程
安装Python的paramiko模块 步骤: 1:管理员方式打开cmd,切换到python安装路径的Scripts目录下: 2:执行命令: 1 pip3.5.exe install paramiko ...
- RelativeLayout实现左中右布局
<RelativeLayout android:layout_width="match_parent" android:layout_height="wrap_co ...
- Git 遇到了 early EOF index-pack failed 问题
Git 遇到了 early EOF index-pack failed 问题 今天想 clone 一下 boost 在 github 的 repo,结果在 clone 的过程中遇到了下面的错误.我原本 ...
- 《zw版·Halcon-delphi系列原创教程》 Halcon分类函数007, match,图像匹配
<zw版·Halcon-delphi系列原创教程> Halcon分类函数007, match,图像匹配 为方便阅读,在不影响说明的前提下,笔者对函数进行了简化: :: 用符号“**”,替换 ...
- 三个 DAL 相关的Java代码小工具
最近在做 DAL (Data Access Layer 数据访问层) 的服务化,发现有不少地方是人工编写比较繁琐的,因此写了几个小工具来完成. 1. 从 DAO 类自动生成 CoreService ...
- JAVA基础知识之NIO.2——Path,Paths,Files
NIO.2 JDK7对NIO进行了重大改进,主要包含以下两方面 新增Path接口,Paths工具类,Files工具类. 这些接口和工具类对NIO中的功能进行了高度封装,大大简化了文件系统的IO编程. ...
- 浅谈 PHP 与手机 APP 开发(API 接口开发)
本文内容转载自:http://www.thinkphp.cn/topic/5023.html 这个帖子写给不太了解PHP与API开发的人一.先简单回答两个问题:1.PHP 可以开发客户端?答:不可以, ...
- Android 进阶 Android 中的 IOC 框架 【ViewInject】 (下)
上一篇博客我们已经带大家简单的吹了一下IoC,实现了Activity中View的布局以及控件的注入,如果你不了解,请参考:Android 进阶 教你打造 Android 中的 IOC 框架 [View ...
- TCP/IP协议(二)
2014-09-04 11:03:27 注:关于seq 和 ack 的理解,seq为发送的字节的第一个序号,一直累加,ack接收字节的最后一个序号+1,建立连接和结束连接时的SYN.FIN标志位占 ...