Scala - 快速学习02 - 搭建开发环境
1- 下载与安装
CMD
CMD : SBT(Simple Build Tool)
- http://www.scala-sbt.org/
- http://www.scala-sbt.org/documentation.html
- http://www.scala-lang.org/documentation/getting-started-sbt-track/getting-started-with-scala-and-sbt-on-the-command-line.html
- http://www.scala-lang.org/documentation/getting-started-sbt-track/testing-scala-with-sbt-on-the-command-line.html
IDE:The Scala IDE (based on Eclipse)
- SDK(http://scala-ide.org/download/sdk.html),其实是为Scala定制的Eclipse版本(将Scala及插件集成到Eclipse),解压后是一个直接可用的Eclipse。在Help---》Installation details可以查看已安装的插件包。
- Update site installation(http://scala-ide.org/download/current.html),对于已有Eclipse可以选择插件方式安装,但要注意版本匹配关系。
IDE:IntelliJ IDEA with the Scala plugin
- https://www.jetbrains.com/idea/
- https://www.jetbrains.com/help/idea/creating-and-running-your-scala-application.html
- http://www.scala-lang.org/documentation/getting-started-intellij-track/getting-started-with-scala-in-intellij.html
- http://www.scala-lang.org/documentation/getting-started-intellij-track/building-a-scala-project-with-intellij-and-sbt.html
- http://www.scala-lang.org/documentation/getting-started-intellij-track/testing-scala-in-intellij-with-scalatest.html
参考信息
- 利用IntelliJ IDEA与Maven开始你的Scala之旅:http://www.jianshu.com/p/ecc6eb298b8f
- Scala + IntelliJ IDEA:http://www.cnblogs.com/wjcx-sqh/p/6551248.html
2- 在Windows系统安装Scala
2.1- 确认已成功安装配置Java环境
C:\Users\guowli>java -version

java version "1.8.0_101"

Java(TM) SE Runtime Environment (build 1.8.0_101-b13)

Java HotSpot(TM) 64-Bit Server VM (build 25.101-b13, mixed mode)

C:\Users\guowli>javac -version

javac 1.8.0_101
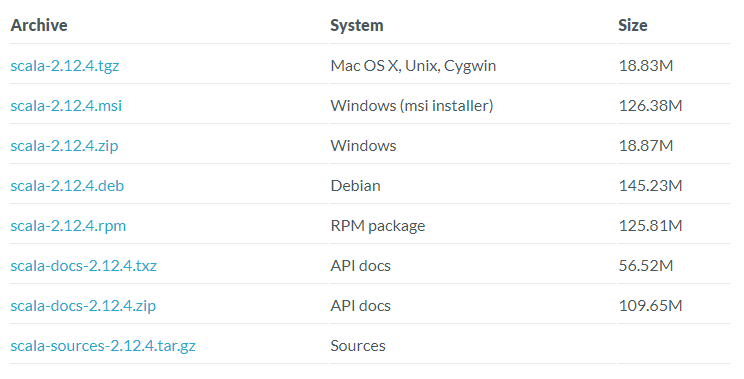
2.2- 下载安装Scala安装包
2.3- 设置环境变量
- 变量名:SCALA_HOME
- 变量值:Scala的安装目录

;%SCALA_HOME%\bin;%SCALA_HOME%\lib\dt.jar;%SCALA_HOME%\lib\tools.jar.;
- "变量名":ClassPath
- "变量值":.;%SCALA_HOME%\bin;%SCALA_HOME%\lib\dt.jar;%SCALA_HOME%\lib\tools.jar.;
2.4-验证
Microsoft Windows [Version 6.1.7601]

Copyright (c) 2009 Microsoft Corporation.  All rights reserved.

C:\Users\guowli>scala -version

Scala code runner version 2.12.4 -- Copyright 2002-2017, LAMP/EPFL and Lightbend, Inc.

C:\Users\guowli>sclac -version

'sclac' is not recognized as an internal or external command,

operable program or batch file.

C:\Users\guowli>scala

Welcome to Scala 2.12.4 (Java HotSpot(TM) 64-Bit Server VM, Java 1.8.0_101).

Type in expressions for evaluation. Or try :help.

scala> println("Hello Scala!")

Hello Scala!

scala> :quit

C:\Users\guowli>
2.5-scala命令帮助信息
C:\Users\guowli>scala -help

Usage: scala <options> [<script|class|object|jar> <arguments>]

   or  scala -help

All options to scalac (see scalac -help) are also allowed.

The first argument to scala after the options designates what to run.

If no argument is given, the Scala REPL, an interactive shell, is started.

Otherwise, the Scala runner will try to run the named target, either as

a compiled class with a main method, a jar file with a Main-Class manifest

header, or as a Scala source file to compile and run.

The REPL accepts expressions to evaluate. Try `:help` to see more commands.

The script runner will invoke the main method of a top-level object if

it finds one; otherwise, the script code is run locally to a synthetic

main method with arguments available in a variable `args`.

Options to scala which reach the Java runtime:

 -Dname=prop  passed directly to Java to set system properties

 -J<arg>      -J is stripped and <arg> passed to Java as-is

 -nobootcp    do not put the Scala jars on the boot classpath (slower)

Other startup options:

 -i <file>    preload <file> before starting the REPL

 -I <file>    preload <file>, enforcing line-by-line interpretation

 -e <string>  execute <string> as if entered in the REPL

 -save        save the compiled script in a jar for future use

 -nc          no compilation daemon: do not use the fsc offline compiler

If the runner does not correctly guess how to run the target:

 -howtorun    what to run <script|object|jar|guess> (default: guess)

When running a script or using -e, an already running compilation daemon

(fsc) is used, or a new one started on demand.  Use the -nc option to

create a fresh compiler instead.

C:\Users\guowli>
3- 运行第一个scala程序
3.1- 官网示例
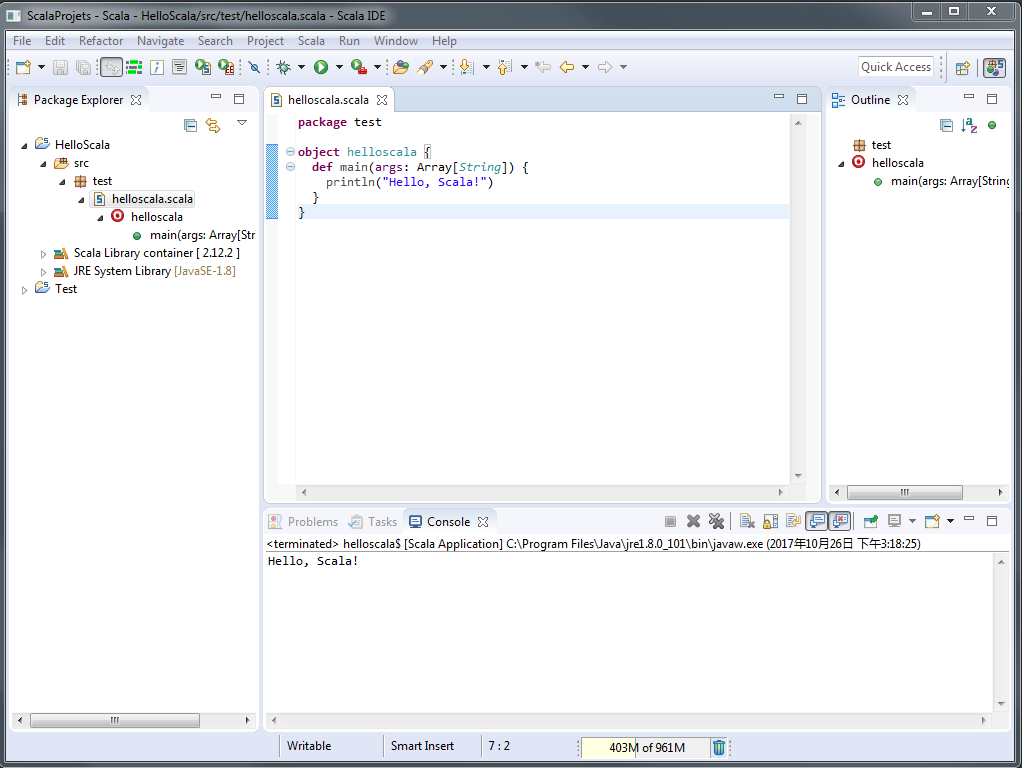
3.2- 利用Scala-IDE
- Create Scala Project : File--》New--》Scala Project--》Enter a project name.--》Next--》Check or Define the Scala build settings.---》Finsh
- Create Package : Choose src folder--》right-click,New--》Package--》Enter a package name.--》Finsh.
- Create Scala Object : Choose package--》right-click,New--》Scala Object--》Enter a object name.--》Finsh.
- Run code : Choose Scala file--》right-click,Run As--》Scala Application.
package test

object helloscala {

  def main(args: Array[String]) {

    println("Hello, Scala!")

  }

}
3.3- 命令行下的编译与执行
anliven@DESKTOP-68OFQFP MINGW64 /d/Anliven/Anliven-Code/ScalaProjects

$ mkdir Testing

anliven@DESKTOP-68OFQFP MINGW64 /d/Anliven/Anliven-Code/ScalaProjects

$ cd Testing/

anliven@DESKTOP-68OFQFP MINGW64 /d/Anliven/Anliven-Code/ScalaProjects/Testing

$ ls -l

total 0

anliven@DESKTOP-68OFQFP MINGW64 /d/Anliven/Anliven-Code/ScalaProjects/Testing

$ vim Testing.scala

anliven@DESKTOP-68OFQFP MINGW64 /d/Anliven/Anliven-Code/ScalaProjects/Testing

$ cat Testing.scala

object Testing extends App {

  println("Hello, "+args(0)+"!")

}

anliven@DESKTOP-68OFQFP MINGW64 /d/Anliven/Anliven-Code/ScalaProjects/Testing

$ scalac Testing.scala

anliven@DESKTOP-68OFQFP MINGW64 /d/Anliven/Anliven-Code/ScalaProjects/Testing

$ ls -l

total 13

-rw-r--r-- 1 anliven 197121 2752 10月 25 23:58 'Testing$.class'

-rw-r--r-- 1 anliven 197121  767 10月 25 23:58 'Testing$delayedInit$body.class'

-rw-r--r-- 1 anliven 197121  768 10月 25 23:58  Testing.class

-rw-r--r-- 1 anliven 197121   64 10月 25 23:58  Testing.scala

anliven@DESKTOP-68OFQFP MINGW64 /d/Anliven/Anliven-Code/ScalaProjects/Testing

$ scala Testing Anliven

Hello, Anliven!

anliven@DESKTOP-68OFQFP MINGW64 /d/Anliven/Anliven-Code/ScalaProjects/Testing

$ ls -l

total 13

-rw-r--r-- 1 anliven 197121 2752 10月 25 23:58 'Testing$.class'

-rw-r--r-- 1 anliven 197121  767 10月 25 23:58 'Testing$delayedInit$body.class'

-rw-r--r-- 1 anliven 197121  768 10月 25 23:58  Testing.class

-rw-r--r-- 1 anliven 197121   64 10月 25 23:58  Testing.scala

anliven@DESKTOP-68OFQFP MINGW64 /d/Anliven/Anliven-Code/ScalaProjects/Testing

$
4- REPL(Read Evaluate Print Loop)
4.1-命令行方式
$ scala

Welcome to Scala 2.12.2 (Java HotSpot(TM) 64-Bit Server VM, Java 1.8.0_131).

Type in expressions for evaluation. Or try :help.

scala> println("Hello, Scala!")

Hello, Scala!

scala> val x=1

x: Int = 1

scala> println(x)

1

scala> :quit
4.2-sbt方式
获取SBT的帮助信息:在命令行下执行“sbt -h”,或者执行“sbt”后输入help并回车。
anliven@DESKTOP-68OFQFP MINGW64 /d/Anliven

$ sbt console

[warn] No sbt.version set in project/build.properties, base directory: D:\Anliven

[info] Set current project to anliven (in build file:/D:/Anliven/)

[info] Starting scala interpreter...

Welcome to Scala 2.12.3 (Java HotSpot(TM) 64-Bit Server VM, Java 1.8.0_131).

Type in expressions for evaluation. Or try :help.

scala> println("Hello, Scala!")

Hello, Scala!

scala> val x=2

x: Int = 2

scala> println(x)

2

scala> :quit

[success] Total time: 41 s, completed 2017-10-25 23:52:39

anliven@DESKTOP-68OFQFP MINGW64 /d/Anliven

$
4.3-IDE方式
- Create Scala Project : File--》New--》Scala Project--》Enter a project name.--》Finsh
- Create Package : Choose project 》right-click,New--》Scala Worksheet--》Enter a Worksheet name.--》Finsh.
- Create code in .sc file: Save .sc file and check the output in the .sc file.
  println("Welcome to the Scala worksheet")       //> Welcome to the Scala worksheet

  var x = 1                                       //> x  : Int = 1

  println(x)                                      //> 1

5- 在Ubuntu系统安装Scala
5.1-安装JDK
root@Ubuntu16:~# apt-get update

root@Ubuntu16:~#

root@Ubuntu16:~# apt-get install openjdk-8-jre openjdk-8-jdk

root@Ubuntu16:~#

root@Ubuntu16:~# java -version

openjdk version "1.8.0_151"

OpenJDK Runtime Environment (build 1.8.0_151-8u151-b12-0ubuntu0.16.04.2-b12)

OpenJDK 64-Bit Server VM (build 25.151-b12, mixed mode)

root@Ubuntu16:~#
5.2-配置环境变量JAVA_HOME
root@Ubuntu16:~# dpkg -L openjdk-8-jdk | grep '/bin'|head -1

/usr/lib/jvm/java-8-openjdk-amd64/bin

root@Ubuntu16:~# vim ~/.bashrc

root@Ubuntu16:~# source ~/.bashrc

root@Ubuntu16:~# cat ~/.bashrc|head -1

export JAVA_HOME=/usr/lib/jvm/java-8-openjdk-amd64

root@Ubuntu16:~#

root@Ubuntu16:~# echo $JAVA_HOME

/usr/lib/jvm/java-8-openjdk-amd64

root@Ubuntu16:~#

root@Ubuntu16:~# $JAVA_HOME/bin/java -version

openjdk version "1.8.0_151"

OpenJDK Runtime Environment (build 1.8.0_151-8u151-b12-0ubuntu0.16.04.2-b12)

OpenJDK 64-Bit Server VM (build 25.151-b12, mixed mode)

root@Ubuntu16:~#

root@Ubuntu16:~# javac -version

javac 1.8.0_151

root@Ubuntu16:~# $JAVA_HOME/bin/javac -version

javac 1.8.0_151

root@Ubuntu16:~#
5.3-安装Scala
wget https://downloads.lightbend.com/scala/2.12.4/scala-2.12.4.tgz

root@Ubuntu16:~# ls -l scala-2.12.4.tgz

-rw-r--r-- 1 root root 19741785 10月 11 16:05 scala-2.12.4.tgz

root@Ubuntu16:~#

root@Ubuntu16:~# tar -zxf scala-2.12.4.tgz -C /usr/local

root@Ubuntu16:~# cd /usr/local

root@Ubuntu16:/usr/local#

root@Ubuntu16:/usr/local# mv ./scala-2.12.4/ ./scala

root@Ubuntu16:/usr/local#

root@Ubuntu16:/usr/local# chown -R root ./scala

root@Ubuntu16:/usr/local#
- x : 从 tar 包中把文件提取出来;
- z : 表示 tar 包是被 gzip 压缩过的,所以解压时需要用gunzip解压;
- f : 表示后面跟着的是文件;
- C:表示文件解压后转到指定的目录下
5.4-配置环境变量PATH并运行scala
root@Ubuntu16:/usr/local# vim ~/.bashrc

root@Ubuntu16:/usr/local# source ~/.bashrc

root@Ubuntu16:/usr/local# cat ~/.bashrc |head -1

export PATH=$PATH:/usr/local/scala/bin

root@Ubuntu16:/usr/local#

root@Ubuntu16:/usr/local# scala

Welcome to Scala 2.12.4 (OpenJDK 64-Bit Server VM, Java 1.8.0_151).

Type in expressions for evaluation. Or try :help.

scala> :help

All commands can be abbreviated, e.g., :he instead of :help.

:edit <id>|<line>        edit history

:help [command]          print this summary or command-specific help

:history [num]          show the history (optional num is commands to show)

:h? <string>            search the history

:imports [name name ...] show import history, identifying sources of names

:implicits [-v]          show the implicits in scope

:javap <path|class>      disassemble a file or class name

:line <id>|<line>        place line(s) at the end of history

:load <path>            interpret lines in a file

:paste [-raw] [path]    enter paste mode or paste a file

:power                  enable power user mode

:quit                    exit the interpreter

:replay [options]        reset the repl and replay all previous commands

:require <path>          add a jar to the classpath

:reset [options]        reset the repl to its initial state, forgetting all session entries

:save <path>            save replayable session to a file

:sh <command line>      run a shell command (result is implicitly => List[String])

:settings <options>      update compiler options, if possible; see reset

:silent                  disable/enable automatic printing of results

:type [-v] <expr>        display the type of an expression without evaluating it

:kind [-v] <type>        display the kind of a type. see also :help kind

:warnings                show the suppressed warnings from the most recent line which had any

scala> :quit

root@Ubuntu16:/usr/local#
5.5-运行示例
root@Ubuntu16:~/testcode# ls -l

总用量 4

-rw-r--r-- 1 root root 96 11月 14 17:10 test.scala

root@Ubuntu16:~/testcode#

root@Ubuntu16:~/testcode# cat test.scala

object HelloWorld {

    def main(args: Array[String]){

        println("Hello, World!")

    }

}

root@Ubuntu16:~/testcode#

root@Ubuntu16:~/testcode# scalac test.scala

root@Ubuntu16:~/testcode# ls -l

总用量 12

-rw-r--r-- 1 root root 602 11月 14 17:11 HelloWorld.class

-rw-r--r-- 1 root root 665 11月 14 17:11 HelloWorld$.class

-rw-r--r-- 1 root root  96 11月 14 17:10 test.scala

root@Ubuntu16:~/testcode#

root@Ubuntu16:~/testcode# scala -classpath . HelloWorld

Hello, World!

root@Ubuntu16:~/testcode# ls -l

总用量 12

-rw-r--r-- 1 root root 602 11月 14 17:11 HelloWorld.class

-rw-r--r-- 1 root root 665 11月 14 17:11 HelloWorld$.class

-rw-r--r-- 1 root root  96 11月 14 17:10 test.scala

root@Ubuntu16:~/testcode#
- 关于main()方法的定义,Scala中则必须使用对象方法,而在Java中是用静态方法(public static void main(String[] args))。
- 对象的命名HelloWorld可以不用和文件名称一致,这点和Java不同。
scalac test.scala  # 编译的时候使用的是Scala文件名称

scala -classpath . HelloWorld  # 执行的时候使用的是HelloWorld对象名称
Scala - 快速学习02 - 搭建开发环境的更多相关文章
- perl学习笔记--搭建开发环境
windows下perl开发环境搭建 perl下载地址:http://www.activestate.com/developer-tools 各个插件的安装方法:(通过代理上网的方法) 方法一:pad ...
- android学习一---搭建开发环境
android基于Java并运行Linux内核上的轻量级操作系统.由于是基于java的,学习起来也不是太难,对java有一定了解并知道一些基本的图形用户界面,入门就很简单了. 一.了解JDK ,SDK ...
- Android开发学习——搭建开发环境
在学校开课学习了android的一些简单的UI组件,布局,四大组件学习了2个,数据存储及网络通信,都是一些简单的概念,入门而已.许多东西需要自己去学习. 学习一下 Android开发环境的搭建,两种方 ...
- 【转】Esp8266学习之旅① 搭建开发环境,开始一个“hellow world”串口打印。
@2019-02-28 [小记] Esp8266学习之旅① 搭建开发环境,开始一个“hellow world”串口打印.
- Hadoop学习笔记(4) ——搭建开发环境及编写Hello World
Hadoop学习笔记(4) ——搭建开发环境及编写Hello World 整个Hadoop是基于Java开发的,所以要开发Hadoop相应的程序就得用JAVA.在linux下开发JAVA还数eclip ...
- React + webpack 快速搭建开发环境
因网上大多React + webpack快速搭建的运行不起来,便自行写了一个.在搭建开发环境的前需安装nodejs,npm. 新建一个工作目录,比如叫reactdome,在reactdome目录中运行 ...
- GJM : Unity3D HIAR -【 快速入门 】 二、搭建开发环境
感谢您的阅读.喜欢的.有用的就请大哥大嫂们高抬贵手"推荐一下"吧!你的精神支持是博主强大的写作动力以及转载收藏动力.欢迎转载! 版权声明:本文原创发表于 [请点击连接前往] ,未经 ...
- 一、React Native 搭建开发环境(1)(Mac OS - IOS项目)
React Native是Facebook推出的一个开发IOS和安卓APP的技术.至于更多的详情,这里不再描述,大家可以自行百度它的定义. 目的: 由于我想在一台电脑上同时开发IOS和Android两 ...
- 深入浅出Docker(五):基于Fig搭建开发环境
概述 在搭建开发环境时,我们都希望搭建过程能够简单,并且一劳永逸,其他的同事可以复用已经搭建好的开发环境以节省开发时间.而在搭建开发环境时,我们经常会被复杂的配置以及重复的下载安装所困扰.在Docke ...
随机推荐
- js二分算法排序
var arr = [1,2,3,5,10,15,23,35,67,76,78,89,100];var len = arr.length;for (var i = 1; i < len; i++ ...
- hive资料
Hive基本操作 Hive 解锁操作 之前使用Hive,出现过一种情况:在代码正在执行insert into或insert overwrite时,中途手动将程序停掉,会出现卡死情况,只能执行查询操作, ...
- 弹飞绵羊[HNOI2010]
--BZOJ2002 Description 某天,Lostmonkey发明了一种超级弹力装置,为了在他的绵羊朋友面前显摆,他邀请小绵羊一起玩个游戏.游戏一开始,Lostmonkey在地上沿着一条直线 ...
- axios封装get方法和post方法
我们常用的ajax请求方法有get.post.put等方法,相信小伙伴都不会陌生.axios对应的也有很多类似的方法,不清楚的可以看下文档.但是为了简化我们的代码,我们还是要对其进行一个简单的封装.下 ...
- shell脚本学习-练习写一个脚本1
# 1.依次展示/etc/passwd中的用户名和UID.格式如:Hello,$USER,your UID is $UID. # 2.统计一个有多少个用户 #!/bin/bash #Program D ...
- 单点登录的三种实现方式 转自: https://blog.csdn.net/python_tty/article/details/53113612
单点登录SSO(Single Sign On)说得简单点就是在一个多系统共存的环境下,用户在一处登录后,就不用在其他系统中登录,也就是用户的一次登录能得到其他所有系统的信任.单点登录在大型网站里使用得 ...
- IOS11导航栏自定义返回按钮被遮挡
将file作为请求体传入到服务端. { WaitForSingleObject(handle, INFINITE); printf(" -- by MoreWindows( http://b ...
- consul搭建
1.准备3台服务器 linux1 192.168.0.101 linux2 192.168.0.102 linux3 192.168.0.103 2.准备向Linux上传文件的工具Winscp 3.去 ...
- Shiro学习
Shiro学习资源 Shiro官网,http://shiro.apache.org/index.html 学习网站链接,http://blog.java1234.com/blog/articles/4 ...
- 2019.03.29 bzoj5463: [APIO2018] 铁人两项(圆方树+树形dp)
传送门 题意简述:给你一张无向图,问你满足存在从a−>b−>ca->b->ca−>b−>c且不经过重复节点的路径的有序点对(a,b,c)(a,b,c)(a,b,c) ...