React之redux学习日志(redux/react-redux/redux-saga)
redux官方中文文档:https://www.redux.org.cn/docs/introduction/CoreConcepts.html
react-redux Dome:https://codesandbox.io/s/react-redux-e1el3(需FQ才能访问)
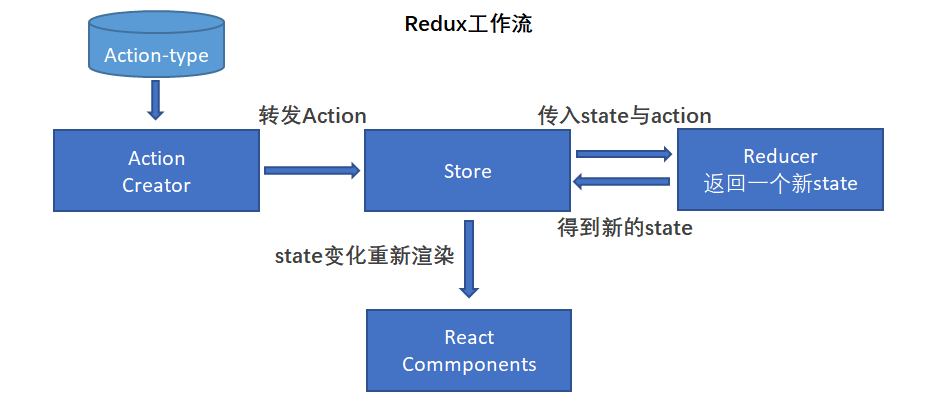
1. Redux工作流程图:
2. redux三大原则:
1. 单一数据源:在Redux中有且只能有一个 state 仓库
2. State是只读的: state仓库的数据只能读取,不能进行修改
3. 使用纯函数执行修改:reducer中,应该返回一个纯函数,函数接受先前的 state和action, 然后返回一个新的 state
3. Redux 搭配 React 使用
安装:
npm install --save react-redux
3.1. react-redux在React中的使用方式
· 在react入口文件中注入Redux
import React from 'react'

import ReactDOM from 'react-dom'

import RouterConfig from '@/Router'

import { Provider } from 'react-redux'

import store from '@/store'

const App = () => (

  <div>

   <!-- Provider 让所有容器组件都可以访问 store -->

    <Provider store={store}>

      <RouterConfig/>

    </Provider>

  </div>

)

const domContainer = document.querySelector('#app')

ReactDOM.render(<App />, domContainer)
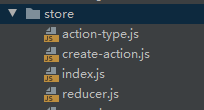
· 根目录中新建store目录,并且添加:index.js、 reducer.js、create-action、action-type
index.js文件
import 'babel-polyfill' // es6解析

import {

  createStore,

  compose,

  applyMiddleware

} from 'redux'

import reducer from './reducer'

// redux-dev-tools工具配置

const composeEnhancers = window.__REDUX_DEVTOOLS_EXTENSION_COMPOSE__ || compose

const store = createStore(

  reducer,

  composeEnhancers(

    applyMiddleware(

    // 这里可以放一些中间件,如 redux-saga 等

    )

  )

)

export default store
create-action.js / action-type.js
// action-type: 一般统一在这个文件中定义 action 的类型,方便管理

export const GET_USERINFO_ACTION = 'GET_USERINFO_ACTION'

// create-action:每个action都返回一个纯对象,type是约定必须

import { GET_USERINFO_ACTION  } from './action-type'

export const getUserInfoAction = (value) => ({

    type: GET_USERINFO_ACTION,

    value

})
reducer.js
import { GET_USERINFO_ACTION } from './action-type'
// 创建一个默认的仓库,一般提出来会更加清晰
const defaultState = {

  userInfo: {}

}


// reducer必须是一个纯函数

const reducer = (state=defaultState, action) => {

   const { type } = action
   // 深拷贝,一定不能直接对state进行修改

   const newState = JSON.parse(JSON.stringify(state))

   if (type === GET_USERINFO_ACTION){

      newState.userInfo = action.value

   }

   return newState

}
至此,仓库已经搭建完毕,接下来是在react中进行使用。
上面已经在react中入口文件中注入了react,接下创建一个组件来对redux进行简单的使用
新建 ReduxTest 组件
import React, { Component, Fragment } from "react";

import stroe from "./stroe";

import { getUserInfoAction} from "./stroe/action-creators";

class TestRedux extends Component {

  constructor(props) {

    super(props)

    this.handleUpdateUserInfoClick = this.handleUpdateUserInfoClick.bind(this)

  }

  handleUpdateUserInfoClick() {
    // 创建一个action,然后reducer会进行对于的处理,然后返回一个新的 state

    const action = getUserInfoAction({name: 'del lee'})

    stroe.dispatch(action)

  }

  render() {

    return (

      <Fragment>

        <button onClick={this.handleUpdateUserInfoClick}>跳转</button>

      </Fragment>

    )

  }

}

export default TestRedux
4. react-redux 在react中的使用
结合上面的内容,我们修改一下ReduxTest组件
import React, { Component, Fragment } from "react";

import stroe from "./stroe";

import { getUserInfoAction} from "./stroe/action-creators";

// 引入 connect

import { connect } from "react-redux";

class TestRedux extends Component {

  constructor(props) {

    super(props)

    // this.handleUpdateUserInfoClick = this.handleUpdateUserInfoClick.bind(this)

  }

  // handleUpdateUserInfoClick() {

  //   创建一个action,然后reducer会进行对于的处理,然后返回一个新的 state

  //   const action = getUserInfoAction({name: 'del lee'})

  //   stroe.dispatch(action)

  //}

  render() {

    return (

      <Fragment>

<!--      <button onClick={this.handleUpdateUserInfoClick}>跳转</button> -->

      <button onClick={this.props.handleUpdateUserInfoClick}>跳转</button>

      </Fragment>

    )

  }

}

const mapStateToProps = state => ({

   userInfo: state.userInfo

})

const mapDispatchToProps = (dispatch) => ({

   handleUpdateUserInfoClick: ()=> {

        const action = getUserInfoAction({name: 'del lee'})

        dispatch(action) // 执行action

   }

})

// export default TestRedux

// 修改为,connect会将 mapStateToProps 与 mapDispatchToProps中的内容链接到 TestRedux 组件的props中

// mapStateToProps 会接受到 state 仓库中所有的值

// mapDispatchToProps: 会接受到 dispatch 方法

export default connect(mapStateToProps, mapDispatchToProps)(TestRedux )
备注:为了确保redux中的state不能够直接修改其中的值和统一数据格式,一般建议结合 immutable.js 使用
具体需查阅官方文档:https://immutable-js.github.io/immutable-js/docs/#/
示例: 修改 reducer.js 文件
import { GET_USERINFO_ACTION  } from './action-type'

import { fromJS } from "immutable";

// 创建一个默认的仓库,一般提出来会更加清晰

//const defaultState = {

//  userInfo: {}

//}

// 转换为 immutable 数据格式

const defaultState = fromJS({

  userInfo: {}

})

// reducer必须是一个纯函数

const reducer = (state=defaultState, action) => {

   const { type } = action

   // 深拷贝,一定不能直接对state进行修改

   // const newState = JSON.parse(JSON.stringify(state))  immutable数据格式不需要进行深拷贝

   if (type === GET_USERINFO_ACTION){

      // newState.userInfo = action.value  不能直接修改值

      // 使用set方法对值进行修改,会返回一个新的immutable对象

      state.set('userInfo', action.value)

   }

   return state  // 若不匹配直接返回原来的state即可

   // return newState

}
还需要修改 ReduxTest 中 mapStateToProps 的获取方式
......

const mapStateToProps = state => ({
   // userInfo: state.userInfo   会抛出异常
   // 使用get或者getIn获取state中的值

   userInfo: state.get('userInfo')

   // or

   // userInfo: state.getIn(['userInfo'])

})

......
5. Redux-Saga中间件
redux-saga中文文档地址:https://redux-saga-in-chinese.js.org/docs/basics/DeclarativeEffects.html
当我们需要执行一些异步操作时,由于action中只能返回一个对象,从而需要借助一些中间件来达到目的,redux-thunk 和 redux-saga是常见的两种中间件。

redux-thunk 主要是使action能够返回一个函数而达到目的,这样导致了action函数变得复杂
redux-saga 可以将异步操作单独分离出来封装到某些模块,这样保证action函数更加干净
redux-saga的引入:
修改 store/index.js 文件
import 'babel-polyfill' // es6解析

import {

  createStore,

  compose,

  applyMiddleware

} from 'redux'

import reducer from './reducer'

// 需要在 store 目录中创建  sagas.js 文件

import testSaga from "./sagas";

import createSagaMiddleware from "redux-saga";

// 创建 redux-saga 中间件

const sagaMiddleware = createSagaMiddleware();

// redux-dev-tools工具配置

const composeEnhancers = window.__REDUX_DEVTOOLS_EXTENSION_COMPOSE__ || compose

const store = createStore(

  reducer,

  composeEnhancers(

    applyMiddleware(

        sagaMiddleware // 引入saga中间件

    )

  )

)

// 运行saga

sagaMiddleware.run(testSaga)

export default store
在 store 中新增 sagas.js 文件
import { call, put, takeEvery } from "redux-saga/effects"

// 你可以写一个异步的接口或者一个异步的函数

import { getUserInfoApi } from './api'

// 可以在create-action.js中新增一个 action:   updateUserInfoAction

import { updateUserInfoAction } from 'create-action'

/** 在create-action.js新增一个action(当然在reducer.js中也要对state就行对应的操作)

* export const updateUserInfoAction = (value) => ({

*  type: 'UPDATE_USERINFO_ACTION',

*  value

*})

*/

// saga 函数接受 action

function* getUserInfoSaga(action) {

    // 声明 effects 函数 call:发起一次请求   call([api, [args]]),args是请求的参数

    const res = yield call(getUserInfoApi, action.userId)

   // 声明 effects 函数 put: 相当于 store中的dispatch

  put(updateUserInfoAction(res))

}

function* testSaga() {

   // 当action-type被准备dispatch时,执行 getUserInfo

   // 声明 effects 函数:takeEvery 监听一个action

    yield takeEvery('GET_USERINFO_ACTION', getUserInfoSaga)

}

export default testSaga
这样就完成了一个简单的redux-saga的配置和使用,在component中dispatch getUserInfoAction这个action,就会执行 getUserInfoSaga 函数,这样就完成了异步的拓展。
redux-saga中有很多 声明 effects 函数(比如:call、put、takeEvery、all、fock等等),具体请查阅redux-saga文档。
备注:redux-saga函数必须是一个Generator函数
拓展:还可以通过以下代码来将saga进行模块化:
import { all, fork } from 'redux-saga/effects'

// 以下saga是我个人项目中使用到的

import headNavigationBarSagas from '@/commponents/HeadNavigationBar/store/sagas'

import viewsHomeSagas from '@/views/Home/store/sagas'

import viewsDetailSagas from '@/views/Detail/store/sagas'

import viewsLoginSagas from '@/views/Login/store/sagas'

import backstageArticleManage from '@/views/backstage/ArticleManage/store/sagas'

// 整合多个模块的saga

export default function * rootSaga () {

  yield all([

    fork(headNavigationBarSagas),

    fork(viewsHomeSagas),

    fork(viewsDetailSagas),

    fork(viewsLoginSagas),

    fork(backstageArticleManage)

  ])

}
大致介绍了redux、react-redux的基本用法和redux-saga中间件的使用,若有错误请各路大佬指出加以改正和学习
React之redux学习日志(redux/react-redux/redux-saga)的更多相关文章
- React+Redux学习笔记:React+Redux简易开发步骤
前言 React+Redux 分为两部分: UI组件:即React组件,也叫用户自定义UI组件,用于渲染DOM 容器组件:即Redux逻辑,处理数据和业务逻辑,支持所有Redux API,参考之前的文 ...
- Redux学习(3) ----- 结合React使用
Redux 和React 进行结合, 就是用React 做UI, 因为Redux中定义了state,并且定义了改变或获取state的方法,完全可以用来进行状态管理,React中就不用保存状态了,它只要 ...
- redux学习日志:关于异步action
当我们在执行某个动作的时候,会直接dispatch(action),此时state会立即更新,但是如果这个动作是个异步的呢,我们要等结果出来了才能知道要更新什么样的state(比如ajax请求),那就 ...
- redux学习日志:关于react-redux
首先先强调一句:一定要多读官方文档,而且要精读,否则你会忽略掉很多东西! 一,Provider 刚开始看的时候,大致浏览了一下,知道了这个组件是能够接收store作为它的属性,然后它里面的子组件就可以 ...
- 【原】redux学习笔记
上周学习了flux,这周研究了一下redux,其实很早之前都已经在研究他们了,只是之前一直没搞懂,最近这两周可能打通了任督二脉,都算入门了. 写博客的目的主要是做一下笔记,总结一下思路,以及和大家交流 ...
- Redux学习及应用
Redux学习及应用 一:Redux的来源? Redux 是 JavaScript 状态容器,提供可预测化的状态管理.Redux是由 Flux 演变而来,但受 Elm 的启发,避开了 Flux 的复杂 ...
- React Redux学习笔记
React Router React Router 使用教程 Redux中间件middleware [译]深入浅出Redux中间件 Redux学习之一:何为middleware? ES6 ES6新特性 ...
- redux 介绍及配合 react开发
前言 本文是 Redux 及 Redux 配合 React 开发的教程,主要翻译自 Leveling Up with React: Redux,并参考了 Redux 的文档及一些博文,相对译文原文内容 ...
- 使用Redux管理你的React应用
因为redux和react的版本更新的比较频繁,博客园这里用的redux版本是1.0.1,如果你关心最新版本的使用技巧,欢迎来我的Github查看(https://github.com/matthew ...
随机推荐
- 晴天小猪历险记之Hill(Dijkstra优先队列优化)
描述 这一天,他来到了一座深山的山脚下,因为只有这座深山中的一位隐者才知道这种药草的所在.但是上山的路错综复杂,由于小小猪的病情,晴天小猪想找一条需时最少的路到达山顶,但现在它一头雾水,所以向你求助. ...
- Jenkins+Sonar质量门禁【实践篇-maven版】
Jenkins+Sonar质量门禁[实践篇-maven版] 配置文档百度挺多的,就不展开来了 首先很遗憾的告诉大家,maven版做不了质量门禁!只能扫描!!! 就我们公司项目里,jenkins ...
- API 网关功能
反向代理和路由 - 大多数项目采用网关的解决方案的最主要的原因.给出了访问后端 API 的所有客户端的单一入口,并隐藏内部服务部署的细节. 负载均衡 - 网关可以将单个传入的请求路由到多个后端目的地. ...
- 实战!退出登录时如何借助外力使JWT令牌失效?
大家好,我是不才陈某~ 今天这篇文章介绍一下如何在修改密码.修改权限.注销等场景下使JWT失效. 文章的目录如下: 解决方案 JWT最大的一个优势在于它是无状态的,自身包含了认证鉴权所需要的所有信息, ...
- IM2603资料 Type-C 扩展坞电源管理芯片
用于带有集成降压转换器的 Type-C 外围应用的电源管理 IC IM2603 是一款主要用于 Type-C 外围应用的电源管理 IC. 它集成了一个带有内置高侧 MOSFET 的同步降压转换器和一个 ...
- CH7511|LT7211|PS8625替代方案 CS5211 设计EDP转LVDS优势方案原理图+PCB板设计
CH7511|LT7211|PS8625这三款都是专门用于设计EDP转LVDS转接板或者屏转换方案板,CH7511.LT7211.PS8625目前这几款都是出于缺货状态,台湾瑞奇达Capstone 新 ...
- Capstone CS5268DEMOBOARD原理图|TYPEC转HDMI+VGA+PD3.0+USB3.0扩展坞方案
Capstone CS5268DEMOBOARD原理图|TYPEC转HDMI+VGA+PD3.0+USB3.0四合一设计参考 CS5268 是typec转HDMI+VGA+pd3.0+U3四合一拓展坞 ...
- <数据结构>XDOJ321.高铁网络
问题与解答 描述: 国家建设高铁网络,网络由一些连接城市的高铁线路构成.现有高铁建设情况可列为一张统计表,表中列出了每一条高铁线路直接连接的两个城市.国家的建设目标是全国每两个城市之间都可以实现高铁交 ...
- 目录-Bug集锦
<Bug集锦>主要是收集一些较有回顾意义的Bug以及Bug的处理思路,方便大家互相学习. 目录 BUG-Nuget包版本不一致导致程序行为与预期不符
- 最小生成树Kruskal算法(1)
概念 一个有 n 个结点的连通图的生成树是原图的极小连通子图,且包含原图中的所有 n 个结点,并且有保持图连通的最少的边. [1] 最小生成树可以用kruskal(克鲁斯卡尔)算法或prim(普里姆) ...