flink-----实时项目---day07-----1.Flink的checkpoint原理分析 2. 自定义两阶段提交sink(MySQL) 3 将数据写入Hbase(使用幂等性结合at least Once实现精确一次性语义) 4 ProtoBuf
1.Flink中exactly once实现原理分析
生产者从kafka拉取数据以及消费者往kafka写数据都需要保证exactly once。目前flink中支持exactly once的source不多,有kafka source;能实现exactly once的sink也不多,如kafka sink、streamingFileSink,其都要开启checkpoint才能实现exactly once。接下来以FlinkKafkaProducer为例,深入研究其源代码,从而理解flink中的exactly once(精准一次性语义)是怎么实现的。
1.1 大致流程图(也叫分两阶段提交原理)
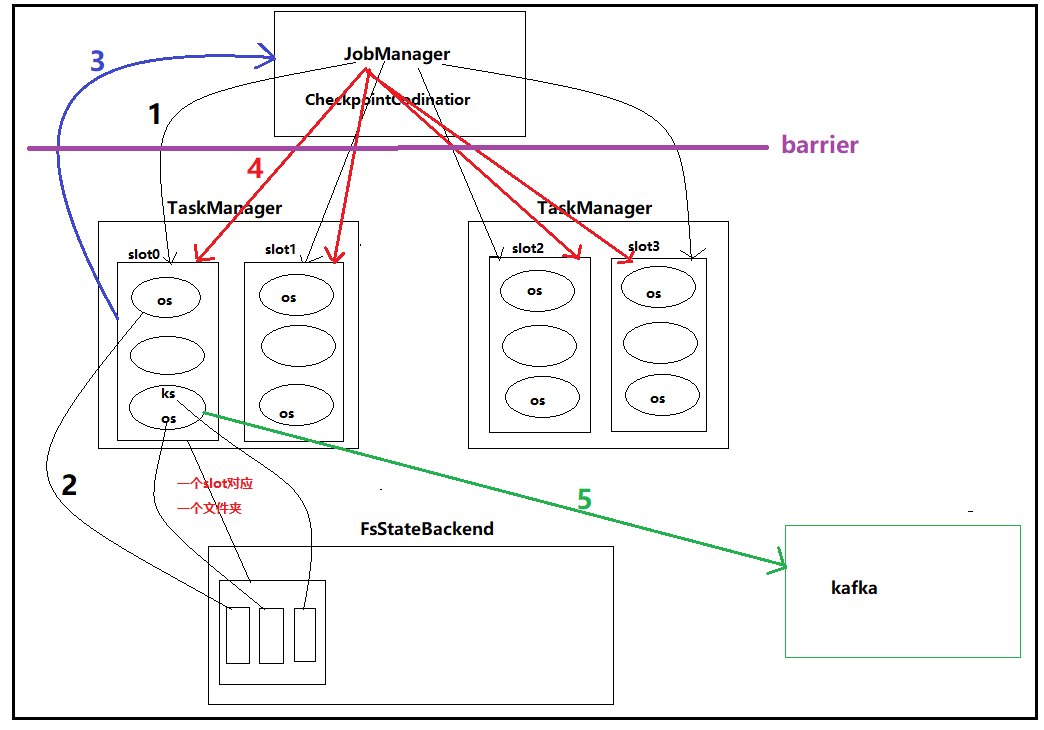
1. JobManager定期(通过CheckpointCodinator)向各个包含state的subTask发起checkpoint的请求
2. subTask将各自的state写入到相应的statebackend,一个资源槽对应一个文件,其中各个subTask的state写入这个文件中
3. 各个subTask向JobManager发送checkpoint成功的消息
4. 当所有subTask都发送了checkpoint成功的消息后,jobManager会向所有实现了checkpoint的subTask发送成功的消息
5. subTask往kafka写数据,并且向Kafka提交事务()
注意:为了保证一个流水线(pipeline)上的operrator state和keyedstate数据一致,flink引入了barrier机制,即在jobmanager和taskManager间设置一个barrier,相当于节流,保证在checkpoint时,source不能在读取数据
问题:kafka涉及到生产者往里面写数据一个事务,以及消费者读取数据一个事务,这两个事物间有什么联系?
1.2 源码解析
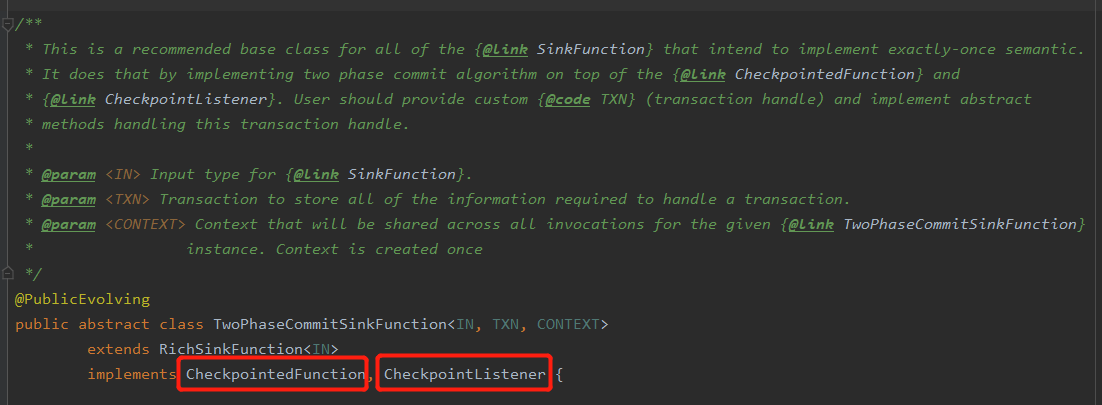
(1)首先看FlinkKafkaProducer类,可以发现其继承了TwoPhaseCommitSinkFunction

(2)TwoPhaseCommitSinkFunction是所有要实现一次性语义的SinkFunction的一个比较推荐的基类,其实现了两个重要的接口,分别为:CheckpointedFunction, CheckpointListener
- CheckpointedFunction接口
此接口中包含两个方法,分别为snapshotState方法、initializeState方法,源代码如下


public interface CheckpointedFunction {

    /**

     * This method is called when a snapshot for a checkpoint is requested. This acts as a hook to the function to

     * ensure that all state is exposed by means previously offered through {@link FunctionInitializationContext} when

     * the Function was initialized, or offered now by {@link FunctionSnapshotContext} itself.

     *

     * @param context the context for drawing a snapshot of the operator

     * @throws Exception

     */

    void snapshotState(FunctionSnapshotContext context) throws Exception;

    /**

     * This method is called when the parallel function instance is created during distributed

     * execution. Functions typically set up their state storing data structures in this method.

     *

     * @param context the context for initializing the operator

     * @throws Exception

     */

    void initializeState(FunctionInitializationContext context) throws Exception;

}
其中snapshotState方法是用checkpoint时,拍快照,其能将state持久化到statebackend。这里面存了一些transactionID、subTask编号、以及kafka的相关信息(用来写数据)。若是checkpoint成功了,但是subTask并没有成功将数据写入kafka,则会通过这个方法恢复原先最近的state进行恢复,然后继续
initializeState方法可以用来恢复state,解释可能以前将state持久化到了statebackend,但并没有将数据成功写入kafka,则可以ton过这个方法恢复最近的state,然后将数据继续往kafka写数据。
- CheckpointListener接口
此接口中包含一个notifyCheckpointComplete方法
源码如下
/**

 * This interface must be implemented by functions/operations that want to receive

 * a commit notification once a checkpoint has been completely acknowledged by all

 * participants.

 */

@PublicEvolving

public interface CheckpointListener {

    /**

     * This method is called as a notification once a distributed checkpoint has been completed.

     *

     * Note that any exception during this method will not cause the checkpoint to

     * fail any more.

     *

     * @param checkpointId The ID of the checkpoint that has been completed.

     * @throws Exception

     */

    void notifyCheckpointComplete(long checkpointId) throws Exception;

}
notifyCheckpointComplete方法什么时候被调用呢?所有分区的subTask向JobManager相应checkpoint后才会被调用,即告知各个subTask,这次checkpoint成功了,可以进行下一步的操作了,该方法源码如下:
@Override
public final void notifyCheckpointComplete(long checkpointId) throws Exception {
// the following scenarios are possible here
//
// (1) there is exactly one transaction from the latest checkpoint that
// was triggered and completed. That should be the common case.
// Simply commit that transaction in that case.
//
// (2) there are multiple pending transactions because one previous
// checkpoint was skipped. That is a rare case, but can happen
// for example when:
//
// - the master cannot persist the metadata of the last
// checkpoint (temporary outage in the storage system) but
// could persist a successive checkpoint (the one notified here)
//
// - other tasks could not persist their status during
// the previous checkpoint, but did not trigger a failure because they
// could hold onto their state and could successfully persist it in
// a successive checkpoint (the one notified here)
//
// In both cases, the prior checkpoint never reach a committed state, but
// this checkpoint is always expected to subsume the prior one and cover all
// changes since the last successful one. As a consequence, we need to commit
// all pending transactions.
//
// (3) Multiple transactions are pending, but the checkpoint complete notification
// relates not to the latest. That is possible, because notification messages
// can be delayed (in an extreme case till arrive after a succeeding checkpoint
// was triggered) and because there can be concurrent overlapping checkpoints
// (a new one is started before the previous fully finished).
//
// ==> There should never be a case where we have no pending transaction here
// Iterator<Map.Entry<Long, TransactionHolder<TXN>>> pendingTransactionIterator = pendingCommitTransactions.entrySet().iterator();
Throwable firstError = null; while (pendingTransactionIterator.hasNext()) {
Map.Entry<Long, TransactionHolder<TXN>> entry = pendingTransactionIterator.next();
Long pendingTransactionCheckpointId = entry.getKey();
TransactionHolder<TXN> pendingTransaction = entry.getValue();
if (pendingTransactionCheckpointId > checkpointId) {
continue;
} LOG.info("{} - checkpoint {} complete, committing transaction {} from checkpoint {}",
name(), checkpointId, pendingTransaction, pendingTransactionCheckpointId); logWarningIfTimeoutAlmostReached(pendingTransaction);
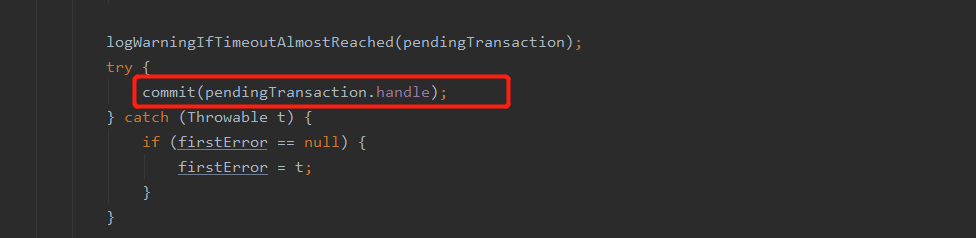
try {
commit(pendingTransaction.handle);
} catch (Throwable t) {
if (firstError == null) {
firstError = t;
}
} LOG.debug("{} - committed checkpoint transaction {}", name(), pendingTransaction); pendingTransactionIterator.remove();
} if (firstError != null) {
throw new FlinkRuntimeException("Committing one of transactions failed, logging first encountered failure",
firstError);
}
}
注意,该方法除了提醒个subTask此次checkpoint成功了外,还会提交事务,具体见源码如下(为该方法源码的一部分):
FlinkKafkaProducer中的commit方法
    @Override

    protected void commit(FlinkKafkaProducer.KafkaTransactionState transaction) {

        if (transaction.isTransactional()) {

            try {

                transaction.producer.commitTransaction();

            } finally {

                recycleTransactionalProducer(transaction.producer);

            }

        }

    }
若是事务提交失败后,该怎么办呢?没关系,事务提交失败后,会根据重启策略重启,并调用initializeState方法恢复先前最近的一个state,继续往kafka写数据,提交事务,再次提交事务时,就不是调用commit方法了,而是调用FlinkKafkaProducer中的recoverAndCommit方法(这块也可能是preCommit方法,自己还没完全看懂源码),先恢复数据再commit事务,源码如下
@Override

    protected void recoverAndCommit(FlinkKafkaProducer.KafkaTransactionState transaction) {

        if (transaction.isTransactional()) {

            try (

                FlinkKafkaInternalProducer<byte[], byte[]> producer =

                    initTransactionalProducer(transaction.transactionalId, false)) {

                producer.resumeTransaction(transaction.producerId, transaction.epoch);

                producer.commitTransaction();

            } catch (InvalidTxnStateException | ProducerFencedException ex) {

                // That means we have committed this transaction before.

                LOG.warn("Encountered error {} while recovering transaction {}. " +

                        "Presumably this transaction has been already committed before",

                    ex,

                    transaction);

            }

        }

    }
注意:这里可以保证checkpoint成功,以及事务提交成功,但是没法保证它俩在一起同时成功。但这也没关系,就算checkpoint成功了,事务没成功也没关系。事务没成功会回滚,它会从statebackend中恢复数据,然后再向kafka中写数据,提交事务。
2 自定义两阶段提交sink实例
自定义两阶段提交sink,其面向的存储系统一定要支持事务,比如mysq,0.11版以后的kafka。简单来说,自定义两阶段提交sink就是继承TwoPhaseCommitSinkFunction类,然后重写里面的方法,具体见下面的例子
MySQL分两阶段提交的Sink
druid连接池
package cn._51doit.flink.day11;

import com.alibaba.druid.pool.DruidDataSourceFactory;

import javax.sql.DataSource;

import java.sql.Connection;

import java.sql.SQLException;

import java.util.Properties;

public class DruidConnectionPool {

    private transient static DataSource dataSource = null;

    private transient static Properties props = new Properties();

    static {

        props.put("driverClassName", "com.mysql.jdbc.Driver");

        props.put("url", "jdbc:mysql://172.16.200.101:3306/bigdata?characterEncoding=UTF-8");

        props.put("username", "root");

        props.put("password", "123456");

        try {

            dataSource = DruidDataSourceFactory.createDataSource(props);

        } catch (Exception e) {

            e.printStackTrace();

        }

    }

    private DruidConnectionPool() {

    }

    public static Connection getConnection() throws SQLException {

        return dataSource.getConnection();

    }

}
MySqlTwoPhaseCommitSinkFunction
package cn._51doit.flink.day11;

import org.apache.flink.api.common.ExecutionConfig;

import org.apache.flink.api.common.typeutils.base.VoidSerializer;

import org.apache.flink.api.java.tuple.Tuple2;

import org.apache.flink.api.java.typeutils.runtime.kryo.KryoSerializer;

import org.apache.flink.streaming.api.functions.sink.TwoPhaseCommitSinkFunction;

import java.sql.Connection;

import java.sql.PreparedStatement;

import java.sql.SQLException;

public class MySqlTwoPhaseCommitSink extends TwoPhaseCommitSinkFunction<Tuple2<String, Integer>, MySqlTwoPhaseCommitSink.ConnectionState, Void> {

    public MySqlTwoPhaseCommitSink() {

        super(new KryoSerializer<>(MySqlTwoPhaseCommitSink.ConnectionState.class, new ExecutionConfig()), VoidSerializer.INSTANCE);

    }

    @Override

    protected MySqlTwoPhaseCommitSink.ConnectionState beginTransaction() throws Exception {

        System.out.println("=====> beginTransaction... ");

        //Class.forName("com.mysql.jdbc.Driver");

        //Connection conn = DriverManager.getConnection("jdbc:mysql://172.16.200.101:3306/bigdata?characterEncoding=UTF-8", "root", "123456");

        Connection connection = DruidConnectionPool.getConnection();

        connection.setAutoCommit(false);

        return new ConnectionState(connection);

    }

    @Override

    protected void invoke(MySqlTwoPhaseCommitSink.ConnectionState connectionState, Tuple2<String, Integer> value, Context context) throws Exception {

        Connection connection = connectionState.connection;

        PreparedStatement pstm = connection.prepareStatement("INSERT INTO t_wordcount (word, counts) VALUES (?, ?) ON DUPLICATE KEY UPDATE counts = ?");

        pstm.setString(1, value.f0);

        pstm.setInt(2, value.f1);

        pstm.setInt(3, value.f1);

        pstm.executeUpdate();

        pstm.close();

    }

    @Override

    protected void preCommit(MySqlTwoPhaseCommitSink.ConnectionState connectionState) throws Exception {

        System.out.println("=====> preCommit... " + connectionState);

    }

    @Override

    protected void commit(MySqlTwoPhaseCommitSink.ConnectionState connectionState) {

        System.out.println("=====> commit... ");

        Connection connection = connectionState.connection;

        try {

            connection.commit();

            connection.close();

        } catch (SQLException e) {

            throw new RuntimeException("提交事物异常");

        }

    }

    @Override

    protected void abort(MySqlTwoPhaseCommitSink.ConnectionState connectionState) {

        System.out.println("=====> abort... ");

        Connection connection = connectionState.connection;

        try {

            connection.rollback();

            connection.close();

        } catch (SQLException e) {

            throw new RuntimeException("回滚事物异常");

        }

    }

    static class ConnectionState {

        private final transient Connection connection;

        ConnectionState(Connection connection) {

            this.connection = connection;

        }

    }

}
3 将数据写入Hbase
使用hbase的幂等性结合at least Once(flink中state能恢复,在两次checkpoint间可能会有重复读取数据的情况)实现精确一次性语义
HBaseUtil
package cn._51doit.flink.day11;

import org.apache.hadoop.conf.Configuration;

import org.apache.hadoop.hbase.HBaseConfiguration;

import org.apache.hadoop.hbase.client.Connection;

import org.apache.hadoop.hbase.client.ConnectionFactory;

/**

 * Hbase的工具类,用来创建Hbase的Connection

 */

public class HBaseUtil {

    /**

     * @param zkQuorum zookeeper地址,多个要用逗号分隔

     * @param port     zookeeper端口号

     * @return

     */

    public static Connection getConnection(String zkQuorum, int port) throws Exception {

        Configuration conf = HBaseConfiguration.create();

        conf.set("hbase.zookeeper.quorum", zkQuorum);

        conf.set("hbase.zookeeper.property.clientPort", port + "");

        Connection connection = ConnectionFactory.createConnection(conf);

        return connection;

    }

}
MyHbaseSink
package cn._51doit.flink.day11;

import org.apache.flink.api.java.tuple.Tuple2;

import org.apache.flink.api.java.utils.ParameterTool;

import org.apache.flink.configuration.Configuration;

import org.apache.flink.streaming.api.functions.sink.RichSinkFunction;

import org.apache.hadoop.hbase.TableName;

import org.apache.hadoop.hbase.client.Connection;

import org.apache.hadoop.hbase.client.Put;

import org.apache.hadoop.hbase.client.Table;

import java.util.ArrayList;

import java.util.List;

public class MyHbaseSink extends RichSinkFunction<Tuple2<String, Double>> {

    private transient  Connection connection;

    private transient Integer maxSize = 1000;

    private transient Long delayTime = 5000L;

    private transient Long lastInvokeTime;

    private transient List<Put> puts = new ArrayList<>(maxSize);

    public MyHbaseSink() {}

    public MyHbaseSink(Integer maxSize, Long delayTime) {

        this.maxSize = maxSize;

        this.delayTime = delayTime;

    }

    @Override

    public void open(Configuration parameters) throws Exception {

        super.open(parameters);

       ParameterTool params = (ParameterTool) getRuntimeContext()

               .getExecutionConfig().getGlobalJobParameters();

        //创建一个Hbase的连接

        connection = HBaseUtil.getConnection(

                params.getRequired("hbase.zookeeper.quorum"),

                params.getInt("hbase.zookeeper.property.clientPort", 2181)

        );

        lastInvokeTime = System.currentTimeMillis();

    }

    @Override

    public void invoke(Tuple2<String, Double> value, Context context) throws Exception {

        String rk = value.f0;

        Put put = new Put(rk.getBytes());

        put.addColumn("data".getBytes(), "order".getBytes(), value.f1.toString().getBytes());

        puts.add(put);

        //使用ProcessingTime

        long currentTime = System.currentTimeMillis();

        //加到一个集合中

        if(puts.size() == maxSize || currentTime - lastInvokeTime >= delayTime) {

            //获取一个HbaseTable

            Table table = connection.getTable(TableName.valueOf("myorder"));

            table.put(puts);

            puts.clear();

            lastInvokeTime = currentTime;

            table.close();

        }

    }

    @Override

    public void close() throws Exception {

        connection.close();

    }

}
4 ProtoBuf
protoBuf是一种序列化机制,数据存储还是二进制,其特点是序列化、反序列化快,占用空间小(相比json而言,是它的1/3)、跨平台、跨语言。
4.1 protobuf的使用测试
(1)创建一个maven工程
(2)导入pom依赖,具体内容见下
<?xml version="1.0" encoding="UTF-8"?>

<project xmlns="http://maven.apache.org/POM/4.0.0"

         xmlns:xsi="http://www.w3.org/2001/XMLSchema-instance"

         xsi:schemaLocation="http://maven.apache.org/POM/4.0.0 http://maven.apache.org/xsd/maven-4.0.0.xsd">

    <modelVersion>4.0.0</modelVersion>

    <groupId>org.example</groupId>

    <artifactId>protobuf-bean</artifactId>

    <version>1.0-SNAPSHOT</version>

    <properties>

        <maven.compiler.source>1.8</maven.compiler.source>

        <maven.compiler.target>1.8</maven.compiler.target>

        <encoding>UTF-8</encoding>

    </properties>

    <dependencies>

        <dependency>

            <groupId>com.google.protobuf</groupId>

            <artifactId>protobuf-java</artifactId>

            <version>3.7.1</version>

        </dependency>

        <dependency>

            <groupId>com.google.protobuf</groupId>

            <artifactId>protobuf-java-util</artifactId>

            <version>3.7.1</version>

        </dependency>

        <dependency>

            <groupId>org.apache.kafka</groupId>

            <artifactId>kafka-clients</artifactId>

            <version>2.4.0</version>

        </dependency>

        <dependency>

            <groupId>junit</groupId>

            <artifactId>junit</artifactId>

            <version>4.12</version>

            <scope>test</scope>

        </dependency>

    </dependencies>

    <build>

        <extensions>

            <extension>

                <groupId>kr.motd.maven</groupId>

                <artifactId>os-maven-plugin</artifactId>

                <version>1.6.2</version>

            </extension>

        </extensions>

        <plugins>

            <plugin>

                <groupId>org.xolstice.maven.plugins</groupId>

                <artifactId>protobuf-maven-plugin</artifactId>

                <version>0.6.1</version>

                <configuration>

                    <protocArtifact>

                        com.google.protobuf:protoc:3.7.1:exe:${os.detected.classifier}

                    </protocArtifact>

                    <pluginId>grpc-java</pluginId>

                </configuration>

                <executions>

                    <execution>

                        <goals>

                            <goal>compile</goal>

                            <goal>compile-custom</goal>

                        </goals>

                    </execution>

                </executions>

            </plugin>

        </plugins>

    </build>

</project>
(3)在main目录下创建一个proto文件夹,在这个文件夹下编辑相应的xxx.proto文件,具体如下
syntax = "proto3";

option java_package = "cn._51doit.proto";

option java_outer_classname = "OrderProto";

message Order {

    int32 id = 1;

    string time = 2;

    double money  = 3;

}
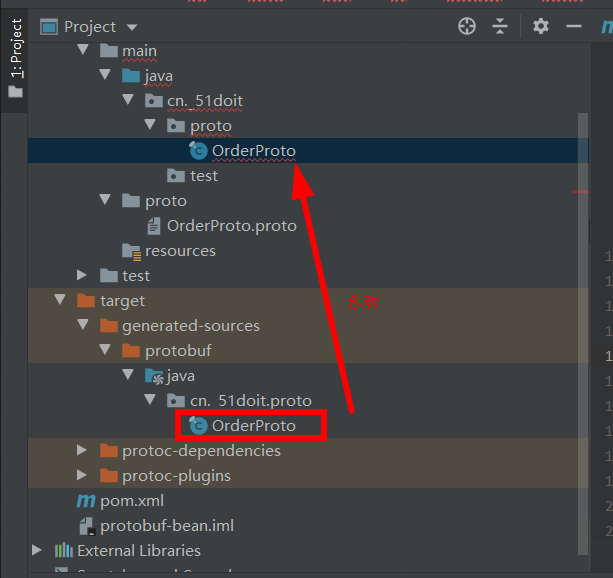
(4)在maven的plugins中会有个protobuf插件,点击里面的protobuf.compile,即可在项目中的target目录下生成相应的protobuf bean文件(支持多种语言的schema信息)
(5)将得到的proto bean移到自己想要的目录中即可
此测试就是将json数据转成protoBuf bean格式数据,然后在将其序列化输出,以及反序列化至bean输出
OrderProtoTest
package cn._51doit.test;

import cn._51doit.proto.OrderProto;

import com.google.protobuf.InvalidProtocolBufferException;

import com.google.protobuf.util.JsonFormat;

public class OrderProtoTest {

    public static void main(String[] args) throws InvalidProtocolBufferException {

        String json = "{\"id\": 100, \"time\": \"2020-07-01\", \"money\": 66.66}";

        //使用工具类生成一个类

        OrderProto.Order.Builder bean = OrderProto.Order.newBuilder();

        //将数据拷贝的bean中

        JsonFormat.parser().merge(json, bean);

        bean.setId(666);

        bean.setTime("2019-10-18");

        bean.setMoney(888.88);

        //序列化转成二进制

        //bean -> byte数组

        byte[] bytes = bean.build().toByteArray();

        System.out.println("二进制:" + bytes);

        //反序列化

        //二进制数组转成bean

        OrderProto.Order order = OrderProto.Order.parseFrom(bytes);

        System.out.println("对象格式:" + order);

    }

}
4.2 将数据以ProtoBuf的二进制形式发送到Kafka
DataToKafka
package cn._51doit.test;

import cn._51doit.proto.DataBeanProto;

import org.apache.kafka.clients.producer.KafkaProducer;

import org.apache.kafka.clients.producer.ProducerRecord;

import java.util.Properties;

public class DataToKafka {

    public static void main(String[] args) {

        // 1 配置参数

        Properties props = new Properties();

        //连接kafka节点

        props.setProperty("bootstrap.servers", "feng05:9092,feng06:9092,feng07:9092");

        props.setProperty("key.serializer", "org.apache.kafka.common.serialization.StringSerializer");

        props.setProperty("value.serializer", "org.apache.kafka.common.serialization.ByteArraySerializer");

        String topic = "dataproto";

        // 2 kafka的生产者

        KafkaProducer<String,  byte[]> producer = new KafkaProducer<String,  byte[]>(props);

        DataBeanProto.DataBean.Builder bean = DataBeanProto.DataBean.newBuilder();

        DataBeanProto.DataBeans.Builder list = DataBeanProto.DataBeans.newBuilder();

        for (int i = 1; i <= 100; i++) {

            //往bean中设置属性

            bean.setId(i);

            bean.setTitle("doit-" + i);

            bean.setUrl("www.51doit.cn");

            //将bean追加到list中

            list.addDataBean(bean);

            //清空原来分组的数据

            bean.clear();

            if(list.getDataBeanCount() == 10) {

                //将beans的集合转成protobuf的二进制

                byte[] bytes = list.build().toByteArray();

                ProducerRecord<String, byte[]> record = new ProducerRecord<>(topic, bytes);

                producer.send(record); //一次发送10条

                producer.flush();

                list.clear();

            }

        }

        System.out.println("message send success");

        // 释放资源

        producer.close();

    }

}
4.3 Flume的KafkaChannel整合kafka序列化器
需求:(1)在kafka中定义序列化器,在数据写入kafka前,将之转成对应的二进制存入kafka
(2)Flink从Kafka中拉取刚存入相应格式的二进制数据,转成ProtoBuf的Bean

(1)kafka序列化器的实现
大致思路就是首先获取一个protoBuf bean,然后定义一个序列化器,实现一个Serializer接口,在里面重写serialize方法,具体逻辑见下面代码。将该代码打包,放到flume的lib文件夹中,注意需要将flume的lib中protobuf-java-2.5.0.jar注释或者删除掉。
KafkaProtoBufSerializer
package cn._51doit.test;

import cn._51doit.proto.UserProto;

import com.google.protobuf.InvalidProtocolBufferException;

import com.google.protobuf.util.JsonFormat;

import org.apache.kafka.common.header.Headers;

import org.apache.kafka.common.serialization.Serializer;

import java.util.Map;

public class KafkaProtoBufSerializer implements Serializer<byte[]> {

    @Override

    public void configure(Map<String, ?> configs, boolean isKey) {

    }

    @Override

    public byte[] serialize(String topic, byte[] data) {

        // 将source传给channel的数据转成ProtoBuf的二进制

        //line是一个json

        String line = new String(data);

        UserProto.User.Builder bean = UserProto.User.newBuilder();

        //使用工具类将JSON的数据的数据set到bean中

        try {

            JsonFormat.parser().merge(line, bean);

        } catch (InvalidProtocolBufferException e) {

            return null;

        }

        return bean.build().toByteArray(); //返回的是ProtoBuf的二进制

    }

    @Override

    public byte[] serialize(String topic, Headers headers, byte[] data) {

        return new byte[0];

    }

    @Override

    public void close() {

    }

}
(2)Flink的Kafka反序列化器的实现
注意,此处除了要设置反序列化,即将kafka中确定topic中的protoBuf格式的二进制数据序列化成protoBuf的bean,还要指定bean的序列化规则(注册自定义的序列化类),这样flink处理该数据时才能进行网络传输
DataBeanProto(bean,跨语言)
使用4.1方法生成
DataBeansDeserializer反序列化器
package cn._51doit.flink.day11;

import org.apache.flink.api.common.serialization.DeserializationSchema;

import org.apache.flink.api.common.typeinfo.TypeInformation;

import java.io.IOException;

/**

 * 自定义的Flink反序列化器

 */

public class DataBeansDeserializer implements DeserializationSchema<DataBeanProto.DataBeans> {

    //反序列化

    @Override

    public DataBeanProto.DataBeans deserialize(byte[] message) throws IOException {

        return DataBeanProto.DataBeans.parseFrom(message);

    }

    @Override

    public boolean isEndOfStream(DataBeanProto.DataBeans nextElement) {

        return false;

    }

    @Override

    public TypeInformation<DataBeanProto.DataBeans> getProducedType() {

        return TypeInformation.of(DataBeanProto.DataBeans.class);

    }

}
PBSerializer序列化器
package cn._51doit.flink.day11;

import com.esotericsoftware.kryo.Kryo;

import com.esotericsoftware.kryo.Serializer;

import com.esotericsoftware.kryo.io.Input;

import com.esotericsoftware.kryo.io.Output;

import com.google.protobuf.Message;

import java.lang.reflect.Method;

import java.util.HashMap;

public class PBSerializer extends Serializer<Message> {

        /* This cache never clears, but only scales like the number of

         * classes in play, which should not be very large.

         * We can replace with a LRU if we start to see any issues.

         */

        final protected HashMap<Class, Method> methodCache = new HashMap<Class, Method>();

        /**

         * This is slow, so we should cache to avoid killing perf:

         * See: http://www.jguru.com/faq/view.jsp?EID=246569

         */

        protected Method getParse(Class cls) throws Exception {

            Method meth = methodCache.get(cls);

            if (null == meth) {

                meth = cls.getMethod("parseFrom", new Class[]{ byte[].class });

                methodCache.put(cls, meth);

            }

            return meth;

        }

        //序列化

        @Override

        public void write(Kryo kryo, Output output, Message mes) {

            byte[] ser = mes.toByteArray();

            output.writeInt(ser.length, true);

            output.writeBytes(ser);

        }

        //反序列化

        @Override

        public Message read(Kryo kryo, Input input, Class<Message> pbClass) {

            try {

                int size = input.readInt(true);

                byte[] barr = new byte[size];

                input.readBytes(barr);

                return (Message)getParse(pbClass).invoke(null, barr);

            } catch (Exception e) {

                throw new RuntimeException("Could not create " + pbClass, e);

            }

        }

    }
测试类
ProtoBufDemo
package cn._51doit.flink.day11;

import cn._51doit.flink.day10.FlinkUtilsV2;

import org.apache.flink.api.common.functions.FlatMapFunction;

import org.apache.flink.api.java.utils.ParameterTool;

import org.apache.flink.streaming.api.datastream.DataStream;

import org.apache.flink.streaming.api.datastream.SingleOutputStreamOperator;

import org.apache.flink.util.Collector;

public class ProtoBufDemo {

    public static void main(String[] args) throws Exception{

        ParameterTool parameters = ParameterTool.fromPropertiesFile(args[0]);

        DataStream<DataBeanProto.DataBeans> dataBeansStream = FlinkUtilsV2.createKafkaDataStream(parameters, "dataproto", "gid", DataBeansDeserializer.class);

        //注册自定义的序列化类

        FlinkUtilsV2.getEnv().getConfig().registerTypeWithKryoSerializer(DataBeanProto.DataBeans.class, PBSerializer.class);

        FlinkUtilsV2.getEnv().getConfig().registerTypeWithKryoSerializer(DataBeanProto.DataBean.class, PBSerializer.class);

        SingleOutputStreamOperator<DataBeanProto.DataBean> dataBeanStream = dataBeansStream.flatMap(

                new FlatMapFunction<DataBeanProto.DataBeans, DataBeanProto.DataBean>() {

                    @Override

                    public void flatMap(DataBeanProto.DataBeans list, Collector<DataBeanProto.DataBean> out) throws Exception {

                        for (DataBeanProto.DataBean dataBean : list.getDataBeanList()) {

                            out.collect(dataBean);

                        }

                    }

                });

        dataBeanStream.print();

        FlinkUtilsV2.getEnv().execute();

    }

}
flink-----实时项目---day07-----1.Flink的checkpoint原理分析 2. 自定义两阶段提交sink(MySQL) 3 将数据写入Hbase(使用幂等性结合at least Once实现精确一次性语义) 4 ProtoBuf的更多相关文章
- 字节跳动流式数据集成基于Flink Checkpoint两阶段提交的实践和优化
背景 字节跳动开发套件数据集成团队(DTS ,Data Transmission Service)在字节跳动内基于 Flink 实现了流批一体的数据集成服务.其中一个典型场景是 Kafka/ByteM ...
- Flink EOS如何防止外部系统乱入--两阶段提交源码
一.前言 根据维基百科的定义,两阶段提交(Two-phase Commit,简称2PC)是巨人们用来解决分布式系统架构下的所有节点在进行事务提交时保持一致性问题而设计的一种算法,也可称之为协议. 在F ...
- 5.Flink实时项目之业务数据准备
1. 流程介绍 在上一篇文章中,我们已经把客户端的页面日志,启动日志,曝光日志分别发送到kafka对应的主题中.在本文中,我们将把业务数据也发送到对应的kafka主题中. 通过maxwell采集业务数 ...
- 3.Flink实时项目之流程分析及环境搭建
1. 流程分析 前面已经将日志数据(ods_base_log)及业务数据(ods_base_db_m)发送到kafka,作为ods层,接下来要做的就是通过flink消费kafka 的ods数据,进行简 ...
- 6.Flink实时项目之业务数据分流
在上一篇文章中,我们已经获取到了业务数据的输出流,分别是dim层维度数据的输出流,及dwd层事实数据的输出流,接下来我们要做的就是把这些输出流分别再流向对应的数据介质中,dim层流向hbase中,dw ...
- 4.Flink实时项目之数据拆分
1. 摘要 我们前面采集的日志数据已经保存到 Kafka 中,作为日志数据的 ODS 层,从 kafka 的ODS 层读取的日志数据分为 3 类, 页面日志.启动日志和曝光日志.这三类数据虽然都是用户 ...
- 7.Flink实时项目之独立访客开发
1.架构说明 在上6节当中,我们已经完成了从ods层到dwd层的转换,包括日志数据和业务数据,下面我们开始做dwm层的任务. DWM 层主要服务 DWS,因为部分需求直接从 DWD 层到DWS 层中间 ...
- 9.Flink实时项目之订单宽表
1.需求分析 订单是统计分析的重要的对象,围绕订单有很多的维度统计需求,比如用户.地区.商品.品类.品牌等等.为了之后统计计算更加方便,减少大表之间的关联,所以在实时计算过程中将围绕订单的相关数据整合 ...
- 10.Flink实时项目之订单维度表关联
1. 维度查询 在上一篇中,我们已经把订单和订单明细表join完,本文将关联订单的其他维度数据,维度关联实际上就是在流中查询存储在 hbase 中的数据表.但是即使通过主键的方式查询,hbase 速度 ...
随机推荐
- hdu 5108 Alexandra and Prime Numbers(水题 / 数论)
题意: 给一个正整数N,找最小的M,使得N可以整除M,且N/M是质数. 数据范围: There are multiple test cases (no more than 1,000). Each c ...
- 重新整理 .net core 实践篇——— filter[四十四]
前言 简单介绍一下filter 正文 filter 的种类,微软文档中写道: 每种筛选器类型都在筛选器管道中的不同阶段执行: 授权筛选器最先运行,用于确定是否已针对请求为用户授权. 如果请求未获授权, ...
- List of devices attached 没有手机设备号 解决办法
问题: cmd下使用adb devices 没有找到手机设备,如下图 解决办法: 采用360手机助手给我们自动安装对应的手机驱动,或者去对应的手机官网下载对应的驱动,这里手机要开启调试模式 我是opp ...
- Java学习(十四)
玩云顶连跪一晚上,搞得心态有点崩了... 源计划5-4还是一星vn,吐了. 今天学习了伪元素: 语法是 :first-letter//元素的第一个字母的位置,如果:前不加元素,默认是#(即所有元素) ...
- 数据结构知识总结(STL整理)
重要知识点 1.基础知识 #include<bits/stdc++.h> //万能头文件 #include< algorithm > //包含sort函数 运用sort实现多关 ...
- 【JAVA】笔记(7)--- 数组精讲
数组的静态初始化: 1.一维数组: int [ ] arr = { 1,2,3,4 } ; Object [ ] arr = { new Object ( ) , new Object ( ) , ...
- java开发环境搭建,配置
java开发环境搭建 下载jdk8的地址 是oracle的 安装JDK 下载电脑对应的版本 双击安装JDK 记住安装路径 配置环境变量 我的电脑/此电脑 右键属性 高级设置 环境变量 点击新建 变量名 ...
- dart系列之:在dart中使用packages
目录 简介 pubspec.yaml get packages 使用packages 升级依赖 总结 简介 java中使用jar包来封装有用的功能,然后将其分发到maven仓库中,供其他人使用.同样的 ...
- Semaphore信号量的使用
package ThreadTest; import java.util.concurrent.Semaphore; import java.util.concurrent.TimeUnit; pub ...
- 前端jsdebug调试
前端如何像java一样的debug呢? 1.在js页面加入debugger next: function(){ debugger var type=this.quiz[this.progress].s ...