QT-可拖拽可编辑的多控件ListView
目标
结合前面的2篇文章, 继续升级QML版本的ListView: 又要拖拽, 又要可编辑, 还得支持多个控件.
循序渐进
本文基于前一篇的基础: Qt-可编辑的ListView 要循序渐进的学习.
几个关键点
- 要用拖拽, 就不能用Layout了 (大部分情况应该是)
- 条条大路通罗马, 但是没有找到官方的示例...只好自己写
- 尽量简洁, 而不是自己控制所有状态(虽然也可以做到, 就是太麻烦)
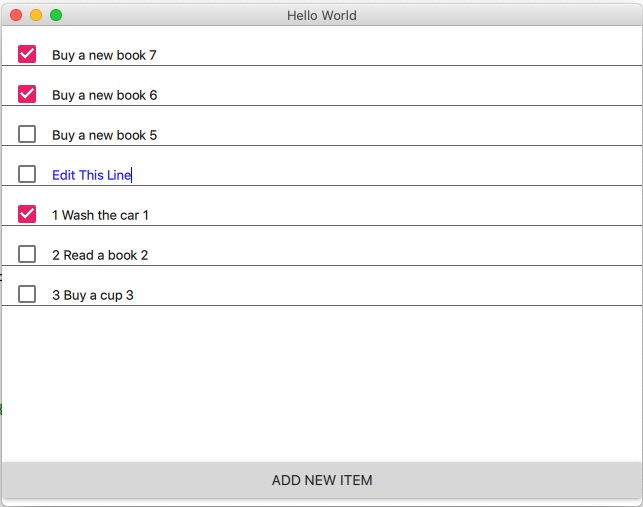
示意图
代码如下
main.cpp, main.qml没啥变化, 和之前的一样.
主要的EditDragList.qml代码如下, 里面注释很多, 还有很多调试打印, 自己可以去除:
import QtQuick 2.12

import QtQuick.Controls 2.5

import QtQuick.Layouts 1.3

import QtQml.Models 2.1

/**

  1. 通过设置currentIndex, 属性自动变化. 支持键盘

  2. 支持拖拽

*/

Rectangle {

    id: root

    //列表容器

    Rectangle {

        id: itemRoot

        width: root.width

        height: root.height - itemOp.height

        //调试显示

        //color: "blue"

        //border.width: 2

        Component {

            id: delegateItem

            MouseArea {

                id: mouseArea

                width: itemRoot.width

                height: itemRect.height

                anchors {

                    left: parent.left

                    right: parent.right

                }

                //hoverEnabled: true

                //拖拽设置

                drag.smoothed: false

                drag.target: itemRect

                drag.axis: Drag.YAxis

                onClicked: {

                    console.debug("onClicked")

                    //方法1: 设置当前

                    listView.currentIndex = index

                    console.log(("MouseArea Click listview currentIndex: "

                                 + listView.currentIndex + " index: " + index))

                    console.log(("MouseArea Click ListView isCurrentItem: "

                                 + ListView.isCurrentItem))

                    // 在onFocusChanged 中设置了, 此处不需要了

                    //textinput.focus = true;

                }

                onFocusChanged: {

                    if (focus) {

                        console.debug("=====got focus of mouseArea, start")

                        console.debug(("got focus of mouseArea, listview currentIndex: "

                                     + listView.currentIndex + " index: " + index))

                        console.debug("got focus of mouseArea, isCurrentItem: " +  mouseArea.ListView.isCurrentItem)

                        console.debug("got focus of mouseArea, drag is active: " + drag.active)

                        console.debug("got focus of mouseArea, textInput visible: " + textinput.visible)

                        textinput.focus = true

                        console.debug("=====got focus of mouseArea, end!")

                    }

                    else {

                        console.debug(("lost focus of mouseArea, listview currentIndex: "

                                     + listView.currentIndex + " index: " + index))

                        console.debug("lost focus of mouseArea, isCurrentItem: " +  mouseArea.ListView.isCurrentItem)

                    }

                }

                //FIXME: 目前某行处于编辑状态, 然后其他行拖动和此行交换, 则会crash, 原因待查 2020.4.21

                //目前解决的思路: 一旦开始拖拽, 则退出编辑状态

                drag.onActiveChanged: {

                    if (mouseArea.drag.active) {

                        //开始拖动时: 设置当前Item为空

                        listView.currentIndex = -1

                    }

                }

                //实际显示内容

                Rectangle {

                    id: itemRect

                    height: 40

                    width: mouseArea.width

                    anchors {

                        horizontalCenter: parent.horizontalCenter

                        verticalCenter: parent.verticalCenter

                    }

                    //拖拽设置

                    Drag.active: mouseArea.drag.active

                    Drag.source: mouseArea

                    Drag.hotSpot.x: width / 2

                    Drag.hotSpot.y: height / 2

                    //拖拽的状态变化

                    states: State {

                        when: itemRect.Drag.active

                        ParentChange {

                            target: itemRect

                            parent: itemRoot

                        }

                        AnchorChanges {

                            target: itemRect

                            anchors {

                                horizontalCenter: undefined

                                verticalCenter: undefined

                            }

                        }

                    }

                    CheckBox {

                        id: chkbox

                        width: 50

                        //height: parent.height

                        anchors.bottom: parent.bottom

                        //底部留点空间

                        bottomPadding: 3

                        checked: model.done

                        onClicked: model.done = checked

                    }

                    Rectangle {

                        id: textSection

                        height: parent.height

                        width: parent.width - chkbox.width

                        anchors.left: chkbox.right

                        Text {

                            id: textShow

                            text: model.description

                            anchors.bottom: parent.bottom

                            //控制可见: 不是当前

                            visible: !mouseArea.ListView.isCurrentItem

                            //底部留点空间

                            bottomPadding: 3

                        } //end textShow

                        TextInput {

                            id: textinput

                            anchors.bottom: parent.bottom

                            color: "blue"

                            //底部留点空间

                            bottomPadding: 3

                            text: model.description

                            //控制是否编辑状态

                            visible: mouseArea.ListView.isCurrentItem

                            enabled: mouseArea.ListView.isCurrentItem

                            //focus: true

                            selectByMouse: true

                            //Debug: 不变不会进入的, 例如已经focus, 再次设置不会触发此事件

                            onFocusChanged: {

                                if (focus) {

                                    console.debug("got focus " + "textInput")

                                }

                                else {

                                    console.debug("lost focus " + "textInput")

                                }

                            }

                            onEditingFinished: {

                                console.debug("=== start onEditingFinished ")

                                model.description = textinput.text

                                //方法1: 设置index

                                if (listView.currentIndex == index) {

                                    listView.currentIndex = -1

                                }

                                console.log(("TextInput listview currentIndex: "

                                             + listView.currentIndex + " index: " + index))

                                console.log(("TextInput ListView isCurrentItem: "

                                             + mouseArea.ListView.isCurrentItem))

                                console.debug("=== end onEditingFinished ")

                            }

                        } //end TextInput

                    } //end textSection Rectangle

                    Frame {

                        width: itemRect.width

                        height: 1

                        anchors.bottom: itemRect.bottom

                        //anchors.topMargin: 1

                    }

                } //end itemRect Rectangle

                DropArea {

                    anchors {

                        fill: parent

                        margins: 10

                    }

                    onEntered: {

                        console.debug("===== start DropArea onEntered")

                        console.debug("drag.source.DelegateModel.itemsIndex: " + drag.source.DelegateModel.itemsIndex)

                        console.debug("mouseArea.DelegateModel.itemsIndex: " + mouseArea.DelegateModel.itemsIndex )

                        //移动Delegate

                        visualModel.items.move(

                                    drag.source.DelegateModel.itemsIndex,

                                    mouseArea.DelegateModel.itemsIndex, 1)

                        //移动Model: 不移动的话model和delegate就不同步了

                        visualModel.model.move(

                                    drag.source.DelegateModel.itemsIndex,

                                    mouseArea.DelegateModel.itemsIndex, 1)

                        console.debug("===== end DropArea onEntered")

                    }

                }

                //end DropArea

            } //end MouseArea

        } //end Component

        DelegateModel {

            id: visualModel

            model: MyModel {}

            delegate: delegateItem

        }

        ListView {

            id: listView

            width: parent.width

            height: parent.height

            keyNavigationEnabled: true

            //clip: true

            model: visualModel

            //delegate: delegateItem

            //默认不要是第一个, 否则第一个是可编辑状态(针对方法1)

            Component.onCompleted: {

                currentIndex = -1

            }

            //默认焦点

            focus: true

            spacing: 0

        }

    }

    //操作区容器

    Rectangle {

        id: itemOp

        width: root.width

        //指定高度

        height: 50

        //和上一个区域挨着

        anchors.top: itemRoot.bottom

        Button {

            text: qsTr("Add New Item")

            width: parent.width

            onClicked: {

                var c = listView.model.model.rowCount()

                //插入在第一个

                listView.model.model.insert(0, {

                                                "description": "Buy a new book " + (c + 1),

                                                "done": false

                                            })

                //追加

                //listView.model.model.append({ "description": "Buy a new book " + (c + 1), "done": false })

                //设置焦点, 否则listView就没焦点了

                listView.focus = true

                listView.currentIndex = 0

            }

        }

    }

}
项目地址
和前一篇一样, 还在同一个项目里面: https://github.com/cnscud/learn/tree/master/qt/editListView
QT-可拖拽可编辑的多控件ListView的更多相关文章
- 编写可编辑的List控件
今天由于项目的需要,要编写个能编辑的List控件,即双击List控件的表项能修改其中的内容.由于MFC自带的List控件是不能编辑的,所以在网上找了下怎样编写可编辑的CListCtrl控件,基本上都是 ...
- 市委组织部考核项目——利用EasyUi中可编辑的DataGrid控件对多行数据进行编辑并提交
http://blog.csdn.net/cjr15233661143/article/details/19041165 市委组织部考核项目中需要录入原始数据,拿开发区的数据录入举例说明,见下图,需要 ...
- as3文本框的动态拖拽和编辑
如今非常多软件都支持了编辑界面的文本拖拽和点击编辑来直接改动数值, 这样便于操作, 并且体验性也好, 抛砖引玉吧 于是就用好久没编写的as3来写了一下: 由于用的flash ide写的没有提示, 就临 ...
- QML学习笔记(七)— 实现可拖拽、编辑、选中的ListView
鼠标单击可选中当前项,头部呈绿色显示:按压当前项可进行拖拽更换列表项位置:点击数据可以进行编辑: GitHub:八至 作者:狐狸家的鱼 这里是自己定义的model,有些字体和颜色都是使用的全局属性, ...
- QT 窗口拖拽移动实现
我们知道,要实现窗口移动可以直接鼠标点住窗口的标题栏实现拖拽移动,这是窗口默认的行为,在QT中的事件响应函数为moveEvent. 但是现实中经常需要鼠标点住窗口客户区域实现窗口的拖拽移动,代码实现如 ...
- ztree-可拖拽可编辑的树
<!DOCTYPE html> <HTML> <HEAD> <TITLE> ZTREE DEMO - addNodes / editName / rem ...
- gantt甘特图可拖拽、编辑(vue、react都可用 highcharts)
前言 Excel功能强大,应用广泛.随着web应用的兴起和完善,用户的要求也越来越高.很多Excel的功能都搬到了sass里面.恨不得给他们做个Excel出来...程序员太难了... 去年我遇到了 ...
- QT窗口拖拽功能简单应用(处理dragEnterEvent和dropEvent事件,不同的事件有不同的信息,比如mimeData)
void dragEnterEvent(QDragEnterEvent *event); void dropEvent(QDropEvent *event); ui->lineEdit-> ...
- MFC设置静态文本框,编辑框等控件背景和字体颜色
在MFC类库提供了CWnd::OnCtlColor函数,在工作框架的子窗口被重画时将调用该成员函数.因此可以重载WM_CTLCOLOR消息的响应函数.此函数的原型:afx_msg HBRUSH OnC ...
随机推荐
- Mac为docker和kubectl添加自动命令补全
我最新最全的文章都在南瓜慢说 www.pkslow.com,欢迎大家来喝茶! 1 前言 自动命令补全是非常有用的功能,特别是当命令有特别多参数时.显然,docker/kubectl就是这样的命令.我们 ...
- OO unit4 summary
Unit4 一.第四单元作业的架构设计 第四单元个人认为主要是考察对于层次结构的理解,即如何理解并处理好UML图的树状结构组织,在理好层次之间以及层次内部的相互关系之后,就只剩下代码实现的问题了.但是 ...
- 最佳实践丨使用Rancher轻松管理上万资源不是梦!
前 言 Rancher 作为一个开源的企业级 Kubernetes 集群管理平台.你可以导入现有集群,如 ACK.TKE.EKS.GKE,或者使用 RKE.RKE2.K3s 自定义部署集群. 作为业界 ...
- 关于基于Nexus3和Docker搭建私有Nuget服务的探索
背景简介 NuGet是Microsoft开发平台的程序集包管理器,它由客户端工具和服务端站点组成,客户端工具提供给用户管理和安装/卸载软件程序包,以及打包和发布程序包到NuGet服务端站点等功能,服务 ...
- 4、saltstack的使用
官方文档地址:http://repo.saltstack.com/#rhel 4.1.saltstatck介绍: 用户要一致,这里使用的是root用户: 用于批量管理成百上千的服务器: 并行的分发,使 ...
- SpringCloud:Feign调用接口不稳定问题以及如何设置超时
1. Feign调用接口不稳定报错 Caused by: java.net.SocketException: Software caused connection abort: recv failed ...
- Hadoop:Hadoop的学习路线
Hadoop生态架构技术 1.语言基础 Java:掌握javase知识,多理解和实践在Java虚拟机的内存管理.以及多线程.线程池.设计模式.并行化就可以,不需要深入掌握. Linux:系统安装( ...
- kafka、rabbitmq、redis区别,各自适合什么场景?
在应用场景方面 RabbitMQ RabbitMQ遵循AMQP协议,由内在高并发的erlanng语言开发,用在实时的对可靠性要求比较高的消息传递上,适合企业级的消息发送订阅,也是比较受到大家欢迎的. ...
- 南京大学计算机基础 X64函数调用和链接器原理和可重定位的文件.o
一. 1.函数调用差别 X64的函数调用,和X86函数调用区别,在于参数的传递不一样了,X64的参数传递不在依靠栈来传,而是寄存器,不过还是具有局限性的 比如只能允许六个寄存器来传,分别是RDI,RS ...
- WPF教程十一:简单了解并使用控件模板
WPF教程十一:简单了解并使用控件模板 这一章梳理控件模板,每个WPF控件都设计成无外观的,但是行为设计上是不允许改变的,比如使用Button的控件时,按钮提供了能被点击的内容,那么自由的改变控件外观 ...