[CAN波形分析] 一次CAN波形分析之旅
Prepare
CAN通信协议使用了有一段时间了,但都是基于软件层面的使用,对于其波形不是很了解,正好这段时间比较闲,是时候补补硬知识。
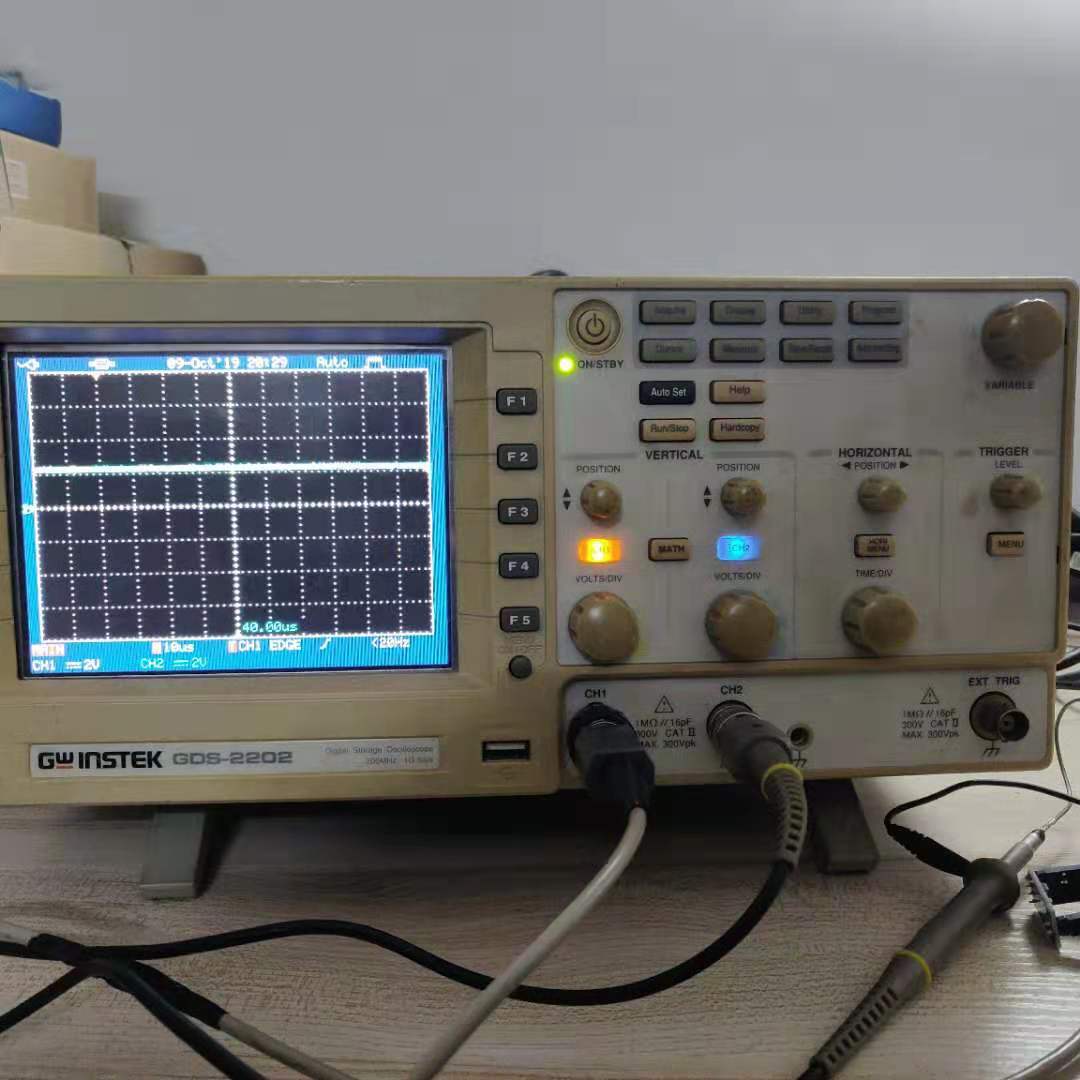
开始之前,先介绍一下设备:
- 咸鱼淘来的古董级别示波器GDS-2202。200MHz,数据记录长度是12500个点(每个点40ns,总记录长度是500us)
- EK-LM4F120XL开发板。也就是现在的EK-TM4C123GXL,板载MCU是TM4C1233H6PM,对应原来的老型号LM4F120H5QR

- CAN收发器,TJA1050模块

Ongoing
软件准备
用CCS9.0导入TI提供的CAN驱动库,每隔1秒钟发送一个CAN信息:
- 波特率:500 kb/s
- ID(Normal): 0x220
- 信息长度 :4 bytes
- 数据:0x12, 0x34, 0x56, 0x78
  1 int main(void)

  2 {

  3     tCANMsgObject sCANMessage;

  4     unsigned char ucMsgData[4];

  5

  6     //

  7     // Set the clocking to run directly from the external crystal/oscillator.

  8     // TODO: The SYSCTL_XTAL_ value must be changed to match the value of the

  9     // crystal on your board.

 10     //

 11     SysCtlClockSet(SYSCTL_SYSDIV_2_5 | SYSCTL_USE_PLL | SYSCTL_OSC_MAIN |

 12                    SYSCTL_XTAL_16MHZ);

 13

 14     //

 15     // Set up the serial console to use for displaying messages.  This is

 16     // just for this example program and is not needed for CAN operation.

 17     //

 18     InitConsole();

 19

 20     //

 21     // For this example CAN0 is used with RX and TX pins on port D0 and D1.

 22     // The actual port and pins used may be different on your part, consult

 23     // the data sheet for more information.

 24     // GPIO port D needs to be enabled so these pins can be used.

 25     // TODO: change this to whichever GPIO port you are using

 26     //

 27     SysCtlPeripheralEnable(SYSCTL_PERIPH_GPIOE);

 28

 29     //

 30     // Configure the GPIO pin muxing to select CAN0 functions for these pins.

 31     // This step selects which alternate function is available for these pins.

 32     // This is necessary if your part supports GPIO pin function muxing.

 33     // Consult the data sheet to see which functions are allocated per pin.

 34     // TODO: change this to select the port/pin you are using

 35     //

 36     GPIOPinConfigure(GPIO_PE4_CAN0RX);

 37     GPIOPinConfigure(GPIO_PE5_CAN0TX);

 38

 39     //

 40     // Enable the alternate function on the GPIO pins.  The above step selects

 41     // which alternate function is available.  This step actually enables the

 42     // alternate function instead of GPIO for these pins.

 43     // TODO: change this to match the port/pin you are using

 44     //

 45     GPIOPinTypeCAN(GPIO_PORTE_BASE, GPIO_PIN_4 | GPIO_PIN_5);

 46

 47     //

 48     // The GPIO port and pins have been set up for CAN.  The CAN peripheral

 49     // must be enabled.

 50     //

 51     SysCtlPeripheralEnable(SYSCTL_PERIPH_CAN0);

 52

 53     //

 54     // Initialize the CAN controller

 55     //

 56     CANInit(CAN0_BASE);

 57

 58     //

 59     // Set up the bit rate for the CAN bus.  This function sets up the CAN

 60     // bus timing for a nominal configuration.  You can achieve more control

 61     // over the CAN bus timing by using the function CANBitTimingSet() instead

 62     // of this one, if needed.

 63     // In this example, the CAN bus is set to 500 kHz.  In the function below,

 64     // the call to SysCtlClockGet() is used to determine the clock rate that

 65     // is used for clocking the CAN peripheral.  This can be replaced with a

 66     // fixed value if you know the value of the system clock, saving the extra

 67     // function call.  For some parts, the CAN peripheral is clocked by a fixed

 68     // 8 MHz regardless of the system clock in which case the call to

 69     // SysCtlClockGet() should be replaced with 8000000.  Consult the data

 70     // sheet for more information about CAN peripheral clocking.

 71     //

 72

 73     sysclk = SysCtlClockGet();

 74     CANBitRateSet(CAN0_BASE, sysclk, 500000);

 75

 76     //

 77     // Enable interrupts on the CAN peripheral.  This example uses static

 78     // allocation of interrupt handlers which means the name of the handler

 79     // is in the vector table of startup code.  If you want to use dynamic

 80     // allocation of the vector table, then you must also call CANIntRegister()

 81     // here.

 82     //

 83     // CANIntRegister(CAN0_BASE, CANIntHandler); // if using dynamic vectors

 84     //

 85     CANIntEnable(CAN0_BASE, CAN_INT_MASTER | CAN_INT_ERROR | CAN_INT_STATUS);

 86

 87     CANRetrySet(CAN0_BASE, false);

 88     //

 89     // Enable the CAN interrupt on the processor (NVIC).

 90     //

 91     IntEnable(INT_CAN0);

 92

 93     //

 94     // Enable the CAN for operation.

 95     //

 96     CANEnable(CAN0_BASE);

 97

 98     //

 99     // Initialize the message object that will be used for sending CAN

100     // messages.  The message will be 4 bytes that will contain an incrementing

101     // value.  Initially it will be set to 0.

102     //

103     *(unsigned long *)ucMsgData = 0;

104     sCANMessage.ulMsgID = 0x220;                    // CAN message ID

105     sCANMessage.ulMsgIDMask = 0;                    // no mask needed for TX

106     sCANMessage.ulFlags = MSG_OBJ_TX_INT_ENABLE;    // enable interrupt on TX

107     sCANMessage.ulMsgLen = sizeof(ucMsgData);       // size of message is 4

108     sCANMessage.pucMsgData = ucMsgData;             // ptr to message content

109

110     ucMsgData[0] = 0x12;

111     ucMsgData[1] = 0x34;

112     ucMsgData[2] = 0x56;

113     ucMsgData[3] = 0x78;

114     //

115     // Enter loop to send messages.  A new message will be sent once per

116     // second.  The 4 bytes of message content will be treated as an unsigned

117     // long and incremented by one each time.

118     //

119     for(;;)

120     {

121         //

122         // Print a message to the console showing the message count and the

123         // contents of the message being sent.

124         //

125         UARTprintf("Sending msg: 0x%02X %02X %02X %02X",

126                    ucMsgData[0], ucMsgData[1], ucMsgData[2], ucMsgData[3]);

127

128         //

129         // Send the CAN message using object number 1 (not the same thing as

130         // CAN ID, which is also 1 in this example).  This function will cause

131         // the message to be transmitted right away.

132         //

133         CANMessageSet(CAN0_BASE, 1, &sCANMessage, MSG_OBJ_TYPE_TX);

134

135         //

136         // Now wait 1 second before continuing

137         //

138         SimpleDelay();

139

140         //

141         // Check the error flag to see if errors occurred

142         //

143         if(g_bErrFlag)

144         {

145             UARTprintf(" error - cable connected?\n");

146         }

147         else

148         {

149             //

150             // If no errors then print the count of message sent

151             //

152             UARTprintf(" total count = %u\n", g_ulMsgCount);

153         }

154

155         //

156         // Increment the value in the message data.

157         //

158         //(*(unsigned long *)ucMsgData)++;

159     }

160

161     //

162     // Return no errors

163     //

164     return(0);

165 }
编译,通过板载调试器下载代码,复位运行代码。
硬件准备
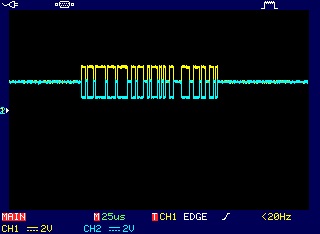
示波器探头CH1连接TJA1050的CANH引脚,探头CH2连接CANL引脚,地跟开发板的GND连接,使用边沿触发模式捕获波形:
分析
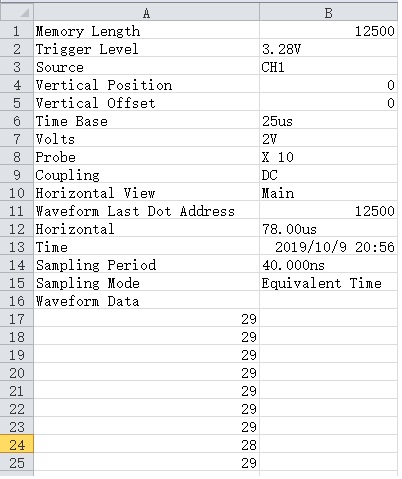
为了方便分析,将波形保存成CSV格式。该CSV文件记录了波形信息和数据,从第17行开始,就是波形的数据,如下图:
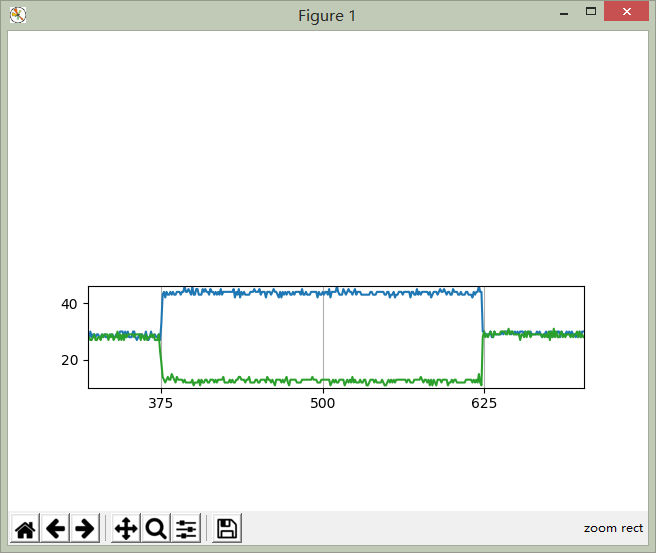
使用Matplotlib导入CSV,绘制折线图,代码如下:
 1 import csv

 2 import matplotlib

 3 import matplotlib.pyplot as plt

 4 import matplotlib.collections as collections

 5 from matplotlib.ticker import MultipleLocator

 6 import numpy as np

 7 import pandas as pd

 8

 9 ax = plt.subplot()

10 #将x主刻度标签设置为125的倍数

11 xmajorLocator = MultipleLocator(125)

12 ax.xaxis.set_major_locator(xmajorLocator)

13 #y轴数据

14 raw_canh = pd.read_csv("canh.csv")

15 raw_canl = pd.read_csv("canl.csv")

16 #x轴数据

17 t = np.arange(130, 12000, 1)

18 ax.plot(t, raw_canh[130:12000], raw_canl[130:12000])

19 ax.xaxis.grid(True)

20

21 plt.show()
运行,效果如下,

局部放大波形图,
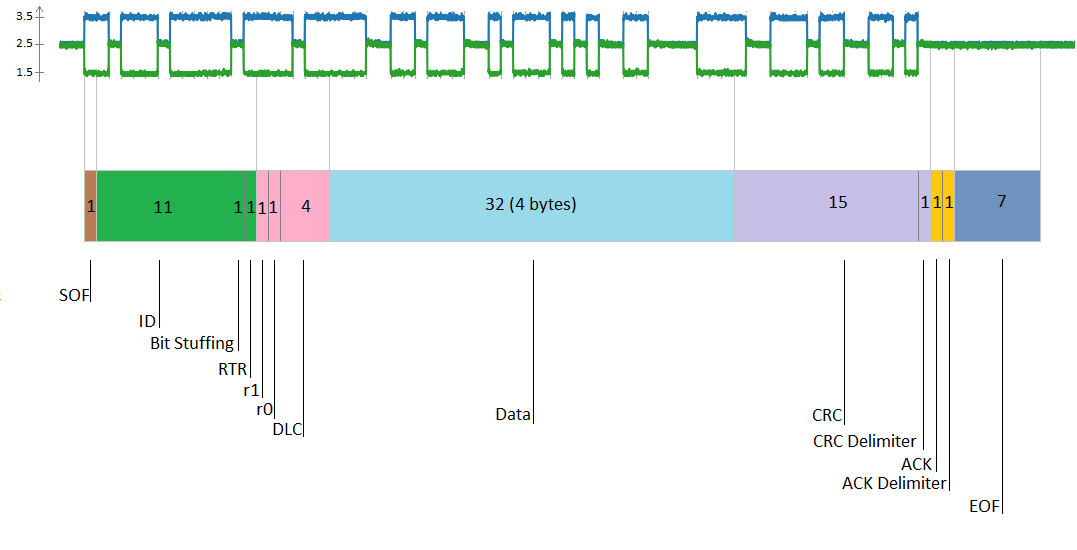
接下来的工作就是PS了,参照CAN2.0B的Spec,找到每一位的定义。首先是整个数据帧(Data Frame)的定义,
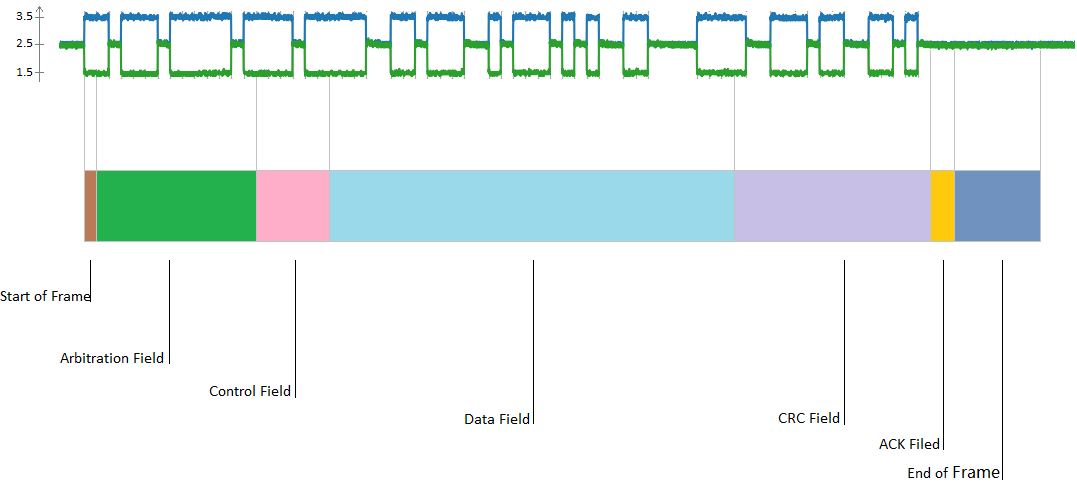
进一步细化每个字段(Field):
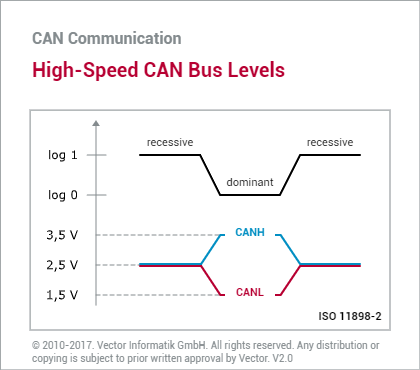
将差分信号转换为实际的二进制值,十六进制值。这里需要补充一点知识,CAN信号电压与实际逻辑的关系,很好记忆,波形像口张开的(O),表示逻辑0(显示);另外一种则表示逻辑1(隐性)。如下图:
根据上面的信息,我们可以进一步得到以下数据,

如果你很细心的看上面图,就会发现一个问题,有些十六进制为什么是有9位?因为有一位是填充位(Bit Stuffing),CAN2.0的协议规定,连续5个显性/隐性电平后,要填充一位隐性/显性电平。如上图中的仲裁字段(Arbitration Field),连续5个'0'后,填充一个'1'。
Post
分析到这里接近尾声了,还有一个疑问,这个CRC校验是怎么算出来的呢?从CAN2.0的Spec了解到,CRC的计算的值从SOF开始,到数据字段(Data Field),多项式:
P(x) = x15+ x14+ x10+ x8+ x7+ x4+ x3+ 1
通过在线CRC计算网站,输入我们的数据,计算CRC的值:
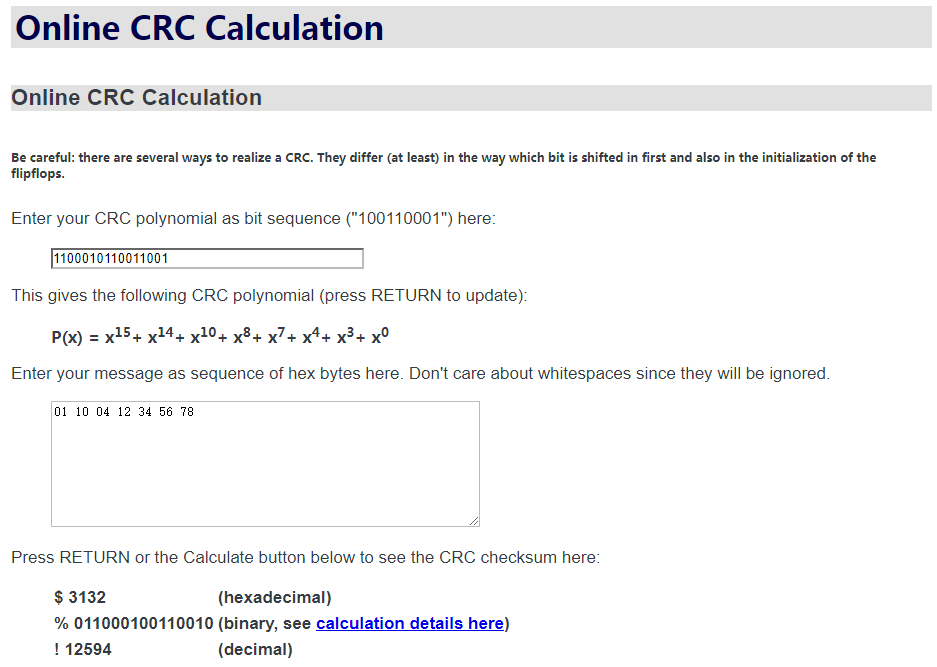
如我们所料,计算的CRC值是正确的!
-----------------------------------------------------------------------------------END
[参考资料]
[CAN波形分析] 一次CAN波形分析之旅的更多相关文章
- [USB波形分析] 全速USB波形数据分析(一)
在之前的文章一次CAN波形分析之旅里,根据示波器采集的波形数据,详细地分析了CAN通信.今天来分析USB数据,还是同样的流程,但是这次使用matplotlib来协助分析. USB基本波形 USB通过一 ...
- 串口RS232和485通信的波形分析
一.串行数据的格式 异步串行数据的一般格式是:起始位+数据位+停止位,其中起始位1 位,数据位可以是5.6.7.8位,停止位可以是1.1.5.2位. 起始位是一个值为0的位,所以对于正逻辑的TTL电平 ...
- Allegro 反射仿真--拓扑结构的提取提取及波形分析
在SPECCTRAQuest下,选择Analyze->SI/EMI sim->Probe,进入如下图所示界面: 注:BRD文件命名不用使用中文字符及一些不常用的字符,如".&qu ...
- [USB波形分析] 全速USB波形数据分析(三)
前面的两篇文章介绍和分析了USB的一些基本知识,结合前面的介绍,今天用实例介绍USB的枚举过程. 1 | 概况 硬件基于EK-TMC123GXL开发板,软件是TI提供的USB批量传输的简单例子,在PC ...
- [USB波形分析] 全速USB波形数据分析(二)
在上一篇文章全速USB波形数据分析(一)介绍了全速USB的数据包(Packet)的组成,数据的类型等基本知识.这篇文章介绍USB的几种传输方式 事务(Transaction) USB协议定义了三种不同 ...
- Linq之旅:Linq入门详解(Linq to Objects)
示例代码下载:Linq之旅:Linq入门详解(Linq to Objects) 本博文详细介绍 .NET 3.5 中引入的重要功能:Language Integrated Query(LINQ,语言集 ...
- WCF学习之旅—第三个示例之四(三十)
上接WCF学习之旅—第三个示例之一(二十七) WCF学习之旅—第三个示例之二(二十八) WCF学习之旅—第三个示例之三(二十九) ...
- 【C#代码实战】群蚁算法理论与实践全攻略——旅行商等路径优化问题的新方法
若干年前读研的时候,学院有一个教授,专门做群蚁算法的,很厉害,偶尔了解了一点点.感觉也是生物智能的一个体现,和遗传算法.神经网络有异曲同工之妙.只不过当时没有实际需求学习,所以没去研究.最近有一个这样 ...
- Hadoop学习之旅二:HDFS
本文基于Hadoop1.X 概述 分布式文件系统主要用来解决如下几个问题: 读写大文件 加速运算 对于某些体积巨大的文件,比如其大小超过了计算机文件系统所能存放的最大限制或者是其大小甚至超过了计算机整 ...
随机推荐
- JAVA获取多个经纬度的中心点
import java.util.LinkedList; public class Test1 { /** * 位置实体类,根据自己的来即可 */ static class Position{ /** ...
- ffmpeg、数字音频教程、JUCE、std::tuple
下载网易云音乐的视频 https://yunyinyue.iiilab.com/ 模板教程: https://github.com/wuye9036/CppTemplateTutorial/blob/ ...
- 【LeetCode】426. Convert Binary Search Tree to Sorted Doubly Linked List 解题报告 (C++)
作者: 负雪明烛 id: fuxuemingzhu 个人博客:http://fuxuemingzhu.cn/ 目录 题目描述 题目大意 解题方法 递归 迭代 日期 题目地址:https://leetc ...
- 【LeetCode】34. Find First and Last Position of Element in Sorted Array 解题报告(Python & C++)
作者: 负雪明烛 id: fuxuemingzhu 个人博客: http://fuxuemingzhu.cn/ 目录 题目描述 题目大意 解题方法 二分查找 日期 题目地址:https://leetc ...
- 【LeetCode】889. Construct Binary Tree from Preorder and Postorder Traversal 解题报告(Python & C++)
作者: 负雪明烛 id: fuxuemingzhu 个人博客: http://fuxuemingzhu.cn/ 目录 题目描述 题目大意 解题方法 日期 题目地址:https://leetcode.c ...
- 1087 - Diablo
1087 - Diablo PDF (English) Statistics Forum Time Limit: 2 second(s) Memory Limit: 64 MB All of ...
- 【Web前端】css属性cursor注意事项
注意使用cursor的url时url的括号后面必须+ ,auto: 错误示范:cursor:url('../picture/head.cur'); 正确示范:cursor: url(". ...
- 第四十四个知识点:在ECC密码学方案中,描述一些基本的防御方法
第四十四个知识点:在ECC密码学方案中,描述一些基本的防御方法 原文地址:http://bristolcrypto.blogspot.com/2015/08/52-things-number-44-d ...
- 一图搞懂Web应用的单点登录
单点登录即Signle Sign On,简称SSO.其解决的是用户在多个站点之间跳转时需要频繁登录的问题,比如用户登录了天猫,就应该无需再使用账号登录淘宝,它们之间是可以相互信任的,应该自动同步登录状 ...
- Java基础周测题,获取用户从控制台输入的年份,判断是否是闰年
需求说明: 获取用户从控制台输入的年份,判断是否是闰年: 是闰年: 是平年: 实现代码: import java.util.Scanner; public class test { public st ...