自定义流式布局:ViewGroup的测量与布局
1、View生命周期以及View层级
1.1、View生命周期
View的主要生命周期如下所示, 包括创建、测量(onMeasure)、布局(onLayout)、绘制(onDraw)以及销毁等流程。
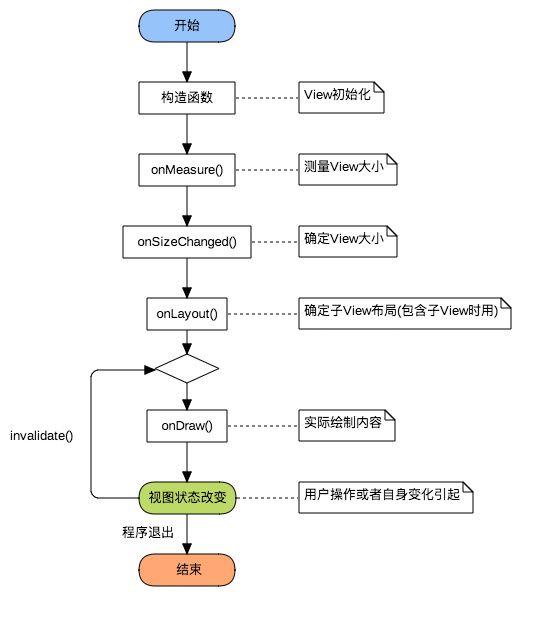
自定义View主要涉及到onMeasure、onLayout和onDraw这三个过程,其中
(1)自定义View(继承自View类):主要实现onMeasure和onDraw,
(2)自定义ViewGroup(继承自ViewGroup类):主要实现onMeasure和onLayout。
1.2、View层级
View层级是一个树形结构。
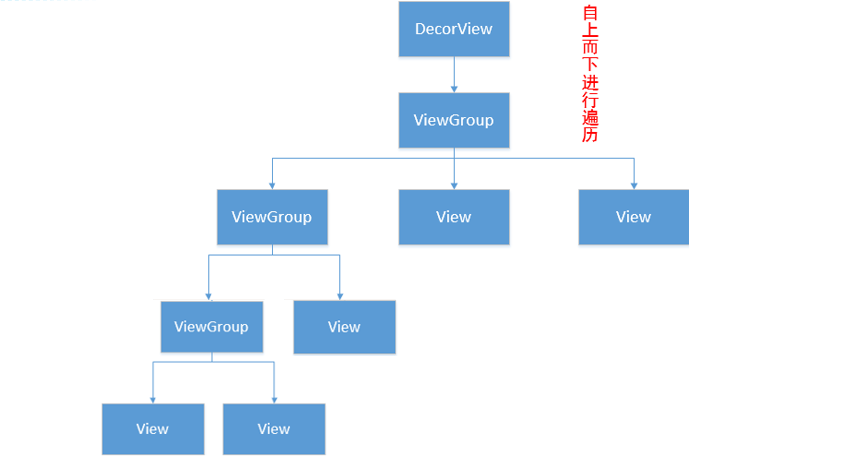
onMeasure、onLayout和onDraw这三个过程都是按照View层级从上到下进行的:(1)ViewGroup主要负责onMeasure和onLayout,确定自身及其子View的大小和放置方式,例如LinearLayout通过onMeasure确定尺寸,通过onLayout对子View进行横向或者纵向布局;(2)View主要负责onMeasure和onDraw,例如TextView通过onMeasure确定自身尺寸,通过onDraw绘制文字。
2、View测量与MeasureSpec类
View测量中最难的一点就是如何根据View的LayoutParams参数确定其实际的宽高,如:
android:layout_width="10dp"

android:layout_width="match_parent"

android:layout_width="wrap_content"
这三种情况,View的宽度究竟应该是多少?这就要从View的测量过程分析了,
2.1、MeasureSpec类
View类的内部类MeasureSpec用来辅助View的测量,使用一个int型变量measureSpec来表示View测量的模式和具体的尺寸(宽和高各一个measureSpec值)。measureSpec共32位,用高两位表示测量模式mode, 通过MeasureSpec.getMode(measureSpec)计算获得, 低30位表示尺寸size,通过MeasureSpec.getSize(measureSpec)计算获得。
mode共有三种情况:
MeasureSpec.UNSPECIFIED:不对View大小做限制,系统使用
MeasureSpec.EXACTLY:确切的大小,如:10dp
MeasureSpec.AT_MOST:大小不可超过某数值,最大不能超过其父类
2.2、父View的限制 :测量约束,限制最大宽度、最大高度等
View的测量过程受到父View的限制,如对一个ViewGroup测量时,其高度测量模式mode为EXACTLY,高度尺寸size为100dp,其子View的高度测量依据对应的android:layout_height参数来确定:
(1)具体尺寸值,如50dp,则该子View高度测量中mode为EXACTLY,尺寸为50dp;
(2)match_parent,则该子View高度和其父View高度相同,也是确定的,高度测量中mode为EXACTLY,尺寸为100dp;
(3)wrap_content, 则该子View最大高度为100dp, 确切高度需要根据内部逻辑确定,像TextView需要根据文字内容、宽度等综合确定,于是高度测量中mode为AT_MOST, 尺寸size为100dp。
其他情况类似,如父View的mode分别为AT_MOST、UNSPECIFIED,具体见下表:

高度测量中mode和size确定后,可通过MeasureSpec.makeMeasureSpec(size, mode)来确定heightMeasureSpec,widthMeasureSpec使用同样的方法确定。该方法的具体实现为ViewGroup.getChildMeasureSpec()方法。
2.3、子View的影响:实际测量
测量过程以LinearLayout作为例子说明:
(1) LinearLayout根据父View的measureSpec以及自身的LayoutParams确定了自身的widthMeasureSpec、heightMeasureSpec后, 调用measure(widthMeasureSpec, heightMeasureSpec) -----> onMeasure(widthMeasureSpec, heightMeasureSpec)来进行实际的测量;
(2) 当该LinearLayout方向为vertical时,实际测量中应该计算所有子View的高度之和,作为LinearLayout的测量高度needHeight;
(3) heightMeasureSpec中size为父类给该LinearLayout的限制高度,根据heightMeasureSpec中mode判断是取needHeight, 还是heightMeasureSpec中size, 然后调用setMeasuredDimension将测量的高度和宽度设置进去。
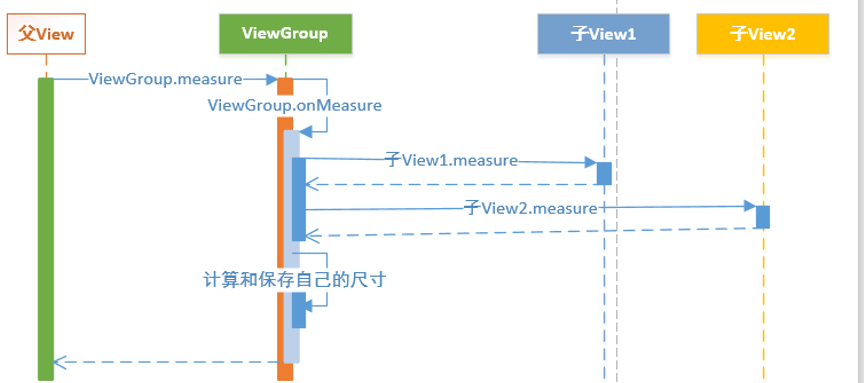
2.4、View的测量过程
Android中View测量是一种递归的过程(见下图),首先View调用measure方法,内部调用了自身的onMeasure方法,这个方法内部调用子View的measure方法(子View同样会调用自身的onMeasure方法),对子View进行测量,保存子View的测量尺寸,测量完所有的子View后再对自身测量,保存测量尺寸,之后便可以通过View.getMeasuredWidth()和View.getMeasuredHeight()来获取View的测量宽高。
3、自定义流式布局FlowLayout
主要思路:
对FlowLayout的所有子View逐个进行测量,获得measuredHeight和measuredWidth,在水平方向上根据这个尺寸依次对View进行放置,放不下则另起一行,每一行的高度取该行所有View的measuredHeight最大值。
3.1、单个子View测量
对其指定子View----child的测量代码如下,其中paddingLeft、paddingRight、paddingTop、paddingBottom分别是FlowLayout四边上的padding,widthMeasureSpec以及heightMeasureSpec是FlowLayout中onMeasure中的两个参数。
int childWidthSpec = ViewGroup.getChildMeasureSpec(widthMeasureSpec,

           paddingLeft + paddingRight, child.getLayoutParams().width);

int childHeightSpec = ViewGroup.getChildMeasureSpec(heightMeasureSpec,

           paddingTop + paddingBottom, child.getLayoutParams().height);

child.measure(childWidthSpec, childHeightSpec);
于是子View的测量宽、高分别可以通过child.getMeasuredWidth() 和child.getMeasuredHeight()来进行获得。
3.2、onMeasure:测量与模拟布局View
   //子View的横向间隔、纵向间隔

   private final int horizontalSpace = dp2px(20);

   private final int verticalSpace = dp2px(10);

   //保存测量的子View, 每一个元素为一行的子View数组

   private final List<List<View>> allLines = new ArrayList<>();

   //记录每一行的最大高度,用于布局

   private final List<Integer> heights = new ArrayList<>();

   @Override

   protected void onMeasure(int widthMeasureSpec, int heightMeasureSpec) {

       allLines.clear();

       heights.clear();

       int paddingLeft = getPaddingLeft();

       int paddingRight = getPaddingRight();

       int paddingTop = getPaddingTop();

       int paddingBottom = getPaddingBottom();

       int usedWidth = 0;

       int height = 0;

       //父布局对FlowLayout的约束宽高

       int seftWidth = MeasureSpec.getSize(widthMeasureSpec) - paddingLeft -

                  paddingRight;

       int seftHeight = MeasureSpec.getSize(heightMeasureSpec) - paddingTop -

                  paddingBottom;

       //FlowLayout的测量宽高

       int needHeight = 0;

       int needWidth = 0;

       List<View> line = new ArrayList<>();

       int count = getChildCount();

       for (int i = 0; i < count; i++) {

           View child = getChildAt(i);

           int childWidthSpec = ViewGroup.getChildMeasureSpec(widthMeasureSpec,

                  paddingLeft + paddingRight, child.getLayoutParams().width);

           int childHeightSpec = ViewGroup.getChildMeasureSpec(heightMeasureSpec,

                  paddingTop + paddingBottom, child.getLayoutParams().height);

           child.measure(childWidthSpec, childHeightSpec);

           if (usedWidth + horizontalSpace + child.getMeasuredWidth() > seftWidth) {

               //当前行无法在放下下一个view,则保存当前行的Views集合以及当前行的最大高度,

               heights.add(height + verticalSpace);

               allLines.add(line);

               //所有行的最大宽度

               needWidth = Math.max(needWidth, usedWidth);

               //所有行的高度之和

               needHeight += height + verticalSpace;

               //重置下一行的使用宽度、高度、View集合

               usedWidth = 0;

               height = 0;

               line = new ArrayList<>();

           }

           //获取当前行的最大高度,作为当前行的高度

           height = Math.max(height, child.getMeasuredHeight());

           //记录已经使用的宽度(第一个元素不需要加横向间隔

           usedWidth += child.getMeasuredWidth() + (line.size() == 0 ? 0 :

                 horizontalSpace);

           //保存已经测量及模拟布局的View

           line.add(child);

           //记录最后一行的数据

           if (i == count - 1) {

               heights.add(height + verticalSpace);

               allLines.add(line);

               needWidth = Math.max(needWidth, usedWidth);

               needHeight += height + verticalSpace;

           }

       }

       int widthMode = MeasureSpec.getMode(widthMeasureSpec);

       int heightMode = MeasureSpec.getMode(heightMeasureSpec);

       //如果mode为MeasureSpec.EXACTLY, 则使用widthMeasureSpec中的size,

       //不然使用测量得到的size, 宽高同理

       int realWidth = widthMode == MeasureSpec.EXACTLY ? seftWidth : needWidth;

       int realHeight = heightMode == MeasureSpec.EXACTLY ? seftHeight : needHeight;

       //保存测量的宽和高

       setMeasuredDimension(realWidth + paddingLeft + paddingRight,

               //如果只有一行,不需要纵向间隔

               realHeight + paddingTop + paddingBottom - (allLines.size() > 0 ?

               verticalSpace : 0));

   }
3.3、布局:onLayout
    @Override

    protected void onLayout(boolean changed, int l, int t, int r, int b) {

        int left = getPaddingLeft();

        int top = getPaddingTop();

        for (int i = 0; i < allLines.size(); i++) {

            List<View> line = allLines.get(i);

            for (int j = 0; j < line.size(); j++) {

                View child = line.get(j);

                child.layout(left, top, left + child.getMeasuredWidth(),

                        top + child.getMeasuredHeight());

                //一行中View布局后每次向后移动child的测量宽 + 横向间隔

                left += child.getMeasuredWidth() + horizontalSpace;

            }

            //每一行布局从paddingLeft开始

            left = getPaddingLeft();

            //布局完成一行,向下移动当前行的最大高度

            top += heights.get(i);

        }

    }
3.4、测试
测试代码如下:
    private final List<String> words = Arrays.asList("家用电器", "手机", "运营商", "数码",

      "电脑", "办公", "电子书", "惠普星系列高清一体机", "格力2匹移动空调");

    @Override

    public void onCreate(@Nullable Bundle savedInstanceState) {

        super.onCreate(savedInstanceState);

        setContentView(R.layout.layout_flow);

        FlowLayout layout = findViewById(R.id.flow_layout);

        for (int i = 0; i < words.size(); i++) {

            TextView textView = new TextView(this);

            textView.setText(words.get(i));

            textView.setBackground(ContextCompat.getDrawable(this,

                    R.drawable.round_background));

            textView.setLayoutParams(new ViewGroup.LayoutParams(

                    ViewGroup.LayoutParams.WRAP_CONTENT, FlowLayout.dp2px(60)));

            //textView.setLayoutParams(new ViewGroup.LayoutParams(

            //          ViewGroup.LayoutParams.WRAP_CONTENT,

            //          ViewGroup.LayoutParams.WRAP_CONTENT));

            int padding = FlowLayout.dp2px(5);

            textView.setPadding(padding, padding, padding, padding);

            layout.addView(textView);

        }

    }
效果图:
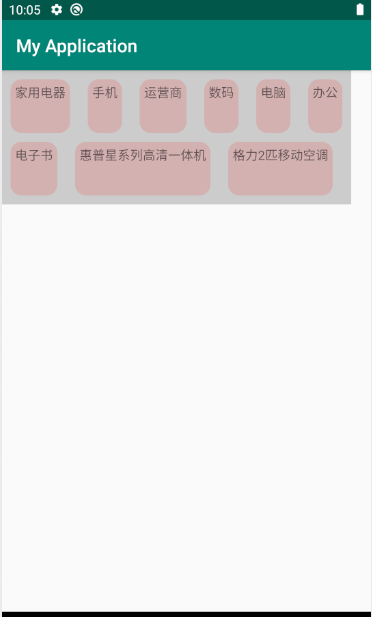
demo
自定义流式布局:ViewGroup的测量与布局的更多相关文章
- Android控件进阶-自定义流式布局和热门标签控件
技术:Android+java 概述 在日常的app使用中,我们会在android 的app中看见 热门标签等自动换行的流式布局,今天,我们就来看看如何 自定义一个类似热门标签那样的流式布局吧,类 ...
- 【Android - 自定义View】之自定义可滚动的流式布局
首先来介绍一下这个自定义View: (1)这个自定义View的名称叫做 FlowLayout ,继承自ViewGroup类: (2)在这个自定义View中,用户可以放入所有继承自View类的视图,这个 ...
- 自定义ViewGroup 流式布局
使用 public class MainActivity extends Activity { @Override protected void onCreate(Bundle sav ...
- 自定义View(三)--实现一个简单地流式布局
Android中的流式布局也就是常说的瀑布流很是常见,不仅在很多项目中都能见到,而且面试中也有很多面试官问道,那么什么是流式布局呢?简单来说就是如果当前行的剩余宽度不足以摆放下一个控件的时候,则自动将 ...
- Android 自定义View修炼-Android中常见的热门标签的流式布局的实现
一.概述:在日常的app使用中,我们会在android 的app中看见 热门标签等自动换行的流式布局,今天,我们就来看看如何 自定义一个类似热门标签那样的流式布局吧(源码下载在下面最后给出哈) 类似的 ...
- Kotlin 第一弹:自定义 ViewGroup 实现流式标签控件
古人学问无遗力, 少壮工夫老始成.纸上得来终觉浅, 绝知此事要躬行. – 陆游 <冬夜读书示子聿> 上周 Google I/O 大会的召开,宣布了 Kotlin 语言正式成为了官方开发语言 ...
- 28 自定义View流式布局
流式布局每行的行高以本行中最高的元素作为高,如果一个元素放不下到一行时直接到第二行 FlowLayoutView package com.qf.sxy.customview05.widget; imp ...
- Android自定义之流式布局
流式布局,好处就是父类布局可以自动的判断子孩子是不是需要换行,什么时候需要换行,可以做到网页版的标签的效果.今天就是简单的做了自定义的流式布局. 具体效果: 原理: 其实很简单,Measure La ...
- BootStrap入门教程 (一) :手脚架Scaffolding(全局样式(Global Style),格网系统(Grid System),流式格网(Fluid grid System),自定义(Customing),布局(Layouts))
2011年,twitter的“一小撮”工程师为了提高他们内部的分析和管理能力,用业余时间为他们的产品构建了一套易用.优雅.灵活.可扩展的前端工具集--BootStrap.Bootstrap由MARK ...
随机推荐
- PHP严格类型检查模式
前言 PHP默认情况下是弱类型校验模式,在php7下declare新增了strict_types指令,通过设置strict_types的值(1或者0),1表示严格类型校验模式,作用于函数调用和返回语句 ...
- Python字符串格式方式 %s format()
p.p1 { margin: 0; font: 12px ".PingFang SC" } p.p2 { margin: 0; font: 12px "Helvetica ...
- buu 达芬奇 && ROT
一.达芬奇 百度了下电影简介,发现了斐波那契数列,同时发现密文是由斐波那契数列移动而来的,有点像base64变种 1 1 2 3 5 8 13 21 34 55 89 144 233 377 610 ...
- 一款不错的 Go Server/API boilerplate,使用 K8S+DDD+CQRS+ES+gRPC 最佳实践构建
Golang API Starter Kit 该项目的主要目的是使用最佳实践.DDD.CQRS.ES.gRPC 提供样板项目设置. 为开发和生产环境提供 kubernetes 配置.允许与反映生产的 ...
- 『动善时』JMeter基础 — 55、JMeter非GUI模式运行
目录 1.JMeter的非GUI模式说明 2.为什么使用非GUI模式运行JMeter 3.怎样使用非GUI模式运行JMeter (1)非GUI模式运行JMeter步骤 (2)其它参数说明 4.CLI模 ...
- Lua控制语句
目录 1. 控制结构 if-else 单个 if 分支 型 两个分支: if-else 型 多个分支: if-elseif-else型 2. while 型控制结构 3. repeat控制结构 4. ...
- Linux sudo命令——sudoers文件的配置
Linux sudo命令与其配置文件/etc/sudoers 对linux有一定了解的人多少也会知道点关于sudo命令.sudo命令核心思想是权限的赋予 ,即某个命令的所属用户不是你自己,而你却有 ...
- 软件测试跟踪工具Bugzilla的安装 - Linux版本
首先查看Linux当前版本 输入"uname -a ",可显示电脑以及操作系统的相关信息 输入"cat /proc/version",说明正在运行的内核版本 输 ...
- Windows配置深度学习环境详细教程(一):安装Pycharm和Miniconda、conda环境介绍
序言 对于想要入门Python或者深度学习的初学者而言,配置环境一直是一个令人头疼的问题.相信有许多人经历过安装第三方包失败,安装好了却在使用中报错,安装CUDA.tensorflow.pytorch ...
- 【贪心+排序】排队接水 luogu-1223
题目描述 有n个人在一个水龙头前排队接水,假如每个人接水的时间为Ti,请编程找出这n个人排队的一种顺序,使得n个人的平均等待时间最小. 分析 注意要开longlong AC代码 #include &l ...