tslib移植arm及使用
测试平台
宿主机平台:Ubuntu 12.04.4 LTS
目标机:Easy-ARM IMX283
目标机内核:Linux 2.6.35.3
tslib 1.4 下载 https://gitlab.com/tslib/tslib/-/archive/1.4/tslib-1.4.tar.gz
备注:建议用 tslib 1.0(测试正常)
tslib 1.4编译移植
1.tslib编译
tslib编译依赖
sudo apt-get install autoconf automake autogen libtool libsysfs-dev
解压,automake生成makefile
tar xzf tslib-1.4.tar.gz

cd tslib-1.4

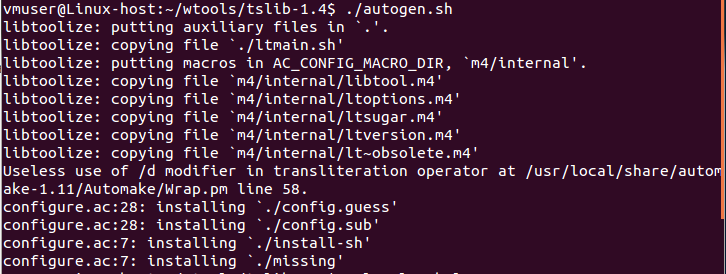
./autogen.sh
出现以下问题

反映的是一些宏定义没有定义,aclocal是个扫描程序, 负责扫描configure.ac中所有的宏定义并展开;
出现上述应该是相关宏定义工具没有安装(但所有依赖工具均安装OK)或者 aclocal 出现问题;
查询 aclocal 路径
aclocal --print-ac-dir

但在对应目录却发现没有次目录 ,应该是不同版本安装、或系统升级导致文件夹丢失
chmod 777 /usr/local/share
将 usr/share/aclocal 文件夹拷贝到 /usr/local/share 下;
在此运行 ./autogen.sh

2. 编译配置、编译及安装
新建安装文件目录
mkdir -p install

chmod 777 install
编译配置
./configure --prefix=$(pwd)/install --host=arm-linux ac_cv_func_malloc_0_nonnull=yes CC=arm-fsl-linux-gnueabi-gcc
然后编译 make,出现错误
input-raw.c: In function 'check_fd':

input-raw.c:188: error: 'ABS_MT_PRESSURE' undeclared (first use in this function)

input-raw.c:188: error: (Each undeclared identifier is reported only once

input-raw.c:188: error: for each function it appears in.)

input-raw.c:199: error: 'ABS_MT_SLOT' undeclared (first use in this function)

input-raw.c: In function 'ts_input_read_mt':

input-raw.c:515: error: 'ABS_MT_PRESSURE' undeclared (first use in this function)

input-raw.c:520: error: 'ABS_MT_TOOL_X' undeclared (first use in this function)

input-raw.c:525: error: 'ABS_MT_TOOL_Y' undeclared (first use in this function)

input-raw.c:540: error: 'ABS_MT_DISTANCE' undeclared (first use in this function)

input-raw.c:577: error: 'ABS_MT_SLOT' undeclared (first use in this function)

make[2]: *** [input-raw.lo] 错误 1

make[2]:正在离开目录 `/home/vmuser/wtools/tslib-1.4/plugins'

make[1]: *** [all-recursive] 错误 1

make[1]:正在离开目录 `/home/vmuser/wtools/tslib-1.4'

make: *** [all] 错误 2
这主要是 tslib 1.4 的 input与 linux 内核的不匹配,使用高版本 linux 内核应该没有该问题
首先 交叉编译工具的 input.h 应该 与 使用Linux 内核 的 input,h 的 ENV_VERSION 一致;
tslib-1.4/plugins/input-raw.h
#ifndef ABS_MT_POSITION_X

#define ABS_MT_SLOT             0x2f    /* MT slot being modified */

#define ABS_MT_TOUCH_MAJOR      0x30    /* Major axis of touching ellipse */

#define ABS_MT_TOUCH_MINOR      0x31    /* Minor axis (omit if circular) */

#define ABS_MT_WIDTH_MAJOR      0x32    /* Major axis of approaching ellipse */

#define ABS_MT_WIDTH_MINOR      0x33    /* Minor axis (omit if circular) */

#define ABS_MT_ORIENTATION      0x34    /* Ellipse orientation */

#define ABS_MT_POSITION_X       0x35    /* Center X touch position */

#define ABS_MT_POSITION_Y       0x36    /* Center Y touch position */

#define ABS_MT_TOOL_TYPE        0x37    /* Type of touching device */

#define ABS_MT_BLOB_ID          0x38    /* Group a set of packets as a blob */

#define ABS_MT_TRACKING_ID      0x39    /* Unique ID of initiated contact */

#define ABS_MT_PRESSURE         0x3a    /* Pressure on contact area */

#define ABS_MT_DISTANCE         0x3b    /* Contact hover distance */

#define ABS_MT_TOOL_X           0x3c    /* Center X tool position */

#define ABS_MT_TOOL_Y           0x3d    /* Center Y tool position */

#endif
而 Linux 2.6.35的内核的 也就是常用的 linux/input
#define ABS_MT_TOUCH_MAJOR    0x30    /* Major axis of touching ellipse */

#define ABS_MT_TOUCH_MINOR    0x31    /* Minor axis (omit if circular) */

#define ABS_MT_WIDTH_MAJOR    0x32    /* Major axis of approaching ellipse */

#define ABS_MT_WIDTH_MINOR    0x33    /* Minor axis (omit if circular) */

#define ABS_MT_ORIENTATION    0x34    /* Ellipse orientation */

#define ABS_MT_POSITION_X    0x35    /* Center X ellipse position */

#define ABS_MT_POSITION_Y    0x36    /* Center Y ellipse position */

#define ABS_MT_TOOL_TYPE    0x37    /* Type of touching device */

#define ABS_MT_BLOB_ID        0x38    /* Group a set of packets as a blob */

#define ABS_MT_TRACKING_ID    0x39    /* Unique ID of initiated contact */
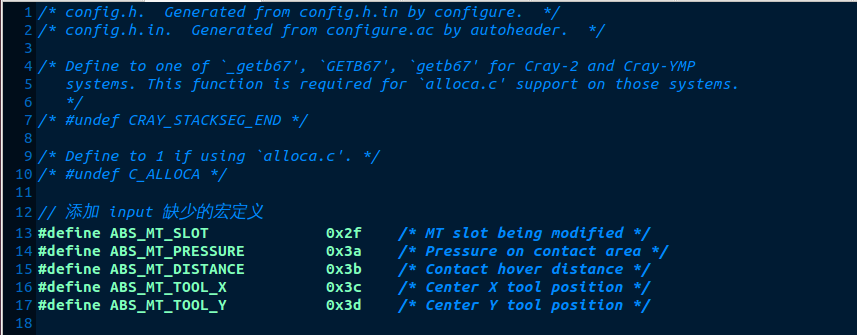
不支持某些触摸类型的定义,因此需要手动添加到顶层头文件中,因为后面的 ts_test_mt.c 也会使用
#define ABS_MT_SLOT 0x2f /* MT slot being modified */
#define ABS_MT_PRESSURE         0x3a    /* Pressure on contact area */

#define ABS_MT_DISTANCE         0x3b    /* Contact hover distance */

#define ABS_MT_TOOL_X           0x3c    /* Center X tool position */

#define ABS_MT_TOOL_Y           0x3d    /* Center Y tool position */
我们将这些添加到 tslib-1.4/config.h 中,后面编译出错的文件 在头部添加 #include "config.h" 即可

我这里主要在以下文件添加
tslib-1.4/tools/ts_uinput.c
tslib-1.4/tests/ts_test_mt.c
tslib-1.4/tests/ts_print_mt.c
tslib-1.4/tests/ts_print_raw_mt.c
然后 make 正常
make inatall
可以看到该指定的安装目录instal下l有4 个文件夹 /bin 、 /etc 、 /lib 、 /include
3. tslib移植及测试
先将上面安装 install 文件见 拷贝到 nfs 调试目录 并命名为 tslib
通过nfs挂载将 tslib 下载到开发板的 /usr/local/下
root@EasyARM-iMX28x /mnt/vm_tools# cp -r tslib /usr/local/
修改开发板的环境变量文件,添加如下内容
vi /etc/profile
#指定 tslib 目录路径

export TSLIB_ROOT=/usr/local/tslib

#指定 tslib 插件文件的路径

export TSLIB_PLUGINDIR=$TSLIB_ROOT/lib/ts

#指定 tslib 配置文件的路径

export TSLIB_CONFFILE=$TSLIB_ROOT/etc/ts.conf

#指定触摸屏设备

export TSLIB_TSDEVICE=/dev/input/ts0

#指定校准文件的存放位置

export TSLIB_CALIBFILE=/etc/pointercal

#指定鼠标设备

export QWS_MOUSE_PROTO=/dev/input/ts0

#指定帧缓冲设备

export TSLIB_FBDEVICE=/dev/fb0
#添加 tslib 库
export LD_LIBRARY_PATH=$LD_LIBRARY_PATH:$TSLIB_ROOT/lib
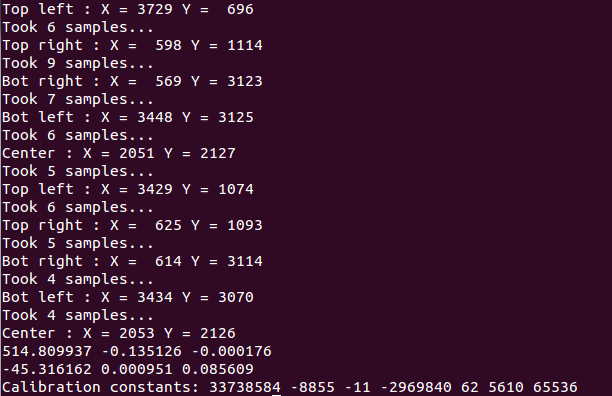
tslib测试:校准测试
cd /usr/local/tslib/bin

# ./ts_calibrate

开发板出现校准界面,则至此, tslib 的安装和移植已经成功完成。
触摸设备检测
hexdump /dev/input/event0

tslib移植arm及使用的更多相关文章
- tslib移植笔记(1)【转】
本文转载自:https://blog.csdn.net/zijie_xiao/article/details/50740950 tslib移植笔记(1)2016-04-25 tslib背景[摘自百度] ...
- Tslib移植与分析【转】
转自:http://blog.csdn.net/water_cow/article/details/7215308 目标平台:LOONGSON-1B开发板(mips32指令集)编译平台:x86PC-- ...
- tslib移植中环境变量编辑
(1)将/usr/local/tslib下的所有文件复制到移植系统文件中/usr/local(2)编辑移植系统中/etc/profile添加触摸屏支持内容:在/etc/profile文件中设置tsli ...
- 移植ARM linux下远程连接工具dropbear
移植ARM linux下远程连接工具dropbear 原文地址:http://www.cnblogs.com/NickQ/p/9010529.html 移植zlib 下载地址:https://gith ...
- 最新QT4.8+kernel_3.2.5+uboot_2010.06+tslib移植成功-问题小结
2012-02-19 21:34:13 都是从源码下载然后自己修改,使用与TQ2440,之前uboot其实已经完成了.但是yaffs2没带起来.现在回头看来是很简单的了.bootargs参数中我设置成 ...
- 【转载】tslib移植_freescale imx6
本文来自网络:http://blog.csdn.net/xishuang_gongzi/article/details/49422879 环境:host:Ubuntu12.04target:frees ...
- tslib 移植问题与解决方法
问题一.执行脚本.提示出错,错误有"cann't exec aclocal" ,错误提示最多的是关于aclocal的问题,查资料显示这个文件是automake必备一个文件,好吧,那 ...
- Tensorflowlite移植ARM平台iMX6
一.LINUX环境下操作: 1.安装交叉编译SDK (仅针对该型号:i.MX6,不同芯片需要对应的交叉编译SDK) 编译方法参考:手动编译用于i.MX6系列的交叉编译SDK 2.下载Tensorflo ...
- Tensorflow模型移植Arm之一:C与Python互相调用
一.C调用Python 1.新建一个Python文件,名称为py_multipy.py: #import numpy as np def multiply(a=1,b=2): print('Funct ...
随机推荐
- LATEX学习和IEEE Tran模板介绍
目录 软件的选择 IEEE 模板下载 模板正文 图 表格 公式 算法 参考文献 Latex学习网站:http://www.latexstudio.net/page/tex-documents/ IEE ...
- Hadoop 3.1.1 - Yarn 服务 - 总览
YARN 服务 总览 Yarn 服务框架为在 Yarn 原生环境里长时间运行的服务,提供了一流的支持和接口.简言之,它扮演了容器编排系统的角色,统一管理 Yarn 上运行的容器化服务.它同时支持 Do ...
- http笔记随笔
1.HTTP (HyperText Transfer Protocol)超文本传输协议(80端口) 1.规定浏览器和服务器之间相互通信的规则 2.万维网交换信息的基础 3.允许将HTML文档从Web服 ...
- Vue 脚手架学习
首先就是安装脚手架 npm install @vue/cil -g 全局安装 在这里我遇到一个问题:安装不了脚手架,报错显示: 通过苦逼的查找原因就是 以前使用的taobao镜像 导致的,删除镜像换成 ...
- MapReduce框架原理-MapTask和ReduceTask工作机制
MapTask工作机制 并行度决定机制 1)问题引出 maptask的并行度决定map阶段的任务处理并发度,进而影响到整个job的处理速度.那么,mapTask并行任务是否越多越好呢? 2)MapTa ...
- 关于java新特性lambda表达式的理解即使用
Lambda 表达式的使用 1.举例: (o1,o2) -> Integer.compare(o1,o2); 2.格式: -> : lambda操作符 或 箭头操作符 ->左边 : ...
- Notes about multiboot usb creator
U盘上的多系统启动工具,Windows上YUMI比较好,Ubuntu上MultiSystem用法复杂,unetbootin是另外一款,需要安装p7zip(apt-get install p7zip-f ...
- A Telnet Client Using Expect
The following expect script achieves a simple telnet client: login -> send command -> exit. Th ...
- Java HashMap【笔记】
Java HashMap[笔记] HashMap HashMap 基本结构 HashMap 底层的数据结构主要是数组 + 链表 + 红黑树 其中当链表的长度大于等于 8 时,链表会转化成红黑树,当红黑 ...
- mysql--使用shardingsphere实现分表
一. 简介 为什么要分表,无非就两个原因,要么是并发太高,要么就是数据量太大. 所谓分表就是把传统的单表扩展为多个数据结构一样的表,通过分表策略确定操作哪一张表. 我使用的分表规则是通过主键id进行取 ...
