腾讯云centos7 从零搭建laravel项目
网页原创链接:https://www.cnblogs.com/lalaza/p/11258929.html
目标,访问网站出现:
-----------------------分割线----------------------------------------
一、Laravel Homestead 环境安装(腾讯云不支持!)
试了各种方法,一直报错,最后在旧版腾讯云贴吧里面找到官方解答
内心各种曹尼玛啊啊啊啊啊!
二、测试环境长期关闭 防火墙&SELinux
- //关闭
- systemctl stop firewalld
- //关闭开机启动
- systemctl disable firewalld
- //临时关闭SELinux
- setenforce 0
- vim /etc/selinux/config
- 把SELINUX=enforcing 改成SELINUX=disabled
三、安装nginx
- cd /etc/yum.repos.d/
- vim nginx.repo
复制下列文本至 nginx.repo (文本来源)
- [nginx-stable]
- name=nginx stable repo
- baseurl=http://nginx.org/packages/centos/$releasever/$basearch/
- gpgcheck=1
- enabled=1
- gpgkey=https://nginx.org/keys/nginx_signing.key
- [nginx-mainline]
- name=nginx mainline repo
- baseurl=http://nginx.org/packages/mainline/centos/$releasever/$basearch/
- gpgcheck=1
- enabled=0
- gpgkey=https://nginx.org/keys/nginx_signing.key
- yum list | grep nginx
- yum -y install nginx
nginx -v- mkdir /www
- mkdir /www/wwwroot
- mkdir /www/wwwroot/default
- cd /www/wwwroot/default
- vim index.html
输入至 index.html
- Hellow World!!!
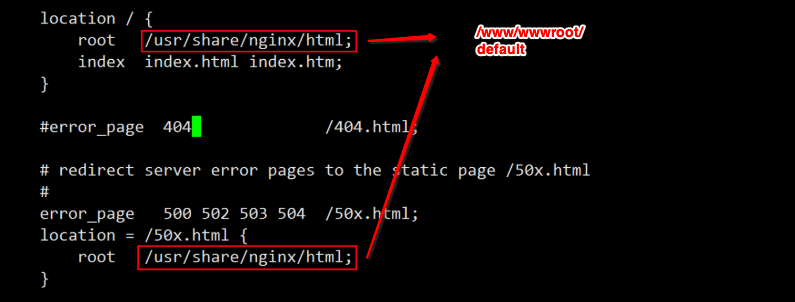
- cd /etc/nginx/conf.d
- vim default.conf
- systemctl start nginx
systemctl enable nginx
四、安装PHP
- yum -y install epel-release
- rpm -ivh https://mirror.webtatic.com/yum/el7/webtatic-release.rpm
- yum list | grep php72
- yum -y install mod_php72w php72w-cli php72w-fpm php72w-common php72w-devel
- mkdir /www/wwwroot/learn
- cd /www/wwwroot/learn
- vim index.php
输入至 index.php
- <?php
- phpinfo();
- ?>
- cd /etc/nginx/conf.d
vim learn.conf
输入下文,
- server {
- listen 8080;
- server_name localhost;
- root /www/wwwroot/learn;
- add_header X-Frame-Options "SAMEORIGIN";
- add_header X-XSS-Protection "1; mode=block";
- add_header X-Content-Type-Options "nosniff";
- index index.php index.html index.htm;
- charset utf-8;
- location / {
- try_files $uri $uri/ /index.php?$query_string;
- }
- location = /favicon.ico { access_log off; log_not_found off; }
- location = /robots.txt { access_log off; log_not_found off; }
- error_page 404 /index.php;
- location ~ \.php$ {
- root /www/wwwroot/learn;
- fastcgi_split_path_info ^(.+\.php)(/.+)$;
- fastcgi_pass 127.0.0.1:9000;
- fastcgi_index index.php;
- fastcgi_param SCRIPT_FILENAME $document_root$fastcgi_script_name;
- include fastcgi_params;
- }
- location ~ /\.(?!well-known).* {
- deny all;
- }
- }
- systemctl restart nginx
- systemctl start php-fpm
systemctl enable php-fpm
五、安装MYSQL
- cd ~
- rpm -ivh https://dev.mysql.com/get/mysql80-community-release-el7-.noarch.rpm
- yum list | grep mysql
- yum-config-manager --disable mysql80-community
- yum-config-manager --enable mysql57-community
- yum list | grep mysql
- //这步安装时间长,请耐心等待,看你的网络状况
- yum -y install mysql-community-server mysql-community-client
- systemctl start mysqld
- systemctl enable mysqld
- //设置MySQL
- set global validate_password_policy=;
- set global validate_password_mixed_case_count=;
- set global validate_password_number_count=;
- set global validate_password_special_char_count=;
- set global validate_password_length=;
- //复制好密码
- grep 'temporary password' /var/log/mysqld.log
- mysql -uroot -p
- (输入密码)
- set password for root@localhost = password('root');
//退出MySQL
exit;
六、安装composer
- cd /tmp
- curl -sS https://getcomposer.org/installer | php
- mv composer.phar /usr/local/bin/composer
- composer -v
- composer config -g repo.packagist composer https://packagist.phpcomposer.com
七、配置Laravel 项目(链接请都点开)
- //安装 laravel
- composer global require laravel/installer
配置环境变量,PATH,
下载离线包,找最新的下
上传文件夹,并解压至 '/www/wwwroot/learn2' 文件夹
- cd /www/wwwroot/learn2
- vim .env
写入下列内容,
- APP_NAME=Laravel
- APP_ENV=local
- APP_KEY=base64:fYG9POLRD3bFB/eAfyRGNakdfbwTVDObop+imw7U42Q=
- APP_DEBUG=true
- APP_URL=http://localhost
- LOG_CHANNEL=stack
- DB_CONNECTION=mysql
- DB_HOST=127.0.0.1
- DB_PORT=
- DB_DATABASE=laravel
- DB_USERNAME=root
- DB_PASSWORD=
- BROADCAST_DRIVER=log
- CACHE_DRIVER=file
- QUEUE_CONNECTION=sync
- SESSION_DRIVER=file
- SESSION_LIFETIME=
- REDIS_HOST=127.0.0.1
- REDIS_PASSWORD=null
- REDIS_PORT=
- MAIL_DRIVER=smtp
- MAIL_HOST=smtp.mailtrap.io
- MAIL_PORT=
- MAIL_USERNAME=null
- MAIL_PASSWORD=null
- MAIL_ENCRYPTION=null
- AWS_ACCESS_KEY_ID=
- AWS_SECRET_ACCESS_KEY=
- AWS_DEFAULT_REGION=us-east-
- AWS_BUCKET=
- PUSHER_APP_ID=
- PUSHER_APP_KEY=
- PUSHER_APP_SECRET=
- PUSHER_APP_CLUSTER=mt1
- MIX_PUSHER_APP_KEY="${PUSHER_APP_KEY}"
- MIX_PUSHER_APP_CLUSTER="${PUSHER_APP_CLUSTER}"
- vim /etc/nginx/conf.d/learn2.conf
写入内容,
- server {
- listen ;
- server_name localhost;
- root /www/wwwroot/learn2/public;
- add_header X-Frame-Options "SAMEORIGIN";
- add_header X-XSS-Protection "1; mode=block";
- add_header X-Content-Type-Options "nosniff";
- index index.php index.html index.htm;
- charset utf-;
- location / {
- try_files $uri $uri/ /index.php?$query_string;
- }
- location = /favicon.ico { access_log off; log_not_found off; }
- location = /robots.txt { access_log off; log_not_found off; }
- error_page /index.php;
- location ~ \.php$ {
- root /www/wwwroot/learn2/public;
- fastcgi_split_path_info ^(.+\.php)(/.+)$;
- fastcgi_pass 127.0.0.1:;
- fastcgi_index index.php;
- fastcgi_param SCRIPT_FILENAME $document_root$fastcgi_script_name;
- include fastcgi_params;
- }
- location ~ /\.(?!well-known).* {
- deny all;
- }
- }
八、填坑
打开网页 'IP:8081', 各种报错,
先在'www/wwwroot/learn2/public/index.php' 里添加:
- ini_set('display_errors',1);
- error_reporting(E_ALL);
- cd /www/wwwroot/learn2
- chmod -R *
- yum -y install php72w-pdo
- yum -y install php72w-mysql
- systemctl restart php-fpm
- php artisan key:generate
OK!,出现:

腾讯云centos7 从零搭建laravel项目的更多相关文章
- 腾讯云centos7服务器环境搭建,tomcat+jdk+mysql+nginx
软件:jdk 1.8.0_45 tomcat 8.5.8 mysql 5.6.36 nginx 1.10.x或以上 其中tomcat在centos6.8中没问题,centos7中会出现卡在启动那里 I ...
- 腾讯云CENTOS7安装MSSQL2017
腾讯云CENTOS7安装MSSQL2017 mkdir -p /opt/sqlserver2017cd /opt/sqlserver2017/ 下载离线包:wget https://packages. ...
- 基于docker搭建laravel项目
基于docker搭建laravel项目 公司PHP项目是Laravel框架写的,目前环境需要通过docker来部署一下.网上学习了一下相关知识.整理后做一个笔记.用到定时任务crontab与进程管理s ...
- 腾讯云CentOS7安装LNMP+wordpress
许多云主机都有学生优惠,于是我趁着现在大一买了个腾讯1元云主机+免费cn域名(高中生的话就别想了).鉴于我只知道用服务器安装博客,别的用途不了解,所以我就去安装wordpress. 而由于我看的教程有 ...
- 阿里云服务器部署php的laravel项目,在阿里云买ECS 搭建 Linux+Nginx+Mysql+PHP环境的
在阿里云买ECS的时候选择自己习惯的镜像系统,我一般都是使用Linux Ubuntu,所以,以下的配置都是在Ubuntu 14.04稳定支持版的环境中搭建Linux+Nginx+Mysql+PHP环境 ...
- 腾讯云centos7远程连接配置
1.申请腾讯云 注册腾讯云账号,申请一个centos7的服务器,1G内存,1核处理器,1M网速. 对于这种入门级配置,建议还是别用windows server了,不然不装任何东西,光运行系统就需要60 ...
- 腾讯云centos7.2安装jdk1.7 tomcat7.0部署项目示例
说实话win server的性能并不好,所以程序员必须会在Linux上安装环境,部署项目. 第一步,官网下载tomcat和jdk压缩文件*.tar.gz 下载路径如下: jdk:http://www ...
- 腾讯云CentOS7.4服务器添加swap分区
自己的腾讯云服务器搭建的zabbix监控中,提示Lack of free swap space 腾讯的官方说明在这: https://cloud.tencent.com/document/produc ...
- 腾讯云CentOS7.0使用yum安装mysql
背景: 今天才申请了腾讯云+校园计划的1元服务器,(https://www.qcloud.com/event/qcloudSchool)安装了Centos7.0,在安装mysql的时候,使用yum l ...
随机推荐
- 使用pjax实现类似github无刷新更改页面url
pjax=pushState+ajax,相信用过github的同学都知道,github部分页面采用了pjax这个项目来实现ajax无刷新加载的同时改变页面url.一起来学习一下这个插件吧. 我们都知道 ...
- Laravel --- 【转】安装调试利器 Laravel Debugbar
[转]http://www.tuicool.com/articles/qYfmmur 1.简介 Laravel Debugbar 在 Laravel 5 中集成了 PHP Debug Bar ,用于显 ...
- 微服务SpringCloud之服务注册与发现
在找.net core 微服务框架时发现了Steeltoe开源项目,它可以基于Spring Cloud实现.net core和.net Framework的微服务.正好之前也有学习过SpringBo ...
- maven中引入oracle驱动报错Missing artifact com.oracle:ojdbc14:jar
maven中央库中查找ojdbc14 ,复制依赖,maven项目中引入ojdbc14 来回折腾,加仓库镜像,各种修改setting.xml 文件 就是不行,后来看到一位网友博客,MMP Oracle ...
- 使用Python爬取微信公众号文章并保存为PDF文件(解决图片不显示的问题)
前言 第一次写博客,主要内容是爬取微信公众号的文章,将文章以PDF格式保存在本地. 爬取微信公众号文章(使用wechatsogou) 1.安装 pip install wechatsogou --up ...
- Centos6 samba服务配置
1.在阿里虚拟机中配置包源 在ecs的 /etc/yum.repos.d 创建个 alios.repo,内容如下 [alios.$releasever.base.$basearch] name=al ...
- 教妹子用IDEA创建web应用,部署到Tomcat服务器
自从上一篇原创发表之后,粉丝反应热烈.主要分两派,一派关注技术的,觉得看了那么多的公众号文章,终于找到一篇能看懂的了,于是沾沾自喜.另一派是关注妹子的,感叹自己空有一身绝技,公司里却无妹子可教,大喊可 ...
- linux 下 设置 MySQL8 表名大小写不敏感方法,解决设置后无法启动 MySQL 服务的问题
在安装完成之后,初始化数据库之前,修改 my.cnf 打开mysql配置文件 vim /etc/my.cnf 在尾部追加一行 lower_case_table_names=1 并保存,然后再初始化数据 ...
- 小白也能看懂的 Laravel 核心概念讲解
自动依赖注入 什么是依赖注入,用大白话将通过类型提示的方式向函数传递参数. 实例 1 首先,定义一个类: /routes/web.php class Bar {} 假如我们在其他地方要使用到 Bar ...
- RabbitMq-安装篇
嘿,大家好,今天更新的内容是rabbitMq的安装篇~~ windows下安装rabbitMq rabbitMq下载地址:点我下载 1.由于rabbitMq用erlang语言开发,所以安装rabbit ...