安卓—自定义 AlertDialog 的样式
自定义修改安卓弹出框的样式
效果图:

1.在style.xml下添加
<!-- 自定义弹出样式 -->

    <style name="MyDialogStyle" parent="Theme.AppCompat.Light.Dialog.Alert">

        <!--是否浮在窗口之上-->

        <!--<item name="android:windowIsFloating">true</item>-->

        <!--半透明-->

        <!--<item name="android:windowIsTranslucent">true</item>-->

        <!--是否显示title-->

        <item name="android:windowNoTitle">true</item>

        <!--dialog之外没有焦点的区域是否罩上黑色半透明-->

        <item name="android:background">@color/white</item>

        <item name="android:textColor">@color/gray</item>

        <item name="android:textSize">@dimen/f24</item>

        <!-- 这里是修改顶部标题背景颜色,具体颜色自己定,可以是图片 -->

        <item name="android:topDark">@color/blue_alert</item>

        <!-- 这里是修改内容区域背景颜色 -->

        <item name="android:layout_gravity">center</item>

        <item name="buttonBarButtonStyle">@color/white</item>

    </style>
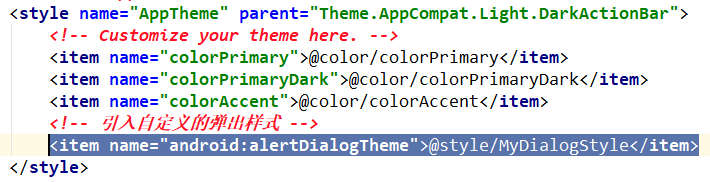
2.在主体配置里引入自定义的AlertDialog主题
3.java代码写法
/**

     * 默认的弹出窗口

     * @param view

     */

    public void alertDialog(View view) {

        AlertDialog.Builder builder = new AlertDialog.Builder(this);

        builder.setTitle("弹出窗");

        builder.setMessage("提示信息!");

        builder.setPositiveButton("确认", new DialogInterface.OnClickListener() {

            @Override

            public void onClick(DialogInterface dialogInterface, int i) {

                System.out.println("确认执行函数");

            }

        }).setNegativeButton("取消", null);

        builder.show();

    }

    /**

     * 自定义样式的弹出窗

     * @param view

     */

    public void alertDialog2(View view) {

        final AlertDialog.Builder builder = new AlertDialog.Builder(this);

        // 自定义 title样式

        TextView title = new TextView(this);

        title.setText("自定义弹出窗");

        title.setTextSize(24);

        title.setGravity(Gravity.CENTER);

        title.setPadding(0,20,0,20);

        builder.setCustomTitle(title);

        // 中间的信息以一个view的形式设置进去

        TextView msg = new TextView(this);

        msg.setText("自定义弹出提示信息");

        msg.setTextSize(24);

        msg.setGravity(Gravity.CENTER);

        msg.setPadding(20, 40, 20, 40);

        builder.setView(msg);

        builder.setPositiveButton("确认", new DialogInterface.OnClickListener() {

            @Override

            public void onClick(DialogInterface dialogInterface, int i) {

                System.out.println("确认执行函数");

            }

        }).setNegativeButton("取消", null);

        // 调用 show()方法后得到 dialog对象

        AlertDialog dialog = builder.show();

        final Button positiveButton = dialog.getButton(AlertDialog.BUTTON_POSITIVE);

        final Button negativeButton=dialog.getButton(AlertDialog.BUTTON_NEGATIVE);

        LinearLayout.LayoutParams positiveParams =(LinearLayout.LayoutParams)positiveButton.getLayoutParams();

        positiveParams.gravity = Gravity.CENTER;

        positiveParams.setMargins(10,10,10,10);

        positiveParams.width = 0;

        // 安卓下面有三个位置的按钮,默认权重为 1,设置成 500或更大才能让两个按钮看起来均分

        positiveParams.weight = 500;

        LinearLayout.LayoutParams negativeParams =(LinearLayout.LayoutParams)negativeButton.getLayoutParams();

        negativeParams.gravity = Gravity.CENTER;

        negativeParams.setMargins(10,10,10,10);

        negativeParams.width = 0;

        negativeParams.weight = 500;

        positiveButton.setLayoutParams(positiveParams);

        negativeButton.setLayoutParams(negativeParams);

        positiveButton.setBackgroundColor(Color.parseColor("#FF733E"));

        positiveButton.setTextColor(Color.parseColor("#FFFFFF"));

        negativeButton.setBackgroundColor(Color.parseColor("#DDDDDD"));

    }
安卓—自定义 AlertDialog 的样式的更多相关文章
- 安卓 自定义AlertDialog对话框(加载提示框)
AlertDialog有以下六种使用方法: 一.简单的AlertDialog(只显示一段简单的信息) 二.带按钮的AlertDialog(显示提示信息,让用户操作) 三.类似ListView的Aler ...
- 自定义AlertDialog的样式
一.在XML中定义好要显示的AlertDialog的布局 二.在代码中创建alertdialog 对象 AlertDialog dialog = new AlertDialog.Builder(thi ...
- 自定义AlertDialog(仿微信)
安卓自定义AlertDialog,原理很简单: AlertDialog dialog = new AlertDialog.Builder(MainActivity.this).create(); di ...
- AlertDialog.Builder 样式设置
AlertDialog.Builder builder = new AlertDialog.Builder(new ContextThemeWrapper(this, R.style.AlertDia ...
- jQuery Validate 表单验证插件----自定义校验结果样式
一.下载依赖包 网盘下载:https://yunpan.cn/cryvgGGAQ3DSW 访问密码 f224 二.引入依赖包 <script src="../../scripts/j ...
- Android 自定义RadioButton的样式
Android 自定义RadioButton的样式 我们知道Android控件里的button,listview可以用xml的样式自定义成自己希望的漂亮样式. 最近用到RadioButton,利用xm ...
- ActionBar官方教程(11)自定义ActionBar的样式(含重要的样式属性表及练习示例)
Styling the Action Bar If you want to implement a visual design that represents your app's brand, th ...
- 自定义input file样式
自定义input file样式:一般都是通过隐藏input,通过定义label来实现.这种做法要注意的是label的for属性要指定input对应的id; <!DOCTYPE html> ...
- WPF界面设计技巧(4)—自定义列表项样式
原文:WPF界面设计技巧(4)-自定义列表项样式 有前面修改按钮样式的基础,我们可以尝试来定制一个即好看又好用的 ListBox ,今天先来讲“好看”部分. 打开 Microsoft Visual S ...
随机推荐
- Navicat使用常见的两个问题及解决方法,提高开发效率
Navicat使用常见问题 在我们日常开发过程中,一般不会直接使用命令行来操作 MYSQL 数据库,而会选择一些图形化界面去帮助我们来进行此类操作,常用的有:SQLyog(Logo也是小海豚),Nav ...
- Event Hub小白入门指南
Event Hub事件中心 本文的目的在于用最白的大白话,让你从“完全不懂”开始,理解什么是分布式大数据流平台Event Hub,并且理解它的关键概念,并且初步理解其收发数据API. 定义,Event ...
- 虚拟现实中的Motion Sickness晕动症问题 - VIMS
虚拟现实(VR)中的晕动症 - VIMS 在玩VR的时候,很多玩家都遇到过发晕恶心等症状,这就是晕动症(Motion Sickness,以下或简称MS).MS并不是VR特有的问题.我们在坐船.坐车.坐 ...
- 一个简单的Eclipse调试Debug流程(四)
本文链接:https://blog.csdn.net/u011781521/article/details/55000066 http://blog.csdn.net/u010075335/ar ...
- JVM(五)回收机制
1.对象的引用 JDK1.2之后,对象的引用分为了四种情况 强引用:Object obj = new Object():只要强引用还在,垃圾回收器就永远不会收集被引用的对象. 软引用:So ...
- JVM Java字节码的角度分析switch的实现
目录 Java字节码的角度分析switch的实现 引子 前置知识 一个妥协而又枯燥的方案 switch的实现 回顾历史 字节码分析 其他实现方式? Java字节码的角度分析switch的实现 作者 k ...
- python编程基础之三十三
构造方法: 目的:构造方法用于初始化对象,可以在构造方法中添加成员属性 触发时机:实例化对象的时候自动调用 参数:第一个参数必须是self,其它参数根据需要自己定义 返回值:不返回值,或者说返回Non ...
- JavaScript ES6函数式编程(一):闭包与高阶函数
函数式编程的历史 函数的第一原则是要小,第二原则则是要更小 -- ROBERT C. MARTIN 解释一下上面那句话,就是我们常说的一个函数只做一件事,比如:将字符串首字母和尾字母都改成大写,我们此 ...
- Bran的内核开发教程(bkerndev)-06 全局描述符表(GDT)
全局描述符表(GDT) 在386平台各种保护措施中最重要的就是全局描述符表(GDT).GDT为内存的某些部分定义了基本的访问权限.我们可以使用GDT中的一个索引来生成段冲突异常, 让内核终止执行异 ...
- CTF-SSH服务渗透
环境 Kali ip 192.168.56.102 Smb 靶机ip 192.168.56.101 0x01信息探测 首页发现有类似用户名的信息 先记录下来 Martin N Hadi M Jimmy ...