HDFS 读写流程-英
HDFS 文件读取流程
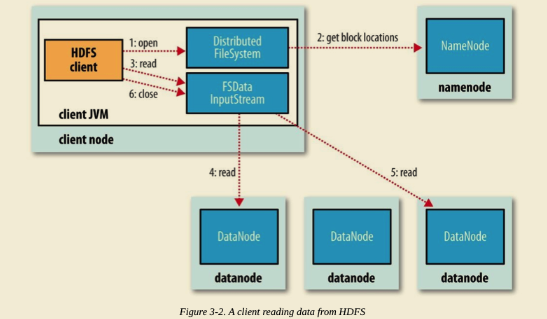
The client opens the file it wishes to read by calling open() on the FileSystem object, which for HDFS is an instance of DistributedFileSystem (step 1 in Figure 3-2).
DistributedFileSystem calls the namenode, using remote procedure calls (RPCs), to determine the locations of the first few blocks in the file (step 2). For each block, the namenode returns the addresses of the datanodes that have a copy of that block.
Furthermore, the datanodes are sorted according to their proximity to the client (according to the topology of the cluster’s network;). If the client is itself a datanode (in the case of a MapReduce task, for instance), the client will read from the local datanode if that datanode hosts a copy of the block.
The DistributedFileSystem returns an FSDataInputStream (an input stream that supports file seeks) to the client for it to read data from. FSDataInputStream in turn wraps a DFSInputStream, which manages the datanode and namenode I/O.
The client then calls read() on the stream (step 3). DFSInputStream, which has stored the datanode addresses for the first few blocks in the file, then connects to the first (closest) datanode for the first block in the file. Data is streamed from the datanode back to the client, which calls read() repeatedly on the stream (step 4). When the end of the block is reached, DFSInputStream will close the connection to the datanode, then find the best datanode for the next block (step 5). This happens transparently to the client, which from its point of view is just reading a continuous stream.
Blocks are read in order, with the DFSInputStream opening new connections to datanodes as the client reads through the stream. It will also call the namenode to retrieve the datanode locations for the next batch of blocks as needed. When the client has finished reading, it calls close() on the FSDataInputStream (step 6).
During reading, if the DFSInputStream encounters an error while communicating with a datanode, it will try the next closest one for that block. It will also remember datanodes that have failed so that it doesn’t needlessly retry them for later blocks. The DFSInputStream also verifies checksums for the data transferred to it from the datanode.
If a corrupted block is found, the DFSInputStream attempts to read a replica of the block from another datanode; it also reports the corrupted block to the namenode.
One important aspect of this design is that the client contacts datanodes directly to retrieve data and is guided by the namenode to the best datanode for each block. This design allows HDFS to scale to a large number of concurrent clients because the data traffic is spread across all the datanodes in the cluster. Meanwhile, the namenode merely has to service block location requests (which it stores in memory, making them very efficient) and does not, for example, serve data, which would quickly become a bottleneck as the number of clients grew.
HDFS 文件写入流程
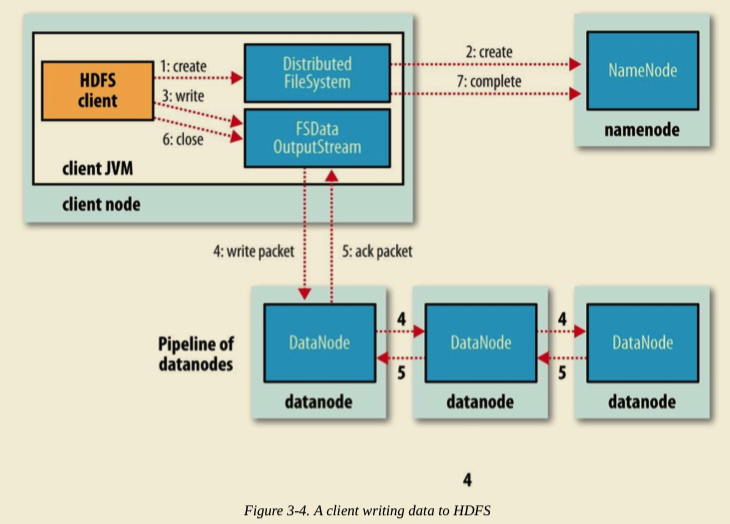
The client creates the file by calling create() on DistributedFileSystem (step 1 in Figure 3-4).
DistributedFileSystem makes an RPC call to the namenode to create a new file in the filesystem’s namespace, with no blocks associated with it (step 2). The namenode performs various checks to make sure the file doesn’t already exist and that the client has the right permissions to create the file. If these checks pass, the namenode makes a record of the new file; otherwise, file creation fails and the client is thrown an IOException. The DistributedFileSystem returns an FSDataOutputStream for the client to start writing data to. Just as in the read case, FSDataOutputStream wraps a DFSOutputStream, which handles communication with the datanodes and namenode.
As the client writes data (step 3), the DFSOutputStream splits it into packets, which it writes to an internal queue called the data queue. The data queue is consumed by the DataStreamer, which is responsible for asking the namenode to allocate new blocks by picking a list of suitable datanodes to store the replicas. The list of datanodes forms a pipeline, and here we’ll assume the replication level is three, so there are three nodes in the pipeline. The DataStreamer streams the packets to the first datanode in the pipeline, which stores each packet and forwards it to the second datanode in the pipeline. Similarly, the second datanode stores the packet and forwards it to the third (and last) datanode in the pipeline (step 4).
The DFSOutputStream also maintains an internal queue of packets that are waiting to be acknowledged by datanodes, called the ack queue. A packet is removed from the ack queue only when it has been acknowledged by all the datanodes in the pipeline (step 5).
If any datanode fails while data is being written to it, then the following actions are taken, which are transparent to the client writing the data. First, the pipeline is closed, and any packets in the ack queue are added to the front of the data queue so that datanodes that are downstream from the failed node will not miss any packets. The current block on the good datanodes is given a new identity, which is communicated to the namenode, so that the partial block on the failed datanode will be deleted if the failed datanode recovers later on.
The failed datanode is removed from the pipeline, and a new pipeline is constructed from the two good datanodes. The remainder of the block’s data is written to the good datanodes in the pipeline. The namenode notices that the block is under-replicated, and it arranges for a further replica to be created on another node. Subsequent blocks are then treated as normal.
When the client has finished writing data, it calls close() on the stream (step 6). This action flushes all the remaining packets to the datanode pipeline and waits for acknowledgments before contacting the namenode to signal that the file is complete (step 7). The namenode already knows which blocks the file is made up of (because DataStreamer asks for block allocations), so it only has to wait for blocks to be minimally replicated before returning successfully.
欢迎关注我的公众号

HDFS 读写流程-英的更多相关文章
- 大数据系列文章-Hadoop的HDFS读写流程(二)
在介绍HDFS读写流程时,先介绍下Block副本放置策略. Block副本放置策略 第一个副本:放置在上传文件的DataNode:如果是集群外提交,则随机挑选一台磁盘不太满,CPU不太忙的节点. 第二 ...
- 【转】HDFS读写流程
概述开始之前先看看其基本属性,HDFS(Hadoop Distributed File System)是GFS的开源实现. 特点如下: 能够运行在廉价机器上,硬件出错常态,需要具备高容错性流式数据访问 ...
- HDFS读写流程(转载)
概述开始之前先看看其基本属性,HDFS(Hadoop Distributed File System)是GFS的开源实现.特点如下: 能够运行在廉价机器上,硬件出错常态,需要具备高容错性 ...
- 超详细的HDFS读写流程详解(最容易理解的方式)
HDFS采用的是master/slaves这种主从的结构模型管理数据,这种结构模型主要由四个部分组成,分别是Client(客户端).Namenode(名称节点).Datanode(数据节点)和Seco ...
- Hadoop之HDFS读写流程
hadoophdfs 1. HDFS写流程 2. HDFS写流程 1. HDFS写流程 HDFS写流程 副本存放策略: 上传的数据块后,触发一个新的线程,进行存放. 第一个副本:与client最近的机 ...
- HDFS 读写流程-译
HDFS 文件读取流程 Client 端调用 DistributedFileSystem 对象的 open() 方法. 由 DistributedFileSystem 通过 RPC 向 NameNod ...
- HDFS读写流程(重点)
@ 目录 一.写数据流程 举例: 二.异常写流程 读数据流程 一.写数据流程 ①服务端启动HDFS中的NN和DN进程 ②客户端创建一个分布式文件系统客户端,由客户端向NN发送请求,请求上传文件 ③NN ...
- HDFS读写流程learning
有许多对流程进行描述的博客,但是感觉还是应当学习一遍代码,不然总感觉怪怪的,https://blog.csdn.net/popsuper1982/article/details/51615285,首先 ...
- HDFS读写流程
01.并行读取 02.逐个节点写入
随机推荐
- 优雅的对象转换解决方案-MapStruct使用进阶(二)
在前面, 介绍了 MapStruct 及其入门. 本文则是进一步的进阶. 在 MapStruct 生成对应的实现类的时候, 有如下的几个情景. 1 属性名称相同,则进行转化 在实现类的时候, 如果属性 ...
- LR有的JMeter也有之三“集合点”
继续上两篇的文章内容和思路进行.(文思如尿崩,谁与我争锋----韩寒)哈哈! 集合点:简单来理解一下,虽然我们的“性能测试”理解为“多用户并发测试”,但真正的并发是不存在的,为了更真实的实现并发这感念 ...
- Hystrix超时测试
package com.cookie.test; import com.netflix.hystrix.HystrixCommand; import com.netflix.hystrix.Hystr ...
- 超全的 Vue 开源项目合集,签收一下
超全的 Vue 开源项目合集,签收一下 xiaoge2016 前端开发 1周前 作者:xiaoge2016 链接: https://my.oschina.net/u/3018050/blog/2049 ...
- 通过wireshark学习Traceroute命令和mtr(UDP,ICMP协议)
traceroute: 通过TTL限定的ICMP/UDP/TCP侦测包来发现从本地主机到远端目标主机之间的第三层转发路径.用来调试网络连接性和路由问题. mtr: traceroute的一个变种,能根 ...
- hadoop的基础思想
转载 http://www.superwu.cn/2014/01/10/963 1.1.1. hadoop的核心思想 Hadoop包括两大核心,分布式存储系统和分布式计算系统.1.1.1.1. 分布式 ...
- exe4j打包--exe转安装包
前面一篇已经详细的说明了打包成exe的步骤了,下面谈谈exe如何压缩成安装文件.这里用到之前的另外一个软件,具体软件看这篇文章 exe4j打包成exe 打开inno 编辑器 打开软件后我们选择 用[脚 ...
- cs231n---CNN架构
1 LeNet-5 (1998) 第一个被提出的卷积网络架构,深度较浅,用于手写数字识别. 2 AlexNet (2012) 架构为: CONV1 ->MAX POOL1 ->NORM1 ...
- 在Win10下,python3和python2同时安装并解决pip共存问题
前提 本文是在Windows64位系统下进行的,32位系统请下载相应版本的安装包,安装方法类似. 在Win10下,python3和python2同时安装并解决pip共存问题解决: 1.下载python ...
- SpringBoot:实现定时任务
一.定时任务实现的几种方式: Timer 这是java自带的java.util.Timer类,这个类允许你调度一个java.util.TimerTask任务.使用这种方式可以让你的程序按照某一个频度执 ...