WPF/MVVM 快速开发
http://www.codeproject.com/Articles/165368/WPF-MVVM-Quick-Start-Tutorial
这篇文章醍醐灌顶,入门良药啊!
Introduction
Assuming that you have a decent understanding of C#, getting started in WPF isn't too difficult. I started looking at WPF a while ago, and didn't find many helpful MVVM tutorials. Hopefully this article addresses that.
As with learning any new technology, you get the benefit of hindsight. From my perspective, almost every tutorial on WPF I've come across is inadequate for one of several reasons:
- The example is all in XAML.
- The example glosses over the key facts that would actually make your life easier.
- The example tries to show off WPF/XAML's capabilities with lots of pointless effects that aren't helping you.
- The example uses classes that have properties that appear far too similar to framework keywords and classes, and are therefore difficult to identify in the (XAML) code as being user defined (the
ListBox GroupStyle'sNameattribute is a complete headache for novices).
So to address this, I've written this based on what I would have liked to have found as the #1 hit on Google after typing 'WPF Tutorial'. This article may not be 100% correct, or even do things 'the one true way', but it will illustrate the main points that I wish I had found in one place 6 months ago.
I will quickly introduce some topics, then show an example that explains or demonstrates each point. Accordingly, I haven't really attempted to make the GUIs pretty, that's not the point of this article (see the bullet points above).
As this tutorial is quite long, I've elided quite a lot of code for brevity, so please download the attached zip file, and look at the examples (.NET 4.0/VS2010). Each example builds on the previous one.
The Basics
- The most important thing about WPF is data binding. In short, you have some data, typically in a collection of some sort, and you want to display it to the user. You can 'bind' your XAML to the data.
- WPF has two parts, the XAML which describes your GUI layout and effects, and the code-behind that is tied to the XAML.
- The neatest and probably most reusable way to organise your code is to use the 'MVVM' pattern: Model, View, ViewModel. This has the aim of ensuring that your View contains minimal (or no) code, and should be XAML-only.
The Key Points You Need to Know
- The collection you should use to hold your data is the
ObservableCollection<>. Not alist, not adictionary, but anObservableCollection. The word 'Observable' is the clue here: the WPF window needs to be able to 'observe' your data collection. This collection class implements certain interfaces that WPF uses. - Every WPF control (including 'Window's) has a '
DataContext' andCollectioncontrols have an 'ItemsSource' attribute to bind to. - The interface '
INotifyPropertyChanged' will be used extensively to communicate any changes in the data between the GUI and your code.
Example 1: Doing It (mostly) Wrong
The best way to start is an example. We will start with a Song class, rather than the usual Person class. We can arrange songs into Albums, or one large collection, or by Artist. A simple Song class would be as follows:
public class Song

{

    #region Members

    string _artistName;

    string _songTitle;

    #endregion

    #region Properties

    /// The artist name.

    public string ArtistName

    {

        get { return _artistName; }

        set { _artistName = value; }

    }

    /// The song title.

    public string SongTitle

    {

        get { return _songTitle; }

        set { _songTitle = value; }

    }

    #endregion

}
In WPF terminology, this is our 'Model'. The GUI is our 'View'. The magic that data binds them together is our 'ViewModel', which is really just an adapter that turns our Model into something that the WPF framework can use. So just to reiterate, this is our 'Model'.
Since we've created a Song as a reference type, copies are cheap and light on memory. We can create ourSongViewModel quite easily. What we need to consider first is, what are we going to (potentially) display? Suppose we just care about the song's artist name, not the song title, then the SongViewModel could be defined as follows:
public class SongViewModel

{

    Song _song;

        public Song Song

        {

            get

            {

                return _song;

            }

            set

            {

                _song = value;

            }

        }

        public string ArtistName

        {

            get { return Song.ArtistName; }

            set { Song.ArtistName = value; }

        }

}
Except that this isn't quite correct. Since we're exposing a property in our ViewModel, we would obviously want a change to the song's artist name made in the code to be automatically shown in the GUI, and vice versa:
SongViewModel song = ...;

// ... enable the databinding ...

//  change the name

song.ArtistName = "Elvis";

//  the gui should change
Notice that in all the examples here, we create our view model *declaratively*, i.e., we do this in the XAML:
<Window x:Class="Example1.MainWindow"

        xmlns:local="clr-namespace:Example1">

    <Window.DataContext>

        <!-- Declaratively create an instance of our SongViewModel -->

        <local:SongViewModel />

    </Window.DataContext>
This is equivalent to doing this in your code-behind MainWindow.cs:
public partial class MainWindow : Window

{

    SongViewModel _viewModel = new SongViewModel();

    public MainWindow()

    {

        InitializeComponent();

        base.DataContext = _viewModel;

    }

}
And removing your DataContext element in the XAML:
<Window x:Class="Example1.MainWindow"

        xmlns:local="clr-namespace:Example1">

    <!--  no data context -->
This is our view:
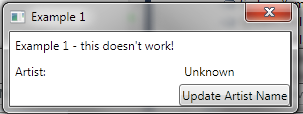
Clicking the button does not update anything, because we have not completely implemented data binding.
Data Binding
Remember I said at the start that I would choose a property that stands out. In this example, we want to display the ArtistName. I chose this name because it is NOT the same as any WPF attribute. There are a countless number of examples on the web that choose a Person class and then a Name attribute (the Name attribute exists on multiple .NET WPF classes). Perhaps the authors of the articles just don't realise that this is particularly confusing for beginners (who are, curiously enough, the target audience of these articles).
There are dozens of other articles about data binding out there, so I won't cover it here. I hope the example is so trivial that you can see what is going on.
To bind to the ArtistName property on our SongViewModel, we simply do this in the MainWindow.xaml:
<Label Content="{Binding ArtistName}" />
The 'Binding' keyword binds the content of the control, in this case a Label, to the property 'ArtistName' of the object returned by DataContext. As you saw above, we set our DataContext to an instance ofSongViewModel, therefore we are effectively displaying _songViewModel.ArtistName in the Label.
Once again: clicking the button does not update anything, because we have not completely implemented data binding. The GUI is not receiving any notifications that the property has changed.
Example 2: INotifyPropertyChanged
This is where we have to implement the cunningly named interface: INotifyPropertyChanged. As it says, any class that implements this interface, notifies any listeners when a property has changed. So we need to modify our SongViewModel class a little bit more:
public class SongViewModel : INotifyPropertyChanged

    {

        #region Construction

        /// Constructs the default instance of a SongViewModel

        public SongViewModel()

        {

            _song = new Song { ArtistName = "Unknown", SongTitle = "Unknown" };

        }

        #endregion

        #region Members

        Song _song;

        #endregion

        #region Properties

        public Song Song

        {

            get

            {

                return _song;

            }

            set

            {

                _song = value;

            }

        }

        public string ArtistName

        {

            get { return Song.ArtistName; }

            set

            {

                if (Song.ArtistName != value)

                {

                    Song.ArtistName = value;

                    RaisePropertyChanged("ArtistName");

                }

            }

        }

        #endregion

        #region INotifyPropertyChanged Members

        public event PropertyChangedEventHandler PropertyChanged;

        #endregion

        #region Methods

        private void RaisePropertyChanged(string propertyName)

        {

            // take a copy to prevent thread issues

            PropertyChangedEventHandler handler = PropertyChanged;

            if (handler != null)

            {

                handler(this, new PropertyChangedEventArgs(propertyName));

            }

        }

        #endregion

    }
There are several things now happening here. Firstly, we check to see if we are going to really change the property: this improves performance slightly for more complex objects. Secondly, if the value has changed, we raise the PropertyChanged event to any listeners.
So now we have a Model, and a ViewModel. We just need to define our View. This is just our MainWindow:
<Window x:Class="Example2.MainWindow"

        xmlns="http://schemas.microsoft.com/winfx/2006/xaml/presentation"

        xmlns:x="http://schemas.microsoft.com/winfx/2006/xaml"

        xmlns:local="clr-namespace:Example2"

        Title="Example 2"  SizeToContent="WidthAndHeight" ResizeMode="NoResize"

        Height="350" Width="525">

    <Window.DataContext>

        <!-- Declaratively create an instance of our SongViewModel -->

        <local:SongViewModel />

    </Window.DataContext>

    <Grid>

        <Grid.RowDefinitions>

            <RowDefinition Height="Auto" />

            <RowDefinition Height="Auto" />

            <RowDefinition Height="Auto" />

        </Grid.RowDefinitions>

        <Grid.ColumnDefinitions>

            <ColumnDefinition Width="Auto" />

            <ColumnDefinition Width="Auto" />

        </Grid.ColumnDefinitions>

        <Label Grid.Column="0" Grid.Row="0" Content="Example 2 - this works!" />

        <Label Grid.Column="0" Grid.Row="1" Content="Artist:  " />

        <Label Grid.Column="1" Grid.Row="1" Content="{Binding ArtistName}" />

        <Button Grid.Column="1" Grid.Row="2" Name="ButtonUpdateArtist"

        Content="Update Artist Name" Click="ButtonUpdateArtist_Click" />

    </Grid>

</Window>
To test the databinding, we can take the traditional approach and create a button and wire to its OnClick event, so the XAML above has a button, and Click event, giving the code behind:
public partial class MainWindow : Window

{

    #region Members

    SongViewModel _viewModel;

    int _count = 0;

    #endregion

    public MainWindow()

    {

        InitializeComponent();

        //  We have declared the view model instance declaratively in the xaml.

        //  Get the reference to it here, so we can use it in the button click event.

        _viewModel = (SongViewModel)base.DataContext;

    }

    private void ButtonUpdateArtist_Click(object sender, RoutedEventArgs e)

    {

        ++_count;

        _viewModel.ArtistName = string.Format("Elvis ({0})", _count);

    }

}
This is ok, but it is not how we should use WPF: firstly, we have added our 'update artist' logic into our code-behind. It does not belong there. The Window class is concerned with windowing. The second problem is, suppose we want to move logic in the *button* click event to a different control, for example, making it a menu entry. It means we will be cut'n'pasting, and editing in multiple places.
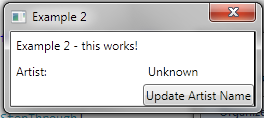
Here is our improved view, where clicking now works:
Example 3: Commands
Binding to GUI events is problematic. WPF offers you a better way. This is ICommand. Many controls have aCommand attribute. These obey binding in the same way as Content and ItemsSource, except you need to bind it to a *property* that returns an ICommand. For the trivial example that we are looking at here, we just implement a trivial class called 'RelayCommand' that implements ICommand.
ICommand requires the user to define two methods: bool CanExecute, and void Execute. The CanExecutemethod really just says to the user, can I execute this command? This is useful for controlling the context in which you can perform GUI actions. In our example, we don't care, so we return true, meaning that the framework can always call our 'Execute' method. It could be that you have a situation where you have a command bound to button, and it can only execute if you have selected an item in a list. You would implement that logic in the 'CanExecute' method.
Since we want to reuse the ICommand code, we use the RelayCommand class that contains all the repeatable code we do not want to keep writing.
To show how easy it is to reuse the ICommand, we bind the Update Artist command to both a button and a menu item. Notice that we no longer bind to Button specific Click event, or Menu specific Click event.

Example 4: Frameworks
By now, if you have read closely, you'll probably notice that a lot of this is just repetitive code: raising INPC, or creating commands. This is mostly boilerplate, and for INPC, we can move it to base class that we call 'ObservableObject'. For the RelayCommand class, we just move that into our .NET class library. This is how all of the MVVM frameworks you find on the web begin (Prism, Caliburn, etc.).
As far as the ObservableObject and RelayCommand classes are concerned, they are rather basic and are the inevitable result of refactoring. Unsurprisingly, these classes are practically the same as those by Josh Smith.
So we move these classes into a small class library that we can reuse in future.
The view looks much the same as before:

Example 5: Collections of Songs, Doing It Wrong
As I said before, in order to display collections of items in your View (i.e. the XAML), you need to use anObservableCollection. In this example, we create an AlbumViewModel, which nicely collects our songs together in something that people understand. We also introduce a simple song database, purely so we can quickly produce some song information for this example.
Your first attempt might be as follows:
class AlbumViewModel

{

    #region Members

    ObservableCollection<Song> _songs = new ObservableCollection<Song>();

    #endregion

}
You might think: "I have a different view model this time, I want to display the songs as an AlbumViewModel, not a SongViewModel".
We also create some more ICommands and attach them to some buttons:
public ICommand AddAlbumArtist {}

public ICommand UpdateAlbumArtists {}
In this example, clicking 'Add Artist' works fine. But clicking 'Update Artist Names', fails. If you read the yellow highlighted note on this page on MSDN, it explains why:
To fully support transferring data values from binding source objects to binding targets, each object in your collection that supports bindable properties must implement an appropriate property changed notification mechanism such as the
INotifyPropertyChangedinterface.
Our view looks like this:

Example 6: Collections of Songs, the Right Way
In this final example, we fix the AlbumViewModel to have an ObservableCollection of SongViewModelsthat we created earlier:
class AlbumViewModel

{

    #region Members

    ObservableCollection<SongViewModel> _songs = new ObservableCollection<SongViewModel>();

    #endregion

    //  code elided for brevity

}
Now all our buttons that are bound to commands operate on our collection. Our code-behind inMainWindow.cs is still completely empty.
Our view looks like this:

Conclusion
Instantiating Your ViewModel
One last point that is worth mentioning is that when you declare your ViewModel declaratively in the XAML, you cannot pass it any parameters: in other words, your ViewModel must have an implicit, or explicit default constructor. How you add state to your ViewModel is up to you. You may find it easier to declare theViewModel in the MainWindow.cs code-behind, where you can pass in construction parameters.
Other Frameworks
There are lots of other MVVM Frameworks of wildly different complexity and functionality, targeting WPF, WP7, Silverlight, and any combination of the three.
Finally...
Hopefully these six examples show you how easy it is to write a WPF application using MVVM. I've tried to cover all of the points that I think are important and often discussed in multiple articles.
If you find this article helpful, please feel to vote it up.
If you find faults in this article, or I've said anything wrong, or you have some other issue with it, please leave a comment below explaining why, and how you would fix it.
WPF/MVVM 快速开发的更多相关文章
- WPF/MVVM 快速开始指南(译)(转)
WPF/MVVM 快速开始指南(译) 本篇文章是Barry Lapthorn创作的,感觉写得很好,翻译一下,做个纪念.由于英文水平实在太烂,所以翻译有错或者译得不好的地方请多指正.另外由于原文是针对W ...
- WPF/MVVM Quick Start Tutorial - WPF/MVVM 快速入门教程 -原文,翻译及一点自己的补充
转载自 https://www.codeproject.com/articles/165368/wpf-mvvm-quick-start-tutorial WPF/MVVM Quick Start T ...
- WPF/MVVM快速指引
简介 最近微软推出了UWA,又是一波新的C#+xaml学习热.好多小伙伴都对MVVM感觉很好奇,但是有些地方也有点难以理解.特意写了这边文章,希望对你有帮助. 这边文章会很长,所以我会用几个例子的形式 ...
- [转]WPF/MVVM快速开始手册
I will quickly introduce some topics, then show an example that explains or demonstrates each point. ...
- 简易的WPF MVVM模式开发
Model层 public class Song { private string _artistName; private string _songTitle; public string Song ...
- WPF MVVM模式的一些理解
/*本文转自 http://www.cnblogs.com/sirkevin/archive/2012/11/28/2793471.html */ 使用WPF+Mvvm开发一年多,期间由于对Mvvm模 ...
- WPF快速入门系列(8)——MVVM快速入门
一.引言 在前面介绍了WPF一些核心的内容,其中包括WPF布局.依赖属性.路由事件.绑定.命令.资源样式和模板.然而,在WPF还衍生出了一种很好的编程框架,即WVVM,在Web端开发有MVC,在WPF ...
- 使用MVVM框架(avalonJS)进行快速开发
背景 在运营活动开发中,因为工作的重复性很大,同时往往开发时间短,某些情况下也会非常紧急,导致了活动开发时间被大大压缩,同时有些活动逻辑复杂,数据或者状态变更都需要手动渲染,容易出错,正是因为这些问题 ...
- WPF MVVM UI分离之《交互与数据分离》 基础才是重中之重~delegate里的Invoke和BeginInvoke 将不确定变为确定系列~目录(“机器最能证明一切”) 爱上MVC3系列~全局异常处理与异常日志 基础才是重中之重~lock和monitor的区别 将不确定变成确定~我想监视我的对象,如果是某个值,就叫另一些方法自动运行 将不确定变成确定~LINQ DBML模型可以对
WPF MVVM UI分离之<交互与数据分离> 在我们使用WPF过程中,不可避免并且超级喜欢使用MVVM框架. 那么,使用MVVM的出发点是视觉与业务逻辑分离,即UI与数据分离 诸如下 ...
随机推荐
- B'day Gift
def main(): n = int(raw_input()) sum = 0 for i in range(n): sum += float(raw_input()) print '%.1f' % ...
- MHA环境搭建【4】manager相关依赖的解决
mha的manager 结点依赖与mha-node软件包.所以在安装mha-manager之前要把mha-node安装上去:再者mha-manger还依赖于perl-Config-Tiny perl- ...
- HBase架构深度解析
原文出处: DLevin(@雪地脚印_) 前记 公司内部使用的是MapR版本的Hadoop生态系统,因而从MapR的官网看到了这篇文文章:An In-Depth Look at the HBase A ...
- 让WordPress的作者在后台只能看到自己的文章
今天需要对WordPress后台进行调整,目的是为了只能让当前用户看见自己所发表的文章,而WordPress默认是登陆用户可以看到所有用户发表的文章. WordPress中的用户角色分的比较详细,作者 ...
- Codeforces Round #276 (Div. 2) 解题报告
题目地址:http://codeforces.com/contest/485 A题.Factory 模拟.判断是否出现循环,如果出现,肯定不可能. 代码: #include<cstdio> ...
- ubuntu及终端快捷键
1.关于终端的快捷键: Tab:tab键是比较常用的一个快捷键,它的作用是补全文件名或者路径.举例 来说,输入”cd /ho”在按一下tab键,终端里就会显示”cd /home”了.如果您的文件夹下, ...
- windows下编译firefox
可以自己定制下.估计很简单..... 官方文档扫一遍: https://developer.mozilla.org/en-US/docs/Mozilla/Developer_guide/Build_I ...
- uva 10706 Number Sequence(数学规律)
题目连接:10706 - Number Sequence 题目大意:有一个有0 ~ 9组成的序列,1 1 2 1 2 3 1 2 3 4 1 2 3 4 5 ....就是第一位为1. ...
- Best Meeting Point 解答
Question A group of two or more people wants to meet and minimize the total travel distance. You are ...
- 简述tcp协议对http性能的影响及优化
当网站服务器并发连接达到一定程度时,你可能需要考虑服务器系统中tcp协议设置对http服务器的影响. tcp相关延时主要包括: 1.tcp连接时建立握手: 2.tcp慢启动拥塞控制: 3.数据聚集的N ...