04-maven学习-pom.xml解析
pom.xml里面各个配置的含义如下:
<!-- 主项目标识,表示当前maven属于哪个实际项目,与包是一样的 -->

     <groupId>反写的公司网址+项目名</groupId>

     <!-- 模块标识-->

     <artifactId>项目名+模块名</artifactId>

     <!--

        版本号,一般由三个数字组成

        第一个0,表示大版本号,

        第二个0表示分支版本号,

        第三个0表示小版本号,

        snapshot 快照

        beta 公测

        alpha 内测

        Release 稳定

        GA正式发布

      -->

     <version></version>

     <!-- 打包的方式,默认为jar,还可以打包成war,zip,pom -->

     <packaging></packaging>

     <!-- 项目描述名 -->

     <name></name>

     <!-- 项目的地址 -->

     <url></url>

     <!-- 项目的描述 -->

     <description></description>

     <!-- 开发人员信息 -->

     <developers></developers>

     <!-- 许可证信息 -->

     <licenses></licenses>

     <!-- 组织信息 -->

     <organization></organization>

    <!--  依赖列表-->

    <dependencies>

        <!-- 依赖项 -->

        <dependency>

            <groupId></groupId>

            <artifactId></artifactId>

            <version></version>

            <type></type>

            <!-- 依赖的范围 -->

            <scope></scope>

            <!-- 设置依赖是否可选,默认false。 -->

            <optional></optional>

            <!-- 排除依赖传递列表 -->

            <exclusions>

                <exclusion>

                </exclusion>

            </exclusions>

        </dependency>

    </dependencies>

    <!-- 依赖的管理 -->

    <dependencyManagement>

         <dependencies>

             <dependency></dependency>

         </dependencies>

    </dependencyManagement>

    <build>

        <!-- 插件列表 -->

        <plugins>

            <plugin>

              <groupId></groupId>

              <artifactId></artifactId>

              <version></version>

            </plugin>

        </plugins>

    </build>

    <!-- 用于子模块对父模块pom的继承 -->

    <parent></parent>

    <!-- 用来聚合多个maven项 -->

    <modules>

        <module></module>

    </modules>
例如上一节创建的如下:
  <groupId>org.maven.mavenDemo</groupId>

  <artifactId>mavenDemo01</artifactId>

  <version>0.0.1-SNAPSHOT</version>

  <packaging>jar</packaging>

  <name>mavenDemo01</name>

  <url>http://maven.apache.org</url>

  <properties>

    <project.build.sourceEncoding>UTF-8</project.build.sourceEncoding>

  </properties>

  <dependencies>

    <dependency>

      <groupId>junit</groupId>

      <artifactId>junit</artifactId>

      <version>3.8.1</version>

      <scope>test</scope>

    </dependency>

  </dependencies>
依赖范围:<scop>
三种classpath:
- 编译
- 测试
- 运行
scop选项:
- compile:默认的范围,编译测试运行都有效
- provided:在编译和测试时候有效
- runtime:在测试和运行时有效
- test:只在测试范围有效
- system:与本机系统相关联,可移植性差。
- import:导入的范围,只使用在dependenceManagement中。表示从其他的pom中导入dependecy的配置
依赖传递
这里建立三个maven项目演示
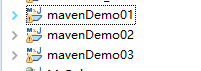
demo02要依赖demo01,要想依赖,必须在本地仓库安装demo01的项目,
首先对demo01进行如下操作:
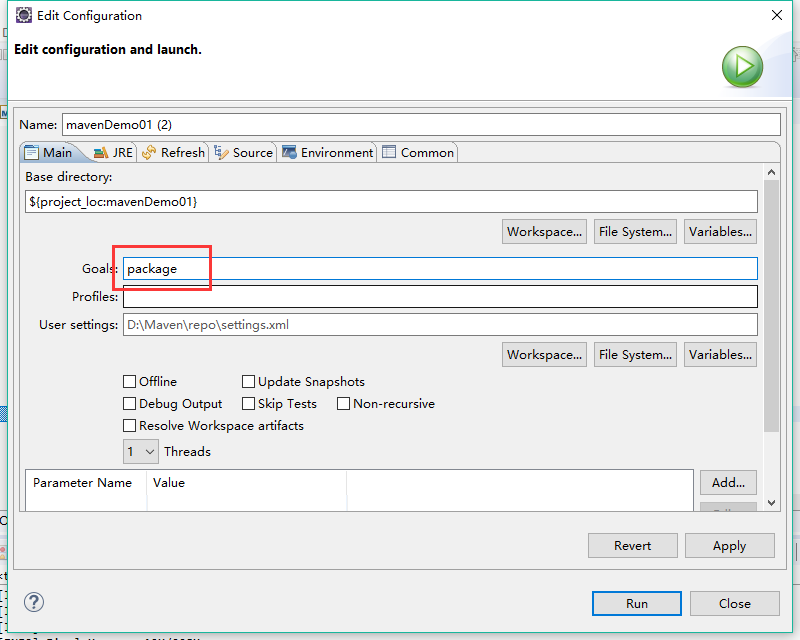
1,右键demo01,使用maven方式运行,将其打包:
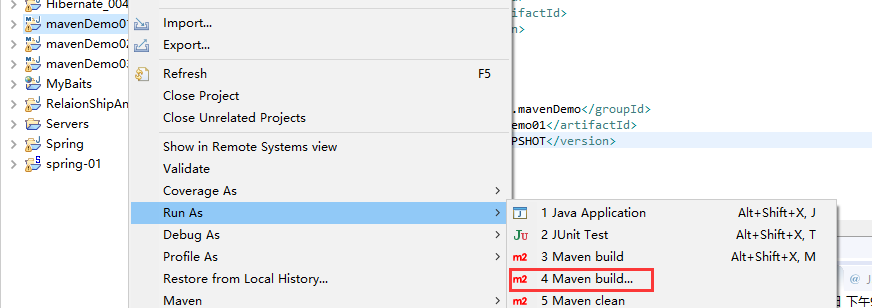
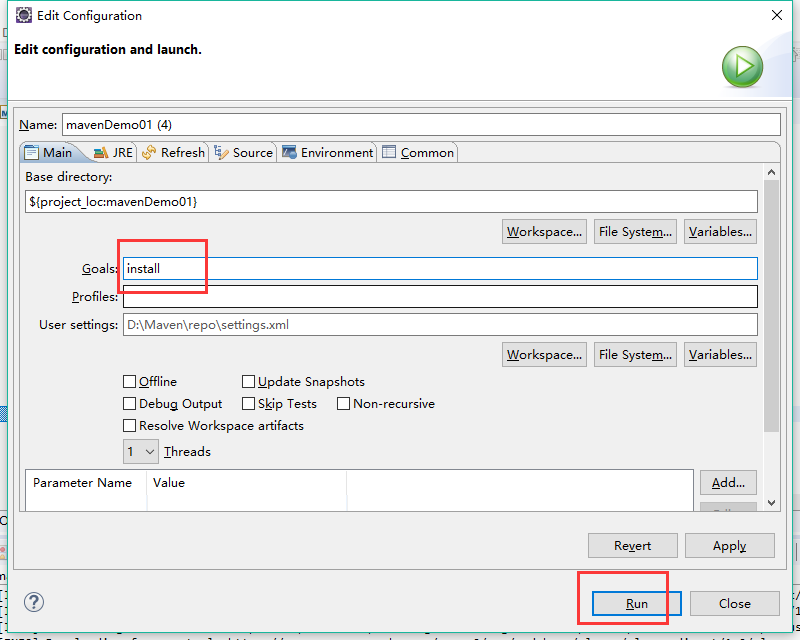
2,将mavendemo01安装到本地仓库中,同样执行maven方式运行,执行install命令。
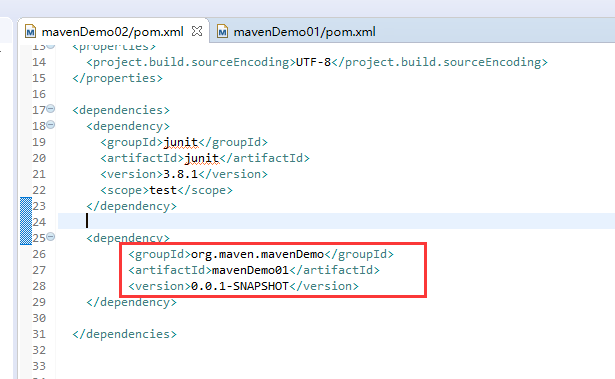
在demo02中加入demo01的依赖:
  <dependencies>

    <dependency>

      <groupId>junit</groupId>

      <artifactId>junit</artifactId>

      <version>3.8.1</version>

      <scope>test</scope>

    </dependency>

    <dependency>

            <groupId>org.maven.mavenDemo</groupId>

          <artifactId>mavenDemo01</artifactId>

          <version>0.0.1-SNAPSHOT</version>

    </dependency>

  </dependencies>
如下:
同样方式将demo02安装,为了省去操作,同时执行两个命令:clean install

在demo03中依赖demo02项目。
  <dependencies>

    <dependency>

      <groupId>junit</groupId>

      <artifactId>junit</artifactId>

      <version>3.8.1</version>

      <scope>test</scope>

    </dependency>

    <dependency>

          <groupId>org.maven.mavenDemo</groupId>

          <artifactId>mavenDemo02</artifactId>

          <version>0.0.1-SNAPSHOT</version>

    </dependency>

  </dependencies>
同样对demo03安装到本地仓库。

观察mavenDemo03的依赖包发现,demo03本来只想依赖demo02,但是连demo01也依赖了,
这表明依赖具有传递性。
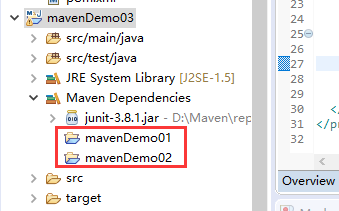
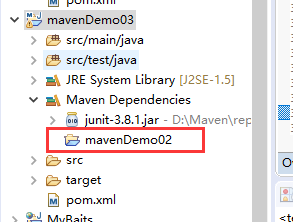
要想不依赖demo01,使用exclusions,可以排除demo01的依赖。
  <dependencies>

    <dependency>

      <groupId>junit</groupId>

      <artifactId>junit</artifactId>

      <version>3.8.1</version>

      <scope>test</scope>

    </dependency>

    <dependency>

          <groupId>org.maven.mavenDemo</groupId>

          <artifactId>mavenDemo02</artifactId>

          <version>0.0.1-SNAPSHOT</version>

          <exclusions>

              <exclusion><!--下面填入mavenDemo01的坐标-->

                  <groupId>org.maven.mavenDemo</groupId>

                  <artifactId>mavenDemo01</artifactId>

              </exclusion>

          </exclusions>

    </dependency>

  </dependencies>
保存后发现只剩demo02的依赖了。
依赖冲突
解决依赖冲突的两条原则:
1,短路优先:A->B-C->X(jar)
A->D->X(jar)
由于第二条路比较短,会依赖第二条的方式。
2,先声明先优先:
如果路径长度相同,则谁先声明,先解析谁。
聚合和继承
聚合
如果想要将多个项目进行install,安装到本地仓库中,必须对其依次进行install命令。
而聚合可以将多个项目放到一起运行,同时安装。
例如:将前面的三个项目聚合,一起安装。
新建一个mavenDemo04,在pom.xml里面配置如下:
首先把packaging改成pom
  <groupId>org.maven.mavenDemo</groupId>

  <artifactId>mavenDemo04</artifactId>

  <version>0.0.1-SNAPSHOT</version>

  <packaging>pom</packaging>
然后添加聚合标签:分别加入要安装的三个项目
    <modules>

        <module>

            ../mavenDemo01

        </module>

        <module>

            ../mavenDemo02

        </module>

        <module>

            ../mavenDemo03

        </module>

    </modules>
而这里的dependency无所谓了,可以删除。
然后运行maven命令,执行 clean install命令。
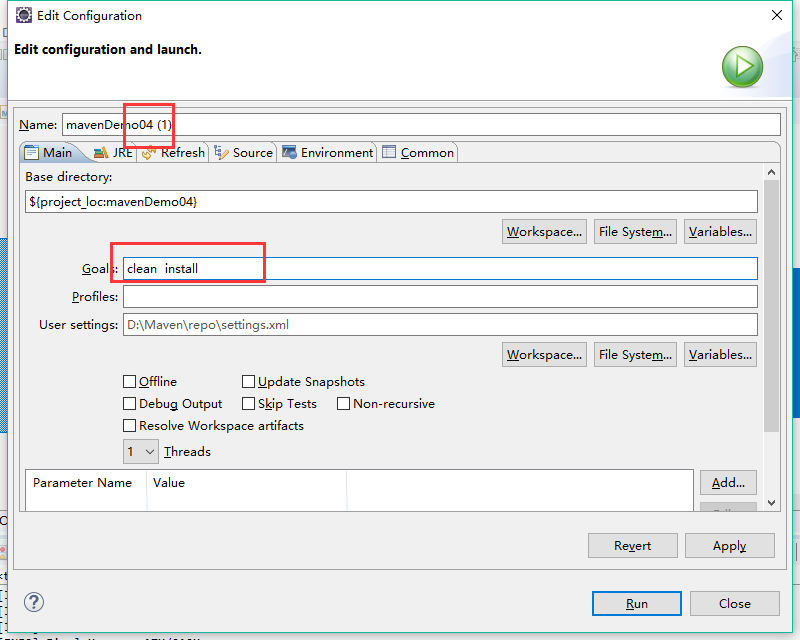
此时就同时安装了三个项目到本地仓库。
继承
例如对于之前的三个项目中,每个项目都依赖了一个junit,其实这样重复了很多,可以使用继承方式代替这种。
1,新建一个demo5,demo5中定义如下:
  <groupId>org.maven.mavenDemo</groupId>

  <artifactId>mavenDemo05</artifactId>

  <version>0.0.1-SNAPSHOT</version>

  <packaging>pom</packaging>

  <name>mavenDemo05</name>

  <url>http://maven.apache.org</url>

  <properties>

    <project.build.sourceEncoding>UTF-8</project.build.sourceEncoding>

      <junit.version>3.8.1</junit.version>

  </properties>

    <dependencyManagement>

          <dependencies>

            <dependency>

              <groupId>junit</groupId>

              <artifactId>junit</artifactId>

              <version>${junit.version}</version>

              <scope>test</scope>

            </dependency>

          </dependencies>

    </dependencyManagement>
一共关注三点:
1,将packaging改为pom
2,在properties中新增一共junit.version属性。然后可以在version标签中通过${属性名}的方式使用。
3,新增一个dependencyManagement标签,将dependencyies标签放进去。
假如在demo3中继承这里。
demo3中junit依赖定义如下:
  <dependencies>

    <dependency>

      <groupId>junit</groupId>

      <artifactId>junit</artifactId>

      <version>3.8.1</version>

      <scope>test</scope>

    </dependency>
</dependencies>
修改,需要将上面的红色部分删除,然后添加一个parent标签。parent标签引入demo05的坐标。
    <parent>

          <groupId>org.maven.mavenDemo</groupId>

          <artifactId>mavenDemo05</artifactId>

          <version>0.0.1-SNAPSHOT</version>

    </parent>

  <dependencies>

    <dependency>

      <groupId>junit</groupId>

      <artifactId>junit</artifactId>

    </dependency>

    <dependency>

          <groupId>org.maven.mavenDemo</groupId>

          <artifactId>mavenDemo02</artifactId>

          <version>0.0.1-SNAPSHOT</version>

          <exclusions>

              <exclusion>

                  <groupId>org.maven.mavenDemo</groupId>

                  <artifactId>mavenDemo01</artifactId>

              </exclusion>

          </exclusions>

    </dependency>

  </dependencies>
04-maven学习-pom.xml解析的更多相关文章
- maven项目pom.xml解析
- Maven项目pom.xml文件简单解析
Maven项目pom.xml简单解析 <project xmlns="http://maven.apache.org/POM/4.0.0" xmlns:xsi="h ...
- 史上最全的maven的pom.xml文件详解(转载)
此文出处:史上最全的maven的pom.xml文件详解——阿豪聊干货 <project xmlns="http://maven.apache.org/POM/4.0.0" x ...
- (六)Maven之pom.xml文件简单说明
通过前面几部分知识,我们对maven已经有了初步的印象,就像Make的Makefile.Ant的build.xml一样,Maven项目的核心是pom.xml.POM(Project Object Mo ...
- SSH项目搭建(四)——Maven的pom.xml配置
史上最全的maven的pom.xml文件详解: https://www.cnblogs.com/qq765065332/p/9238135.html 下面的节点有不理解是啥意思的可以到上面链接的文章里 ...
- maven(4)------maven核心pom.xml文件常用元素分析
在maven项目中,pom文件是核心文件 pom.xml: <?xml version="1.0" encoding="UTF-8"?> <p ...
- Maven项目pom.xml配置详解
maven项目pom.xml文件配置详解,需要时可以用作参考: <project xmlns="http://maven.apache.org/POM/4.0.0" xmln ...
- Maven 教程(6)— Maven之pom.xml文件简单说明
原文地址:https://blog.csdn.net/liupeifeng3514/article/details/79543963 通过前面几部分知识,我们对maven已经有了初步的印象,就像Mak ...
- [转]Maven的pom.xml文件详解
Maven的pom.xml文件详解------Build Settings 2013年10月30日 13:04:01 阅读数:44678 根据POM 4.0.0 XSD,build元素概念性的划分为两 ...
随机推荐
- PAT甲级1049. Counting Ones
PAT甲级1049. Counting Ones 题意: 任务很简单:给定任何正整数N,你应该计算从1到N的整数的十进制形式的1的总数.例如,给定N为12,在1,10, 11和12. 思路: < ...
- Java实现-每天三道剑指Offre(2-4)
实现一个单例模式 /** * 面试题2:实现单例模式 * * @author qiuyong 饿汉式 */ public class Singleton01 { private Singleton01 ...
- Intelij Idea下的git使用
一.简介 在我们入门软件研发并且是团队开发的时候,总会遇到这样合代码这么简单粗暴的工作,最开始我也能体会到这项工作折磨.那git是干什么得呢?简称分布式版本控制系统,常见就是上传代码.整合代码.更新代 ...
- drbd + pacemaker
Centos6.5 X86 64 2014-04-27 # yum -y install corosync pacemaker # -.el6.x86_64.rpm pssh--.el6.x86_64 ...
- iOS可持续化集成: Jenkins + bundler + cocoapods + shenzhen + fastlane + pgyer
工具介绍 1. bundler bundler用于管理ruby gem的工具,我们用来管理cocoapods以及fastlane的版本.直接sudo gem install bundler就可以.然后 ...
- MySQL 一个库中表数量是否有限制?
在网上找了一下,有说几乎没有限制的,也有说表多了肯定会影响性能的,综合起来应该讲: 1)一个库中表数是有限制的, 按照 UNSIGNED 类型,最多42亿多一点,正常应用根本达不到. 2)文件系统 ...
- 辛星跟您解析在CSS面包屑中三角形的定位问题
刚才看到有位网友非常纳闷第二个棕色三角形是怎么定位的,我当感觉在以下说不清楚,就特别开了一片博客.来说清楚它.首先,前面的代码我们先抄下来,至于前面这部分代码是怎么来的,读我的用CSS制作面包屑导航的 ...
- Linux 静态库与动态库搜索路径设置详解
转载:http://blog.chinaunix.net/uid-29025972-id-3855495.html 1. 连接和运行时库文件搜索路径的设置 库文件在连接(静态库和共享库)和运行(仅限于 ...
- Junit Hamcrest Mockito单元测试
pom.xml配置 <?xml version="1.0" encoding="UTF-8"?> <project xmlns="h ...
- XHTML学习要点
目标 掌握XHTML语法,能正确书写出符合规则的文档. 要点 基本概念,与HTML有什么不一样 基本语法规则: XHTML 文档必须拥有一个根元素 标签名.属性名称必须小写 属性值必须加引号 属性不能 ...