我的Android学习路线(一)
最近实在是闲的无聊,本着不能让自己的时间白白流失的目的,我就决定完成一下之前的诺言:把 Android 开发学了。正好手头有一本《Android 4编程入门经典》,于是便用两天时间把视图部分的代码全部敲了一遍。
然后寻思着这么一个现阶段的入门学习路线:
- 撸一个计算器出来,并且做到屏幕自动适配。
- 利用四大组件,给计算器加入各种鬼畜功能。
之前在入门 Java 的时候,老师在教我们 Java 图形界面之后便叫我们制作一个计算器,算是对图形界面的入门。其实当时写计算器的时候我偷了个懒,布局使用了绝对布局,反正我叫你 TextView 、Button 待哪儿你就给我待哪儿,让你多大就多大。这样做的好处就是,我根本不用考虑相对布局的时候产生的种种不可思议的情况,但是坏处就在于,这个图形界面的大小就定死了。但是为了赶紧把实验报告赶出来,我还是偷懒用了绝对布局。
好了现在轮到Android布局了,经过我半小时的奋战,弄出了这么一个玩意儿
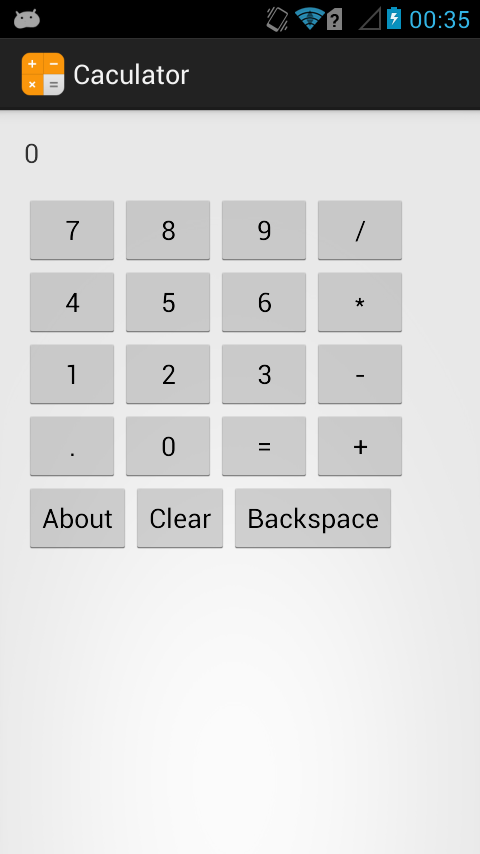
呃好吧的确还是非常的……粗糙,因为你可以看看我的源代码:
<RelativeLayout xmlns:android="http://schemas.android.com/apk/res/android"

    xmlns:tools="http://schemas.android.com/tools"

    android:layout_width="match_parent"

    android:layout_height="match_parent"

    android:paddingBottom="@dimen/activity_vertical_margin"

    android:paddingLeft="@dimen/activity_horizontal_margin"

    android:paddingRight="@dimen/activity_horizontal_margin"

    android:paddingTop="@dimen/activity_vertical_margin"

    tools:context=".MainActivity" >

    <TextView

        android:id="@+id/TextView_1"

        android:layout_width="fill_parent"

        android:layout_height="40dp"

        android:textSize="18sp"

        android:text="0" />

    <!-- 第一排按钮 -->

    <Button

        android:id="@+id/btn_7"

        android:layout_width="wrap_content"

        android:layout_height="wrap_content"

        android:layout_below="@id/TextView_1"

        android:text="7" />

    <Button

        android:id="@+id/btn_8"

        android:layout_width="wrap_content"

        android:layout_height="wrap_content"

        android:layout_toRightOf="@id/btn_7"

        android:layout_below="@id/TextView_1"

        android:text="8" />

    <Button

        android:id="@+id/btn_9"

        android:layout_width="wrap_content"

        android:layout_height="wrap_content"

        android:layout_toRightOf="@id/btn_8"

        android:layout_below="@id/TextView_1"

        android:text="9" />

    <Button

        android:id="@+id/btn_div"

        android:layout_width="wrap_content"

        android:layout_height="wrap_content"

        android:layout_toRightOf="@id/btn_9"

        android:layout_below="@id/TextView_1"

        android:text="/" />

    <!-- 第二排按钮 -->

    <Button

        android:id="@+id/btn_4"

        android:layout_width="wrap_content"

        android:layout_height="wrap_content"

        android:layout_below="@id/btn_7"

        android:text="4" />

    <Button

        android:id="@+id/btn_5"

        android:layout_width="wrap_content"

        android:layout_height="wrap_content"

        android:layout_toRightOf="@id/btn_4"

        android:layout_below="@id/btn_7"

        android:text="5" />

    <Button

        android:id="@+id/btn_6"

        android:layout_width="wrap_content"

        android:layout_height="wrap_content"

        android:layout_toRightOf="@id/btn_5"

        android:layout_below="@id/btn_7"

        android:text="6" />

    <Button

        android:id="@+id/btn_mul"

        android:layout_width="wrap_content"

        android:layout_height="wrap_content"

        android:layout_toRightOf="@id/btn_6"

        android:layout_below="@id/btn_7"

        android:text="*" />

    <!-- 第三排按钮 -->

    <Button

        android:id="@+id/btn_1"

        android:layout_width="wrap_content"

        android:layout_height="wrap_content"

        android:layout_below="@id/btn_4"

        android:text="1" />

    <Button

        android:id="@+id/btn_2"

        android:layout_width="wrap_content"

        android:layout_height="wrap_content"

        android:layout_toRightOf="@id/btn_1"

        android:layout_below="@id/btn_4"

        android:text="2" />

    <Button

        android:id="@+id/btn_3"

        android:layout_width="wrap_content"

        android:layout_height="wrap_content"

        android:layout_toRightOf="@id/btn_2"

        android:layout_below="@id/btn_4"

        android:text="3" />

    <Button

        android:id="@+id/btn_sub"

        android:layout_width="wrap_content"

        android:layout_height="wrap_content"

        android:layout_toRightOf="@id/btn_3"

        android:layout_below="@id/btn_4"

        android:text="-" />

    <!-- 第四排按钮 -->

    <Button

        android:id="@+id/btn_point"

        android:layout_width="wrap_content"

        android:layout_height="wrap_content"

        android:layout_below="@id/btn_1"

        android:text="." />

    <Button

        android:id="@+id/btn_0"

        android:layout_width="wrap_content"

        android:layout_height="wrap_content"

        android:layout_toRightOf="@id/btn_point"

        android:layout_below="@id/btn_1"

        android:text="0" />

    <Button

        android:id="@+id/btn_equ"

        android:layout_width="wrap_content"

        android:layout_height="wrap_content"

        android:layout_toRightOf="@id/btn_0"

        android:layout_below="@id/btn_1"

        android:text="=" />

    <Button

        android:id="@+id/btn_add"

        android:layout_width="wrap_content"

        android:layout_height="wrap_content"

        android:layout_toRightOf="@id/btn_equ"

        android:layout_below="@id/btn_1"

        android:text="+" />

    <!-- 第五排按钮 -->

    <Button

        android:id="@+id/btn_about"

        android:layout_width="wrap_content"

        android:layout_height="wrap_content"

        android:layout_below="@id/btn_point"

        android:text="About" />

    <Button

        android:id="@+id/btn_clear"

        android:layout_width="wrap_content"

        android:layout_height="wrap_content"

        android:layout_toRightOf="@id/btn_about"

        android:layout_below="@id/btn_point"

        android:text="Clear" />

    <Button

        android:id="@+id/btn_back"

        android:layout_width="wrap_content"

        android:layout_height="wrap_content"

        android:layout_toRightOf="@id/btn_clear"

        android:layout_below="@id/btn_point"

        android:text="Backspace" />

</RelativeLayout>
这里,我选择的是相对布局,目前在我看来相对布局是最简单的布局(对计算器这样的 app 来说)。
接下来是程序的逻辑,大致的思路就是用几个 Boolean 变量控制按钮的效果,具体变量如下:
is_A:判断目前输入的是哪个数字;
is_Add,is_Sub,is_Mul,is_Div:判断使用的运算方式;
result_exist:判断是否需要使用运算结果进行下一次运算;
operator_exist:判断之前一次的操作是否为按下运算符。
按照目前的进度,使用到的 boolean 变量只有上述七个,在第二次笔记上会加上新的变量以满足功能需求。
经过周日一个下午的努力,目前的计算器已经实现了基本的二元运算的功能,并且有按下运算符直接得出结果并等待第二个数字输入、使用结果直接进行下一部运算等功能。
代码如下,有点粗糙:
package cn.zhouxuchen.caculator; import android.os.Bundle;
import android.app.Activity;
import android.view.Menu;
import android.view.View;
import android.widget.Button;
import android.widget.TextView; public class MainActivity extends Activity { double num_A = 0;
double num_B = 0;
double result = 0; boolean is_A = true; //判断是否操作A数,是则操作A数,否则操作B数
boolean float_A = false; //判断在操作A时是否输入小数点
boolean float_B = false; //判断在操作B时是否输入小数点
boolean is_Add = false; //判断是否进行加法运算
boolean is_Sub = false; //判断是否进行减法运算
boolean is_Mul = false; //判断是否进行乘法运算
boolean is_Div = false; //判断是否进行除法运算
boolean result_exist = false; //判断是否已经计算出一个结果
boolean operator_exist = false; //判断是否已经按下运算符按钮 String textScreen = ""; @Override
protected void onCreate(Bundle savedInstanceState) {
super.onCreate(savedInstanceState);
setContentView(R.layout.activity_main); //--- 文字显示 ---
final TextView textView = (TextView) findViewById(R.id.TextView_1);
//--- 数字按钮 ---
Button btn_0 = (Button) findViewById(R.id.btn_0);
Button btn_1 = (Button) findViewById(R.id.btn_1);
Button btn_2 = (Button) findViewById(R.id.btn_2);
Button btn_3 = (Button) findViewById(R.id.btn_3);
Button btn_4 = (Button) findViewById(R.id.btn_4);
Button btn_5 = (Button) findViewById(R.id.btn_5);
Button btn_6 = (Button) findViewById(R.id.btn_6);
Button btn_7 = (Button) findViewById(R.id.btn_7);
Button btn_8 = (Button) findViewById(R.id.btn_8);
Button btn_9 = (Button) findViewById(R.id.btn_9);
//--- 运算符 ---
Button btn_add = (Button) findViewById(R.id.btn_add);
Button btn_sub = (Button) findViewById(R.id.btn_sub);
Button btn_mul = (Button) findViewById(R.id.btn_mul);
Button btn_div = (Button) findViewById(R.id.btn_div);
Button btn_equ = (Button) findViewById(R.id.btn_equ);
Button btn_posint = (Button) findViewById(R.id.btn_point);
//--- 其他按钮 ---
Button btn_about = (Button) findViewById(R.id.btn_about);
Button btn_clear = (Button) findViewById(R.id.btn_clear);
Button btn_back = (Button) findViewById(R.id.btn_back); //--- 为数字按钮添加监听器以及相应的方法 ---
btn_0.setOnClickListener(new View.OnClickListener() {
@Override
public void onClick(View arg0) {
result_exist = false;
operator_exist = false; if(is_A) {
num_A *= 10;
textScreen = num_A + "";
textView.setText(textScreen);
} else {
num_B *= 10;
textView.setText(textScreen + num_B);
}
}
}); btn_1.setOnClickListener(new View.OnClickListener() {
@Override
public void onClick(View arg0) {
result_exist = false;
operator_exist = false; if(is_A) {
num_A = num_A*10 + 1;
textScreen = num_A + "";
textView.setText(textScreen);
} else {
num_B = num_B*10 + 1;
textView.setText(textScreen + num_B);
}
}
}); btn_2.setOnClickListener(new View.OnClickListener() {
@Override
public void onClick(View arg0) {
result_exist = false;
operator_exist = false; if(is_A) {
num_A = num_A*10 + 2;
textScreen = num_A + "";
textView.setText(textScreen);
} else {
num_B = num_B*10 + 2;
textView.setText(textScreen + num_B);
}
}
}); btn_3.setOnClickListener(new View.OnClickListener() {
@Override
public void onClick(View arg0) {
result_exist = false;
operator_exist = false; if(is_A) {
num_A = num_A*10 + 3;
textScreen = num_A + "";
textView.setText(textScreen);
} else {
num_B = num_B*10 + 3;
textView.setText(textScreen + num_B);
}
}
}); btn_4.setOnClickListener(new View.OnClickListener() {
@Override
public void onClick(View arg0) {
result_exist = false;
operator_exist = false; if(is_A) {
num_A = num_A*10 + 4;
textScreen = num_A + "";
textView.setText(textScreen);
} else {
num_B = num_B*10 + 4;
textView.setText(textScreen + num_B);
}
}
}); btn_5.setOnClickListener(new View.OnClickListener() {
@Override
public void onClick(View arg0) {
result_exist = false;
operator_exist = false; if(is_A) {
num_A = num_A*10 + 5;
textScreen = num_A + "";
textView.setText(textScreen);
} else {
num_B = num_B*10 + 5;
textView.setText(textScreen + num_B);
} textView.setText(textScreen);
}
}); btn_6.setOnClickListener(new View.OnClickListener() {
@Override
public void onClick(View arg0) {
result_exist = false;
operator_exist = false; if(is_A) {
num_A = num_A*10 + 6;
textScreen = num_A + "";
textView.setText(textScreen);
} else {
num_B = num_B*10 + 6;
textView.setText(textScreen + num_B);
}
}
}); btn_7.setOnClickListener(new View.OnClickListener() {
@Override
public void onClick(View arg0) {
result_exist = false;
operator_exist = false; if(is_A) {
num_A = num_A*10 + 7;
textScreen = num_A + "";
textView.setText(textScreen);
} else {
num_B = num_B*10 + 7;
textView.setText(textScreen + num_B);
}
}
}); btn_8.setOnClickListener(new View.OnClickListener() {
@Override
public void onClick(View arg0) {
result_exist = false;
operator_exist = false; if(is_A) {
num_A = num_A*10 + 8;
textScreen = num_A + "";
textView.setText(textScreen);
} else {
num_B = num_B*10 + 8;
textView.setText(textScreen + num_B);
}
}
}); btn_9.setOnClickListener(new View.OnClickListener() {
@Override
public void onClick(View arg0) {
result_exist = false;
operator_exist = false; if(is_A) {
num_A = num_A*10 + 9;
textScreen = num_A + "";
textView.setText(textScreen);
} else {
num_B = num_B*10 + 9;
textView.setText(textScreen + num_B);
}
}
}); //--- 为运算符按钮添加监听器及相应的方法 ---
btn_add.setOnClickListener(new View.OnClickListener() {
@Override
public void onClick(View arg0) {
//--- 判断之前是否按下过运算符按钮 ---
if(operator_exist) {
is_Add = true;
is_Sub = false;
is_Mul = false;
is_Div = false;
return;
} else {
is_Add = true;
}
operator_exist = true; //--- 首先判断之前有没有运算出结果 ---
if(result_exist) {
num_A = result;
result_exist = false;
} //--- 判断是否需要计算出结果并进行下一次运算 ---
if(!is_A) {
if(is_Add) {
result = num_A + num_B;
is_Add = false;
} else if(is_Sub) {
result = num_A - num_B;
is_Sub = false;
} else if(is_Mul) {
result = num_A * num_B;
is_Mul = false;
} else if(is_Div){
result = num_A / num_B;
is_Div = false;
} num_A = result;
num_B = 0;
textScreen = num_A + " + ";
textView.setText(textScreen);
return;
} is_A = false;
textScreen = num_A + " + ";
textView.setText(textScreen);
}
}); btn_sub.setOnClickListener(new View.OnClickListener() {
@Override
public void onClick(View arg0) {
//--- 判断之前是否按下过运算符按钮 ---
if(operator_exist) {
is_Add = false;
is_Sub = true;
is_Mul = false;
is_Div = false;
return;
} else {
is_Sub = true;
}
operator_exist = true; //--- 首先判断之前有没有运算出结果 ---
if(result_exist) {
num_A = result;
result_exist = false;
} //--- 判断是否需要计算出结果并进行下一次运算 ---
if(!is_A) {
if(is_Add) {
result = num_A + num_B;
is_Add = false;
} else if(is_Sub) {
result = num_A - num_B;
is_Sub = false;
} else if(is_Mul) {
result = num_A * num_B;
is_Mul = false;
} else if(is_Div){
result = num_A / num_B;
is_Div = false;
} num_A = result;
num_B = 0;
textScreen = num_A + " - ";
textView.setText(textScreen);
return;
} is_A = false;
textScreen = num_A + " - ";
textView.setText(textScreen);
}
}); btn_mul.setOnClickListener(new View.OnClickListener() {
@Override
public void onClick(View arg0) {
//--- 判断之前是否按下过运算符按钮 ---
if(operator_exist) {
is_Add = false;
is_Sub = false;
is_Mul = true;
is_Div = false;
return;
} else {
is_Mul = true;
}
operator_exist = true; //--- 首先判断之前有没有运算出结果 ---
if(result_exist) {
num_A = result;
result_exist = false;
} //--- 判断是否需要计算出结果并进行下一次运算 ---
if(!is_A) {
if(is_Add) {
result = num_A + num_B;
is_Add = false;
} else if(is_Sub) {
result = num_A - num_B;
is_Sub = false;
} else if(is_Mul) {
result = num_A * num_B;
is_Mul = false;
} else if(is_Div){
result = num_A / num_B;
is_Div = false;
} num_A = result;
num_B = 0;
textScreen = num_A + " * ";
textView.setText(textScreen);
return;
} is_A = false;
textScreen = num_A + " * ";
textView.setText(textScreen);
}
}); btn_div.setOnClickListener(new View.OnClickListener() {
@Override
public void onClick(View arg0) {
//--- 判断之前是否按下过运算符按钮 ---
if(operator_exist) {
is_Add = false;
is_Sub = false;
is_Mul = false;
is_Div = true;
return;
} else {
is_Div = true;
}
operator_exist = true; //--- 首先判断之前有没有运算出结果 ---
if(result_exist) {
num_A = result;
result_exist = false;
} //--- 判断是否需要计算出结果并进行下一次运算 ---
if(!is_A) {
if(is_Add) {
result = num_A + num_B;
is_Add = false;
} else if(is_Sub) {
result = num_A - num_B;
is_Sub = false;
} else if(is_Mul) {
result = num_A * num_B;
is_Mul = false;
} else if(is_Div){
result = num_A / num_B;
is_Div = false;
} num_A = result;
num_B = 0;
textScreen = num_A + " / ";
textView.setText(textScreen);
return;
} is_A = false;
textScreen = num_A + " / ";
textView.setText(textScreen);
}
}); btn_equ.setOnClickListener(new View.OnClickListener() {
@Override
public void onClick(View arg0) {
if(is_A) {
result = num_A;
textScreen = result + "";
result_exist = true;
textView.setText(textScreen);
return;
} if(is_Add) {
result = num_A + num_B;
is_Add = false;
} else if(is_Sub) {
result = num_A - num_B;
is_Sub = false;
} else if(is_Mul) {
result = num_A * num_B;
is_Mul = false;
} else if(is_Div) {
result = num_A / num_B;
is_Div = false;
} textScreen = result + "";
num_A = 0;
num_B = 0;
is_A = true;
result_exist = true;
textView.setText(textScreen);
}
});
} }
--- 总结 ---
总的来说,写一个计算器出来对有一点编程基础的人来说就像叫一个小孩用笔画一个圆。做这个的目的是熟悉一下 Android 的布局方式以及使用监听器的方法,并不是很难。
我的Android学习路线(一)的更多相关文章
- Android学习路线总结,绝对干货
title: Android学习路线总结,绝对干货 tags: Android学习路线,Android学习资料,怎么学习android grammar_cjkRuby: true --- 一.前言 不 ...
- Android学习路线(二十四)ActionBar Fragment运用最佳实践
转载请注明出处:http://blog.csdn.net/sweetvvck/article/details/38645297 通过前面的几篇博客.大家看到了Google是怎样解释action bar ...
- Android学习路线指南
看到这位大牛的博文,不禁得感概,我最近也遇到了很多问题,内心彷徨不堪,转载大牛这篇博文,是为了更好的勉励自己.原文地址在最后面. 前言 看到一篇文章中提到"最近几年国内的初级Android程 ...
- (转)Android学习路线总结,绝对干货
一.前言 不知不觉自己已经做了几年开发了,由记得刚出来工作的时候感觉自己能牛逼,现在回想起来感觉好无知.懂的越多的时候你才会发现懂的越少. 如果你的知识是一个圆,当你的圆越大时,圆外面的世界也就越大. ...
- Android学习路线总结,绝对干货(转)
转自:https://www.cnblogs.com/yishaochu/p/5436094.html 一.前言 不知不觉自己已经做了几年开发了,由记得刚出来工作的时候感觉自己能牛逼,现在回想起来感觉 ...
- Android学习路线总结,绝对干货(转)
title: Android学习路线总结,绝对干货tags: Android学习路线,Android学习资料,怎么学习androidgrammar_cjkRuby: true--- 一.前言 不知不觉 ...
- Android学习路线(二十一)运用Fragment构建动态UI——创建一个Fragment
你能够把fragment看成是activity的模块化部分.它拥有自己的生命周期,接受它自己的输入事件,你能够在activity执行时加入或者删除它(有点像是一个"子activity&quo ...
- 工作不久的安卓开发者,他们是这样规划自己的Android学习路线
Android开发工作者工作不久的时候,会有一段迷茫期,觉得自己应该再学一点,却不知道从何学起,该怎样规划自己的学习路线呢?今天,我给大家梳理一下Android基础,就像建造房屋一样,要建造一座宏伟的 ...
- android学习路线总结
感谢安辉作者,学习路线 https://www.cnblogs.com/yishaochu/p/5436094.html https://www.cnblogs.com/jycboy/p/60666 ...
随机推荐
- 再次学习javascript中的參数传递
javascript中的全部函数的參数传递都是依照值传递的,做了以下測试: function addTen(num){ num +=10; return num; } var count = ...
- docker+MySQL+读写分离
一.拉取mysql镜像文件docker pull mysql二.查看镜像docker images三.创建配置文件目录mkdir /data/docker/mysql/{master,slave} - ...
- macOS 上安装 PECL
一.简介 PECL(The PHP Extension Community Library)是 PHP 扩展的存储库,为 PHP 所有的扩展提供提供托管和下载服务. 通过 PEAR(PHP Exten ...
- linux根文件系统 /etc/resolv.conf 文件详解(转)
大家好,今天51开源给大家介绍一个在配置文件,那就是/etc/resolv.conf.很多网友对此文件的用处不太了解.其实并不复杂,它是DNS客户机配置文件,用于设置DNS服务器的IP地址及DNS域名 ...
- JAVA math包
Math类: java.lang.Math 类中包含基本的数字操作,如指数.对数.平方根和三角函数. java.math是一个包,提供用于执行任意精度整数(BigInteger)算法和任意精度小数(B ...
- HDU3123:GCC(同余模简单题)
题目:http://acm.hdu.edu.cn/showproblem.php?pid=3123 题意很简单,就是同余模的简单应用. 代码如下: #include <iostream> ...
- boost单元测试框架
头文件: #include <boost/test/unit_test.hpp> 编译加:-lboost_unit_test_framework 单元测试: 需要定义BOOST_TEST_ ...
- linux安装以及相关配置
计算机操作系统简介 操作系统是什么 操作系统的内核是什么 两种操作系统用户界面 安装Linux操作系统的准备工作 LINUX发行版(CENTOS.RHEL.FEDORA.UBUNTU.SUSE) RH ...
- 自定义admin管理工具(stark组件)
自定义admin管理工具(stark组件) 创建项目 了解了admin的功能后,我们可以开始仿照admin编写我们自己的管理工具stark组件 首先创建一个新的项目,并创建三个app stark就是我 ...
- vue工程权限怎么配置?
vue工程权限怎么配置? router.beforeEach((to, from, next) => { }):方法的to参数能拿到router设置的对象信息,如: { path: " ...