python 使用yaml模块
python:yaml模块
一、yaml文件介绍
YAML是一种简洁的非标记语言。其以数据为中心,使用空白,缩进,分行组织数据,从而使得表示更加简洁。
1. yaml文件规则
基本规则:
大小写敏感
使用缩进表示层级关系
缩进时不允许使用Tab键,只允许使用空格。
缩进的空格数目不重要,只要相同层级的元素左侧对齐即可
使用#表示注释
字符串可以不用引号标注
2. yaml文件数据结构
对象:键值对的集合(简称 "映射或字典")
键值对用冒号 “:” 结构表示,冒号与值之间需用空格分隔
数组:一组按序排列的值(简称 "序列或列表")
数组前加有 “-” 符号,符号与值之间需用空格分隔
纯量(scalars):单个的、不可再分的值(如:字符串、bool值、整数、浮点数、时间、日期、null等)
None值可用null可 ~ 表示
二、安装yaml
pip命令: pip install PyYaml
引入:import yaml
用python读取yaml文件如下:
代码:
import yaml
from Common.dir_config import *
# 打开yaml文件
fs = open(os.path.join(caps_dir, "data.yaml"),encoding="UTF-8")
datas = yaml.load(fs)
print(datas)
备注:yaml版本5.1之后弃用,YAMLLoadWarning: calling yaml.load() without Loader=... is deprecated
代码改后:
import yaml
from Common.dir_config import *
# 打开yaml文件
fs = open(os.path.join(caps_dir, "data.yaml"),encoding="UTF-8")
datas = yaml.load(fs,Loader=yaml.FullLoader) #添加后就不警告了
print(datas)
三、python中读取yaml配置文件
1. 前提条件
python中读取yaml文件前需要安装pyyaml和导入yaml模块:
使用yaml需要安装的模块为pyyaml(pip3 install pyyaml);
导入的模块为yaml(import yaml)
2. 读取yaml文件数据
python通过open方式读取文件数据,再通过load函数将数据转化为列表或字典;
import yaml
import os
def get_yaml_data(yaml_file):
# 打开yaml文件
print("***获取yaml文件数据***")
file = open(yaml_file, 'r', encoding="utf-8")
file_data = file.read()
file.close()
print(file_data)
print("类型:", type(file_data))
# 将字符串转化为字典或列表
print("***转化yaml数据为字典或列表***")
data = yaml.load(file_data)
print(data)
print("类型:", type(data))
return data
current_path = os.path.abspath(".")
yaml_path = os.path.join(current_path, "config.yaml")
get_yaml_data(yaml_path)
"""
***获取yaml文件数据***
# yaml键值对:即python中字典
usr: my
psw: 123455
类型:<class 'str'>
***转化yaml数据为字典或列表***
{'usr': 'my', 'psw': 123455}
类型:<class 'dict'>
"""
3. yaml文件数据为键值对
(1)yaml文件中内容为键值对:
# yaml键值对:即python中字典
usr: my
psw: 123455
s: " abc\n"
python解析yaml文件后获取的数据:
{'usr': 'my', 'psw': 123455, 's': ' abc\n'}
(2)yaml文件中内容为“键值对'嵌套"键值对"
# yaml键值对嵌套:即python中字典嵌套字典
usr1:
name: a
psw: 123
usr2:
name: b
psw: 456
python解析yaml文件后获取的数据:
{'usr1': {'name': 'a', 'psw': 123}, 'usr2': {'name': 'b', 'psw': 456}}
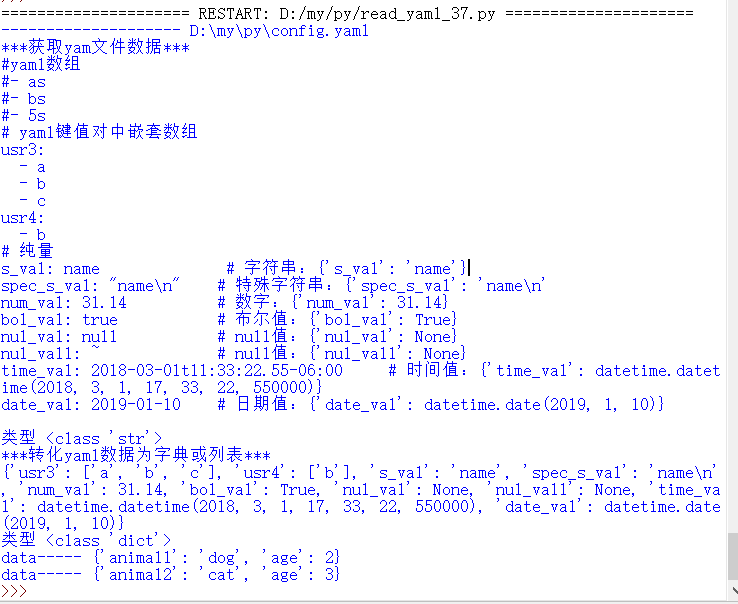
(3)yaml文件中“键值对”中嵌套“数组”
# yaml键值对中嵌套数组
usr3:
- a
- b
- c
usr4:
- b
python解析yaml文件后获取的数据:
{'usr3': ['a', 'b', 'c'], 'usr4': ['b']}
4. yaml文件数据为数组
(1)yaml文件中内容为数组
# yaml数组
- a
- b
- 5
python解析yaml文件后获取的数据:
['a', 'b', 5]
(2)yaml文件“数组”中嵌套“键值对”
# yaml"数组"中嵌套"键值对"
- usr1: aaa
- psw1: 111
usr2: bbb
psw2: 222
python解析yaml文件后获取的数据:
[{'usr1': 'aaa'}, {'psw1': 111, 'usr2': 'bbb', 'psw2': 222}]
5. yaml文件中基本数据类型:
# 纯量
s_val: name # 字符串:{'s_val': 'name'}
spec_s_val: "name\n" # 特殊字符串:{'spec_s_val': 'name\n'
num_val: 31.14 # 数字:{'num_val': 31.14}
bol_val: true # 布尔值:{'bol_val': True}
nul_val: null # null值:{'nul_val': None}
nul_val1: ~ # null值:{'nul_val1': None}
time_val: 2018-03-01t11:33:22.55-06:00 # 时间值:{'time_val': datetime.datetime(2018, 3, 1, 17, 33, 22, 550000)}
date_val: 2019-01-10 # 日期值:{'date_val': datetime.date(2019, 1, 10)}
6. yaml文件中引用
yaml文件中内容
animal3: &animal3 fish
test: *animal3
python读取的数据
{'animal3': 'fish', 'test': 'fish'}
三、python中读取多个yaml文档
1. 多个文档在一个yaml文件,使用 --- 分隔方式来分段
如:yaml文件中数据
# 分段yaml文件中多个文档
---
animal1: dog
age: 2
---
animal2: cat
age: 3
2. python脚本读取一个yaml文件中多个文档方法
python获取yaml数据时需使用load_all函数来解析全部的文档,再从中读取对象中的数据
# yaml文件中含有多个文档时,分别获取文档中数据
def get_yaml_load_all(yaml_file):
# 打开yaml文件
file = open(yaml_file, 'r', encoding="utf-8")
file_data = file.read()
file.close()
all_data = yaml.load_all(file_data)
for data in all_data:
print(data)
current_path = os.path.abspath(".")
yaml_path = os.path.join(current_path, "config.yaml")
get_yaml_load_all(yaml_path)
"""结果
{'animal1': 'dog', 'age': 2}
{'animal2': 'cat', 'age': 3}
"""
四、python对象生成yaml文档
1. 直接导入yaml(即import yaml)生成的yaml文档
通过yaml.dump()方法不会将列表或字典数据进行转化yaml标准模式,只会将数据生成到yaml文档中
# 将python对象生成yaml文档
import yaml
def generate_yaml_doc(yaml_file):
py_object = {'school': 'zhang',
'students': ['a', 'b']}
file = open(yaml_file, 'w', encoding='utf-8')
yaml.dump(py_object, file)
file.close()
current_path = os.path.abspath(".")
yaml_path = os.path.join(current_path, "generate.yaml")
generate_yaml_doc(yaml_path)
"""结果
school: zhang
students: [a, b]
"""
2. 使用ruamel模块中的yaml方法生成标准的yaml文档
(1)使用ruamel模块中yaml前提条件
使用yaml需要安装的模块:ruamel.yaml(pip3 install ruamel.yaml);
导入的模块:from ruamel import yaml
(2)ruamel模块生成yaml文档
def generate_yaml_doc_ruamel(yaml_file):
from ruamel import yaml
py_object = {'school': 'zhang',
'students': ['a', 'b']}
file = open(yaml_file, 'w', encoding='utf-8')
yaml.dump(py_object, file, Dumper=yaml.RoundTripDumper)
file.close()
current_path = os.path.abspath(".")
yaml_path = os.path.join(current_path, "generate.yaml")
generate_yaml_doc_ruamel(yaml_path)
"""结果
school: zhang
students:
- a
- b
"""
(3)ruamel模块读取yaml文档
# 通过from ruamel import yaml读取yaml文件
def get_yaml_data_ruamel(yaml_file):
from ruamel import yaml
file = open(yaml_file, 'r', encoding='utf-8')
data = yaml.load(file.read(), Loader=yaml.Loader)
file.close()
print(data)
current_path = os.path.abspath(".")
yaml_path = os.path.join(current_path, "dict_config.yaml")
get_yaml_data_ruamel(yaml_path)
**************************************************
上代码
- import yaml
- import os
- #单个文档
- def get_yaml_data(yaml_file):
- #打开yaml文件
- print("***获取yam文件数据***")
- file=open(yaml_file,'r',encoding='utf-8')
- file_data=file.read()
- file.close()
- print(file_data)
- print("类型",type(file_data))
- #将字符串转化为字典或列表
- print("***转化yaml数据为字典或列表***")
- data=yaml.safe_load(file_data) #safe_load,safe_load,unsafe_load
- print(data)
- print("类型",type(data))
- return data
- current_path=os.path.abspath(".")
- yaml_path=os.path.join(current_path,"config.yaml")
- print('--------------------',yaml_path)
- get_yaml_data(yaml_path)
- #yaml文件中含多个文档时,分别获取文档中数据
- def get_yaml_load_all(yaml_file):
- #打开文件
- file=open(yaml_file,'r',encoding='utf-8')
- file_data=file.read()
- file.close()
- all_data=yaml.load_all(file_data,Loader=yaml.FullLoader)
- for data in all_data:
- print('data-----',data)
- current_path=os.path.abspath(".")
- yaml_path=os.path.join(current_path,"configall.yaml")
- get_yaml_load_all(yaml_path)
- #生成yaml文档
- def generate_yaml_doc(yaml_file):
- py_ob={"school":"zhang",
- "students":['a','b']}
- file=open(yaml_file,'w',encoding='utf-8')
- yaml.dump(py_ob,file)
- file.close()
- current_path=os.path.abspath(".")
- yaml_path=os.path.join(current_path,"generate.yaml")
- generate_yaml_doc(yaml_path)
执行结果

原文:https://www.jianshu.com/p/eaa1bf01b3a6
python 使用yaml模块的更多相关文章
- python中yaml模块的使用
1.yaml库的导入 经过尝试,发现在python2 和python3语言环境下,安装yaml库的命令行语句不一样. python2: pip install yaml python3:pip ins ...
- python之yaml模块和ddt模块
aml文件是专门用来写配置文件的语言,非常简洁和强大,远比json格式方便. 在PC中新建一个yml/yaml为为缩略名的文件,输入信息见下图 新建一个py文件处理yml文件,直接处理成字典格式 缩进 ...
- python的logging模块之读取yaml配置文件。
python的logging模块是用来记录应用程序的日志的.关于logging模块的介绍,我这里不赘述,请参见其他资料.这里主要讲讲如何来读取yaml配置文件进行定制化的日志输出. python要读取 ...
- Python yaml模块
引用自:https://www.cnblogs.com/shaosks/p/7344771.html 一.简介 YAML 语言(发音 /ˈjæməl/ )的设计目标,就是方便人类读写.它实质上是一种通 ...
- day6 ConfigParser模块 yaml模块
yaml模块: python可以处理yaml文件,yaml文件安装的方法为:$ pip3 install pyyaml configparser模块,用来处理文件的模块,可以实现文件的增 ...
- python(五)常用模块学习
版权声明:本文为原创文章,允许转载,转载时请务必以超链接形式标明文章 原始出处 .作者信息和本声明. https://blog.csdn.net/fgf00/article/details/52357 ...
- Python中logging模块的基本用法
在 PyCon 2018 上,Mario Corchero 介绍了在开发过程中如何更方便轻松地记录日志的流程. 整个演讲的内容包括: 为什么日志记录非常重要 日志记录的流程是怎样的 怎样来进行日志记录 ...
- Python大佬告诉你:使用Python处理yaml格式的数据简单到爆
一.思考❓❔ 1.什么是yaml? 不是标记语言 对用户极其友好 数据序列化标准 跨语言 所有编程语言都支持 跨平台 所有平台都支持 Windows.linux.Mac 格式简单 比json小姐姐穿得 ...
- Python中Pyyaml模块的使用
一.YAML是什么 YAML是专门用来写配置文件的语言,远比JSON格式方便. YAML语言的设计目标,就是方便人类读写. YAML是一种比XML和JSON更轻的文件格式,也更简单更强大,它可以通过缩 ...
随机推荐
- Design:设计(活动)百科
ylbtech-Design:设计(活动)百科 设计是把一种设想通过合理的规划.周密的计划.通过各种感觉形式传达出来的过程.人类通过劳动改造世界,创造文明,创造物质财富和精神财富,而最基础.最主要的创 ...
- 【HTTP】http请求url参数包含+号,被解析为空格
项目技术:Angular 6 问题现象:接口传参的时候,使用 httpClient.post 方法提交数据,字段中包含+号被解析成空格,提交数据错误 解决过程: 1.http请求中包含+号,会被自动解 ...
- springCloud的使用09-----高可用的注册中心
思路:创建多个注册中心,在他们的配置文件中配置相互之间的注册 1 在eureka-server项目的resources目录下创建两个配置文件application-peer1.yml和applicat ...
- kubernetes里面有时候centos源用不了
kubernetes里面有时候centos源用不了,快速配一个阿里云的源. mkdir /etc/yum.repos.d/yangback;mv /etc/yum.repos.d/* /etc/yum ...
- nginx之域名重定向
一般网站默认的访问端口为80,当多个域名指向同一个服务器IP时,可以nginx进行重定向,分别指向不同的目的地址或其他主机. 在nginx目录下的conf/vhost子目录下建两个conf文件,hos ...
- elasticsearch relevance score相关性评分的计算
一.多shard场景下relevance score不准确问题 1.问题描述: 多个shard下,如果每个shard包含指定搜索条件的document数量不均匀的情况下,会导致在某个shard上doc ...
- IO复用: select 和poll 到epoll
linux 提供了select.poll和epoll三种接口来实现多路IO复用.下面总结下这三种接口. select 该函数允许进程指示内核等待多个事件中的任何一个发生,并只在有一个或多个事件发生或经 ...
- springboot 2.x相关配置
1.在配置文件中进行配置 #############指定项目中所有的日期类型返回json格式########### spring.jackson.date-format=yyyy-MM-dd HH:m ...
- Tornado中异步框架的使用
tornado的同步框架与其他web框架相同都是处理先来的请求,如果先来的请求阻塞,那么后面的请求也会处理不了.一直处于等待过程中.但是请求一旦得到响应,那么: 请求发送过来后,将需要的本站资源直接返 ...
- vue video全屏播放
需求: 1.视频为长方形,页面初始化打开为横屏全屏播放视频. 2.微信不支持自动播放,故自动播放需求删除. 方法: 1.vue-video-player插件 因需求较简单,仅要求播放本地一个视频,故未 ...
