《Using Python to Access Web Data》Week4 Programs that Surf the Web 课堂笔记
Coursera课程《Using Python to Access Web Data》 密歇根大学
Week4 Programs that Surf the Web
12.3 Unicode Characters and Strings
Representing Simple Strings
使用ASCII码,每个字符都被一个0到256的数字表示来存在8bits的内存里。
使用ord()函数可以查询,指定字符所对应的ASCII码。
>>> print(ord('H'))

72

>>> print(ord('e'))

101

>>> print(ord('\n'))

10
Multi-Byte Characters
unicode是为了解决之前编码只考虑英文字符的问题而出现的,因为以前的ASCII码只使用一个字节来表示字符,所以它最多也只能表示256个字符, 如果只使用英文是够用的,但是事实是世界要发展,所以出现各种字符,那么它就不够用了。于是就出现了许多的编码方式,例如中国就出了GBK编码。 但是这是不适于国家与国家之间的交流的,于是ISO就指定了unicode这个编码标准。
unicode现在通常是使用两个字节来表示一个字符,但是其实它可以被看成一个字符集,它将所有字符都定义了一个唯一的ID,这样网络就能有一个统一的字符表,不再出现之前的需要相互转化的问题。
那么新的问题就是直接使用unicode来表示字符时,它有时候会浪费空间,在编码表中靠前的字符,例如英文字符,它前一字节就是0000,后一字节才是它真正的序号。 于是,在网络传输中,由于网络带宽并没有这么的理想,大家肯定就会嫌弃unicode编码浪费带宽,所以,于1992年创建,由Ken Thompson创建了UTF传输标准,它的全名是Unicode Transformation Format,这个全名就能明白了UTF的意思。
UTF是针对unicode的一种网络传输标准,按照我们通信的人来说,它就是一种针对unicode的编码方式。 它现在有UTF-7、UTF-7.5、UTF-8、UTF-16、UTF-32几种格式,当然现在最为流行的就是其中的UTF-8。 它是一种变长的编码方式,这样就能减少网络传输中的数据量,所以在网络传输中,大家都用它。
Two Kinds of Strings in Python
# python 2.7.10

>>> x = '我爱你'

>>> type(x)

<type 'str'>

>>> x = u'我爱你'

>>> type(x)

<type 'unicode'>

# python 3.5.1

>>> x = '我爱你'

>>> type(x)

<class 'str'>

>>> x = u'我爱你'

>>> type(x)

<class 'str'>
Python2 Versus Python3
# Python 2.7.10

>>> x = b'abc'

>>> type(x)

<type 'str'>

>>> x = '我爱你'

>>> type(x)

<type 'str'>

>>> x = u'我爱你'

>>> type(x)

<type 'unicode'>

# Python 3.5.1

>>> x = b'abc'

>>> type(x)

<class 'bytes'>

>>> x = '我爱你'

>>> type(x)

<class 'str'>

>>> x = u'我爱你'

>>> type(x)

<class 'str'>
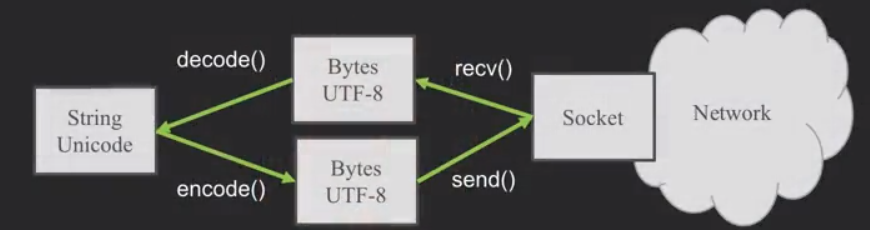
在python3内部,所有的字符都是unicode编码,unicode与UTF-8并不能直接通用,所有在字符出入的时候就要加上encode()与decode()。
Python Strings to Bytes
当我们与外部资源通信时,比如说一个网络socket,我们就要发送bytes。所以我们要把Python3的strings来encode。
当我们读取外部资源发来的数据时,我们就要把它decode变成strings。
while True:

    data = mysock.recv(512)

    if (len(data) < 1):

        break

    mystring = data.decode()

    print(mystring)
也就是说,在网络上大家用bytes(它包含UTF-8等)交流,而在自己的程序里使用unicode。
12.4 Retrieving Web Pages
Using urllib in Python
由于HTTP现在太普遍了,所以我们有一个库可以做所有的socket工作,以及让网页看起来像文件一样。
import urllib.request, urllib.parse, urllib.error

fhand = urllib.request.urlopen('http://data.pr4e.org/romeo.txt')

for line in fhand:

    print(line.decode().strip())
这个urllib.request.urlopen()函数看起来就跟打开文件一样。
Reading Web Pages
import urllib.request,urllib.parse,urllib.error

fhand = urllib.request.urlopen('http://www.dr-chuck.com/page1.htm')

for line in fhand:

    print(line.decode().strip())
输出结果
<h1>The First Page</h1>

<p>If you like, you can switch to the <ahref="http://www.dr-chuck.com/page2.htm">Second Page</a>

</p>
其实读取html文件是一样的。
12.5 Parsing Web Pages
What is Web Scraping?
网络数据采集。使用搜索引擎来采集网页数据,我们叫"spidering the web"或者"web crawling"。
The Easy Way - Beautiful Soup
BeautifulSoup是一个额外的模块,可以使用pip来安装。
pip install bs4
具体的用处,官方解释如下
Beautiful Soup提供一些简单的、python式的函数用来处理导航、搜索、修改分析树等功能。它是一个工具箱,通过解析文档为用户提供需要抓取的数据,因为简单,所以不需要多少代码就可以写出一个完整的应用程序。
Beautiful Soup自动将输入文档转换为Unicode编码,输出文档转换为utf-8编码。你不需要考虑编码方式,除非文档没有指定一个编码方式,这时,Beautiful Soup就不能自动识别编码方式了。然后,你仅仅需要说明一下原始编码方式就可以了。
Beautiful Soup已成为和lxml、html6lib一样出色的python解释器,为用户灵活地提供不同的解析策略或强劲的速度。
import urllib.request,urllib.parse,urllib.error

from bs4 import BeautifulSoup

url = input('Enter -')

html = urllib.request.urlopen(url).read()

soup = BeautifulSoup(html, 'html.parser')

# Retrieve all of the anchor tags

tags = soup('a')

for tag in tags:

    print(tag.get('href',None))
其中第6行的soup = BeautifulSoup(html, 'html.parser')代码,就是把我们的html文件处理成了一个soup对象.
第9行的tags = soup('a')是把html文件中的anchor tag读成了一个anchor tag的list。
而第11行的tag对象相当于一个字典,可以获取'href'或None的值。
再复杂的学习可以参看三夜灯的blog文章(文后参考2)
Worked Example: BeautifulSoup
# To run this, you can install BeautifulSoup

# https://pypi.python.org/pypi/beautifulsoup4

# Or download the file

# http://www.py4e.com/code3/bs4.zip

# and unzip it in the same directory as this file

import urllib.request, urllib.parse, urllib.error

from bs4 import BeautifulSoup

import ssl

# Ignore SSL certificate errors

ctx = ssl.create_default_context()

ctx.check_hostname = False

ctx.verify_mode = ssl.CERT_NONE

url = input('Enter - ')

html = urllib.request.urlopen(url, context=ctx).read()

soup = BeautifulSoup(html, 'html.parser')

# Retrieve all of the anchor tags

tags = soup('a')

for tag in tags:

    print(tag.get('href', None))
作业:Scraping HTML Data with BeautifulSoup
# To run this, you can install BeautifulSoup

# https://pypi.python.org/pypi/beautifulsoup4

# Or download the file

# http://www.py4e.com/code3/bs4.zip

# and unzip it in the same directory as this file

from urllib.request import urlopen

from bs4 import BeautifulSoup

import ssl

# Ignore SSL certificate errors

ctx = ssl.create_default_context()

ctx.check_hostname = False

ctx.verify_mode = ssl.CERT_NONE

url = input('Enter - ')

html = urlopen(url, context=ctx).read()

soup = BeautifulSoup(html, "html.parser")

# Retrieve all of the anchor tags

tags = soup('span')

count = 0

sum = 0

for tag in tags:

    # Look at the parts of a tag

   sum = sum + int(tag.contents[0])

   count += 1

print ('Count ',count)

print('Sum ', sum)
使用的是python3与bs4。
作业:Following Links in HTML Using BeautifulSoup
# To run this, you can install BeautifulSoup

# https://pypi.python.org/pypi/beautifulsoup4

# Or download the file

# http://www.py4e.com/code3/bs4.zip

# and unzip it in the same directory as this file

import urllib.request, urllib.parse, urllib.error

from bs4 import BeautifulSoup

import ssl

import re

# Ignore SSL certificate errors

ctx = ssl.create_default_context()

ctx.check_hostname = False

ctx.verify_mode = ssl.CERT_NONE

count = int(input("Enter count:"))

position = int(input("Enter position:"))

first_name = input("Start with:")

def retrievinghtml(name):

	url = "http://py4e-data.dr-chuck.net/known_by_%s.html"%(name)

	html = urllib.request.urlopen(url, context=ctx).read()

	soup = BeautifulSoup(html, 'html.parser')

	# Retrieve all of the anchor tags

	tags = soup('a')

	temp_tag = tags[position-1]

	temp_site = temp_tag.get('href', None)

	temp_name = (re.findall('known_by_(\S+).html',temp_site))[0]

	print("Retrieving: "+"http://py4e-data.dr-chuck.net/known_by_%s.html"%(temp_name))

	return temp_name

name = []

name.append(first_name)

print("Retrieving: "+"http://py4e-data.dr-chuck.net/known_by_%s.html"%(first_name))

for i in range(count):

	temp_name = retrievinghtml(name[i])

	name.append(temp_name)

print(name)
使用的仍然是python3与bs4。
【参考】
[1]龙的博客
《Using Python to Access Web Data》Week4 Programs that Surf the Web 课堂笔记的更多相关文章
- Python Web-第四周-Programs that Surf the Web(Using Python to Access Web Data)
1.Understanding HTML 1.最简单的爬虫 import urllib fhand=urllib.urlopen('http://www.dr-chuck.com/page1.htm' ...
- Python Web-第二周-正则表达式(Using Python to Access Web Data)
0.课程地址与说明 1.课程地址:https://www.coursera.org/learn/python-network-data/home/welcome 2.课程全名:Using Python ...
- 【Python学习笔记】Coursera课程《Using Python to Access Web Data》 密歇根大学 Charles Severance——Week6 JSON and the REST Architecture课堂笔记
Coursera课程<Using Python to Access Web Data> 密歇根大学 Week6 JSON and the REST Architecture 13.5 Ja ...
- 【Python学习笔记】Coursera课程《Using Python to Access Web Data 》 密歇根大学 Charles Severance——Week2 Regular Expressions课堂笔记
Coursera课程<Using Python to Access Web Data > 密歇根大学 Charles Severance Week2 Regular Expressions ...
- 《Using Python to Access Web Data》 Week5 Web Services and XML 课堂笔记
Coursera课程<Using Python to Access Web Data> 密歇根大学 Week5 Web Services and XML 13.1 Data on the ...
- 《Using Python to Access Web Data》 Week3 Networks and Sockets 课堂笔记
Coursera课程<Using Python to Access Web Data> 密歇根大学 Week3 Networks and Sockets 12.1 Networked Te ...
- paip. 解决php 以及 python 连接access无效的参数量。参数不足,期待是 1”的错误
paip. 解决php 以及 python 连接access无效的参数量.参数不足,期待是 1"的错误 作者Attilax 艾龙, EMAIL:1466519819@qq.com 来源 ...
- Python之路【第十八篇】:Web框架们
Python之路[第十八篇]:Web框架们 Python的WEB框架 Bottle Bottle是一个快速.简洁.轻量级的基于WSIG的微型Web框架,此框架只由一个 .py 文件,除了Pytho ...
- Python之路【第十五篇】:Web框架
Python之路[第十五篇]:Web框架 Web框架本质 众所周知,对于所有的Web应用,本质上其实就是一个socket服务端,用户的浏览器其实就是一个socket客户端. 1 2 3 4 5 6 ...
随机推荐
- centos7 部署zabbix服务器端
zabbix服务器端搭建与部署: 1.部署LAMP环境由于zabbix提供集中的web监控管理界面,因此服务在web界面的呈现需要LAMP架构支持.php 连接mysql服务,因为7版本mysql要收 ...
- Python核心技术与实战——十三|Python中参数传递机制
我们在前面的章节里学习了Python的函数基础以及应用,那么现在想一想:传参,也就是把一些参数从一个函数传递到另一个函数,从而使其执行相应的任务,这个过程的底层是如何工作的,原理又是怎样的呢? 在实际 ...
- win7抓带tag标记报文
1. 本地连接 ,右键→属性→高级→属性里选择“优先级和 VLAN” ,看右 边的 “值” 是不是已经启用, 没有启用的话就启用它. (如果没有这个选项, 那你可能要把网卡驱动升个高版本的了. ) ...
- centos6.5下修改系统的roo用户/非root用户的密码
1.修改系统root用户的密码 [........~]# passwd然后输入新密码,若提示密码太简单,无需理会,直接敲回车: 然后再次输入新密码,即可修改成功. 2.修改系统非root用户的密码:e ...
- Gym-100923I-Por Costel and the Pairs(数学,思维)
链接: https://vjudge.net/problem/Gym-100923I 题意: We don't know how Por Costel the pig arrived at FMI's ...
- 风控MIS那些事
信贷风险管理应基于数据进行决策,MIS则是通过对数据的加工与展示,给决策者提供参考. 管理信息系统(ManagementInformation System,MIS)是进行信息的 收集.传输.加工.储 ...
- iOS画线段
CGContextRef context = UIGraphicsGetCurrentContext(); //设置线条类型 CGContextSetLineCap(context, kCGLineC ...
- jmeter测试文件上传功能
最近为了完成自动化KPI开始慢慢接触jmeter,其中遇到了不少问题,今天就遇到了文件上传的问题,在这里记录下加深记忆,也可供jmeter初级使用者作为一个参考.另外论坛上已有同事发过关于jmeter ...
- input框与img在同一行对齐
将input和img放同一行,img标签总是比input高出一个头,难看.后来在网站搜到最多的就是给img添加一个align="absmiddle"属性,这个方法似乎的确可行,但是 ...
- Codeforces 963A Alternating Sum ( 思维 && 数论 )
题意 : 题目链接 分析 : Tutorial 讲的很清楚 至于为什么这样去考虑 算是一个经验问题吧 如果一个问题要你给出模意义下的答案 就多考虑一下答案是要用逆元构造出来 也就说明有除法的存在 那么 ...