在windows上安装nginx
在windows上安装nginx并注册
一、前言
最近自己也尝试了一下在windows上安装nginx,其实非常的简单,这里算是备忘一下。
二、在windows下面安装
首先需要到nginx的官网上下载最新版的nginx:http://nginx.org/en/download.html
找到最新版本下载即可:

至于后面的pgp,其实是一种密钥机制(pretty good privacy)。
下载之后,我们发现这个文件是不用安装的,也就是不需要在windows的注册表中注册的,因此我们可以直接使用,如果大家有使用过masm之类的汇编软件,相信大家会理解的,之后,我们就可以直接在cmd中运行了,这个时候可能会出现问题,其中一个问题是闪退。
闪退的原因有很多种,我们要注意查看日志文件:
如果大家遇到下图中我画出的问题:
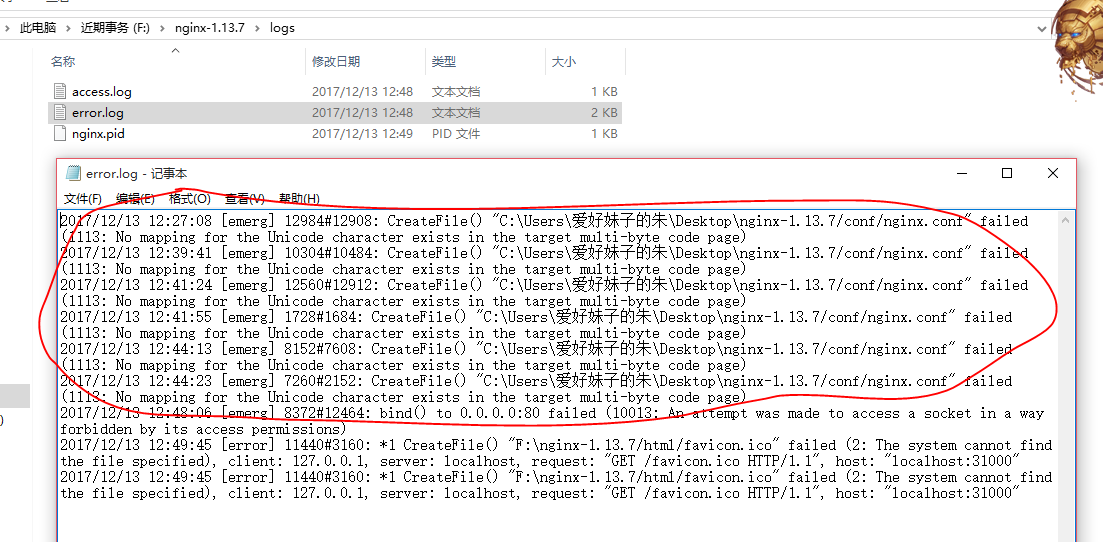
// :: [emerg] #: CreateFile() "C:\Users\爱好妹子的朱\Desktop\nginx-1.13.7/conf/nginx.conf" failed (: No mapping for the Unicode character exists in the target multi-byte code page)
那么原因其实很简单,我们读了日志之后就能理解,不能映射编码,说明我们肯定是在路径中有中文字符,也就是我们的文件存放目录一定不能是中文的,要不然肯定会闪退的。
解决办法就是把下载的文件放到全英文的目录之中。
还有一个错误是:

绑定端口异常,那肯定呀,80端口是默认让http协议使用的,我们这里肯定不能占用,同时我们也可以回忆一下常用的端口,比如HTTPS(443),ftp(20,21)等等。
解决办法也很简单,只需要在NGINX中修改一下配置即可:
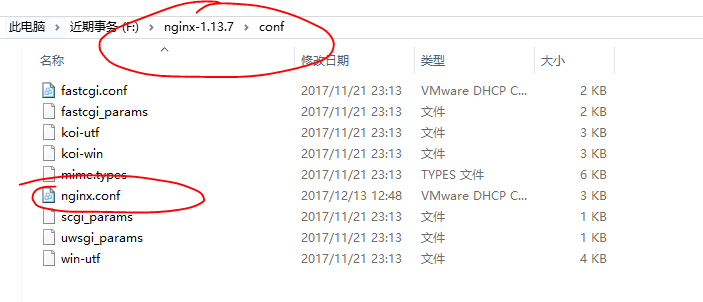
我们在sublime中打开该文件:
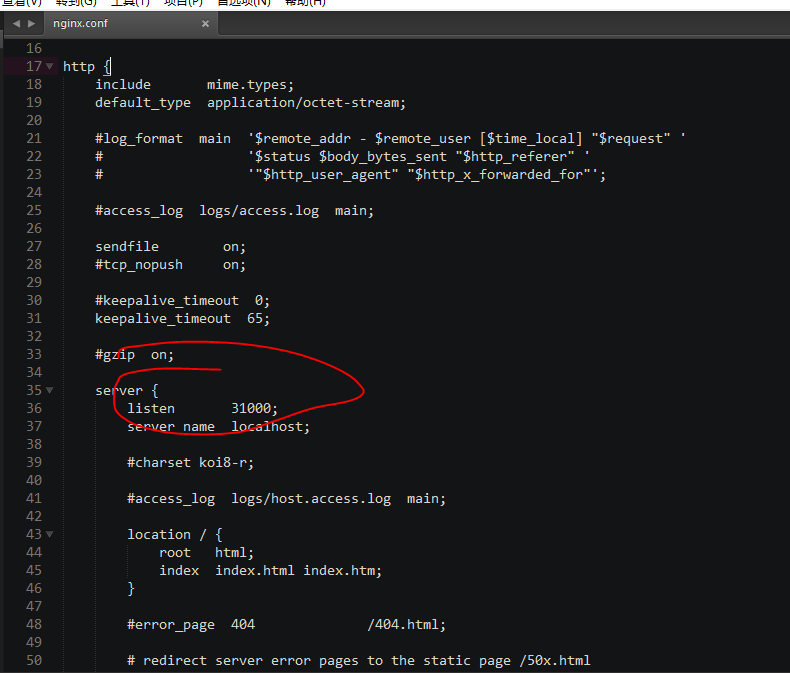
就可以看到相应的配置信息,比如IP地址和端口,这里笔者已经改成了一个大于1024的端口了(其他任意)。
让我们仔细看一下配置文件,我们以后的很多操作都可以从中配置:
   #user  nobody;

   worker_processes  ;

   #error_log  logs/error.log;

   #error_log  logs/error.log  notice;

   #error_log  logs/error.log  info;

   #pid        logs/nginx.pid;

  events {

      worker_connections  ;

  }

  http {

      include       mime.types;

      default_type  application/octet-stream;

      #log_format  main  '$remote_addr - $remote_user [$time_local] "$request" '

      #                  '$status $body_bytes_sent "$http_referer" '

      #                  '"$http_user_agent" "$http_x_forwarded_for"';

      #access_log  logs/access.log  main;

      sendfile        on;

      #tcp_nopush     on;

      #keepalive_timeout  ;

      keepalive_timeout  ;

      #gzip  on;

      server {

          listen       ;

          server_name  localhost;

          #charset koi8-r;

          #access_log  logs/host.access.log  main;

          location / {

              root   html;

              index  index.html index.htm;

          }

          #error_page                /.html;

          # redirect server error pages to the static page /50x.html

          #

          error_page        /50x.html;

          location = /50x.html {

              root   html;

          }

          # proxy the PHP scripts to Apache listening on 127.0.0.1:

          #

          #location ~ \.php$ {

          #    proxy_pass   http://127.0.0.1;

          #}

          # pass the PHP scripts to FastCGI server listening on 127.0.0.1:

          #

          #location ~ \.php$ {

          #    root           html;

          #    fastcgi_pass   127.0.0.1:;

          #    fastcgi_index  index.php;

          #    fastcgi_param  SCRIPT_FILENAME  /scripts$fastcgi_script_name;

          #    include        fastcgi_params;

          #}

          # deny access to .htaccess files, if Apache's document root

          # concurs with nginx's one

          #

          #location ~ /\.ht {

          #    deny  all;

          #}

      }

      # another virtual host using mix of IP-, name-, and port-based configuration

      #

      #server {

      #    listen       ;

      #    listen       somename:;

      #    server_name  somename  alias  another.alias;

      #    location / {

      #        root   html;

      #        index  index.html index.htm;

      #    }

      #}

      # HTTPS server

      #

      #server {

      #    listen        ssl;

      #    server_name  localhost;

     #    ssl_certificate      cert.pem;

     #    ssl_certificate_key  cert.key;

     #    ssl_session_cache    shared:SSL:1m;

     #    ssl_session_timeout  5m;

     #    ssl_ciphers  HIGH:!aNULL:!MD5;

     #    ssl_prefer_server_ciphers  on;

     #    location / {

     #        root   html;

     #        index  index.html index.htm;

     #    }

     #}

 }
三、将nignx注册成服务
如果我们经常使用,那么在cmd之中启动是非常不方便的,因此,我们可以将其注册成服务。
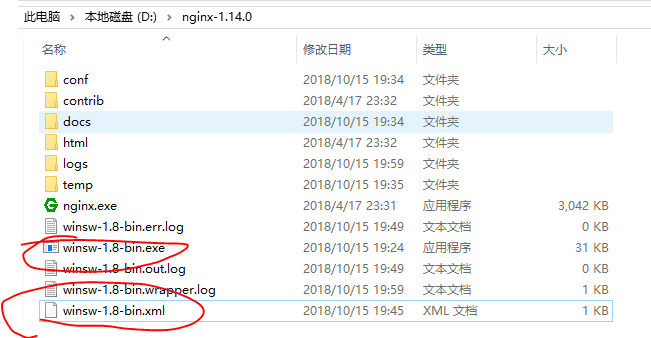
首先我们下载Windows Service Wrapper(比如winsw-1.8-bin.exe)服务注册工具,然后将这个工具放到ngnix安装目录之下,然后新建一个文件,这个文件的文件名需要和我们的服务注册工具一致,也就是说如果把服务注册工具重命名,那么这个文件也需要重命名(winsw-1.8-bin.xml):
 <?xml version="1.0" encoding="UTF-8" ?>

 <service>

 <id>nginx</id>

 <name>zyrNginx Service</name>

 <description>High Performance Nginx Service  朱彦荣 zyr</description>

 <executable>D:\nginx-1.14.\nginx.exe</executable>

 <logpath>D:\nginx-1.14.\</logpath>

 <logmode>roll</logmode>

 <depend></depend>

 <startargument>-p D:\nginx-1.14.</startargument>

 <stopargument>-p D:\nginx-1.14. -s stop</stopargument>

 </service>
注意上面的文件我们要修改nginx存放的目录,以及相关的配置。
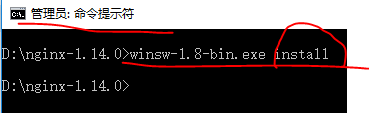
然后我们在命令行(管理员模式,不然权限不够)中,将该服务注册到windows系统之中:
最后我们打开任务管理器中的服务,可以发现我们自己命名的服务已经出现了:


在windows上安装nginx的更多相关文章
- 在windows上安装nginx并注册
在windows上安装nginx并注册 一.前言 最近自己也尝试了一下在windows上安装nginx,其实非常的简单,这里算是备忘一下. 二.在windows下面安装 首先需要到nginx的 ...
- 在Linux和Windows系统上安装Nginx服务器的教程
在Linux和Windows系统上安装Nginx服务器的教程 1.在CentOS系统上安装Nginx 在 CentOS6 版本的 EPEL 源中,已经加入了 nginx 的 rpm 包,不过此 RP ...
- Windows 编译安装 nginx 服务器 + rtmp 模块
有关博客: <Windows 编译安装 nginx 服务器 + rtmp 模块>.<Ubuntu 编译安装 nginx>.<Arm-Linux 移植 Nginx> ...
- WordPress安装篇(2):用宝塔面板在Windows上安装WordPress
上一篇文章介绍了如何使用PHPStudy工具在Windows Server环境安装WordPress,接下来介绍一款更加强大的部署WordPress的集成工具--宝塔面板.宝塔面板不仅提供免费版本,还 ...
- 在Windows上安装Elasticsearch 5.0
在windows上安装Elasticsearch Elasticsearch可以使用.zip软件包安装在Windows上. elasticsearch-service.bat命令,它将设置Elasti ...
- 在 Windows 上安装Rabbit MQ 指南
rabbitMQ是一个在AMQP协议标准基础上完整的,可服用的企业消息系统.他遵循Mozilla Public License开源协议.采用 Erlang 实现的工业级的消息队列(MQ)服务器. Ra ...
- windows下安装nginx
说起开发,自己感到非常惭愧,由于公司让我给<绿电侠>项目写整体架构解决方案,才开始接触nginx这个东东,突然觉得它是一把非常好的利器. 本文主要记录在windows下安装nginx,另参 ...
- 在Windows上安装虚拟机详细图文教程
用虚拟机来安装最新的软件,安装最新的系统等等比较保险,可以避免安装不顺利影响自己原来的系统和应用,想尝鲜又担心自己完全更换系统不适应的朋友可以尝试. 虚拟机下载:https://yunpan.cn/c ...
- 在windows上安装ASP.NET 5(译文)
本文将介绍如何在windows上安装ASP.NET5,包括单独安装和通过Visual Studio 2015 安装. 本文包括: 通过Visual Studio安装ASP.NET 单独安装ASP.NE ...
随机推荐
- sass和compass实战 读书笔记(一)
sass优势: 不做重复的工作 一 消除样式表冗余(通过变量赋值的方式) 1. 通过变量来复用属性值 2. 使用嵌套来快速写出多层级的选择器 3. 通过混合器来复用一段样式 4. 使用选择器继承来避 ...
- linux下安装python3
不建议卸载python2 可能会导致系统内其他软件无法使用 1.下载 wget https://www.python.org/ftp/python/3.6.0/Python-3.6.0a1.tar.x ...
- python 导入模块错误
问题: 导入一些模块或者运行第三方软件的时候,会出现一下类似错误: ImportError: No module named future.utils 问题原因: 没有安装第三方库 future,这个 ...
- python_9_集合
什么是集合? --一种无序,没有重复元素的一种数据类型 -- 形式: {元素1,元素2,......} 如何把一个列表变成一个集合? --set(列表) ...
- centos7 下搭建hadoop2.9 分布式集群
首先说明,本文记录的是博主搭建的3节点的完全分布式hadoop集群的过程,环境是centos 7,1个nameNode,2个dataNode,如下: 1.首先,创建好3个Centos7的虚拟机,具体的 ...
- java面向对象基础(二)
*/ .hljs { display: block; overflow-x: auto; padding: 0.5em; color: #333; background: #f8f8f8; } .hl ...
- ajax请求获取实时数据
<!DOCTYPE html> <html lang="en" xmlns="http://www.w3.org/1999/xhtml"> ...
- https原理及实践
转载请注明出处 安全知识 网络安全问题 数据机密性 在网络传输数据信息时,对数据的加密是至关重要的,否则所有传输的数据都是可以随时被第三方看到,完全没有机密性可言. 数据机密性解决问题思路 利用算法 ...
- dom4j读取xml
-----记录和回顾是一个比学习更重要的环节----- 一.首先,我们需要知道xml是做什么的 1.作为软件的配置文件 2.作为数据的载体(小型的数据库) 二.xml的语法 xml文件以xml后缀名结 ...
- BZOJ 2707: [SDOI2012]走迷宫 [高斯消元 scc缩点]
2707: [SDOI2012]走迷宫 题意:求s走到t期望步数,\(n \le 10^4\),保证\(|SCC| \le 100\) 求scc缩点,每个scc高斯消元,scc之间直接DP 注意每次清 ...