Gatling简单测试SpringBoot工程


前言
Gatling是一款基于Scala 开发的高性能服务器性能测试工具,它主要用于对服务器进行负载等测试,并分析和测量服务器的各种性能指标。目前仅支持http协议,可以用来测试web应用程序和RESTful服务。
除此之外它拥有以下特点:
支持Akka Actors 和 Async IO,从而能达到很高的性能
支持实时生成Html动态轻量报表,从而使报表更易阅读和进行数据分析
支持DSL脚本,从而使测试脚本更易开发与维护
支持录制并生成测试脚本,从而可以方便的生成测试脚本
支持导入HAR(Http Archive)并生成测试脚本
支持Maven,Eclipse,IntelliJ等,以便于开发
支持Jenkins,以便于进行持续集成
支持插件,从而可以扩展其功能,比如可以扩展对其他协议的支持
开源免费
依赖工具
Maven
JDK
Intellij IDEA
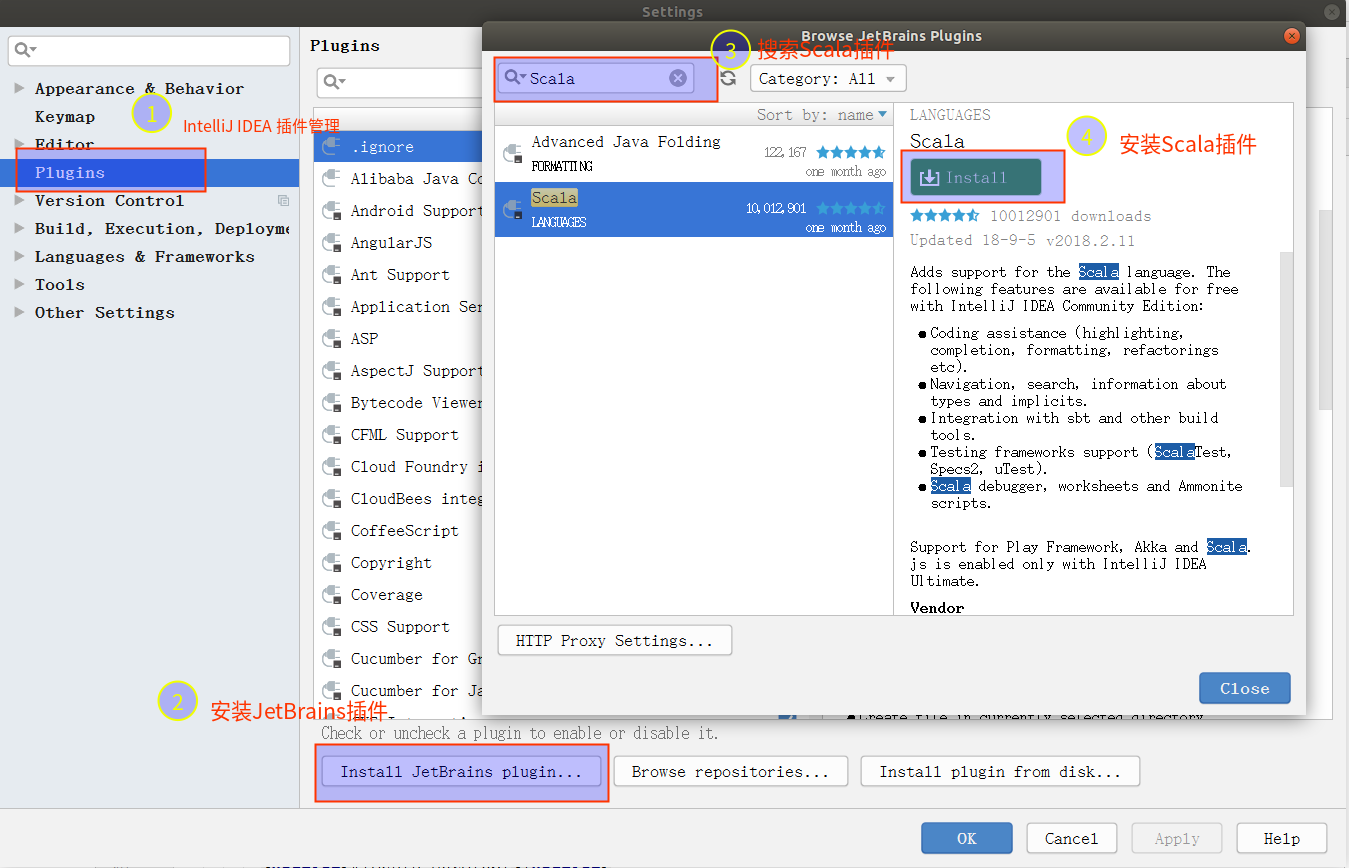
安装Scala插件
打开 IDEA ,点击【IntelliJ IDEA】 -> 【Preferences】 -> 【Plugins】,搜索 “Scala”,搜索到插件然后点击底部的 【Install JetBrains plugin…】安装重启即可。

Gatling Maven工程
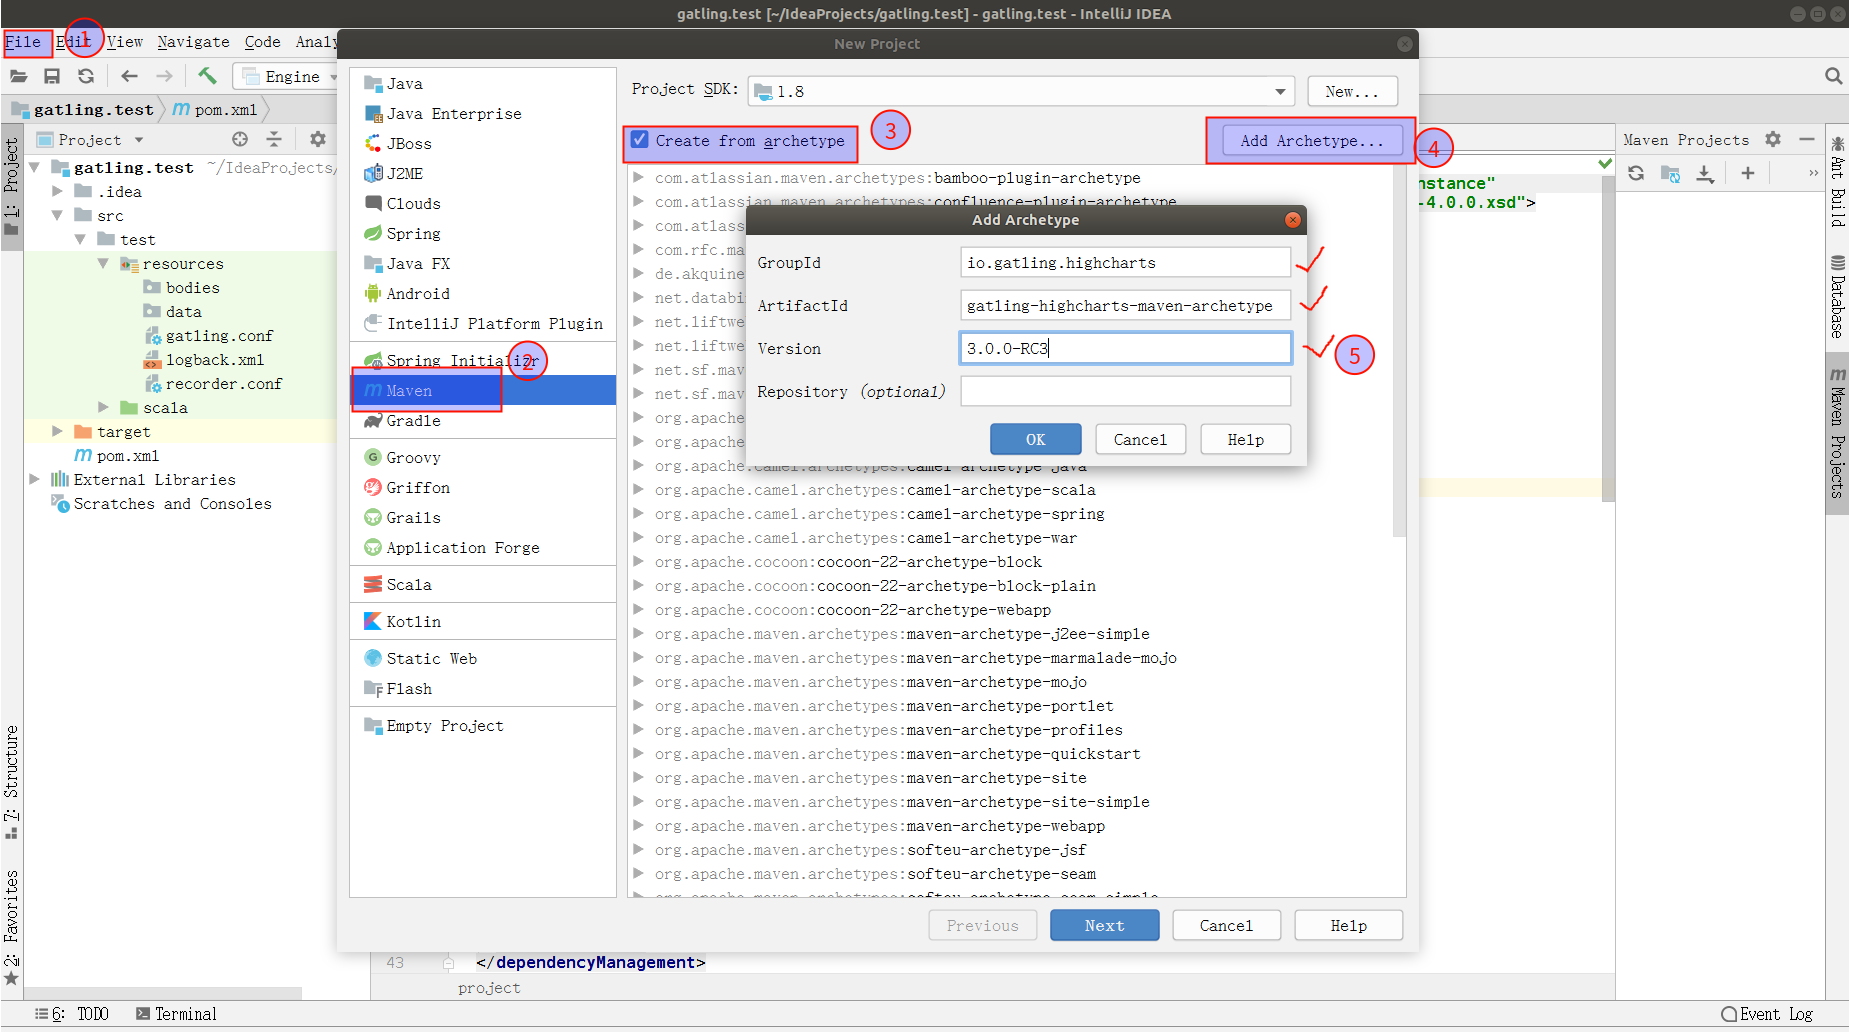
创建Gatling提供的gatling-highcharts-maven-archetype,
在 IntelliJ中选择 New Project -> Maven -> Create form archetype -> Add Archetype,在弹出框中输入一下内容:
 GroupId: io.gatling.highcharts

 ArtifactId: gatling-highcharts-maven-archetype

 Version: 3.0.0-RC3
点击查看最新版本: 最新版本
之后输入你项目的GroupId(包名)和ArtifactId(项目名)来完成项目创建,
项目创建完成后,Maven会自动配置项目结构。


注:在创建的工程,修改pom.xml文件,添加如下配置,加快构建速度:
 <repositories>

      <repository>

        <id>public</id>

        <name>aliyun nexus</name>

        <url>http://maven.aliyun.com/nexus/content/groups/public/</url>

        <releases>

          <enabled>true</enabled>

        </releases>

      </repository>

    </repositories>

    <pluginRepositories>

      <pluginRepository>

        <id>public</id>

        <name>aliyun nexus</name>

        <url>http://maven.aliyun.com/nexus/content/groups/public/</url>

        <releases>

          <enabled>true</enabled>

        </releases>

        <snapshots>

          <enabled>false</enabled>

        </snapshots>

      </pluginRepository>

    </pluginRepositories>
工程项目目录
工程项目结构如下图:
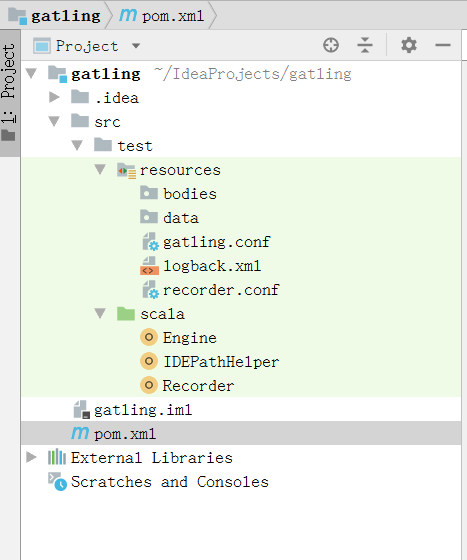

项目目录说明:
bodies:用来存放请求的body数据
data:存放需要输入的数据
scala:存放Simulation脚本
Engine:右键运行跟运行
bin\gatling.bat和bin\gatling.sh效果一致Recorder:右键运行跟运行
bin\recorder.bat和bin\recorder.sh效果一致,录制的脚本存放在scala目录下target:存放运行后的报告
至此就可以使用IntelliJ愉快的开发啦。
Gatling测试SpringBoot
Gatling基于Scala开发的压测工具,我们可以通过录制自动生成脚本,也可以自己编写脚本,大家不用担心,首先脚本很简单常用的没几个,另外gatling封装的也很好我们不需要去专门学习Scala语法,当然如果会的话会更好。
SpringBoot测试工程示例
Maven依赖
代码如下
<parent>
<groupId>org.springframework.boot</groupId>
<artifactId>spring-boot-starter-parent</artifactId>
<version>2.0.5.RELEASE</version>
<relativePath/> <!-- lookup parent from repository -->
</parent>
<properties>
<project.build.sourceEncoding>UTF-8</project.build.sourceEncoding>
<project.reporting.outputEncoding>UTF-8</project.reporting.outputEncoding>
<java.version>1.8</java.version>
</properties>
<dependencies>
<dependency>
<groupId>org.springframework.boot</groupId>
<artifactId>spring-boot-starter-web</artifactId>
</dependency>
<dependency>
<groupId>org.springframework.boot</groupId>
<artifactId>spring-boot-starter-test</artifactId>
<scope>test</scope>
</dependency>
</dependencies>
控制层接口
代码如下:
@RestController

  public class HelloWorldController {

      @RequestMapping("/helloworld")

      public String sayHelloWorld(){

          return "hello World !";

      }

  }
浏览器演示


Gatling测试脚本编写
Gatling基于Scala开发的压测工具,我们可以通过录制自动生成脚本,也可以自己编写脚本,大家不用担心,首先脚本很简单常用的没几个,另外gatling封装的也很好我们不需要去专门学习Scala语法,当然如果会的话会更好。
脚本示例
import io.gatling.core.Predef._
import io.gatling.http.Predef._
class SpringBootSimulation extends Simulation{
//设置请求的根路径
val httpConf = http.baseUrl("http://localhost:8080")
/*
运行100秒 during 默认单位秒,如果要用微秒 during(100 millisecond)
*/
val scn = scenario("SpringBootSimulation").during(100){
exec(http("springboot_home").get("/helloworld"))
}
//设置线程数
// setUp(scn.inject(rampUsers(500) over(10 seconds)).protocols(httpConf))
setUp(scn.inject(atOnceUsers(10)).protocols(httpConf))
}
脚本编写

Gatling脚本的编写主要包含下面三个步骤
http head配置
Scenario 执行细节
setUp 组装
我们以百度为例,进行第一个GET请求测试脚本的编写,类必须继承 Simulation
配置下head,只是简单的请求下百度首页,所以只定义下请求的base url,采用默认的http配置即可
//设置请求的根路径

  val httpConf = http.baseURL("http://localhost:8080")
声明Scenario,指定我们的请求动作
val scn = scenario("SpringBootSimulation").during(100){

      exec(http("springboot_home").get("/helloworld"))

    }
scenario里的参数:scenario name exec()里的参数就是我们的执行动作,http(“本次请求的名称”).get(“本次http get请求的地址”)
设置并发数并组装
 //设置线程数

  setUp(scn.inject(atOnceUsers(10)).protocols(httpConf))
atOnceUsers:立马启动的用户数,可以理解为并发数
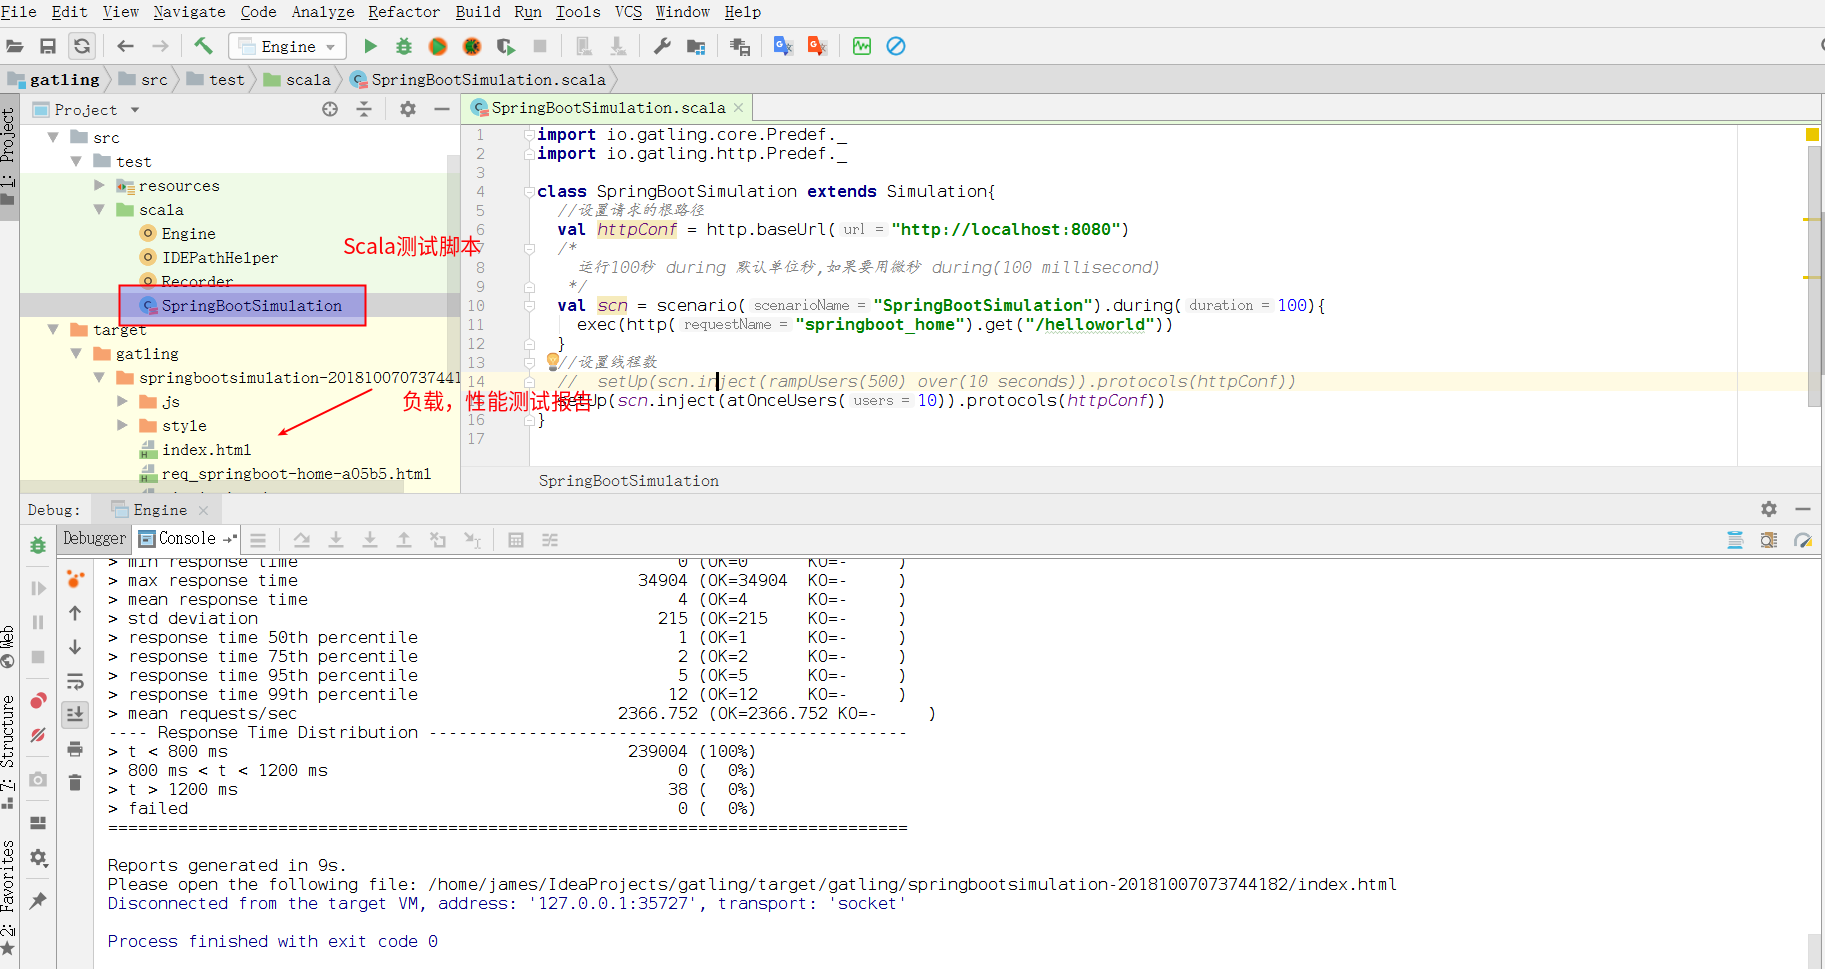
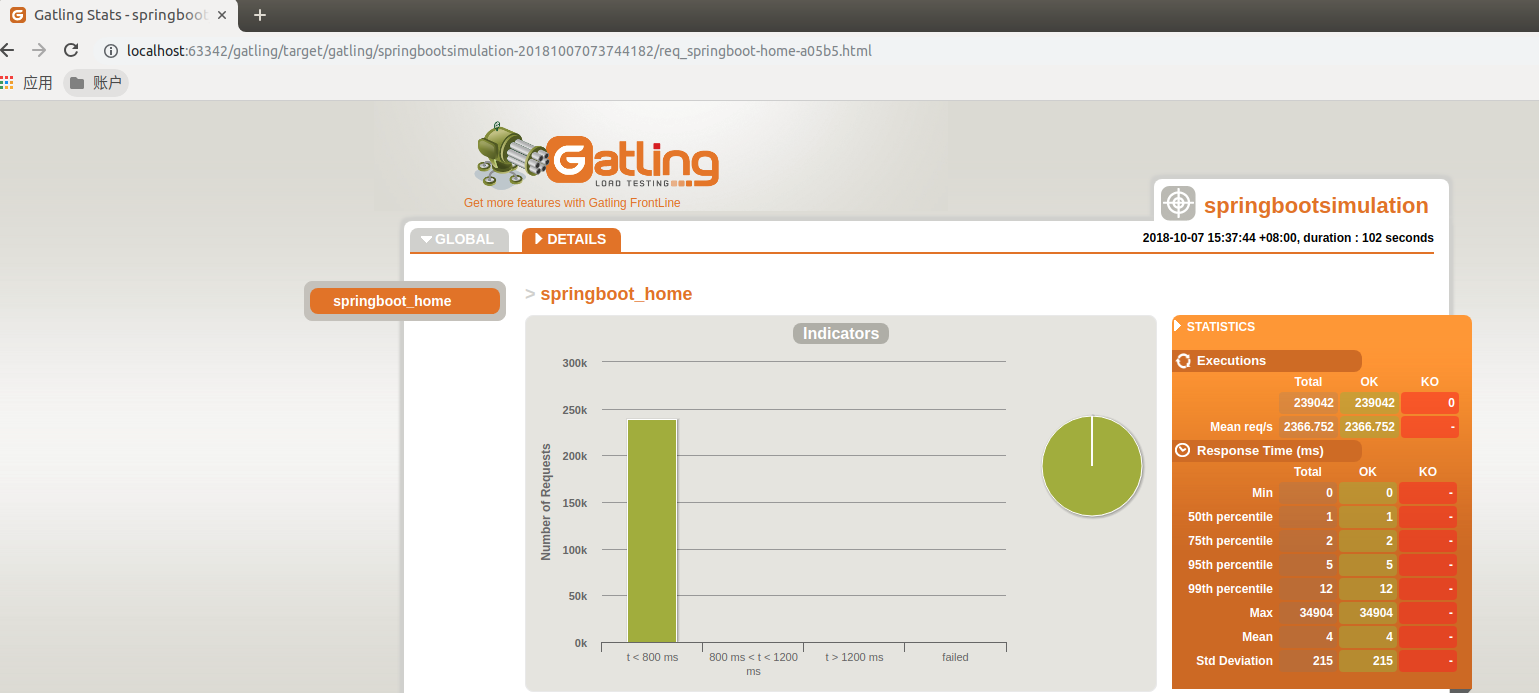
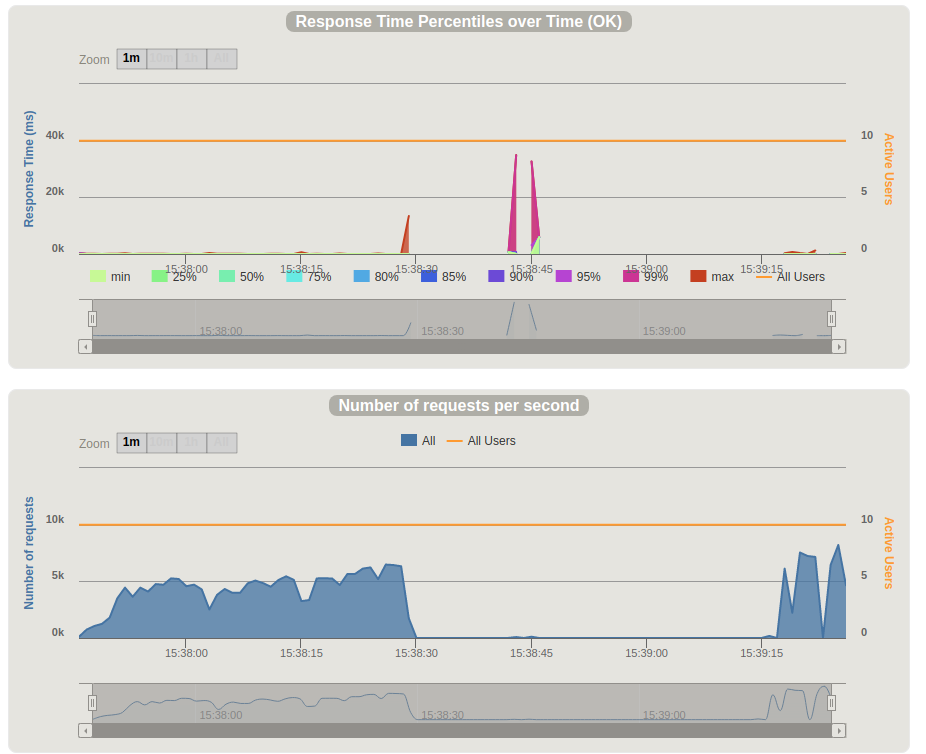
这样我们一个简单的脚本就完成了,可以运行看下效果。
部分测试报告如下:


高级教程
Injection – 注入
注入方法用来定义虚拟用户的操作
 setUp(

    scn.inject(

      nothingFor(4 seconds), //

      atOnceUsers(10), //

      rampUsers(10) over(5 seconds), //

      constantUsersPerSec(20) during(15 seconds), //

      constantUsersPerSec(20) during(15 seconds) randomized, //

      rampUsersPerSec(10) to 20 during(10 minutes), //

      rampUsersPerSec(10) to 20 during(10 minutes) randomized, //

      splitUsers(1000) into(rampUsers(10) over(10 seconds)) separatedBy(10 seconds), //

      splitUsers(1000) into(rampUsers(10) over(10 seconds)) separatedBy atOnceUsers(30), //

      heavisideUsers(1000) over(20 seconds) //

    ).protocols(httpConf)

  )
nothingFor(duration):设置一段停止的时间
atOnceUsers(nbUsers):立即注入一定数量的虚拟用户
setUp(scn.inject(atOnceUsers(50)).protocols(httpConf))
rampUsers(nbUsers) over(duration):在指定时间内,设置一定数量逐步注入的虚拟用户
setUp(scn.inject(rampUsers(50) over(30 seconds)).protocols(httpConf))
constantUsersPerSec(rate) during(duration):定义一个在每秒钟恒定的并发用户数,持续指定的时间
setUp(scn.inject(constantUsersPerSec(30) during(15 seconds)).protocols(httpConf))
constantUsersPerSec(rate) during(duration) randomized:定义一个在每秒钟围绕指定并发数随机增减的并发,持续指定时间
setUp(scn.inject(constantUsersPerSec(30) during(15 seconds) randomized).protocols(httpConf))
rampUsersPerSec(rate1) to (rate2) during(duration):定义一个并发数区间,运行指定时间,并发增长的周期是一个规律的值
setUp(scn.inject(rampUsersPerSec(30) to (50) during(15 seconds)).protocols(httpConf))
rampUsersPerSec(rate1) to(rate2) during(duration) randomized:定义一个并发数区间,运行指定时间,并发增长的周期是一个随机的值
setUp(scn.inject(rampUsersPerSec(30) to (50) during(15 seconds) randomized).protocols(httpConf))
heavisideUsers(nbUsers) over(duration):定义一个持续的并发,围绕和海维赛德函数平滑逼近的增长量,持续指定时间(译者解释下海维赛德函数,H(x)当x>0时返回1,x<0时返回0,x=0时返回0.5。实际操作时,并发数是一个成平滑抛物线形的曲线)
setUp(scn.inject(heavisideUsers(50) over(15 seconds)).protocols(httpConf))
splitUsers(nbUsers) into(injectionStep) separatedBy(duration):定义一个周期,执行injectionStep里面的注入,将nbUsers的请求平均分配
setUp(scn.inject(splitUsers(50) into(rampUsers(10) over(10 seconds)) separatedBy(10 seconds)).protocols(httpConf))
splitUsers(nbUsers) into(injectionStep1) separatedBy(injectionStep2):使用injectionStep2的注入作为周期,分隔injectionStep1的注入,直到用户数达到nbUsers
setUp(scn.inject(splitUsers(100) into(rampUsers(10) over(10 seconds)) separatedBy atOnceUsers(30)).protocols(httpConf))
循环
val scn = scenario("BaiduSimulation").

      exec(http("baidu_home").get("/"))
上面的测试代码运行时只能跑一次,为了测试效果,我们需要让它持续运行一定次数或者一段时间,可以使用下面两个方式:
repeat
  repeat(times,counterName)

  times:循环次数

  counterName:计数器名称,可选参数,可以用来当当前循环下标值使用,从0开始
 val scn = scenario("BaiduSimulation").repeat(100){

      exec(http("baidu_home").get("/"))

    }
during
during(duration, counterName, exitASAP)

  duration:时长,默认单位秒,可以加单位milliseconds,表示毫秒

  counterName:计数器名称,可选。很少使用

  exitASAP:默认为true,简单的可以认为当这个为false的时候循环直接跳出,可在

  循环中进行控制是否继续
  /*

      运行100秒 during 默认单位秒,如果要用微秒 during(100 millisecond)

     */

    val scn = scenario("BaiduSimulation").during(100){

      exec(http("baidu_home").get("/"))

    }
POST请求
post参数提交方式:
JSON方式
 import io.gatling.core.Predef._

  import io.gatling.core.scenario.Simulation

  import io.gatling.http.Predef._

  class JsonSimulation extends Simulation {

  val httpConf = http.baseURL("http://127.0.0.1:7001/tst")

  //注意这里,设置提交内容type

  val headers_json = Map("Content-Type" -> "application/json")

  val scn = scenario("json scenario")

      .exec(http("test_json")   //http 请求name

      .post("/order/get")     //post url

      .headers(headers_json)  //设置body数据格式

      //将json参数用StringBody包起,并作为参数传递给function body()

      .body(StringBody("{\"orderNo\":201519828113}")))

  setUp(scn.inject(atOnceUsers(10))).protocols(httpConf)

  }
Form方式
import io.gatling.core.Predef._

  import io.gatling.http.Predef._

  class FormSimulation extends Simulation {

  val httpConf = http

      .baseURL("http://computer-database.gatling.io")

  //注意这里,设置提交内容type

  val contentType = Map("Content-Type" -> "application/x-www-form-urlencoded")

  //声明scenario

  val scn = scenario("form Scenario")

      .exec(http("form_test") //http 请求name

      .post("/computers") //post地址, 真正发起的地址会拼上上面的baseUrl http://computer-database.gatling.io/computers

      .headers(contentType)

      .formParam("name", "Beautiful Computer") //form 表单的property name = name, value=Beautiful Computer

      .formParam("introduced", "2012-05-30")

      .formParam("discontinued", "")

      .formParam("company", "37"))

  setUp(scn.inject(atOnceUsers(1)).protocols(httpConf))
RawFileBody
  import io.gatling.core.Predef._

  import io.gatling.core.scenario.Simulation

  import io.gatling.http.Predef._

  class JsonSimulation extends Simulation {

  val httpConf = http.baseURL("http://127.0.0.1:7001/tst")

  //注意这里,设置提交内容type

  val headers_json = Map("Content-Type" -> "application/json")

  val scn = scenario("json scenario")

      .exec(http("test_json")   //http 请求name

      .post("/order/get")     //post url

      .headers(headers_json)  //设置body数据格式

      //将json参数用StringBody包起,并作为参数传递给function body()

      .body(RawFileBody("request.txt"))

  setUp(scn.inject(atOnceUsers(10))).protocols(httpConf)

  }
txt的文件内容为JSON数据,存放目录
/resources/bodies下
Feed 动态参数
Gatling对参数的处理称为Feeder[供料器],支持主要有:
数组
 val feeder = Array(

  Map("foo" -> "foo1", "bar" -> "bar1"),

  Map("foo" -> "foo2", "bar" -> "bar2"),

  Map("foo" -> "foo3", "bar" -> "bar3"))
CSV文件
val csvFeeder = csv("foo.csv")//文件路径在 %Gatling_Home%/user-files/data/JSON文件
 val jsonFileFeeder = jsonFile("foo.json")

  //json的形式:

  [

  {

      "id":19434,

      "foo":1

  },

  {

      "id":19435,

      "foo":2

  }

  ]
JDBC数据
jdbcFeeder("databaseUrl", "username", "password", "SELECT * FROM users")Redis
可参看官方文档http://gatling.io/docs/2.1.7/session/feeder.html#feeder
使用示例:
import io.gatling.core.Predef._

import io.gatling.core.scenario.Simulation

import io.gatling.http.Predef._

import scala.concurrent.duration._

/**

* region请求接口测试

*/

class DynamicTest extends Simulation {

val httpConf = http.baseURL("http://127.0.0.1:7001/test")

//地区 feeder

val regionFeeder = csv("region.csv").random

//数组形式

val mapTypeFeeder = Array(

    Map("type" -> ""),

    Map("type" -> "id_to_name"),

    Map("type" -> "name_to_id")).random

//设置请求地址

val regionRequest =

    exec(http("region_map").get("/region/map/get"))

    //加载mapType feeder

    .feed(mapTypeFeeder)

    //执行请求, feeder里key=type, 在下面可以直接使用${type}

    .exec(http("province_map").get("/region/provinces?mType=${type}"))

    //加载地区 feeder

    .feed(regionFeeder)

    //region.csv里title含有provinceId和cityId,所以请求中直接引用${cityId}/${provinceId}

    .exec(http("county_map").get("/region/countties/map?mType=${type}&cityId=${cityId}&provinceId=${provinceId}"))

//声明scenario name=dynamic_test

val scn = scenario("dynamic_test")

        .exec(during(180){ regionRequest

        })

//在2秒内平滑启动150个线程(具体多少秒启动多少线程大家自己评估哈,我这里瞎写的)

setUp(scn.inject(rampUsers(150) over (2 seconds)).protocols(httpConf))

}
注意:通过下面的代码只会第一次调用生成一个随机数,后面调用不变
exec(http("Random id browse")

        .get("/articles/" + scala.util.Random.nextInt(100))

        .check(status.is(200))
Gatling的官方文档解释是,由于DSL会预编译,在整个执行过程中是静态的。因此Random在运行过程中就已经静态化了,不会再执行。应改为Feeder实现,Feeder是gatling用于实现注入动态参数或变量的,改用Feeder实现:
val randomIdFeeder =

    Iterator.continually(Map("id" ->

        (scala.util.Random.nextInt(100))))

feed(randomIdFeeder)

    .exec(http("Random id browse")

        .get("/articles/${id}"))

.check(status.is(200))feed()在每次执行时都会从Iterator[Map[String, T]]对象中取出一个值,这样才能实现动态参数的需求。
Gatling简单测试SpringBoot工程的更多相关文章
- 构建简单的Maven工程,使用测试驱动的方式开发项目
构建简单的Maven工程很简单,这里写这篇随笔的原因是希望自己能记住几个小点. 一.安装Maven 1.下载maven:https://maven.apache.org/download.cgi 2. ...
- springboot+nginx+https+linux实现负载均衡加域名访问简单测试
把springboot项目打包成三个jar包,并指定端口为 14341,14342,14343 下载腾讯云免费ssl证书,解压后会出现如下图文件夹 把nginx文件夹下的 .crt 和 .key文件复 ...
- idea 创建springboot工程
公司最近用springboot做微服务开发 1,使用idea创建一个spring initializr 工程 2,点击next 3,配置好后继续next 4,可以勾选上web,继续next 5,fin ...
- Spring Boot2 系列教程 (二) | 第一个 SpringBoot 工程详解
微信公众号:一个优秀的废人 如有问题或建议,请后台留言,我会尽力解决你的问题. 前言 哎呦喂,按照以往的惯例今天周六我的安排应该是待在家学学猫叫啥的.但是今年这种日子就可能一去不复返了,没法办法啊.前 ...
- 使用Maven新建SpringBoot工程
最近用IDEA插件创建Springboot项目,总是403,估计被墙了! 那么这里在提供两种方法 1.从官网下载模板,导入IDEA内 2.使用Maven创建 方法一:打开 https://start. ...
- 快速搭建springboot工程
一.创建SpringBoot的三种方式 在线创建: https://start.spring.io 在IntelliJ IDEA中选择Spring Initializr创建:或者在Eclipse中选择 ...
- IntelliJ IDEA 15 部署Tomcat及创建一个简单的Web工程
一.部署Tomcat 二.创建一个简单的Web工程 2.1创建一个新工程 创建一个新工程 设置JDK及选择Web Application (创建的是Web工程) 点击Next,选择工作空间,起个工程名 ...
- struts2+hibernate+spring注解版框架搭建以及简单测试(方便脑补)
为了之后学习的日子里加深对框架的理解和使用,这里将搭建步奏简单写一下,目的主要是方便以后自己回来脑补: 1:File--->New--->Other--->Maven--->M ...
- struts2+hibernate+spring配置版框架搭建以及简单测试(方便脑补)
为了之后学习的日子里加深对框架的理解和使用,这里将搭建步奏简单写一下,目的主要是方便以后自己回来脑补: 1:File--->New--->Other--->Maven--->M ...
随机推荐
- SpringBoot框架Scheduled注入参数说明
注解 @Scheduled(cron = "0/5 * * * * ?") @Scheduled(fixedDelay = 1000 * 7,initialDelay=1000*1 ...
- 用js来实现那些数据结构16(图02-图的遍历)
上一篇文章我们简单介绍了一下什么是图,以及用JS来实现一个可以添加顶点和边的图.按照惯例,任何数据结构都不可或缺的一个point就是遍历.也就是获取到数据结构中的所有元素.那么图当然也不例外.这篇文章 ...
- Spring JTA multiple resource transactions in Tomcat with Atomikos example
http://www.byteslounge.com/tutorials/spring-jta-multiple-resource-transactions-in-tomcat-with-atomik ...
- Java 面试知识点解析(二)——高并发编程篇
前言: 在遨游了一番 Java Web 的世界之后,发现了自己的一些缺失,所以就着一篇深度好文:知名互联网公司校招 Java 开发岗面试知识点解析 ,来好好的对 Java 知识点进行复习和学习一番,大 ...
- 图片与base64的互转
/// <summary> /// 把图片转换到文本信息 /// </summary> /// <param name=&quo ...
- DataTime显示格式【转】
随心所欲的DateTime显示格式 任何项目,难免会碰到DateTime的显示问题,.net框架虽提供丰富多样的显示方法,但我很少使用,因老忘记细节,每次都要纠结到底月份在前还是年份在前:日期分隔符到 ...
- python 基础(四) 正则,递归 生成器
字符串是编程时涉及到的最多的一种数据结构,对字符串进行操作的需求几乎无处不在.比如判断一个字符串是否是合法的Email地址,虽然可以编程提取@前后的子串,再分别判断是否是单词和域名,但这样做不但麻烦, ...
- .NET之Dapper框架运用
Dapper框架 1.项目引用Dapper的Nuget程序包; 2.配置链接类 using System; using System.Collections.Generic; using System ...
- C Primer Plus 第10章 数组和指针 编程练习
这章感觉好难啊,放个别人的总结. // 多维数组和指针 #include <stdio.h> int main(void) { int zippo[4][2] = {{2, 4}, {6, ...
- 杨老师课堂_VBA学习教程之根据部门列创建工作表
课件下载 : 方式1:本节课件下载地址:链接: https://pan.baidu.com/s/1rf5pRmZ95fjVbz70KYi6Aw 密码: q9yk 方式2:或点击此处下载 效果预览图: ...