jdk源码阅读笔记-LinkedList
一、LinkedList概述
LinkedList的底层数据结构为双向链表结构,与ArrayList相同的是LinkedList也可以存储相同或null的元素。相对于ArrayList来说,LinkedList的插入与删除的速度更快,时间复杂度为O(1),查找的速度就相对比较慢了,因为每次遍历的时候都必须从链表的头部或者链表的尾部开始遍历,时间复杂度为O(n/2)。为了实现快速插入或删除数据,LinkedList在每个节点都维护了一个前继节点和一个后续节点,这是一种典型的以时间换空间的思想。LinkedList同时也可以实现栈与队列的功能。
二、LinkedList的结构图
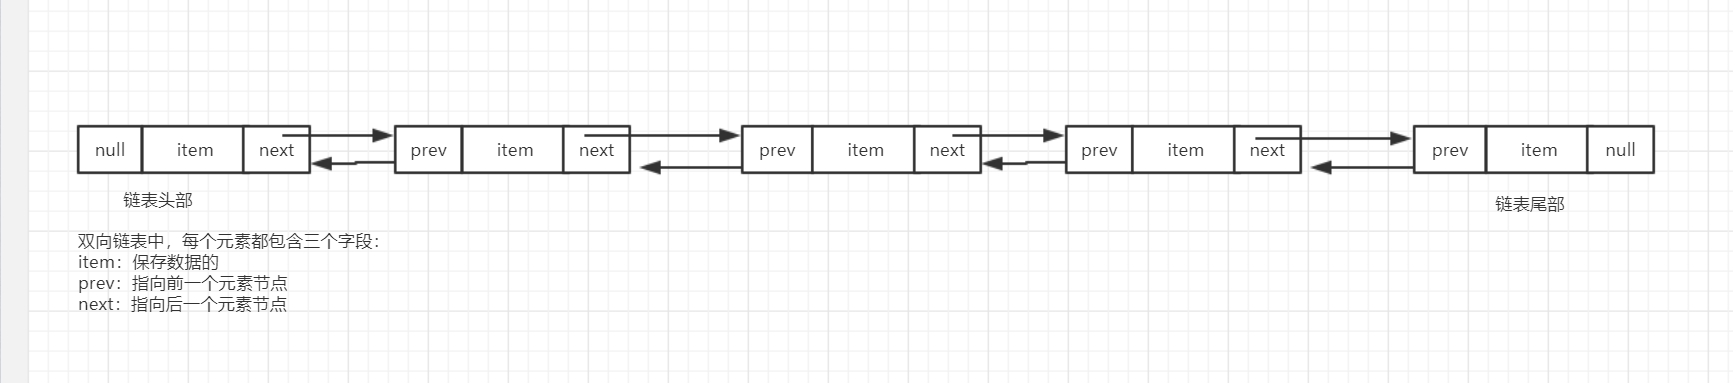
在LinkedList中每个节点有会有两个指针,一个指向前一个节点,另一个指向下一个节点。链表的头部的前指针为null,尾部的后指针也为null,因此也可以说明LinkedList(基于jdk1.8)是非循环双向链表结构。源码如下:
private static class Node<E> {

        E item;

        Node<E> next;

        Node<E> prev;

        Node(Node<E> prev, E element, Node<E> next) {

            this.item = element;

            this.next = next;

            this.prev = prev;

        }

    }
这是一个私有静态内部类
三、LinkedList属性
1、size: 链表的长度
2、first:链表的第一个节点
3、last:链表的最后一个节点
transient int size = ;

    /**

     * Pointer to first node.

     * Invariant: (first == null && last == null) ||

     *            (first.prev == null && first.item != null)

     */

    transient Node<E> first;

    /**

     * Pointer to last node.

     * Invariant: (first == null && last == null) ||

     *            (last.next == null && last.item != null)

     */

    transient Node<E> last;

    /**

     * Constructs an empty list.

     */
四、添加节点
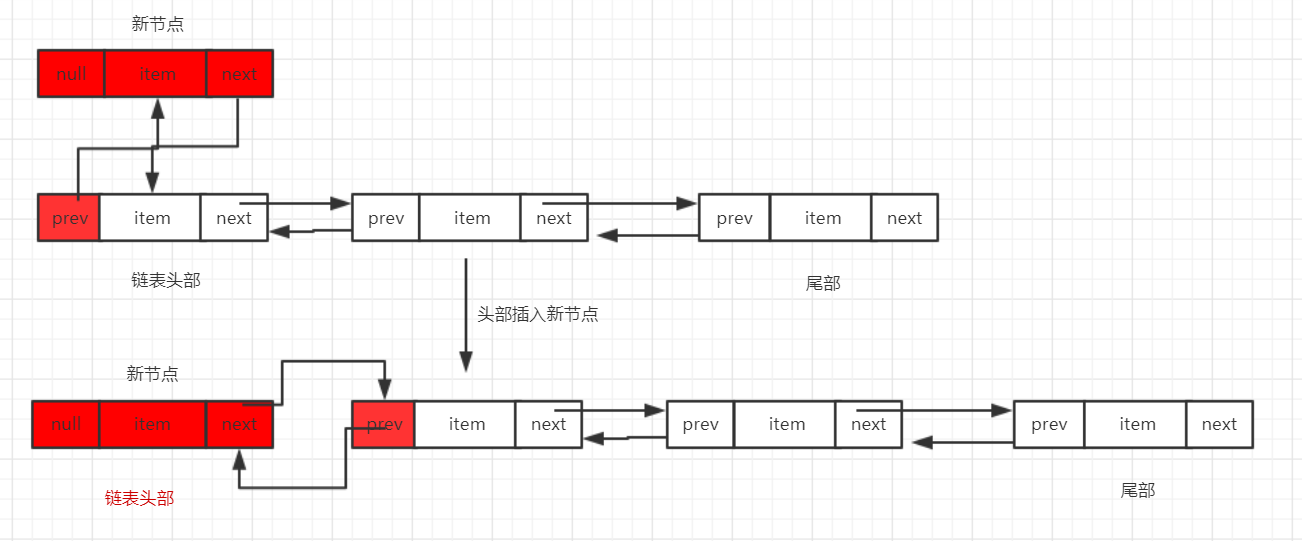
1、链表头部添加新节点
/**

     * Links e as first element.

     *  链接头部

     */

    private void linkFirst(E e) {

        //链表的第一个节点

        final Node<E> f = first;

        //创建节点

        final Node<E> newNode = new Node<>(null, e, f);

        //将新创建的节点放到链条头部

        first = newNode;

        //当链表为null时,链表头部和尾部都指向新节点

        if (f == null)

            last = newNode;

        else

            f.prev = newNode;//把原本第一个节点的前一个节点指向新的节点

        size++;//链表长度加1

        modCount++;//链表修改次数加1

    }
当链表为空的时候比较简单,直接将链表的头部和尾部都指向新节点即可,下面我来说一下在非空的情况下头部插入新节点:
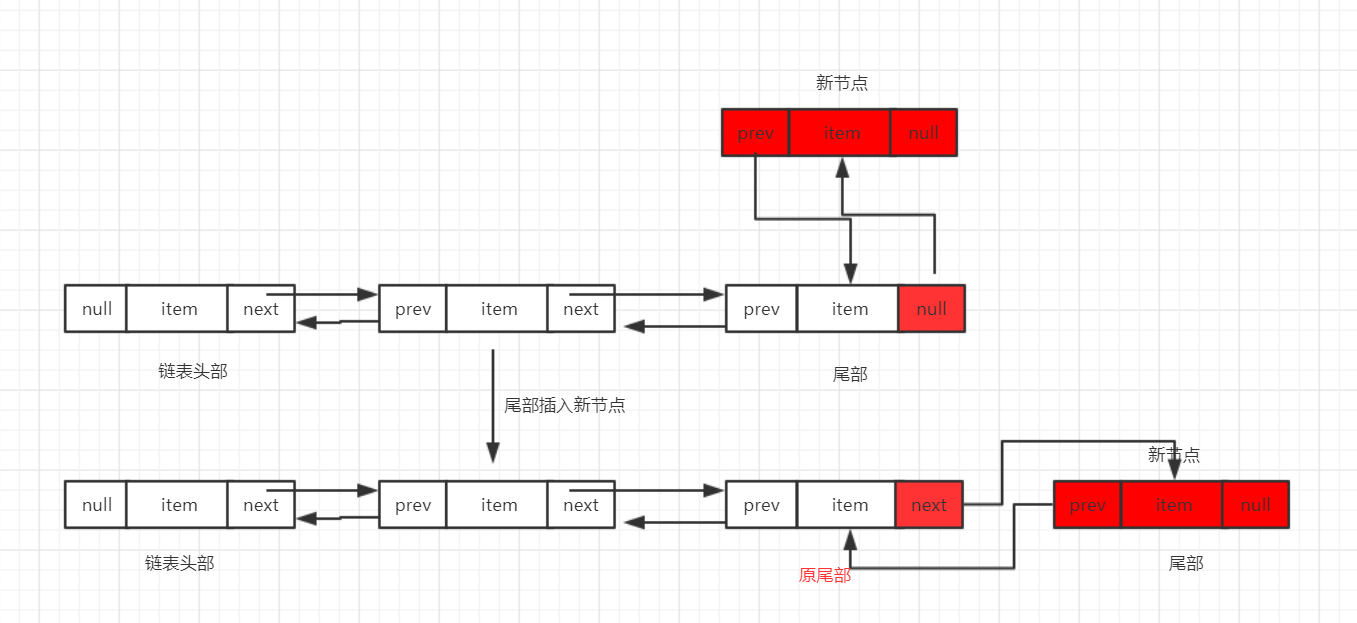
2、往链表尾部插入新节点
/**

     * Links e as last element.

     */

    void linkLast(E e) {

        //原来的最后一个节点

        final Node<E> l = last;

        //创建新的节点,next为null

        final Node<E> newNode = new Node<>(l, e, null);

        //将新节点指向最后一个节点

        last = newNode;

        if (l == null)

            first = newNode;//链表为空时第一个节点也指向新节点

        else

            l.next = newNode;//将原最后一个节点的next指针指向新节点

        size++;

        modCount++;

    }
具体流程:
3、在指定节点之前插入新节点
/**

     * Inserts element e before non-null Node succ.

     *  指定节点之前插入新节点

     */

    void linkBefore(E e, Node<E> succ) {

        // assert succ != null;

        //指定的节点的前一个节点

        final Node<E> pred = succ.prev;

        //待插入的新节点,新节点的前一个节点为 指定节点的前一个节点,下一个节点为指定节点

        final Node<E> newNode = new Node<>(pred, e, succ);

        //指定节点的前一个节点指向新节点

        succ.prev = newNode;

        if (pred == null)

            first = newNode;//如果指定节点为第一个节点,那么将节点设置为头部

        else

            pred.next = newNode;//否则将前一个的下一个节点指向新节点

        size++;

        modCount++;

    }
流程:

五、删除节点
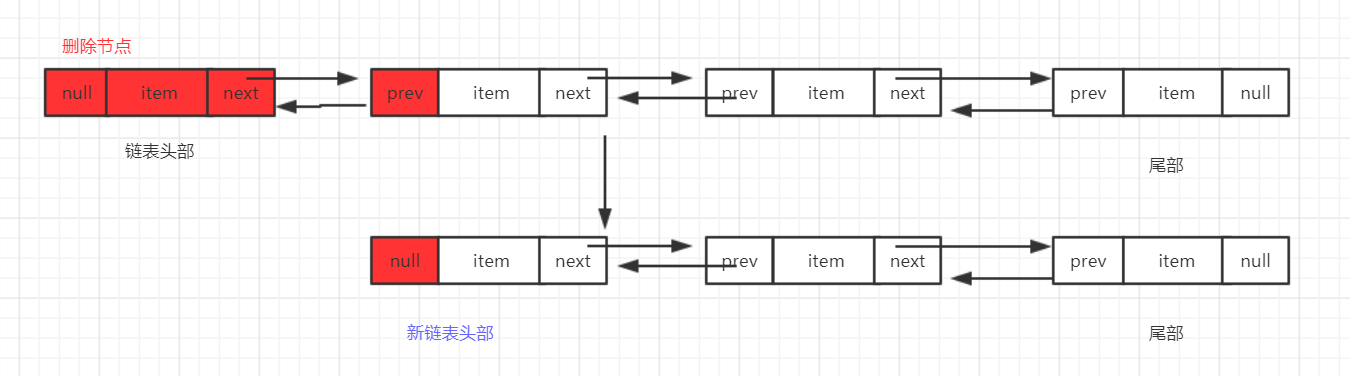
1、删除第一个节点
/**

     * Unlinks non-null first node f.

     * 删除第一个节点

     */

    private E unlinkFirst(Node<E> f) {

        // assert f == first && f != null;

        //第一个节点

        final E element = f.item;

        //第一个节点的前一个节点

        final Node<E> next = f.next;

        //将前一个节点和原第一个节点掷为空,方便回收

        f.item = null;

        f.next = null; // help GC

        //把原第一个节点设置成第一个节点

        first = next;

        //链表只有一个节点的情况

        if (next == null)

            last = null;

        else

            next.prev = null;//将原节点的下一个的前一个节点设置为null,因为该节点已经设置为第一个节点,而第一个节点的前一个节点为null

        size--;

        modCount++;

        return element;

    }
流程:
2、删除链表最后一个节点
/**

     * Unlinks non-null last node l.

     * 删除最后一个节点

     */

    private E unlinkLast(Node<E> l) {

        // assert l == last && l != null;

        //最后一个节点

        final E element = l.item;

        //最后一个节点的前一个节点

        final Node<E> prev = l.prev;

        l.item = null;

        l.prev = null; // help GC

        last = prev;

        //只有一个节点的情况

        if (prev == null)

            first = null;

        else

            prev.next = null;//将前一个节点的下一个节点掷为null

        size--;

        modCount++;

        return element;

    }
流程:

3、删除指定节点
/**

     * Unlinks non-null node x.

     * 删除指定节点

     */

    E unlink(Node<E> x) {

        // assert x != null;

        //指定节点的数据

        final E element = x.item;

        //指定节点的下一个节点

        final Node<E> next = x.next;

        //指定节点的前一个节点

        final Node<E> prev = x.prev;

        //指定节点为第一个节点,将下一个节点设置为第一个节点

        if (prev == null) {

            first = next;

        } else {//否则,将指定节点的前一个节点指向指定节点的下一个节点

            prev.next = next;

            x.prev = null;

        }

        //指定节点为最后一个节点,将前一个节点设置为最后一个节点

        if (next == null) {

            last = prev;

        } else {//否则,

            next.prev = prev;

            x.next = null;

        }

        x.item = null;

        size--;

        modCount++;

        return element;

    }
流程:

六、添加数据
1、add方法:
    /**

     * Appends the specified element to the end of this list.

     *

     * <p>This method is equivalent to {@link #addLast}.

     *

     * @param e element to be appended to this list

     * @return {@code true} (as specified by {@link Collection#add})

     */

    public boolean add(E e) {

        //向链表的最后位置插入一个节点

        linkLast(e);

        return true;

    }
2、addFirst方法:
/**

     * Inserts the specified element at the beginning of this list.

     *

     * @param e the element to add

     */

    public void addFirst(E e) {

        linkFirst(e);

    }
具体的插入流程可参照第4部分;
3、addLast方法:
/**

     * Appends the specified element to the end of this list.

     *

     * <p>This method is equivalent to {@link #add}.

     *

     * @param e the element to add

     */

    public void addLast(E e) {

        linkLast(e);

    }
具体流程参照第四部分的linkLast方法解释;
七、获取数据
获取数据也是分为3个方法,获取链表头部的节点数据,尾部节点数据和其他的节点数据。获取头部和尾部比简单,直接获取first节点或last节点就可以了,这里我们主要看一下是怎么获取其他的节点:
/**

     * Returns the element at the specified position in this list.

     *

     * @param index index of the element to return

     * @return the element at the specified position in this list

     * @throws IndexOutOfBoundsException {@inheritDoc}

     */

    public E get(int index) {

        checkElementIndex(index);

        return node(index).item;

    }
从源码中可以看到,获取其他节点的数据时,是根据下标来获取的,首先先检查输入的index下标是否有越界的嫌疑,然后node方法,下面我们看一下node方法具体实现方式:
    /**

     * Returns the (non-null) Node at the specified element index.

     */

    Node<E> node(int index) {

        // assert isElementIndex(index);

        /**

         * 传入的index如果大于链表长度的一半,那个从链表后面向前遍历

         * 否则,从前面开始遍历

         */

        if (index < (size >> )) {

            Node<E> x = first;

            for (int i = ; i < index; i++)

                x = x.next;

            return x;

        } else {

            Node<E> x = last;

            for (int i = size - ; i > index; i--)

                x = x.prev;

            return x;

        }

    }
从代码中可以看到,如果使用get(index)方法时,每一次都需要从头部或尾部开始遍历,效率比较低。如果要遍历LinkedList,也不推荐这种方式。
八、删除数据
删除数据也是3中方法,只讲删除其他节点数据的方法:
/**
* Removes the first occurrence of the specified element from this list,
* if it is present. If this list does not contain the element, it is
* unchanged. More formally, removes the element with the lowest index
* {@code i} such that
* <tt>(o==null ? get(i)==null : o.equals(get(i)))</tt>
* (if such an element exists). Returns {@code true} if this list
* contained the specified element (or equivalently, if this list
* changed as a result of the call).
*
* @param o element to be removed from this list, if present
* @return {@code true} if this list contained the specified element
*/
public boolean remove(Object o) {
if (o == null) {//为null的情况,从头部开始查找
for (Node<E> x = first; x != null; x = x.next) {
if (x.item == null) {
unlink(x);
return true;
}
}
} else {//非null,从头部开始查找,然后删除掉
for (Node<E> x = first; x != null; x = x.next) {
if (o.equals(x.item)) {
unlink(x);
return true;
}
}
}
return false;
}
从源码中可以看到,在删除元素的时候是从第一个节点开始一个一个遍历,通过equals方法的来获取到需要删除节点,然后调用unlinke方法将节点删除掉的。
九、实现stack相关方法
栈的数据结构实现了FIFO的顺序,即先进先出的规则。
1、push方法:
/**

     * Pushes an element onto the stack represented by this list.  In other

     * words, inserts the element at the front of this list.

     *

     * <p>This method is equivalent to {@link #addFirst}.

     *

     * @param e the element to push

     * @since 1.6

     */

    public void push(E e) {

        addFirst(e);

    }
每次添加数据的时候都是添加到链表头部。
2、pop方法:
/**

     * Pops an element from the stack represented by this list.  In other

     * words, removes and returns the first element of this list.

     *

     * <p>This method is equivalent to {@link #removeFirst()}.

     *

     * @return the element at the front of this list (which is the top

     *         of the stack represented by this list)

     * @throws NoSuchElementException if this list is empty

     * @since 1.6

     */

    public E pop() {

        return removeFirst();

    }
往栈中获取一个数据,同时也将栈的第一个数据删除。
3、peek方法:
    /**

     * Retrieves, but does not remove, the head (first element) of this list.

     *

     * @return the head of this list, or {@code null} if this list is empty

     * @since 1.5

     */

    public E peek() {

        final Node<E> f = first;

        return (f == null) ? null : f.item;

    }
查看栈中的第一个数据,跟pop方法的区别是peek方法只是查看数据,并没有删除数据,pop是从栈中弹出一个数据,需要从栈中删除数据。
十、实现queue方法
队列也是我们在开发的过程经常使用到数据结构,比如消息队列等,队列的特点是每次添加数据的时候都是添加大队列的尾部,获取数据时总是从头部拉取。基于以上特点,我们可以使用LinkedList中的linkLast方式实现数据的添加,使用unLinkfirst方法实现数据的拉取,使用getFisrt方法实现数据的查看,源码如下:
1、添加数据:
/**

     * Adds the specified element as the tail (last element) of this list.

     *

     * @param e the element to add

     * @return {@code true} (as specified by {@link Queue#offer})

     * @since 1.5

     */

    public boolean offer(E e) {

        return add(e);

    }
2、拉取数据:
/**

     * Retrieves and removes the head (first element) of this list.

     *

     * @return the head of this list, or {@code null} if this list is empty

     * @since 1.5

     */

    public E poll() {

        final Node<E> f = first;

        return (f == null) ? null : unlinkFirst(f);

    }
3、查看数据:
/**

     * Retrieves, but does not remove, the head (first element) of this list.

     *

     * @return the head of this list, or {@code null} if this list is empty

     * @since 1.5

     */

    public E peek() {

        final Node<E> f = first;

        return (f == null) ? null : f.item;

    }
十一、LinkedList使用注意事项
1、LinkedList是非线程安全的,在多线程的环境下可能会发生不可预知的结果,所以在多线程环境中谨慎使用它,可以转换成线程类,或是使用线程安全的集合类来代替LinkedList的使用。
2、遍历LinkedList中的数据的时候,切记别使用fori方式(即随机顺序访问get(index))去遍历,建议使用迭代器或foreach方式遍历。原因在上面的源码中也说到过,可以看一下第七部分数据获取中,使用get(index)方法获取数据时每次都是链表头部或尾部开始遍历,这样是非常不合理的,时间复杂度为O(n^2)。在数据量较小的情况下是没有什么区别,但是数据上去之后,可能会出现程序假死的现象。测试如下:
public static void main(String[] args) throws Exception {

        List<Integer> list = new LinkedList<>();

        for (int i = ; i < ; i++) {

            list.add(i);

        }

        long start = System.currentTimeMillis();

        for (int i = ; i < list.size(); i++) {

            list.get(i);

        }

        long end = System.currentTimeMillis();

        System.out.println("使用fori方式所需时间:" + (end - start));

        start = System.currentTimeMillis();

        for (Integer integer : list) {

        }

        end = System.currentTimeMillis();

        System.out.println("使用foreach方式所需时间:" + (end - start));

        start = System.currentTimeMillis();

        Iterator<Integer> iterator = list.iterator();

        while (iterator.hasNext()){

            Integer next = iterator.next();

        }

        end = System.currentTimeMillis();

        System.out.println("使用迭代器方式所需时间:" + (end - start));

    }
三种遍历10万条数据所需要时间:
使用fori方式所需时间:

使用foreach方式所需时间:

使用迭代器方式所需时间:
从结果中可以看到,使用迭代器或foreach方式比fori方式快的不是十倍百倍,原因是使用foreach和迭代器的时候每次获取数据后都记录当前的位置index,当下个循环的时候直接在index+1处获取即可,而不需要从新在头部或尾部开始遍历了。
十二、总结
1、LinkedList是非线程安全的。
2、LinkedList可以存储null值或重复的数据。
3、LinkedList底层存储结构为双向链式非循环结构,这种结构添加删除的效率高于查询效率。
4、与ArrayList相比较,LinkedList的删除添加数据效率要比ArrayList高,查询数据效率低于ArrayList。
5、LinkedList可以用于实现stack和queue数据结构,比如:Queue<T> queue = new LinkedList<T>();
6、遍历数据时切勿使用随机访问方式遍历,推荐使用foreach或迭代器遍历。
7、如果文章中有什么写得不对的地方,欢迎大家指出来。
jdk源码阅读笔记-LinkedList的更多相关文章
- jdk源码阅读笔记-LinkedHashMap
Map是Java collection framework 中重要的组成部分,特别是HashMap是在我们在日常的开发的过程中使用的最多的一个集合.但是遗憾的是,存放在HashMap中元素都是无序的, ...
- jdk源码阅读笔记-HashSet
通过阅读源码发现,HashSet底层的实现源码其实就是调用HashMap的方法实现的,所以如果你阅读过HashMap或对HashMap比较熟悉的话,那么阅读HashSet就很轻松,也很容易理解了.我之 ...
- jdk源码阅读笔记-ArrayList
一.ArrayList概述 首先我们来说一下ArrayList是什么?它解决了什么问题?ArrayList其实是一个数组,但是有区别于一般的数组,它是一个可以动态改变大小的动态数组.ArrayList ...
- jdk源码阅读笔记
1.环境搭建 http://www.komorebishao.com/2020/idea-java-jdk-funyard/ 2. 好的源码阅读资源 https://zhuanlan.zhihu.co ...
- jdk源码阅读笔记-Integer
public final class Integer extends Number implements Comparable<Integer> Integer 由final修饰了,所以该 ...
- JDK源码学习笔记——LinkedList
一.类定义 public class LinkedList<E> extends AbstractSequentialList<E> implements List<E& ...
- jdk源码阅读笔记-HashMap
文章出处:[noblogs-it技术博客网站]的博客:jdk1.8源码分析 在Java语言中使用的最多的数据结构大概右两种,第一种是数组,比如Array,ArrayList,第二种链表,比如Array ...
- jdk源码阅读笔记-AbstractStringBuilder
AbstractStringBuilder 在java.lang 包中,是一个抽象类,实现 Appendable 接口和 CharSequence 接口,这个类的诞生是为了解决 String 类在创建 ...
- jdk源码阅读笔记-String
本人自学java两年,有幸初入这个行业,所以功力尚浅,本着学习与交流的态度写一些学习随笔,什么错误的地方,热烈地希望园友们提出来,我们共同进步!这是我入园写的第一篇文章,写得可能会很乱. 一.什么是S ...
随机推荐
- HTML 标签小细节
简书地址:https://www.jianshu.com/p/03a23aa28a34 今天重新学习了一下HTML中标签的用法,补充并记录一下自己新学到的知识. a中的href href Contai ...
- invalid bound statement (not found)
invalid bound statement (not found) mybatis 错误: 一般是Mapepr.xml文件中文nameapce没有和mapper接口发生映射,导致mybatis绑定 ...
- 基于elk 实现nginx日志收集与数据分析。
一.背景 前端web服务器为nginx,采用filebeat + logstash + elasticsearch + granfa 进行数据采集与展示,对客户端ip进行地域统计,监控服务器响应时间等 ...
- 免费Git客户端:sourcetree详细介绍
一.简介:一个用于Windows和Mac的免费Git客户端.Sourcetree简化了如何与Git存储库进行交互,这样您就可以集中精力编写代码.通过Sourcetree的简单Git GUI可视化和管理 ...
- 【机器学习】使用gensim 的 doc2vec 实现文本相似度检测
环境 Python3, gensim,jieba,numpy ,pandas 原理:文章转成向量,然后在计算两个向量的余弦值. Gensim gensim是一个python的自然语言处理库,能够将文档 ...
- android 开发常见问题
指定版本 就OK了 路径: android/app/build.gradle compile ("com.facebook.react:react-native:填你自己的RN版本" ...
- R 网络图 nodes,edges属性计算
前面提到了用R画网络图,免不了要对网络图nodes和edges的特征做一些统计.分享下我的代码: ########## nodes edges的统计########### # ####nodes的度有 ...
- Struts标签库详解【2】
==================================================================== 需要在head中用<s:head />标签 一.控 ...
- vim折叠快捷键
参考:http://www.cnblogs.com/fakis/archive/2011/04/14/2016213.html 1. 折叠方式 可用选项来设定折叠方式: 可在Vim 配置文件中设置 s ...
- Hadoop是一种开源的适合大数据的分布式存储和处理的平台
"Hadoop能做什么?" ,概括如下: 1)搜索引擎:这也正是Doug Cutting设计Hadoop的初衷,为了针对大规模的网页快速建立索引: 2)大数据存储:利用Hadoop ...