AutoMapper自动映射
十年河东,十年河西,莫欺少年穷。
学无止境,精益求精。
不扯犊子,直接进入正题:
AutoMapper自动映射常用于EF中,能很好的解决DTO和Model之间相互映射的问题。在未使用AutoMapper之前,我们回顾下传统的对象相互映射的方法。
首先贴出本节要用到的DTO,学生表及系表,他们之间存在主外键关系!如下:
    public partial class Dept

    {

        public Dept()

        {

            this.Student = new HashSet<Student>();

        }

        public int Id { get; set; }

        public string deptNum { get; set; }

        public string deptName { get; set; }

        public virtual ICollection<Student> Student { get; set; }

    }

    public partial class Student

    {

        public int Id { get; set; }

        public string StuNum { get; set; }

        public string deptNum { get; set; }

        public string StuName { get; set; }

        public string StuSex { get; set; }

        public Nullable<System.DateTime> AddTime { get; set; }

        public virtual Dept Dept { get; set; }

    }
假设,现在要求将得到的学生对象转化为Model
新建学生对象Model
    public class StudentModel

    {

        public int Id { get; set; }

        public string StuNum { get; set; }

        public string deptNum { get; set; }

        public string StuName { get; set; }

        public string StuSex { get; set; }

        public Nullable<System.DateTime> AddTime { get; set; }

    }
传统方法如下:
        public ActionResult Index()

        {

            var profiler = MiniProfiler.Current;

            using (profiler.Step("查询Student的数据"))

            {

                using (BingFaTestEntities context = new BingFaTestEntities())

                {

                    var SM = context.Student.Where(A => A.StuNum == "").FirstOrDefault();

                    if (SM != null)

                    {

                        var StudetM = new StudentModel()

                        {

                            Id = SM.Id,

                            StuName = SM.StuNum,

                            StuNum = SM.StuNum,

                            StuSex = SM.StuSex,

                            deptNum = SM.deptNum,

                            AddTime = SM.AddTime

                        };

                    }

                }

                return View();

            }

        }
传统方法实现相互映射存在一个弊端,如果数据表字段特别多,那么,试问你需要写多少行代码?
OK,AutoMapper闪亮登场,那么如果使用AutoMapper需要写什么样的代码呢?
        public ActionResult Index()

        {

            var profiler = MiniProfiler.Current;

            using (profiler.Step("查询Student的数据"))

            {

                using (BingFaTestEntities context = new BingFaTestEntities())

                {

                    var SM = context.Student.Where(A => A.StuNum == "").FirstOrDefault();

                    if (SM != null)

                    {

                        StudentModel StudentM = Mapper.DynamicMap<StudentModel>(SM);

                    }

                }

                return View();

            }

        }
由上述代码可知,其相互映射只需一行代码搞定。这里需要注意,你定义的Model层个字段属性要和DTO层字段属性一致。
OK,那如果需要转化一个泛型集合呢?
传统方法如下:
        public ActionResult Index()

        {

            var profiler = MiniProfiler.Current;

            using (profiler.Step("查询Student的数据"))

            {

                using (BingFaTestEntities context = new BingFaTestEntities())

                {

                    var SMList = context.Student.Where(A => A.StuName.Contains("陈")).ToList();

                    if (SMList != null&&SMList.Count>)

                    {

                        foreach (var SM in SMList)

                        {

                            var StudetM = new StudentModel()

                            {

                                Id = SM.Id,

                                StuName = SM.StuNum,

                                StuNum = SM.StuNum,

                                StuSex = SM.StuSex,

                                deptNum = SM.deptNum,

                                AddTime = SM.AddTime

                            };

                        }

                    }

                }

                return View();

            }

        }
那么,AutoMapper是否可以做到呢?
当然,可以...
        public ActionResult Index()

        {

            var profiler = MiniProfiler.Current;

            using (profiler.Step("查询Student的数据"))

            {

                using (BingFaTestEntities context = new BingFaTestEntities())

                {

                    var SMList = context.Student.Where(A => A.StuName.Contains("陈")).ToList();

                    if (SMList != null && SMList.Count > )

                    {

                        List<StudentModel> StudentM = Mapper.DynamicMap<List<StudentModel>>(SMList);

                    }

                }

                return View();

            }

        }
有上述代码可知,是不是连Foreach都省了?
哈哈,OK,这些都是些基础功能,咱们继续深究。
如果需要映射导航属性对应表中的字段怎么写呢?
我们将StudentModel修改成如下:
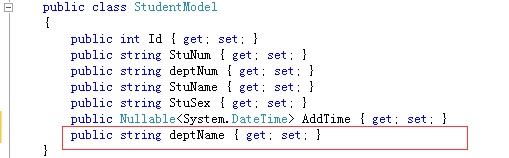
如果要得到系名称 deptName ,我们就要用到EF的懒加载。关于用EF懒加载时要注意的事项,大家可参考博客: EF性能优化-有人说EF性能低,我想说:EF确实不如ADO.NET,当然本节也会详细说明。
首先用传统方法实现如下:
        public ActionResult Index()

        {

            var profiler = MiniProfiler.Current;

            using (profiler.Step("查询Student的数据"))

            {

                using (BingFaTestEntities context = new BingFaTestEntities())

                {

                    var SM = context.Student.Where(A => A.StuNum == "").FirstOrDefault();

                    if (SM != null)

                    {

                        var StudetM = new StudentModel()

                        {

                            Id = SM.Id,

                            StuName = SM.StuNum,

                            StuNum = SM.StuNum,

                            StuSex = SM.StuSex,

                            deptNum = SM.deptNum,

                            AddTime = SM.AddTime,

                            deptName=SM.Dept.deptName

                        };

                    }

                }

                return View();

            }

        }

传统方法变化不大,那么,用AutoMapper怎么实现呢?
        public ActionResult Index()

        {

            var profiler = MiniProfiler.Current;

            using (profiler.Step("查询Student的数据"))

            {

                using (BingFaTestEntities context = new BingFaTestEntities())

                {

                    var SM = context.Student.Where(A => A.StuNum == "").FirstOrDefault();

                    AutoMapper.Mapper.CreateMap<Student, StudentModel>().ForMember(dest => dest.deptName, opts => opts.MapFrom(src => src.Dept.deptName));

                   var model = AutoMapper.Mapper.Map<StudentModel>(SM);

                }

                return View();

            }

        }
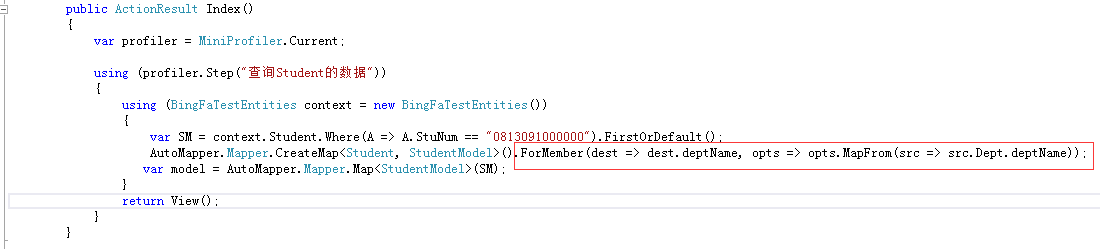
由上述方法可知,使用AutoMapper方法进行映射,需要指定目标字段dest.deptName 以及 源字段 src.Dept.deptName,关于AutoMapper的详细用法及说明大家可参考:【来龙去脉系列】AutoMapper一款自动映射框架
在这里,我要告诫大家关于使用懒加载的注意事项,如果你不注意,那么你写的代码效率有可能将会非常低。
如上述两种方法,我们来监控下生成的SQL语句:(关于是如果监控生成的SQL语句,大家可参考我的博客:MiniProfiler工具介绍(监控EF生成的SQL语句)--EF,迷你监控器,哈哈哈)

生成了2条SQL语句:
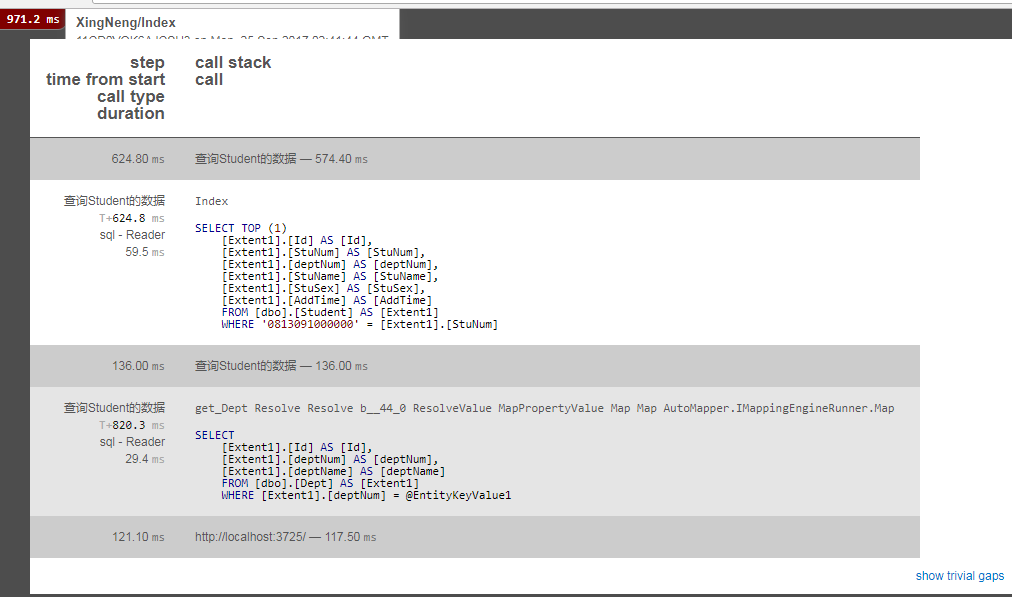
OK,仅仅生成两条SQL语句还可以接受,但是如果你的项目数据表关系比较复杂,有很多导航属性时,就会生成很多SQL语句,会产生极大的性能问题。
那么关于懒加载的问题怎么解决呢?还好,EF中有Include,在使用Include时需要引入using System.Data.Entity;
将上边的程序修改成如下:
        public ActionResult Index()

        {

            var profiler = MiniProfiler.Current;

            using (profiler.Step("查询Student的数据"))

            {

                using (BingFaTestEntities context = new BingFaTestEntities())

                {

                    var SMList = context.Student.Include(A=>A.Dept).Where(A => A.StuName.Contains("陈")).ToList();

                    AutoMapper.Mapper.CreateMap<Student, StudentModel>()

                        .ForMember(dest => dest.deptName, opts => opts.MapFrom(src => src.Dept.deptName));

                    var modelList = AutoMapper.Mapper.Map<List<StudentModel>>(SMList);

                }

                return View();

            }

        }

使用Include,其实相当于声明弃用懒加载,这里使用显示加载!
OK,关于使用AutoMapper应用懒加载的方法讲完了。正如上述所说:AutoMapper是将DTO映射成Model,如果反过来映射是否可行呢?
还好,AutoMapper提供了.ReverseMap();方法,将Model映射成DTO,如下:
        public ActionResult Index()

        {

            var profiler = MiniProfiler.Current;

            using (profiler.Step("查询Student的数据"))

            {

                using (BingFaTestEntities context = new BingFaTestEntities())

                {

                    StudentModel M = new StudentModel()

                    {

                        StuName = "陈星辰",

                        AddTime = DateTime.Now,

                        deptNum = "",

                        StuNum = "",

                        StuSex = "男"

                    };

                    Student Sm = new Student();

                    AutoMapper.Mapper.CreateMap<StudentModel, Student>().ReverseMap();

                    Sm = AutoMapper.Mapper.Map<Student>(M);

                    context.Student.Add(Sm);

                    context.SaveChanges();

                }

                return View();

            }

        }

OK。截止到这里,关于AutoMapper的基础用法也就讲完了,本人能力有限,如有未提及之处,请大家多多指点。希望大家喜欢!
@陈卧龙的博客
AutoMapper自动映射的更多相关文章
- automapper 自动映射 集成asp.net Core2.1
学习博文:https://www.cnblogs.com/yan7/p/8085410.html 1.使用nuget 安装 <PackageReference Include="Aut ...
- Asp.NetCore 3.1 使用AutoMapper自动映射转换实体 DTO,Data2ViewModel
1:什么是AutoMapper? 下面为AutoMapper官方的解释: AutoMapper是一个对象-对象映射器.对象-对象映射通过将一种类型的输入对象转换为另一种类型的输出对象来工作. 使Aut ...
- AutoMapper 自动映射工具
先引用对应的DLL. 11.转换匿名对象 结合LINQ映射新的实体类. using System;using System.Collections.Generic;using System.Linq; ...
- 【来龙去脉系列】AutoMapper一款自动映射框架
前言 通常在一个应用程序中,我们开发人员会在两个不同的类型对象之间传输数据,通常我们会用DTOs(数据传输对象),View Models(视图模型),或者直接是一些从一个service或者Web AP ...
- 打造强大的BaseModel(2):让Model实现自动映射,将字典转化成Model
打造强大的BaseModel(1):让Model自我描述 这篇文章将讲述Model一项更高级也最常用的功能,让Model实现自动映射–将字典转化成Model(所有代码全由Swift实现) 将JSON转 ...
- 反射+自定义注解---实现Excel数据列属性和JavaBean属性的自动映射
简单粗暴,直奔主题. 需求:通过自定义注解和反射技术,将Excel文件中的数据自动映射到pojo类中,最终返回一个List<pojo>集合? 今天我只是通过一位使用者的身份来给各位分享 ...
- 禁用自动映射的 Exchange 邮箱
客户最近询问他们无法从用户的Outlook配置文件中删除邮箱.在这种情况下,它们是共享邮箱,并出现在Outlook的左窗格中.但原因和解决方法同样适用于用户邮箱.并且 无论用户邮箱在本地 Exchan ...
- .NET之AutoMapper对象映射工具运用
AutoMapper对象映射工具:主要是将某一个实体转成另一个实体. 1.引用NuGet包;搜索:AutoMapper 2.创建实体类 using System; using System.Colle ...
- Mybatis映射文件的自动映射与手动映射问题
Mapper XML 文件 MyBatis 的真正强大在于它的映射语句,也是它的魔力所在.由于它的异常强大,映射器的 XML 文件就显得相对简单.如果拿它跟具有相同功能的 JDBC 代码进行对比,你会 ...
随机推荐
- Django 添加mdia文件目录路径
1.settings.py MEDIA_URL = '/media/' MEDIA_ROOT = os.path.join(BASE_DIR, 'media') 2.urls.py from djan ...
- JavaScript大杂烩11 - 理解事件驱动
前面我们回顾了前端JavaScript只干的两件事:操作BOM与操作DOM,那么什么时候去干这些事呢?答案是需要干的时候去干.那么什么时候是需要干的时候呢?答案是事件被触发的时候.这就是通常所说的“事 ...
- springboot中使用mybatis显示执行sql
springboot 中使用mybatis显示执行sql的配置,在properties中添加如下 logging.你的包名=debug 2018-11-27 16:35:43.044 [DubboSe ...
- 洗礼灵魂,修炼python(40)--面向对象编程(10)—定制魔法方法+time模块
定制魔法方法 1.什么是定制魔法方法 首先定制是什么意思呢?其实就是自定义了,根据我们想要的要求来自定义.而在python中,其实那些所谓的内置函数,内置方法,内置属性之类的其实也是自定义出来的,不过 ...
- 模拟开户接口,使用shell脚本实现批量用户开通
1.目的 通过模拟接口方法,实现批量用户开通 2.分析 A.接口含body和head部分,其中body中的某些变量为必填字段,包含用户的信息,接口可整理成body.xml.head.xml文件. B. ...
- Vue2 框架开发的单页程序页面首次加载慢的原因与优化方案
在用Vue2 框架进行单页面开发时,开发完成后项目打包到线上环境,发现vendor脚本有963K,app.css文件也有四百多k,用户第一次打开网页加载这两个文件要十多秒,会使页面白屏十多秒,之后再次 ...
- 用Python实现数据结构之栈
栈 栈是最简单的数据结构,也是最重要的数据结构.它的原则就是后进先出(LIFO),栈被使用于非常多的地方,例如浏览器中的后退按钮,文本编辑器中的撤销机制,接下来我们用Python来具体实现这个数据结构 ...
- 【PAT】B1038 统计同成绩学生(20)(20 分)
#include<stdio.h> int arr[102]={0};//分数作为自己的下标,注意 int main(){ int N;scanf("%d",& ...
- Android逆向分析(2) APK的打包与安装
http://blog.zhaiyifan.cn/2016/02/13/android-reverse-2/ 2/18日增加对aidl和java编译的描述. 前言 上一次我们反编译了手Q,并遇到了Ap ...
- ucml 子业务组件与行为参与者业务组件