网易 UI 自动化工具 Airtest 浅用记录
一 使用目的
该工具主要是面向游戏UI测试基于图像识别,如游戏框架unity,Cocos-js以及网易内部的游戏框架
同时也支持原生Android App 的基于元素识别的UI自动化测试.
本文主要使用目的是做安卓原生App的元素UI自动化.
二 资源索引
官方资源
网易游戏新开源的 UI 自动化测试项目 [Airtest Project]
Airtest官网
Airtest官网上手教程
AirtestProject Github主页
AirtestIDE官方中文文档
Airtest 官方中文文档
PocoUI自动化框架官方中文文档
Android App UI自动化相关API
airtest.core.api module
poco.drivers.android.uiautomation module
三 环境准备
Python3 开发环境部署
如果只想用AirtestIDE这款前端集大成的开发IDE工具通过,前端点点点生成或录制方式生成脚本的话,你完全可以开箱即用,完全不用搞以下Python开发环境.
如果想自己利用底层API扩展高级脚本框架,为了更便利的直接使用airtest 或 poco 的API,建议还是提前部署好Python3开发环境.
Python3.6.4
这里提供了许多种格式的安装包,如windows下常见的.exe格式.这种安装方便,大多数的选择.
找到你系统对应的安装包,我是win10 64位操作系统 选择的是python-3.6.4-amd64.exe
安装到我本地的D:盘D:\Python36\ 下
配置环境变量(请注意根据跟人习惯统一添加到用户变量还是系统变量,我个人一般全部添加到系统变量),追加到Path末尾,D:\Python36\;D:\Python36\Scripts\
笔者当前win10,是Python2和Python3共存的,如有需要具体部署请参考
Win10下python3和python2同时安装并解决pip共存问题
附上最终的一些版本检查与pip2 pip3部署检查命令
#Python2 检查
C:\Users\cmd>python2
Python 2.7.14 (v2.7.14:84471935ed, Sep 16 2017, 20:25:58) [MSC v.1500 64 bit (AMD64)] on win32
Type "help", "copyright", "credits" or "license" for more information.
>>> exit()
#Python3检查
C:\Users\cmd>python3
Python 3.6.4 (v3.6.4:d48eceb, Dec 19 2017, 06:54:40) [MSC v.1900 64 bit (AMD64)] on win32
Type "help", "copyright", "credits" or "license" for more information.
>>> exit()
#pip3部署
C:\Users\cmd>python3 -m pip install --upgrade pip --force-reinstall
Collecting pip
  Downloading pip-9.0.2-py2.py3-none-any.whl (1.4MB)
    100% |████████████████████████████████| 1.4MB 746kB/s
Installing collected packages: pip
  Found existing installation: pip 9.0.1
    Uninstalling pip-9.0.1:
      Successfully uninstalled pip-9.0.1
Successfully installed pip-9.0.2#pip2部署C:\Users\cmd>python2 -m pip install --upgrade pip --force-reinstallCollecting pip  Using cached pip-9.0.2-py2.py3-none-any.whlInstalling collected packages: pip  Found existing installation: pip 9.0.1    Uninstalling pip-9.0.1:      Successfully uninstalled pip-9.0.1Successfully installed pip-9.0.2#检查pip2C:\Users\cmd>pip2 -Vpip 9.0.2 from d:\python27\lib\site-packages (python 2.7)#检查pip3C:\Users\cmd>pip3 -Vpip 9.0.2 from d:\python36\lib\site-packages (python 3.6)#检查pip2 python2已安装库C:\Users\cmd>pip2 listDEPRECATION: The default format will switch to columns in the future. You can use --format=(legacy|columns) (or define a format=(legacy|columns) in your pip.conf under the [list] section) to disable this warning.pip (9.0.2)setuptools (28.8.0)#检查pip3 python3已安装库C:\Users\cmd>pip3 listDEPRECATION: The default format will switch to columns in the future. You can use --format=(legacy|columns) (or define a format=(legacy|columns) in your pip.conf under the [list] section) to disable this warning.pip (9.0.2)setuptools (28.8.0)#检查哪些python3库需要升级C:\Users\cmd>pip3 list -oDEPRECATION: The default format will switch to columns in the future. You can use --format=(legacy|columns) (or define a format=(legacy|columns) in your pip.conf under the [list] section) to disable this warning.setuptools (28.8.0) - Latest: 39.0.1 [wheel]# 升级该库C:\Users\cmd>pip3 install --upgrade setuptoolsCollecting setuptools  Downloading setuptools-39.0.1-py2.py3-none-any.whl (569kB)    100% |████████████████████████████████| 573kB 815kB/sInstalling collected packages: setuptools  Found existing installation: setuptools 28.8.0    Uninstalling setuptools-28.8.0:      Successfully uninstalled setuptools-28.8.0Successfully installed setuptools-39.0.1
虚拟Python virtualenv环境部署
为什么要用virtualenv 虚拟环境,因为当你鼓捣Python开源项目多了的时候,比如自动化方向的selenium, Appium-Python-Client, ATX的uiautomator2的时候,如果放在一个Python环境下,用Pycharm找引用ctrl+B的时候,相似api方法名就会跳出多个,你就会不知道到底是引用的哪一个库下的,独立分开各个UI自动化Python虚拟环境的话,查起来就方便减少了迷惑.
#安装virtualenv
C:\Users\cmd>pip3 install virtualenv
Collecting virtualenv
  Using cached virtualenv-15.1.0-py2.py3-none-any.whl
Installing collected packages: virtualenv
Successfully installed virtualenv-15.1.0
#激活使用该virtualenv
C:\Users\cmd\venv\Scripts>activate.bat
#见到以下输出即成功
(venv) C:\Users\cmd\venv\Scripts>
如果想创建独立的Airtest Python3开发环境,可如下
#创建基于Python3.6.4的名为Airtest364的虚拟环境
C:\Users\cmd>virtualenv -p D:\Python36\python3.exe Airtest364
Running virtualenv with interpreter D:\Python36\python3.exe
Using base prefix 'D:\\Python36'
New python executable in C:\Users\cmd\Airtest364\Scripts\python3.exe
Also creating executable in C:\Users\cmd\Airtest364\Scripts\python.exe
Installing setuptools, pip, wheel...done.
#切换到Airtest364下并激活该环境
C:\Users\cmd>cd Airtest364\Scripts
C:\Users\cmd\Airtest364\Scripts>activate.bat
#检查虚拟环境初始化安装的Python库
(Airtest364) C:\Users\cmd\Airtest364\Scripts>pip list
DEPRECATION: The default format will switch to columns in the future. You can use --format=(legacy|columns) (or define a format=(legacy|columns) in your pip.conf under the [list] section) to disable this warning.
pip (9.0.2)
setuptools (39.0.1)
wheel (0.30.0)
安装Airtest提供的Android App UI测试库pocoui
#安装Airtest提供的Android App UI测试库 pocoui
(Airtest364) C:\Users\cmd\Airtest364\Scripts>pip3 install pocoui
#检查都依赖安装了哪些
(Airtest364) C:\Users\cmd\Airtest364\Scripts>pip list
DEPRECATION: The default format will switch to columns in the future. You can use --format=(legacy|columns) (or define a format=(legacy|columns) in your pip.conf under the [list] section) to disable this warning.
airtest (1.0.2)
AxmlParserPY (0.1)
certifi (2018.1.18)
chardet (3.0.4)
comtypes (1.1.4)
hrpc (1.0.3)
idna (2.6)
Jinja2 (2.10)
MarkupSafe (1.0)
numpy (1.14.2)
opencv-contrib-python (3.4.0.12)
Pillow (5.0.0)
pip (9.0.2)
pocoui (1.0.26)
pydash (4.4.1)
pypiwin32 (223)
pywin32 (223)
pywinauto (0.6.4)
requests (2.18.4)
setuptools (39.0.1)six (1.11.0)urllib3 (1.22)websocket-client (0.47.0)wheel (0.30.0)
Android sdk工具部署
下载地址 http://tools.android-studio.org/index.php/sdk 处下载 android-sdk_r24.4.1-windows.zip
将android-sdk-windows解压到你需要的目录下,笔者是D:\Android\android-sdk-windows
配置android-sdk环境变量:
ANDROID_HOME 变量值为android-sdk的解压目录,笔者为D:\Android\android-sdk-windows
PATH PATH变量值的最后追加 ;%ANDROID_HOME%\tools;%ANDROID_HOME%\platform-tools;%ANDROID_HOME%\build-tools;
接下来你便可以用D:\Android\android-sdk-windows 下的SDK Manager.exe下载配置SDK 或AVD Manager.exe 配置 AVD模拟器了。
如果你需要测试android应用的话,请先安装配置好某一版本的SDK及其相关工具。
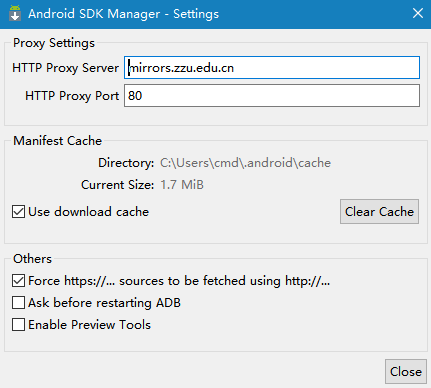
如下图,SDK manager必要配置:
Tools->Options设置
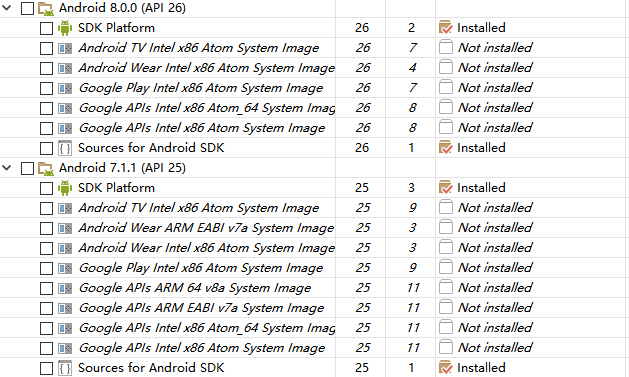
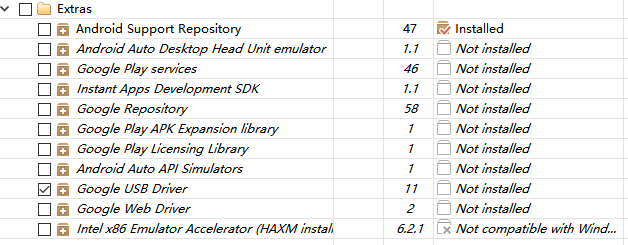
其它要下载的:
此处为了与Macaca环境兼容,目前稳定没敢乱升级,大家也可用此.
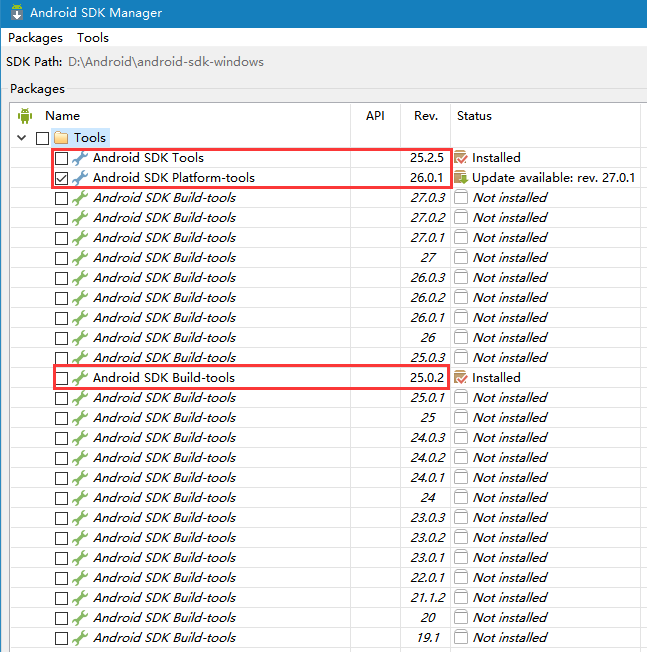
此处的按需选择与AVD模拟器配套使用的
关于Android开发环境的大家可以参考此人的博客
Android SDK Manager和AVD Manager使用
Android开发环境配置
该步骤,主要是为了部署adb工具而已,当然也有独立部署adb的方案.这个你按需选择吧,不过你既然要搞Android UI自动化相关了,Android sdk工具的部署最终还是逃不过的.
#检查下最终的adb版本
C:\Users\cmd>adb -v
Android Debug Bridge version 1.0.39
Revision 3db08f2c6889-android
Installed as D:\Android\android-sdk-windows\platform-tools\adb.exe
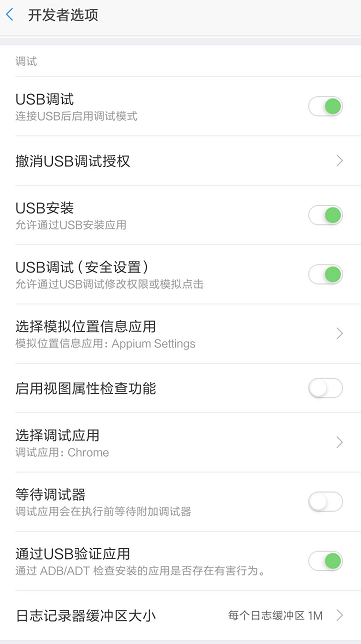
手机真机相关设置
真机小米Mix2
需要开启真机开发者选项->USB调试,模式和其他相关,主要是调试这一栏要打开的有
PyCharm 开发工具
Pycharm download
PyCharm+IDE+and+Python+Plugin+for+IntelliJ+IDEA
Meet PyCharm
请自行安装配置部署好PyCharm开发工具.
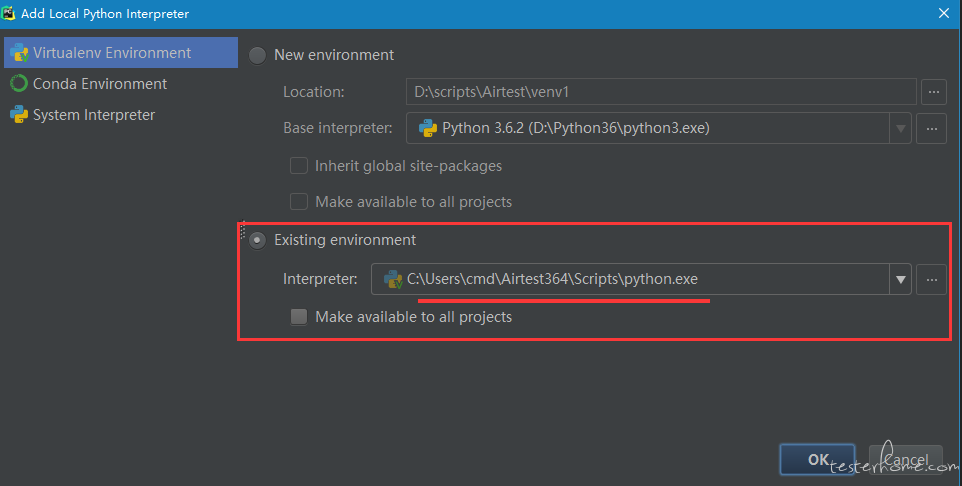
AirTest Project Interpreter环境切换
打开Settings->Project Interpreter
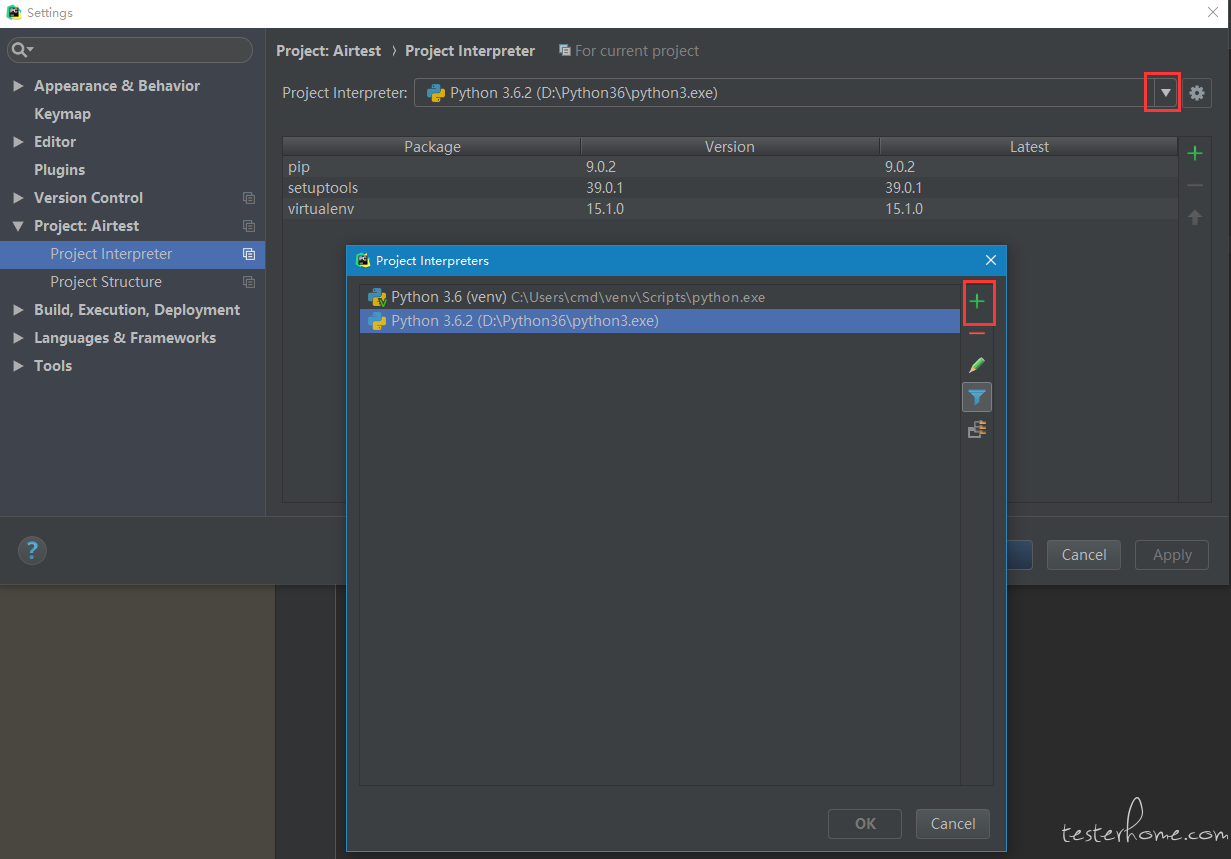
如果上述步骤无误的话,可以直接找到Existing environment选择即可,如果没有请使用添加并找到上述路径C:\Users\cmd\Airtest364\Scripts\添加.
四 AirTestIDE工具简单使用
先通过adb命令检查小米Mix2真机是否连接正常
C:\Users\cmd>adb devices -l
List of devices attached
yourSerialNo          device product:chiron model:MIX_2 device:chiron
AirTestIDE下载地址
然后去官网下载最新版本的AirTestIDE,直接解压到D:盘即可,笔者解压到的路径是D:\AirtestIDE
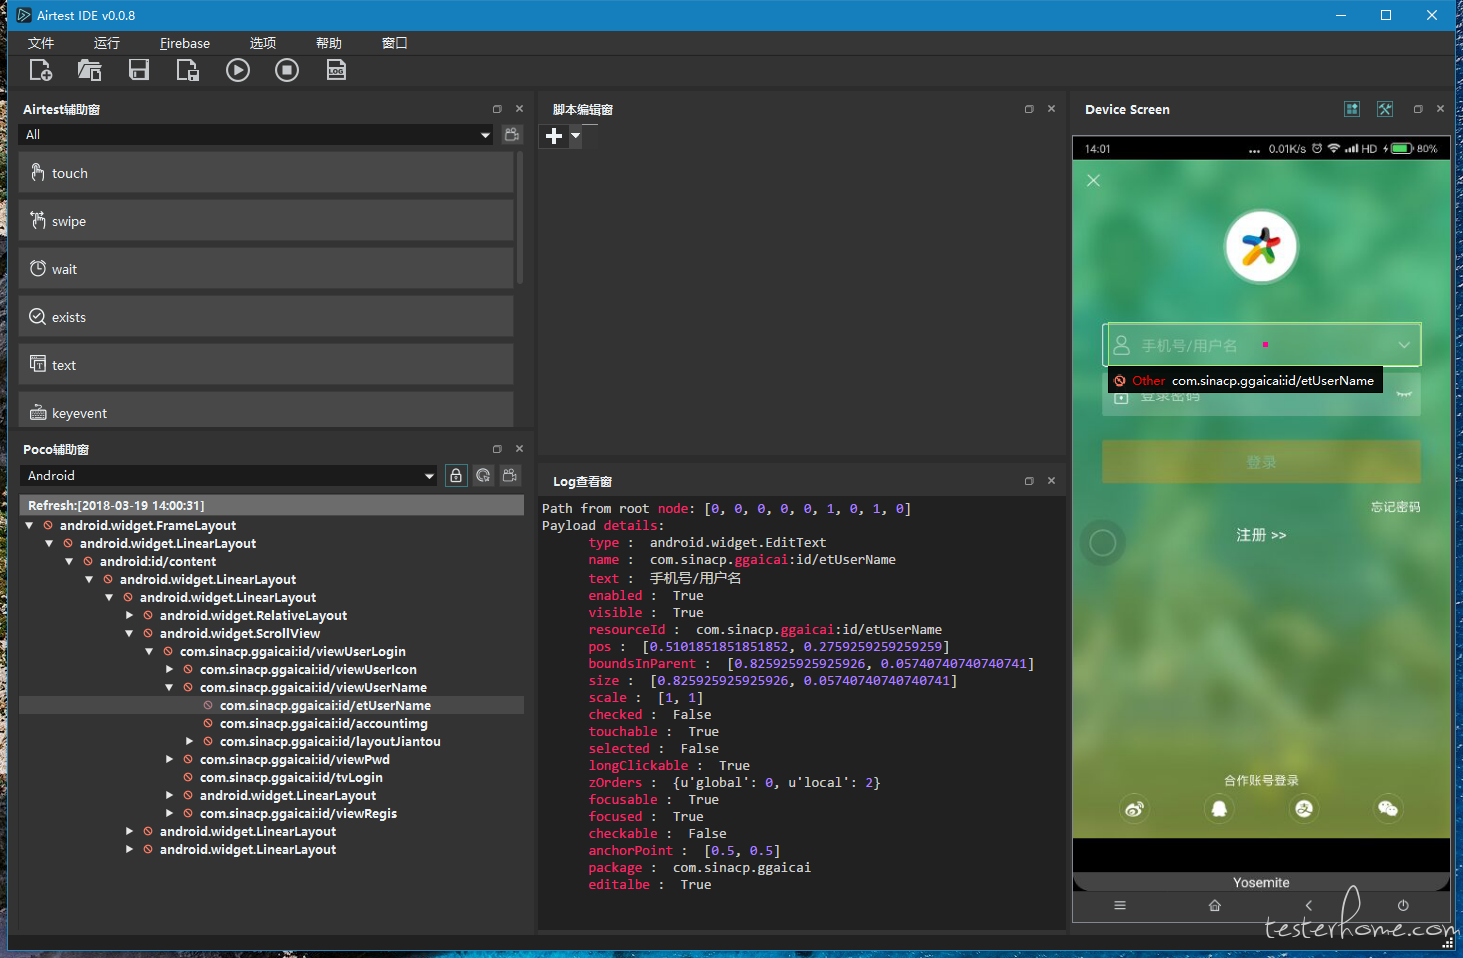
解压目录下找到AirtestIDE.exe双击即可执行,目前还未GDC正式发布,所以你会看到打开了两个窗口,一个是命令行的实时日志(为了便捷的捕获工具本身问题日志),一个就是AirtestIDE主图形工具窗口.
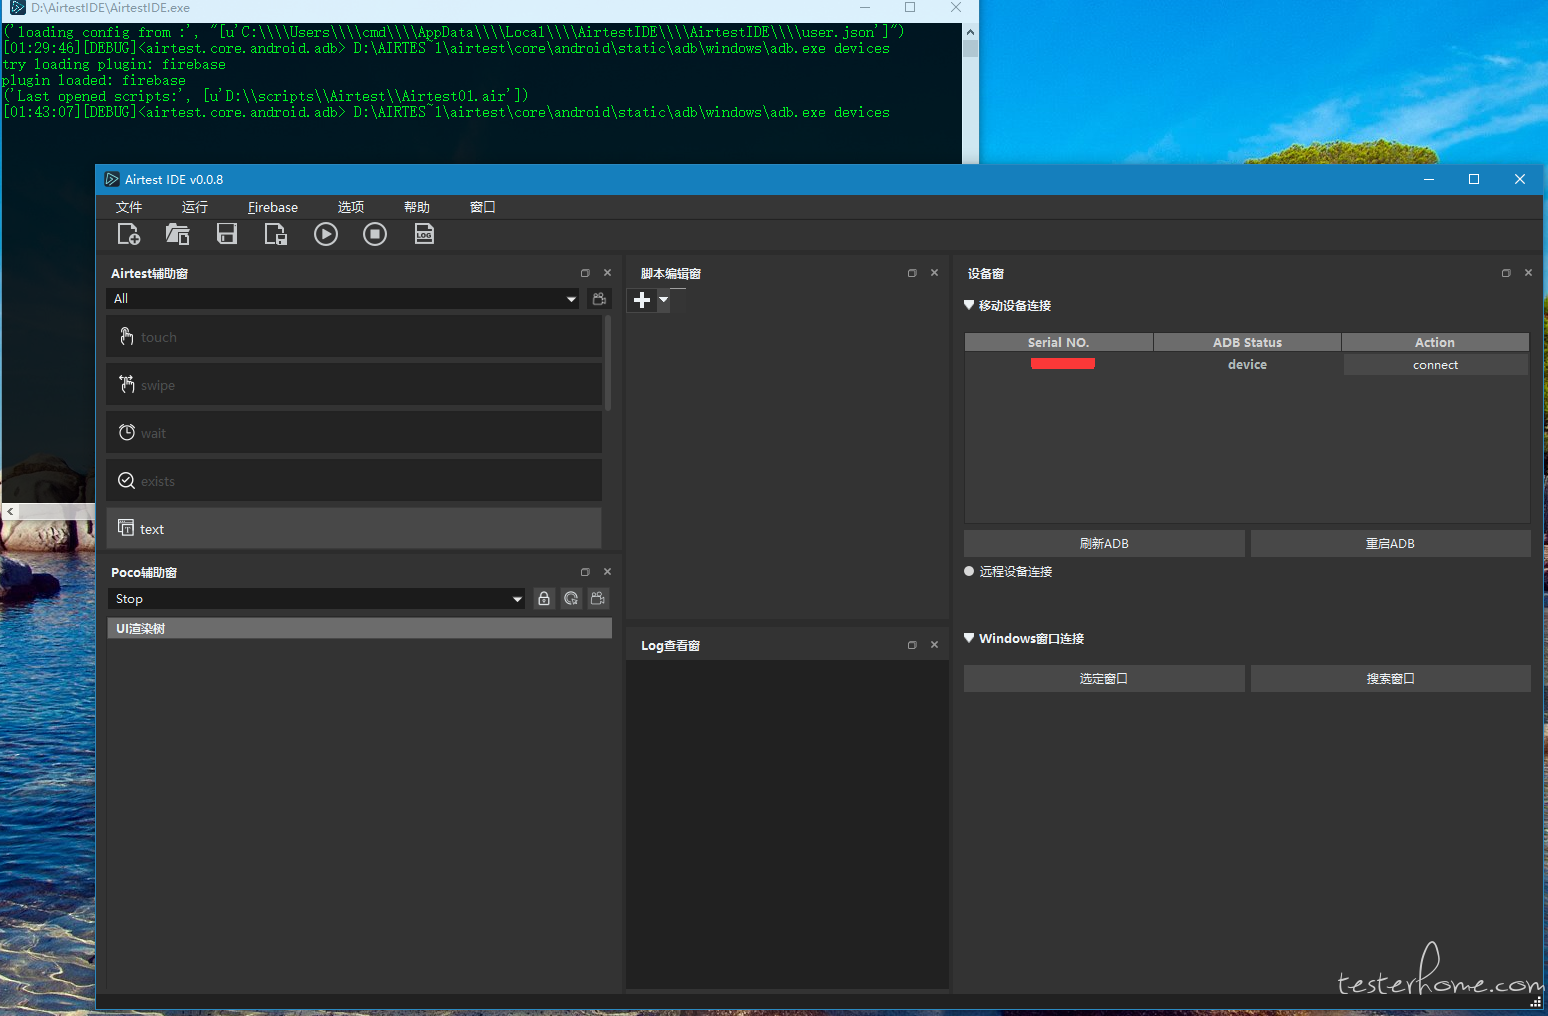
点击设备窗口下的 connect即可看到一个实时同步的且可双向操作的Device Screen窗口,怎么样很腻害吧,实时同步的且可双向操作的呦
此时请注意观察你连接的真机,会提示向手机安装以下依赖包:
RotationWatcher
Poco辅助窗下的Poco Inspector
既是一个类似Macaca Inspector或Appium Inspector的一款界面UI元素查看工具.
使用方法,在Poco辅助窗下拉切换到Android.
此时请注意观察你连接的真机,会提示向手机安装以下依赖包和Poco组件服务:
PocoService
com.netease.open.pocoservice.test
Yosemite(与输入法相关)
安装成功后,我们再找到Poco辅助窗右侧的Poco Inspector按钮,点击之,然后在Device Screen窗口便可即点即提示你当前的选中UI元素了,与其他工具类似.
然后在点击Poco辅助窗右侧的Poco Inspector按钮左侧的Poco Pause即可锁定和树形化展示元素dom树.
如下图
我们利用此方法,找到需要操作的UI元素后,便可以编辑业务流脚本了.
五 编辑登录流程脚本
需要先首先创建个空文件,文件->新建脚本后,选择一保存路径我的是D:\scripts\Airtest\ 取名为Airtest01,确定后,即会发现一个名为Airtest01.air的文件夹.
然后以下,这里用到的就是上述搭建好的Pycharm Python3 virtualenv Airtest364开发环境.
分别用到了两个库下的api airtest.core.api和poco.drivers.android.uiautomation,请自行根据官方文档查看并使用.
最终脚本如下:
# -*- encoding=utf8 -*-
__author__ = "cmd"
__title__ = "Acp Login"
__desc__ = """
this is a test script.
"""
from airtest.core.api import *
from poco.drivers.android.uiautomation import AndroidUiautomationPoco
poco = AndroidUiautomationPoco(force_restart=False)

# start your script here
connect_device('Android:///yourSerialNo')
start_app('com.sinacp.ggaicai')
sleep(9)
poco("com.acp.main:id/tvTabImg4").click()
sleep(3)
poco("com.acp.main:id/tvAccount").click()
sleep(3)
poco("com.sinacp.ggaicai:id/etUserName").click()
poco("com.sinacp.ggaicai:id/etUserName").set_text('张三李四')
sleep(3)
poco("com.sinacp.ggaicai:id/etPwd").click()
poco("com.sinacp.ggaicai:id/etPwd").set_text('123UI895')
sleep(3)
poco("com.sinacp.ggaicai:id/tvLogin").click()
sleep(6)
编辑好无语法错误后,可以直接在AirtestIDE中打开,点击Run Script(F5)执行该脚本.
Log查看窗日志
"D:\AirtestIDE\AirtestIDE" runner "D:\scripts\Airtest\Airtest01.air"  --device Android://127.0.0.1:5037/yourSerialNo --log "C:\Users\cmd\AppData\Local\Temp\AirtestIDE\scripts\c227edd84edf79234c03c3162327120c"
============================================================

[Start running..]
[02:14:11][DEBUG]<airtest.core.android.adb> D:\AIRTES~1\airtest\core\android\static\adb\windows\adb.exe -P 5037 -s yourSerialNo wait-for-device
[02:14:11][DEBUG]<airtest.core.android.adb> D:\AIRTES~1\airtest\core\android\static\adb\windows\adb.exe -P 5037 -s yourSerialNo shell getprop ro.build.version.sdk
[02:14:11][DEBUG]<airtest.utils.logwraper> main_script: {'script': u'D:\\scripts\\Airtest\\Airtest01.air'}
[02:14:11][DEBUG]<airtest.core.android.adb> D:\AIRTES~1\airtest\core\android\static\adb\windows\adb.exe -P 5037 -s yourSerialNo shell dumpsys activity top
[02:14:11][DEBUG]<airtest.core.android.adb> D:\AIRTES~1\airtest\core\android\static\adb\windows\adb.exe -P 5037 -s yourSerialNo shell settings get secure default_input_method[02:14:11][DEBUG]<airtest.core.android.adb> D:\AIRTES~1\airtest\core\android\static\adb\windows\adb.exe -P 5037 -s yourSerialNo shell ime list -a[02:14:12][DEBUG]<airtest.core.android.adb> D:\AIRTES~1\airtest\core\android\static\adb\windows\adb.exe -P 5037 -s yourSerialNo shell dumpsys package com.netease.open.pocoservice[02:14:12][DEBUG]<airtest.core.android.adb> D:\AIRTES~1\airtest\core\android\static\adb\windows\adb.exe -P 5037 -s yourSerialNo shell dumpsys package com.netease.open.pocoservice.test[02:14:12][DEBUG]<airtest.core.android.adb> D:\AIRTES~1\airtest\core\android\static\adb\windows\adb.exe -P 5037 -s yourSerialNo forward --no-rebind tcp:19517 tcp:10080[02:14:12][DEBUG]<airtest.core.android.adb> D:\AIRTES~1\airtest\core\android\static\adb\windows\adb.exe -P 5037 -s yourSerialNo forward --no-rebind tcp:17292 tcp:10081[02:14:13][DEBUG]<airtest.core.android.adb> D:\AIRTES~1\airtest\core\android\static\adb\windows\adb.exe -P 5037 -s yourSerialNo shell ps[02:14:13][DEBUG]<airtest.core.android.adb> D:\AIRTES~1\airtest\core\android\static\adb\windows\adb.exe -s yourSerialNo wait-for-device[02:14:13][DEBUG]<airtest.core.android.adb> D:\AIRTES~1\airtest\core\android\static\adb\windows\adb.exe -s yourSerialNo shell getprop ro.build.version.sdk[02:14:13][DEBUG]<airtest.core.android.adb> D:\AIRTES~1\airtest\core\android\static\adb\windows\adb.exe -s yourSerialNo shell monkey -p com.sinacp.ggaicai -c android.intent.category.LAUNCHER 1[02:14:14][DEBUG]<airtest.utils.logwraper> >start_app Time used: 0.596000s[02:14:14][DEBUG]<airtest.utils.logwraper> function: {'time_used': 0.5959999561309814, 'args': ('com.sinacp.ggaicai',), 'name': 'start_app', 'ret': None, 'kwargs': {}}[02:14:23][DEBUG]<airtest.utils.logwraper> >sleep Time used: 9.012000s[02:14:23][DEBUG]<airtest.utils.logwraper> function: {'time_used': 9.01200008392334, 'args': (9,), 'name': 'sleep', 'ret': None, 'kwargs': {}}[02:14:23][DEBUG]<airtest.core.android.adb> D:\AIRTES~1\airtest\core\android\static\adb\windows\adb.exe -s yourSerialNo shell pm path jp.co.cyberagent.stf.rotationwatcher[02:14:23][DEBUG]<airtest.core.android.adb> D:\AIRTES~1\airtest\core\android\static\adb\windows\adb.exe -s yourSerialNo shell export CLASSPATH=/data/app/jp.co.cyberagent.stf.rotationwatcher-kp6OiHzpT4ITooezG-vtMA==/base.apk;exec app_process /system/bin jp.co.cyberagent.stf.rotationwatcher.RotationWatcher[02:14:23][DEBUG]<airtest.core.android.adb> D:\AIRTES~1\airtest\core\android\static\adb\windows\adb.exe -s yourSerialNo shell ls /data/local/tmp/minicap[02:14:24][DEBUG]<airtest.core.android.adb> D:\AIRTES~1\airtest\core\android\static\adb\windows\adb.exe -s yourSerialNo shell ls /data/local/tmp/minicap.so[02:14:24][DEBUG]<airtest.core.android.adb> D:\AIRTES~1\airtest\core\android\static\adb\windows\adb.exe -s yourSerialNo shell LD_LIBRARY_PATH=/data/local/tmp /data/local/tmp/minicap -v 2>&1[02:14:24][DEBUG]<airtest.core.android.adb> D:\AIRTES~1\airtest\core\android\static\adb\windows\adb.exe -s yourSerialNo shell dumpsys display[02:14:24][DEBUG]<airtest.core.android.minicap> version:5[02:14:24][DEBUG]<airtest.core.android.minicap> skip install minicap[02:14:24][DEBUG]<airtest.core.android.adb> D:\AIRTES~1\airtest\core\android\static\adb\windows\adb.exe -s yourSerialNo forward --no-rebind tcp:13151 localabstract:minicap_13151[02:14:24][DEBUG]<airtest.core.android.adb> D:\AIRTES~1\airtest\core\android\static\adb\windows\adb.exe -s yourSerialNo shell dumpsys window[02:14:24][DEBUG]<airtest.core.android.adb> D:\AIRTES~1\airtest\core\android\static\adb\windows\adb.exe -s yourSerialNo shell dumpsys SurfaceFlinger[02:14:25][DEBUG]<airtest.core.android.adb> D:\AIRTES~1\airtest\core\android\static\adb\windows\adb.exe -s yourSerialNo shell getevent -p[02:14:25][DEBUG]<airtest.core.android.adb> D:\AIRTES~1\airtest\core\android\static\adb\windows\adb.exe -s yourSerialNo shell LD_LIBRARY_PATH=/data/local/tmp /data/local/tmp/minicap -n 'minicap_13151' -P 1080x2160@1080x2160/0 -l 2>&1[02:14:25][DEBUG]<airtest.utils.nbsp> [minicap_server]'PID: 28547'[02:14:25][DEBUG]<airtest.utils.nbsp> [minicap_server]'INFO: Using projection 1080x2160@1080x2160/0'[02:14:25][DEBUG]<airtest.utils.nbsp> [minicap_server]'INFO: (external/MY_minicap/src/minicap_26.cpp:241) Creating SurfaceComposerClient'[02:14:25][DEBUG]<airtest.utils.nbsp> [minicap_server]'INFO: (external/MY_minicap/src/minicap_26.cpp:244) Performing SurfaceComposerClient init check'[02:14:25][DEBUG]<airtest.utils.nbsp> [minicap_server]'INFO: (external/MY_minicap/src/minicap_26.cpp:255) Creating virtual display'[02:14:25][DEBUG]<airtest.utils.nbsp> [minicap_server]'INFO: (external/MY_minicap/src/minicap_26.cpp:261) Creating buffer queue'[02:14:25][DEBUG]<airtest.utils.nbsp> [minicap_server]'INFO: (external/MY_minicap/src/minicap_26.cpp:264) Setting buffer options'[02:14:25][DEBUG]<airtest.utils.nbsp> [minicap_server]'INFO: (external/MY_minicap/src/minicap_26.cpp:268) Creating CPU consumer'[02:14:25][DEBUG]<airtest.utils.nbsp> [minicap_server]'INFO: (external/MY_minicap/src/minicap_26.cpp:272) Creating frame waiter'[02:14:25][DEBUG]<airtest.utils.nbsp> [minicap_server]'INFO: (external/MY_minicap/src/minicap_26.cpp:276) Publishing virtual display'[02:14:25][DEBUG]<airtest.utils.nbsp> [minicap_server]'INFO: (jni/minicap/JpgEncoder.cpp:64) Allocating 7052292 bytes for JPG encoder'[02:14:25][DEBUG]<airtest.utils.nbsp> [minicap_server]'INFO: (/home/lxn3032/minicap_for_ide/jni/minicap/minicap.cpp:473) Server start'[02:14:25][DEBUG]<airtest.utils.nbsp> [minicap_server]'INFO: (/home/lxn3032/minicap_for_ide/jni/minicap/minicap.cpp:475) New client connection'[02:14:25][DEBUG]<airtest.core.android.minicap> (1, 24, 28547, 1080, 2160, 1080, 2160, 0, 2)[02:14:25][DEBUG]<airtest.utils.logwraper> >snapshot Time used: 2.319000s[02:14:25][DEBUG]<airtest.utils.logwraper> function: {'name': 'snapshot', 'kwargs': {'msg': u'UIObjectProxy of "com.acp.main:id/tvTabImg4"'}, 'time_used': 2.319000005722046, 'screen': '1521440065604.jpg', 'args': (), 'ret': u'C:\\Users\\cmd\\AppData\\Local\\Temp\\AirtestIDE\\scripts\\c227edd84edf79234c03c3162327120c\\1521440063344.jpg'}[02:14:29][DEBUG]<airtest.utils.logwraper> >sleep Time used: 3.005000s[02:14:29][DEBUG]<airtest.utils.logwraper> function: {'time_used': 3.005000114440918, 'args': (3,), 'name': 'sleep', 'ret': None, 'kwargs': {}}[02:14:29][DEBUG]<airtest.utils.logwraper> >snapshot Time used: 0.223000s[02:14:29][DEBUG]<airtest.utils.logwraper> function: {'name': 'snapshot', 'kwargs': {'msg': u'UIObjectProxy of "com.acp.main:id/tvAccount"'}, 'time_used': 0.22300004959106445, 'screen': '1521440069855.jpg', 'args': (), 'ret': u'C:\\Users\\cmd\\AppData\\Local\\Temp\\AirtestIDE\\scripts\\c227edd84edf79234c03c3162327120c\\1521440069682.jpg'}[02:14:33][DEBUG]<airtest.utils.logwraper> >sleep Time used: 3.015000s[02:14:33][DEBUG]<airtest.utils.logwraper> function: {'time_used': 3.0149998664855957, 'args': (3,), 'name': 'sleep', 'ret': None, 'kwargs': {}}[02:14:34][DEBUG]<airtest.utils.logwraper> >snapshot Time used: 0.443000s[02:14:34][DEBUG]<airtest.utils.logwraper> function: {'name': 'snapshot', 'kwargs': {'msg': u'UIObjectProxy of "com.sinacp.ggaicai:id/etUserName"'}, 'time_used': 0.44300007820129395, 'screen': '1521440074313.jpg', 'args': (), 'ret': u'C:\\Users\\cmd\\AppData\\Local\\Temp\\AirtestIDE\\scripts\\c227edd84edf79234c03c3162327120c\\1521440073922.jpg'}[02:14:35][DEBUG]<airtest.core.android.adb> D:\AIRTES~1\airtest\core\android\static\adb\windows\adb.exe -P 5037 -s yourSerialNo shell dumpsys package com.netease.nie.yosemite[02:14:35][INFO]<airtest.core.android.yosemite> local version code is 281, installed version code is 281[02:14:35][DEBUG]<airtest.core.android.adb> D:\AIRTES~1\airtest\core\android\static\adb\windows\adb.exe -P 5037 -s yourSerialNo shell am broadcast -a ADB_INPUT_TEXT --es msg '张三李四'[02:14:38][DEBUG]<airtest.utils.logwraper> >sleep Time used: 3.001000s[02:14:38][DEBUG]<airtest.utils.logwraper> function: {'time_used': 3.000999927520752, 'args': (3,), 'name': 'sleep', 'ret': None, 'kwargs': {}}[02:14:39][DEBUG]<airtest.utils.logwraper> >snapshot Time used: 0.379000s[02:14:39][DEBUG]<airtest.utils.logwraper> function: {'name': 'snapshot', 'kwargs': {'msg': u'UIObjectProxy of "com.sinacp.ggaicai:id/etPwd"'}, 'time_used': 0.3789999485015869, 'screen': '1521440079428.jpg', 'args': (), 'ret': u'C:\\Users\\cmd\\AppData\\Local\\Temp\\AirtestIDE\\scripts\\c227edd84edf79234c03c3162327120c\\1521440079098.jpg'}[02:14:40][DEBUG]<airtest.core.android.adb> D:\AIRTES~1\airtest\core\android\static\adb\windows\adb.exe -P 5037 -s yourSerialNo shell am broadcast -a ADB_INPUT_TEXT --es msg '123UI895'[02:14:43][DEBUG]<airtest.utils.logwraper> >sleep Time used: 3.000000s[02:14:43][DEBUG]<airtest.utils.logwraper> function: {'time_used': 3.0, 'args': (3,), 'name': 'sleep', 'ret': None, 'kwargs': {}}[02:14:51][DEBUG]<airtest.core.android.adb> D:\AIRTES~1\airtest\core\android\static\adb\windows\adb.exe -s yourSerialNo forward --remove tcp:13151[02:14:44][DEBUG]<airtest.utils.logwraper> >snapshot Time used: 0.454000s[02:14:44][DEBUG]<airtest.utils.logwraper> function: {'name': 'snapshot', 'kwargs': {'msg': u'UIObjectProxy of "com.sinacp.ggaicai:id/tvLogin"'}, 'time_used': 0.45399999618530273, 'screen': '1521440084269.jpg', 'args': (), 'ret': u'C:\\Users\\cmd\\AppData\\Local\\Temp\\AirtestIDE\\scripts\\c227edd84edf79234c03c3162327120c\\1521440083861.jpg'}[02:14:51][DEBUG]<airtest.utils.logwraper> >sleep Time used: 6.012000s[02:14:51][DEBUG]<airtest.utils.logwraper> function: {'time_used': 6.01200008392334, 'args': (6,), 'name': 'sleep', 'ret': None, 'kwargs': {}}----------------------------------------------------------------------Ran 1 test in 40.255sOK[02:14:51][DEBUG]<airtest.core.android.adb> D:\AIRTES~1\airtest\core\android\static\adb\windows\adb.exe -P 5037 -s yourSerialNo forward --remove tcp:19517[02:14:51][DEBUG]<airtest.core.android.adb> D:\AIRTES~1\airtest\core\android\static\adb\windows\adb.exe -P 5037 -s yourSerialNo forward --remove tcp:17292[02:14:51][ERROR]<airtest.core.android.rotation> orientationWatcher has endedsave log in 'C:\Users\cmd\AppData\Local\Temp\AirtestIDE\scripts\c227edd84edf79234c03c3162327120c'installed version is 26, installer version is 26. force_reinstall=Falseinstalled version is 0, installer version is 0. force_reinstall=Falseexiting.......EndOfStream: minicap_server[Finished]============================================================
从执行日志来分析发现
C:/Users/cmd/AppData/Local/Temp/AirtestIDE/scripts/**
目录下会记录每步操作的截图
点一下AirtestIDE 工具栏最后一项View Report 还会在上述目录 生成个 log.html
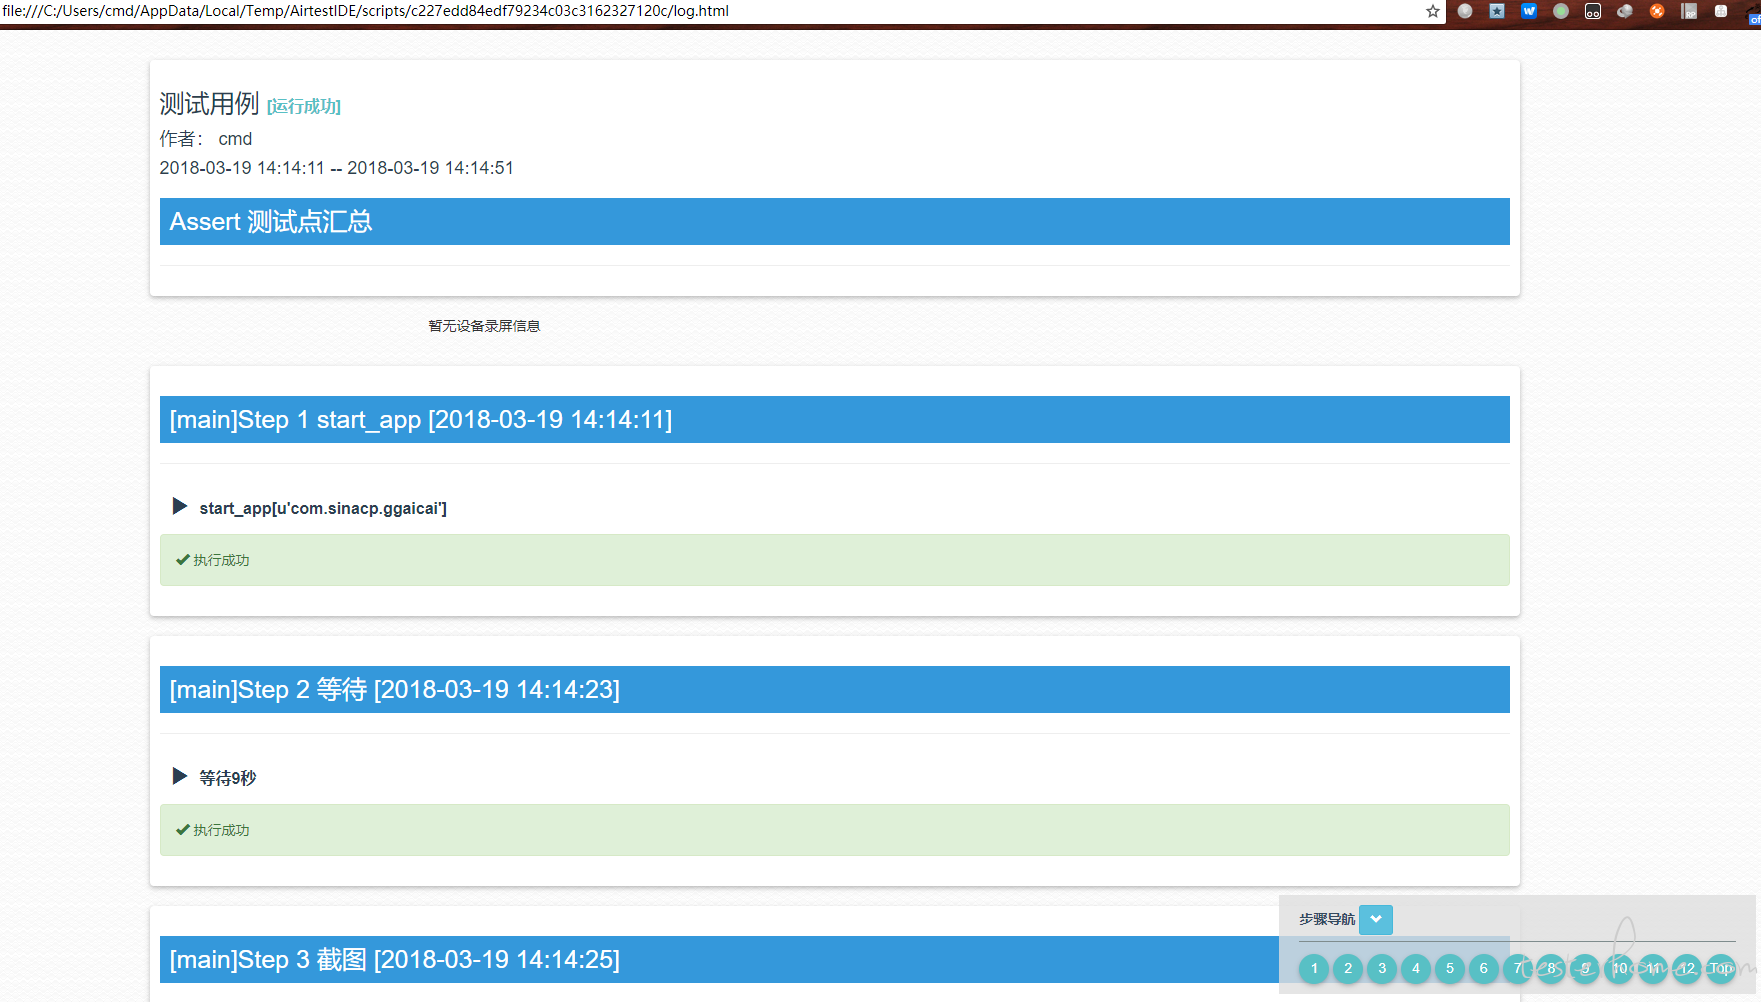
以上便是简单的利用AirTest提供的Android App 基于元素识别做的UI自动化小案例.

网易 UI 自动化工具 Airtest 浅用记录的更多相关文章
- Airtest 网易 UI 自动化工具 Airtest 浅用记录
一 使用目的 该工具主要是面向游戏UI测试基于图像识别,如游戏框架unity,Cocos-js以及网易内部的游戏框架同时也支持原生Android App 的基于元素识别的UI自动化测试.本文主要使用目 ...
- 网易UI自动化测试工具Airtest中导入air文件中的方法
最近看了一下网易的Airtest ,UI测试工具,写了一些后在导入其他air文件中的.py文件,卡了一下,现在博客中纪录一下导入其他air文件的方式: 在Airtest 测试工具中,导入其他air文件 ...
- 微信小程序UI自动化:实践之后的记录01-选择工具/框架
目录 1. 前言 2. 工具/框架/库选择 2.1 miniprogram-automator官方介绍(摘自官方哈) 小程序自动化 特性 2.2 minium官方介绍 特性 3. 如何选择 4. 对应 ...
- UI自动化测试之Airtest
官方文档: https://airtest.doc.io.netease.com/ 本文我们讲解下Airtest的使用,主要学习目标有以下几点: (1)认识Airtest (2)了解Airtest能做 ...
- 一种新的自动化 UI 测试解决方案 Airtest Project
今天分享一个自动化UI测试工具airtest——一款网易出品的基于图像识别面向游UI测试的工具,也支持原生Android App基于元素识别的UI自动化测试.主要包含了三部分:Airtest IDE. ...
- 手机UI自动化之显示点触位置(触摸轨迹)
上期回顾:Airtest源码分析--Android屏幕截图方式 不管是用Appium还是Airtest,或是其他手机UI自动化工具,你是不是经常遇到这种情况,代码明明执行了click或swipe,怎么 ...
- Airtest网易开源的一款UI自动化测试工具
Airtest网易开源的一款UI自动化测试工具 1 Airtest 简介Airtest Project是网易游戏内部工具团队开发并开源的一款UI自动化测试工具,据说曾经获得谷歌力挺. AirtestI ...
- 非常好用的1款UI自动化测试工具:airTest
网易团队开发的UI自动化测试神器airTest,下载地址:http://airtest.netease.com/tutorial/Tutorial.html Appium和airTest对比,我的看法 ...
- airtest自动化中的poco+python连接手机实现ui自动化
airtest:http://airtest.netease.com/docs/docs_AirtestIDE-zh_CN/index.html官网地址 AirtestIDE:跨平台的UI自动化测试编 ...
随机推荐
- Web container==Servlet container
Web container From Wikipedia, the free encyclopedia (Redirected from Servlet container) Web co ...
- java中的Enumeration
Enumeration en = pp.keys(); while(en.hasMoreElements()){ String key = (String)en.nextElement(); Syst ...
- win7系统查看端口占用情况
我们在启动应用或者在开发的时候的时候经常发现我们需要使用的端口被别的程序占用,但是我们又不知道是被谁占用,这时候我们需要找出“真凶”,如何做到呢? 方法/步骤 开始---->运行----&g ...
- codeforces 631A A. Interview
A. Interview time limit per test 1 second memory limit per test 256 megabytes input standard input o ...
- python suds 调用webservice 缓存
在linux系统中 如果webservice更新了字段 suds调用有可能缓存以前的字段或方法,对新的字段报找不到类型 TypeNotFound,或者对 新加的方法找不到该方法的错误. 当更新或添加w ...
- Arc077_E Guruguru
传送门 题目大意 有$m$个点编号从小到大按照顺时针编成了一个环,有一枚棋子,每次移动可以选择顺时针移动到下一个或者直接移动到编号为$x$的点,现在有$n-1$次数操作,第$i$次要把棋子从第$A_i ...
- 数据schemaAvro简介
文章结束给大家来个程序员笑话:[M] 最近在研究Thrift和Avro以及它们的区分,通过各种渠道搜集资料,现整顿出有关Avro的一些资料,方便当前参考. 一.弁言 1. 简介 Avro是Hadoop ...
- jqgrid--api,官网demo,编辑
api参考: http://blog.csdn.net/hurryjiang/article/details/7551477 官网demo: http://www.trirand.com/blog/j ...
- Swift错误处理
相对于可选中运用值的存在与缺失来表达函数的成功与失败,错误处理可以推断失败的原因,并传播至程序的其他部分. throws关键词 一个函数可以通过在声明中添加throws关键词来抛出错误消息. func ...
- NSDictionary和NSArray
// 字典里套数组 NSArray *array1 = @[@"huahau" , @"hehe"]; NSArray *array2 = @[@"x ...