Database 2 Day DBA guide_Chapter2
website:http://www.oracle.com/webfolder/technetwork/tutorials/obe/db/11g/r2/2day_dba/install/install.htm
Chapter 2: Installing Oracle Software and Building the Database
第二章:安装Oracle软件和建造数据库。
Purpose
目的
This chapter shows you how to use the Oracle Universal Installer (OUI) to install your Oracle database software and create a starter database. You will also learn how you can use the Database Configuration Assistant (DBCA) to create additional databases.
这个章节展示你如何的使用oracle通用安装安装你的数据库软件和创建一个启动数据库。你也会学习到如何使用数据库配置助手(DBCA)创建另外的数据库。
Time to Complete
完成时间。
Approximately 2 hours
大约2小时。
Topics 主题
This tutorial covers the following topics: 这个手册覆盖到下面的主题。
 |
Prerequisites 前期准备 |
 |
Installing the Software Using the Oracle Universal Installer (OUI) 使用oracle通用安装(OUI)安装软件 |
 |
Using the Database Configuration Assistant (DBCA) to Create a Database 使用数据库配置助手创建一个数据库。 |
 |
Summary 总结 |
Viewing Screenshots 查看屏幕截图
 Place the cursor over this icon to load and view all the screenshots for this tutorial. (Caution: This action loads all screenshots simultaneously, so response time may be slow depending on your Internet connection.)
放置那个关标通过图表为了加载所有这个手册的屏幕截图。(注意:这个动作加载所有的屏幕截图同时的,所以响应时间可以好是慢的依赖于你的网络连接。)
Note: Alternatively, you can place the cursor over an individual icon in the following steps to load and view only the screenshot associated with that step. You can hide an individual screenshot by clicking it.
注意:选择性的,你可以放置你的光标通过一个单个的图标,在下面的步骤为了加载和查看唯一的关联的屏幕截图。你可以隐藏当个屏幕截图通过点击它。
Prerequisites 前期准备。
Before you perform this tutorial, you should: 在完成这个手册之前,你应该:
| 1. |
General computer knowledge. 常规的电脑知识。 |
|
| 2. |
Familiarity with basic product installs. 相似的基础产品安装。 |
|
返回的主题。
Installing the Software Using the Oracle Universal Installer (OUI) 安装软件使用oracle通用安装。
You can use the Oracle Universal Installer (OUI) to install your Oracle software . The OUI is a GUI tool that enables you to view the Oracle software that is installed on your machine, install new Oracle
software, and delete Oracle software that you no longer intend to use. There are two methods that you can use to install the Oracle software: basic and advanced. Choose the basic installation method to
quickly the install the software with minimal user input. The advanced installation method enables you to perform a custom installation.
你可以使用orcle 通用安装为了安装你的oracle软件。那个oracle通用安装是一个图形用户工具使你能够观看安装在你的机器oracle软件那个是,安装新的oracle软件和删除oracle软件那个你不在打算使用它。这里有两种方法那个你可以使用为了安装那个oracle数据库的软件:基础和高级。选择基础安装方法为了快速的安装那个软件伴随着用户最小的输入。
| A | Basic Installation 基础安装。 |
| B. | Advanced Installation 高级安装。 |
Basic Installation 基础安装。
Follow the steps below to install the Oracle software and create a database using the basic installation method.
顺着那个下面的步骤为了安装你的oracle软件和创建一个数据库使用基本的安装方法。
(Note: The Sample Schemas are not installed by default using the Basic Installation option): 注意这个示例模式不是被安装通过默认使用的基本安装选项。
| 1. |
Log onto you computer as a member of the administrative group that is authorized to install Oracle software and create and run the database. 登进你的电脑成为一个管理组的成员那个是被授权安装oracle软件和创建和运行那个数据库。 |
|
| 2. |
Insert the distribution CD for the database into your CD drive. The Autorun window will appear automatically. 插入那个分布式的CD为了数据库进入CD驱动。那个自动的运行窗口会出现自动的。 Note: If you are downloading from Oracle’s download site, follow the instructions given on the Web site. 注意:如果你是下载从oracle下载网站,下面的指导给那个网址。 |
|
| 3. |
At the Configure Security Updates window, enter your e-mail address and Oracle Support password and click Next. 在那个配置安全更新窗口,输入你的电子邮箱和oracle支持的密码和点击下一步。 If you choose to not supply your email address and Oracle Support password, uncheck the check box, leave both text boxes empty, then click Next. When prompted, click Yes. 如果你选择不提供你的电子邮箱地址和oracle支持密码,未检查那个检查盒子,离开两个文本盒子是空的,然后点击下一步,当被提醒点击是。
|
|
| 4. |
At the Installation Option window, select Create and configure a database and click Next. 在安装选择窗口,选择创建和配置一个数据库并且点击下一步。
|
|
| 5. |
At the System Class window, select Server Class and click Next. 在系统级别窗口,选择服务器并且点击下一步。
|
|
| 6. |
At the Grid Options window, select Single instance database installation and click Next. 在网格选项窗口,选择单实例数据库安装并且点击下一步。
|
|
| 7. |
At the Install Type window, select Typical install and click Next. 在安装类型窗口,选择典型安装和点击下一步。
|
|
| 8. |
At the Typical Installation window, enter an Administrative Password. Enter it a second time to confirm the password and click Next. 在典型安装窗口,输入管理员的密码,第二次输入为了确认密码和点击下一步。 Note that the password is evaluated to make sure that it conforms to Oracle recommended standards. If it is not, you will receive an error window asking if you would like to proceed. 注意:那个密码是评估确保它一致的与oracle推荐的密码。如果他不是你会收到一个错误窗口是否你想要继续。
|
|
| 9. |
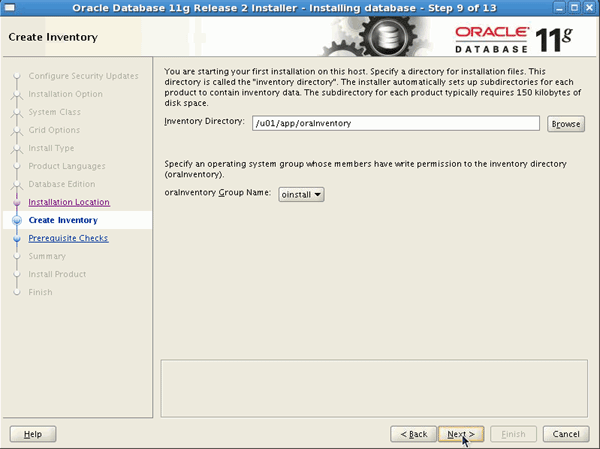
At the Create Inventory window, accept the defaults and click Next. 在创建详细目录窗口,接受默认的和点击继续。
|
|
| 10. |
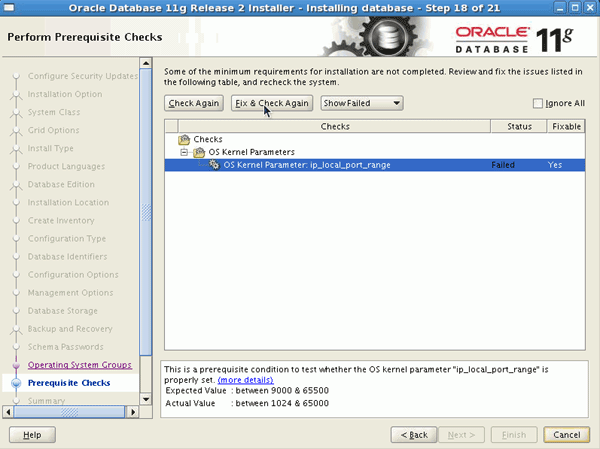
At the Prerequisite Checks window, you see a list of issues that were not met. Issues which can be resolved by the OUI are listed with Yes in the Fixable column. To allow the OUI to generate a script to fix the fixable issues, click Fix and Check Again. 在那个前期准备窗口,你看问题的列表那个不是满足的。问题那个可以被解决通过oracle通用安装是那个列表伴随着是在fixable列。为了允许oracle通用安装生成一个脚本修复那个可固定的问题,点击修复和检查在一次。
|
|
| 11. |
The Execute Fixup Scripts window will appear, providing instructions. 执行修正脚本窗口会出现下面的,提供指示。
|
|
| 12. |
Open a terminal. Change to the OS user root. Then execute the script. 打开终端设备,改变那个操作系统用户使用root,然后执行那个脚本。 su - root
|
|
| 13. |
Return to the Execute Fixup Scripts window and click OK. 返回修复脚本窗口,点击OK
|
|
| 14. |
At the Summary window, click Finish. 在那个总结窗口,点击完成。
|
|
| 15. |
A progress window will appear. 那个进程窗口会出现。
|
|
| 16. |
After the software is installed, the Database Configuration Assistant will begin and create your database. 之后软件被安装,那个数据库配置助手会开始和创建你的数据库。
|
|
| 17. |
The database was created successfully. Click Close. 数据库被创建完成点击关闭。
|
|
| 18. |
You need to execute a couple of scripts as the root user. 你需要执行一些脚本当成root用户。
|
|
| 19. |
Open a terminal window and execute the following commands: 打开终端窗口和执行下面的命令。 su -
|
|
| 20. |
Return to the Execute Configuration Script window and click OK. 返回执行配置脚本窗口和点击OK
|
|
| 21. |
Your installation and database creation completed successfully. click Close. 你安装和数据库创建完成成功的,点击关闭
|
|
Advanced Installation 高级安装
Follow the steps below to install the Oracle software and create a database using the advanced installation method.
跟着下面的步骤安装oracle软件和创建一个数据库使用高级的安装方法。
Note: If you performed the Basic Installation steps, you do not need to complete this section. 注意:如果你完成那个基础的安装步骤,你不需要完成下面这部分。
| 1. |
Log onto you computer as a member of the administrative group that is authorized to install Oracle software and create and run the database. 登进你的计算机是一个成员管理员组的那个是被授权为了安装oracle软件 创建和运行数据库。 |
|
| 2. |
Insert the distribution CD for the database into your CD drive. The Autorun window will appear automatically. 插入那个分布CD为了那个数据库进入你的CD驱动。那个自动窗口会出现自动的。 Note: If you are downloading from Oracle’s download site, follow the instructions given on the Web site. 注意:如果你是下载从oracle的下载地址,遵循那个网站上的指导。 |
|
| 3. |
At the Configure Security Updates window, enter your e-mail address and Oracle Support password and click Next. If you choose to not supply your email address and Oracle Support password, uncheck the check box, leave both text boxes empty, then click Next. When prompted, click Yes. 在配置安全更新窗口中,键入你的电子邮件地址和oracle支持的密码点击下一步。如果你选择不提供你的电子邮件和oracle支持的密码,不选那个选择窗口。离开文本盒子空的,然后点击下一步。当提醒的时候,点击是。
|
|
| 4. |
At the Installation Option window, select Create and configure a database and click Next. 在安装选项窗口,选择创建和配置一个数据库点击下一步。
|
|
| 5. |
At the System Class window, select Server Class and click Next. 在系统级窗口,选择服务级别和点击下一步。
|
|
| 6. |
At the Grid Options window, select Single instance database installation and click Next. 在网格选择窗口,选择单实例数据库安装和点击下一步。
|
|
| 7. |
At the Install Type window, select Advanced install and click Next. 在那个安装类型窗口,选择高级安装和点击下一步。
|
|
| 8. |
At the Product Languages window, select the Move All button to select all the languages. 在产品语言窗口,选择那个移动所有的按钮to选择所有的语言。
|
|
| 9. |
Click Next. 点击下一步。
|
|
| 10. |
At the Database Edition window, make sure that Enterprise Edition is selected and click Next. 在数据库版本窗口,确保企业版本被选择和点击下一步。
|
|
| 11. |
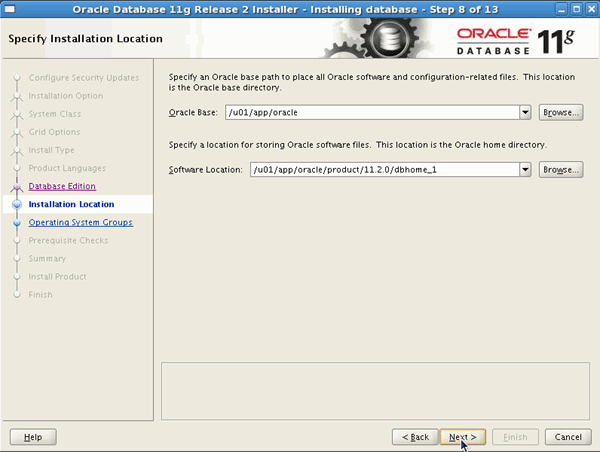
At the Installation Location window, accept the defaults and click Next. 在那个安装定位窗口,接受默认和点击下一步。
|
|
| 12. |
At the Create Inventory window, accept the defaults and click Next. 在创建详细目录窗口,接受默认和点击下一步。
|
|
| 13. |
At the Configuration Type window, make sure the type of database is set to General Purpose / Transaction Processing and click Next. 在配置类型窗口,确保那个数据库类型是集合为了常规的目的/事物的进程和点击下一步。
|
|
| 14. |
At the Database Identifier window, accept the defaults and click Next. 在数据库标识符窗口,接收默认和点击下一步。
|
|
| 15. |
At the Configuration Options window, for the memory tab, you will accept the defaults. Click the Character sets tab. 在配置选项窗口,为了存储标签栏,你会接受那个默认的。点击那个字符集合页签。
|
|
| 16. |
Change the setting to Use Unicode (AL32UTF8) and click the Security tab. 选择那个集合为AL32UTF8和点击安全标签。
|
|
| 17. |
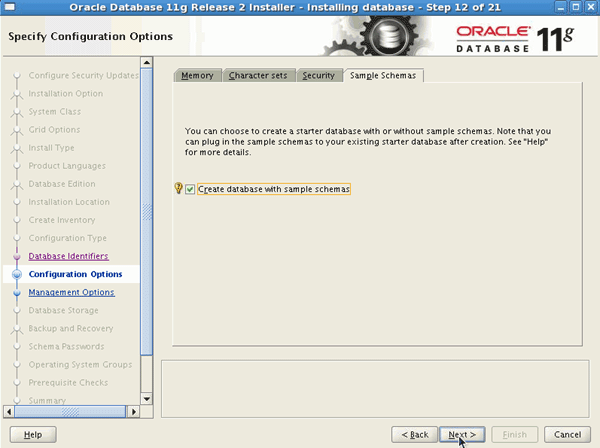
Accept the default and click the Sample Schema tab. 接受默认的和点击示例模式标签。
|
|
| 18. |
Select the Create database with sample schema check box and click Next. 选择那个创建数据库示例模式验证盒子和点击下一步。
|
|
| 19. |
At the Management Options window, accept the defaults and click Next. 在那个管理选项窗口,接受那个默认和点击下一步。
|
|
| 20. |
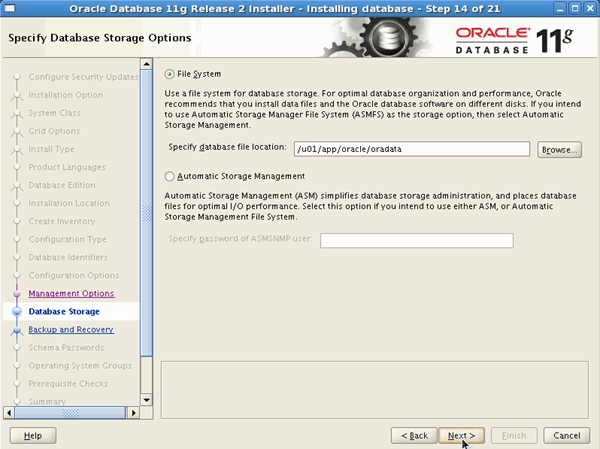
At the Database Storage window, accept the defaults and click Next. 在数据库存储窗口,接受那个默认的和点击下一步。
|
|
| 21. |
At the Backup and Recovery window, accept the defaults and click Next. 在那个恢复和备份窗口,接受默认的和点击下一步。
|
|
| 22. |
At the Schema Passwords window, select Use the same password for all accounts and enter an Oracle Recommended password and confirm password and click Next. 在那个模式密码窗口,选择使用相同的密码为了所有的账号和输入一个oracle推荐的密码并且确认密码和点击下一步。
|
|
| 23. |
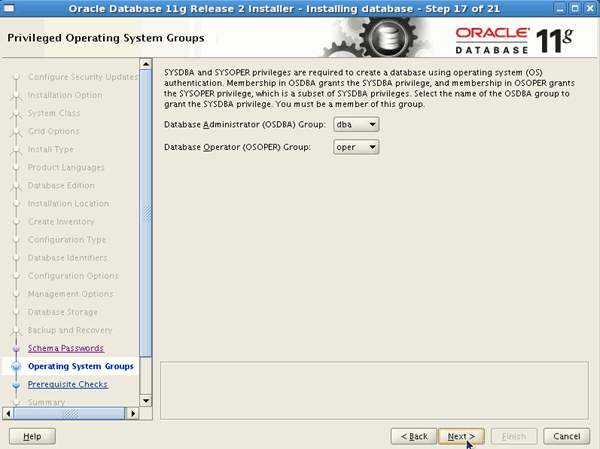
At the Operating System Groups window, accept the defaults and click Next. 在操作系统组窗口,接受默认的和点击下一步。
|
|
| 24. |
At the Prerequisite Checks window, you see a list of issues that were not met. Issues which can be resolved by the OUI are listed with Yes in the Fixable column. To allow the OUI to generate a script to fix the fixable issues, click Fix and Check Again. 在那个先决条件窗口,你看问题列表不满足的。问题可以被解决通过oracle列表带着是在能够修复字段里面。允许oracle通用安装生成脚本为了修复那个可修复的问题。点击修复和检查在一次。
|
|
| 25. |
The Execute Fixup Scripts window will appear, providing instructions. 执行修复脚本窗口会出现,提供指导。
|
|
| 26. |
Open a terminal. Change to the OS user root. Then execute the script. 打开终端,改变你的操作系统用户root然后执行下面脚本。 su - root
|
|
| 27. |
Return to the Execute Fixup Scripts window and click OK. 返回执行修正脚本窗口和点击OK
|
|
| 28. |
At the Summary window, click Finish. 在总结窗口,点击完成。
|
|
| 29. |
A progress window will appear. 一个进程窗口会出现。
|
|
| 30. |
After the software is installed, the Database Configuration Assistant will begin and create your database. 软件安装之后,数据库配置助手会开始和创建你的数据库。
|
|
| 31. |
The database was created successfully. Click Close. 那个数据库被创建成功。点击关闭。
|
|
| 32. |
You need to execute a couple of scripts as the root user. 你需要执行一些脚本使用那个root用户。
|
|
| 33. |
Open a terminal window and execute the following commands: 打开那个终端和执行下面的命令。 su -
|
|
| 34. |
Return to the Execute Configuration Script window and click OK. 返回执行配置脚本窗口和点击OK
|
|
| 35. |
Your installation and database creation completed successfully. click Close. 你安装和数据库创建被完成成功的,点击关闭。 |
|
Using the Database Configuration Assistant (DBCA) to Create a Database 使用数据库配置助手创建数据库。
If you choose to install software only and later create a database, or if you want to create additional databases using the software that you just installed, you can do so by using the Database Configuration Assistant (DBCA).
如果你选择安装软件仅仅稍后创建数据库,或者你想要创建另一个数据库使用那个软件你仅仅安装的。你可以如此的做通过使用数据库配置助手。
Note: If you created a database as part of the Basic Installation or Advanced Installation, you do not need to complete this section.
注意:如果你创建一个数据库是基础安装和高级安装的部分,你不需要完成这个部分。
Follow the steps below to create a new database or a second database if you created a database as part of the software installation:
随着下面的步骤为了创建一个新的数据库或者第二个数据库如果你创建一个数据库成为软件安装的部分。
| 1. |
Log onto your computer as a member of the administrative group that is authorized to install Oracle software and create and manage the database. 搭建你的电脑成为管理员的组那个是被授权为了安装oracle软件,创建和管理那个数据库。 |
| 2. |
Launch the DBCA on a Linux or UNIX operating system by entering the following at a command prompt: 开启那个数据库配置助手在linux或者unix操作系统通过键入下面的提醒的命令。 dbca |
| 3. |
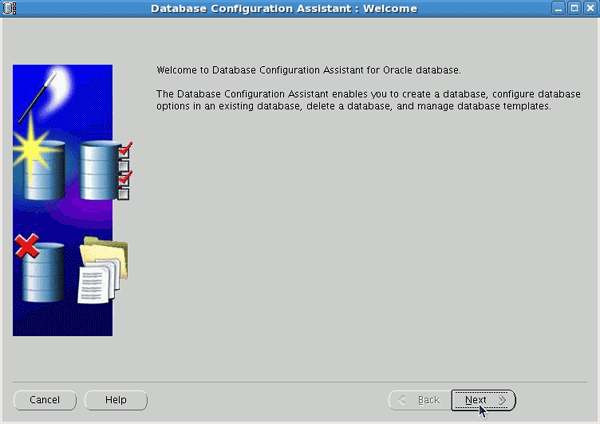
The Welcome window appears. Click Next. 欢迎窗口出现,点击下一步。
|
| 4. |
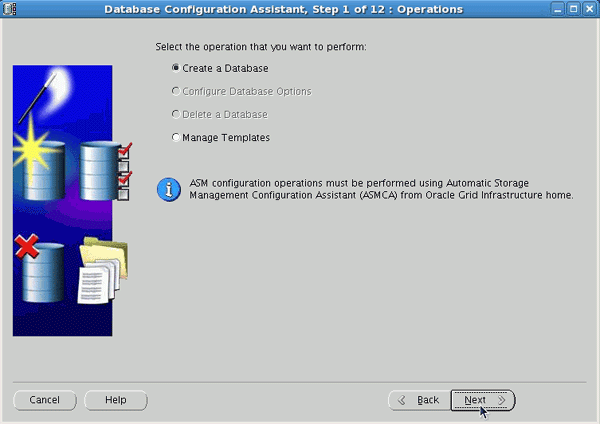
Select Create a Database in the Operations window to begin a process that enables you to configure and create a database. Click Next. 选择创建一个数据库在那个操作系统窗口,开始那个进程使你能够配置和创建一个数据库。点击下一步。
|
| 5. |
On the Database Templates window, select the type of database template to be used in creating the database. You can click Show Details to see the configuration for each type of database. Choose the template suited to the type of workload your database will support. If you are not sure, select the default General Purpose or Transaction Processing template. Click Next. 在数据库模板窗口,选择那个数据库模板类型使用创建那个数据库。你可以点击显示详细看那个配置每一个数据库的类型。选择那个适合的你会支持数据库工作量类型。如果你不确信你需要什么样的数据库,选择那个默认的常规目的或者事物处理的模板。点击下一步。
|
| 6. |
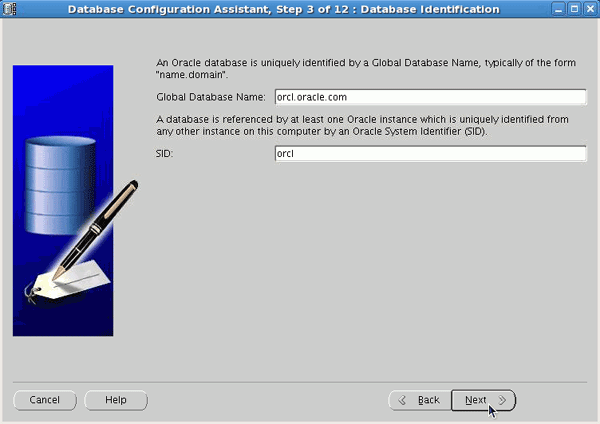
On the Database Identification window, enter a Global Database Name and SID. Click Next. 在数据库验证窗口,键入全库名字和系统ID。点击下一步。 Note: If you created a database as part of your installation of the Oracle software and you are creating a second database with DBCA, you must choose a different global database name and SID for your second database. 注意:如果你创建一个数据库作为一部分安装oracle软件。你创建第二个数据库使用数据库配置助手。你必须是不一样的SID名字为了你的第二个库。
|
| 7. |
The Management Options window appears. To use Enterprise Manager, select Configure Enterprise Manager. Select Configure Database Control for local management to manage your database locally as appropriate to your configuration. Click Next. 那个管理选项窗口出现,为了使用企业管理,选择配置企业管理。选择配置数据库控制关于本地管理,管理你的数据库本地地是恰当的对于你的配置。点击下一步。
|
| 8. |
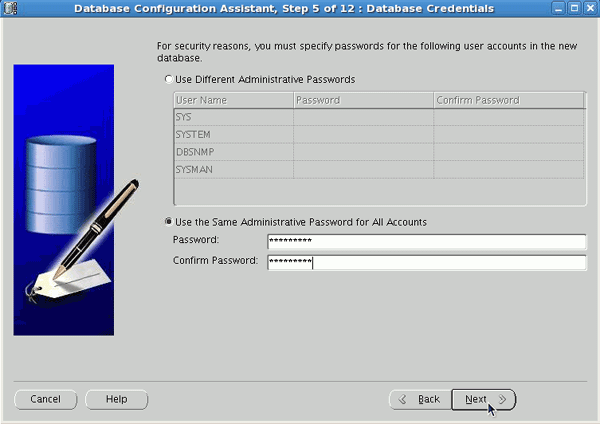
On the Database Credentials window, you can choose to use different administrative passwords or use the same password for all accounts. Select one of the options and enter your password data. Click Next. 在数据库凭证窗口,你可以选择使用不同的管理的密码或者使用相同的密码为了所有的账号。选择选项之一和键入你的密码。点击下一步。
|
| 9. |
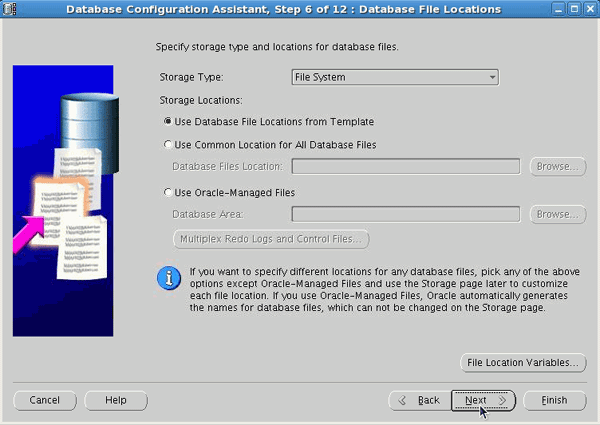
For storage options, select File System, Automatic Storage Management, or Raw Devices as appropriate to your environment. Click Next. 关于存储选项,选择文件系统,自动存储管理,或者裸设备成为你恰当对于你的环境。点击下一步。
|
| 10. |
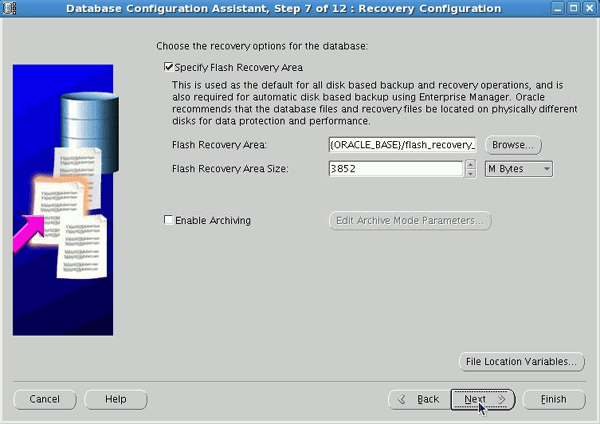
Select Specify Flash Recovery Area and enter a directory location and size. You may also choose to Enable Archiving to place your database in ARCHIVELOG mode. Click Next. 选择指定闪回区域和键入目录位置和大小。你也可以选择启动归档放置你的数据库在归档日志模式。点击下一步。
|
| 11. |
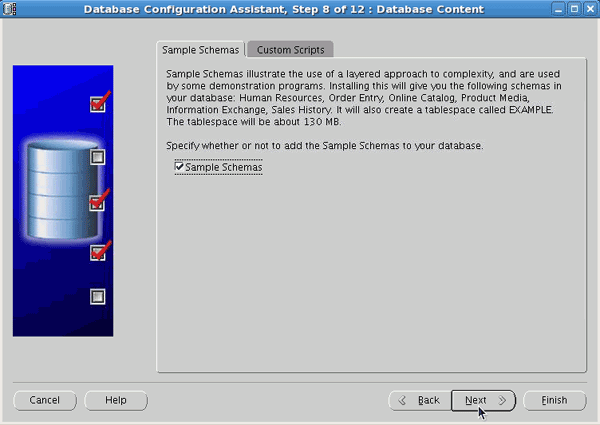
Select Sample Schemas if you want to include the Sample Schemas (EXAMPLE) tablespace in your database. Click Next. 选择示例模式如果你想要包括那个示例模式(例如)表空间在你的数据库。点击下一步。
|
| 12. |
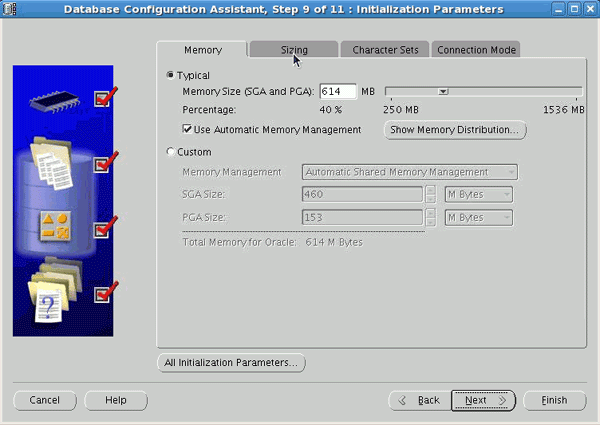
The Memory window appears. Select Typical and enter a Memory Size (SGA and PGA). Click the Sizing tab. 内存窗口出现。选择典型和键入你的内存大小(系统全局域和程序全局域)。点击那个大小标签。
|
| 13. |
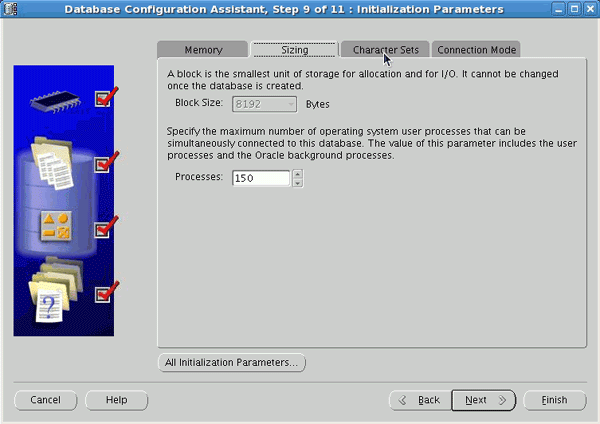
The Sizing window appears. Specify the smallest block size and the maximum number of operating system user processes that can simultaneously connect to the database. 那个大小窗口出现。指定那个最小的块大小和最大数量操作系统进程那个你可以同时的连接到那个数据库。 Note: You cannot specify the block size if you are using a template. 注意:如果不能指定那个块的大小你可以使用那个模板。 Click the Character Sets tab. 点击那个字符集标签。
|
| 14. |
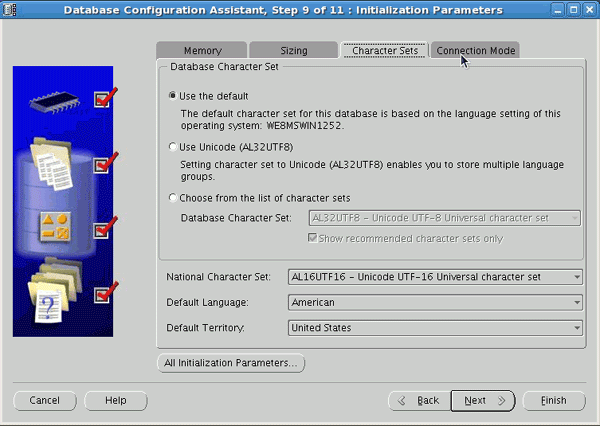
The Character Sets window appears. Select the character set for your database. Click the Connection Mode tab. 那个字符集窗口出现。选择那个字符集对于你的数据库。点击那个连接模式标签。
|
| 15. |
The Connection Mode window appears. Select Dedicated Server Mode or Shared Server Mode as appropriate for your environment. Click Next. 连接模式窗口出现。选择指定服务器模式或者共享服务器模式成为合适的对于你的环境。点击下一步。
|
| 16. |
On the Database Storage window, you can specify storage parameters for the database creation. Accept the default values. Click Next. 在数据库存储窗口,你可以指定存储参数为了你的数据库创建。接受那个默认的值。点击下一步。
|
| 17. |
On the Creation Options window, select Create Database to create your database. You can also select Save as a Database Template to save your configuration. Click Finish. 在创建选择窗口,选择创建数据库创建一个你的数据库。你也可以选择保存成为数据库模板为了保存你的配置。点击完成。
|
| 18. |
At the Confirmation window, confirm the options that will be installed and click OK. 在那个确认窗口,确认选项那个会被安装点击OK。
|
| 19. |
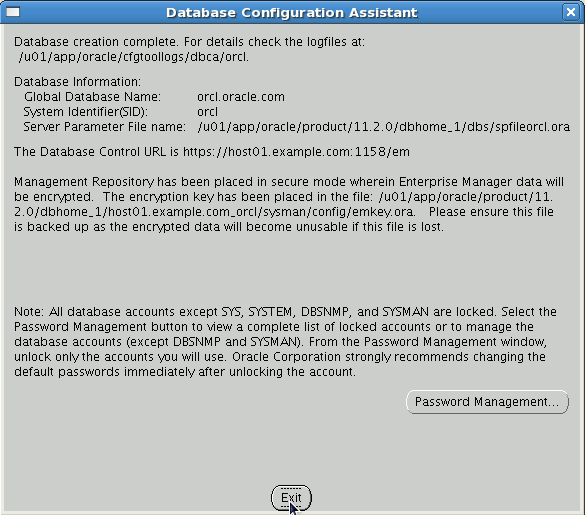
Your database is now being created. 你的数据库现在被创建了。
After the database is created, you can change or unlock your passwords or click Exit. 之后数据库被创建,你可以改变或者解锁你的密码或者点击退出。
|
Summary 总结
In this tutorial, you learned how to: 在这个手册中你学会了如何的:
 |
Install the basic version of the database. 安装数据库的基本版本。 | |
 |
Install the advanced version of the database including running the Database Configuration Assistant. 安装高级版本数据库包括运行那个数据库配置助手。 |
|
 |
Create a database using the Database Configuration Assistant. 创建数据库使用数据库配置助手。 |
|
 Place the cursor over this icon to hide all screenshots. 放置光标通过这个图标为了隐藏你所有的屏幕截图。
Database 2 Day DBA guide_Chapter2的更多相关文章
- DBA_Oracle Database 11g 面向 DBA 和开发人员的重要特性
2015-01-23 Created By BaoXinjian
- Database 2 Day DBA guide_Chapter3
Chapter 3: Getting Started with Oracle Enterprise Manager 第三章:开始oracle企业管理器. Purpose(目的) This chapte ...
- [Windows Azure] How to Scale a SQL Database Solution
How to Scale a SQL Database Solution On Windows Azure, database scalability is synonymous with scale ...
- oracle之 oracle database vault(数据库保险库)
在12c建库中 Database Vault 与 Label Security 选项,之前没有留意过,特意记录一下 12.1 中: 12.2 中: 转载:http://www.linuxidc.co ...
- DBA的做法
防止有人删除数据库,创建一个触发器当数据库被删除是发送一份邮件给管理员并撤销这个命令. Create trigger [tridbsafe]ON ALL SERVERFOR DROP_DATABASE ...
- PHP7函数大全(4553个函数)
转载来自: http://www.infocool.net/kb/PHP/201607/168683.html a 函数 说明 abs 绝对值 acos 反余弦 acosh 反双曲余弦 addcsla ...
- 1Z0-050
QUESTION 13 View the Exhibit.Examine the following command that is executed for the TRANSPORT table ...
- web安全性测试用例
建立整体的威胁模型,测试溢出漏洞.信息泄漏.错误处理.SQL 注入.身份验证和授权错误. 1. 输入验证 客户端验证 服务器端验证(禁用脚本调试,禁用Cookies) 1.输入很大的数(如4,29 ...
- MySQL 5.7 学习:安全相关特性
背景: 继上次介绍 初识 MySQL 5.6 新功能.参数完之后,刚好MySQL 5.7又GA了,在官方测试里看到,MySQL5.7在功能.性能.可用性.安全和监控上又提升了很高.现在看看和MySQL ...
随机推荐
- js数组、内置对象、自定义对象
[js中的数组] 1.数组的基本概念? 数组是在内存空间中连续存储的一组有序数据的集合 元素在数组中的顺序,称为下标.可以使用下表访问数字的每个元素. 2.如何声明一个数组? ① 使用字面量声明: 在 ...
- python--学校管理系统(只做了学校管理的接口)
1.老师的要求是做学校管理.学生.老师的接口,本文档,只做了学校管理的接口 2.具体要求: 角色:学校.学员.课程.讲师 要求: 1. 创建北京.上海 2 所学校 2. 创建linux , pytho ...
- RDS最佳实践(一)—如何选择你的RDS
在去年双11之前,为了帮助商家准备天猫双11的大促,让用户更好的使用RDS,把RDS的性能发挥到最佳,保障双11当天面对爆发性增加的压力,不会由于RDS的瓶颈导致系统出现问题,编写了 RDS的最佳实践 ...
- SNS团队Beta阶段第五次站立会议(2017.5.26)
1.立会照片 2.每个人的工作 成员 今天已完成的工作 明天计划完成的工作 罗于婕 生词本功能测试,bug修复 发音图标的改进 龚晓婷 辅助完善历史纪录的功能 对于历史记录功能的测试 林仕庄 继续完善 ...
- list后台转化为JSON的方法ajax
导入alibaba的fastJson包 后台: protected void doGet(HttpServletRequest request, HttpServletResponse respons ...
- 201521123006 《Java程序设计》第7周学习总结
1. 本周学习总结 以你喜欢的方式(思维导图或其他)归纳总结集合相关内容. 2. 书面作业 1.ArrayList代码分析 1.1 解释ArrayList的contains源代码 public boo ...
- 201521123109《java程序设计》第六周学习总结
1. 本周学习总结 1.1 面向对象学习暂告一段落,请使用思维导图,以封装.继承.多态为核心概念画一张思维导图,对面向对象思想进行一个总结. 注1:关键词与内容不求多,但概念之间的联系要清晰,内容覆盖 ...
- 201521123033《Java程序设计》第5周学习总结
1. 本周学习总结 1.1 尝试使用思维导图总结有关多态与接口的知识点. 参考资料: 百度脑图 XMind 2. 书面作业 作业参考文件下载 1.代码阅读:Child压缩包内源代码 1.1 com.p ...
- 201521123105《jave程序》第二周学习总结
1. 本周学习总结 学习了各种java数据类型以及各种运算符的使用 学习了一维,二维数组的用法 学习了String类对象使用 2. 书面作业 使用Eclipse关联jdk源代码,并查看String对象 ...
- 201521123077 《Java程序设计》第10周学习总结
1. 本周学习总结 1.1 以你喜欢的方式(思维导图或其他)归纳总结异常与多线程相关内容. 多线程 Runnable类 表示任务的类,可以当作参数传入Thread的构造器来运行该任务 Thread类 ...


