python--第六天总结
执行系统命令
可以执行shell命令的相关模块和函数有:
- os.system
- os.spawn*
- os.popen* --废弃
- popen2.* --废弃
- commands.* --废弃,3.x中被移除
import commands

result = commands.getoutput('cmd')

result = commands.getstatus('cmd')

result = commands.getstatusoutput('cmd')
以上执行shell命令的相关的模块和函数的功能均在 subprocess 模块中实现,并提供了更丰富的功能。
subprocess
subprocess允许你能创建很多子进程,创建的时候能指定子进程和子进程的输入、输出、错误输出管道,执行后能获取输出结果和执行状态。
call
执行命令,返回状态码
- ret = subprocess.call(["ls", "-l"], shell=False)
- ret = subprocess.call("ls -l", shell=True)
shell=True ,参数会让subprocess.call 接受字符串形式的变量作为命令,并调用系统shell去执行这个字符串。
shell=False,subprocess.call只接受数组变量作为命令,并将数组的第一个元素作为命令,剩下的全部作为该命令的参数。
注:shell=False 的参数能让你的程序更加安全,尤其是当你的cmd变量值是从外部读取到的时候。官方声明里说要尽力避免使用shell=True这个参数。
check_call
执行命令,如果执行状态码是 0 ,则返回0,否则抛异常
- subprocess.check_call(["ls", "-l"])
- subprocess.check_call("exit 1", shell=True)
check_output
执行命令,如果状态码是 0 ,则返回执行结果,否则抛异常
- subprocess.check_output(["echo", "Hello World!"])
- subprocess.check_output("exit 1", shell=True)
subprocess.Popen(...)
用于执行复杂的系统命令
参数:
- args:shell命令,可以是字符串或者序列类型(如:list,元组)
- bufsize:指定缓冲。0 无缓冲,1 行缓冲,其他 缓冲区大小,负值 系统缓冲
- stdin, stdout, stderr:分别表示程序的标准输入、输出、错误句柄
- preexec_fn:只在Unix平台下有效,用于指定一个可执行对象(callable object),它将在子进程运行之前被调用
- close_sfs:在windows平台下,如果close_fds被设置为True,则新创建的子进程将不会继承父进程的输入、输出、错误管道。
所以不能将close_fds设置为True同时重定向子进程的标准输入、输出与错误(stdin, stdout, stderr)。 - shell:同上
- cwd:用于设置子进程的当前目录
- env:用于指定子进程的环境变量。如果env = None,子进程的环境变量将从父进程中继承。
- universal_newlines:不同系统的换行符不同,True -> 同意使用 \n
- startupinfo与createionflags只在windows下有效
将被传递给底层的CreateProcess()函数,用于设置子进程的一些属性,如:主窗口的外观,进程的优先级等等
eg:
>>> t = subprocess.Popen(["python"], stdin=subprocess.PIPE,stdout=subprocess.PIPE,stderr=subprocess.PIPE)

>>> t.stdin.write("print 1\n")

>>> t.communicate()

('1\n', '')
注;subprocess.check_output(["df","-h", "|","grep","M"],shell=True) 在测试grep 时 未生效。
shutil
高级的 文件、文件夹、压缩包 处理模块
shutil.copyfileobj(fsrc, fdst[, length])
将文件内容拷贝到另一个文件中,可以部分内容
可选参数length指定缓冲区的大小,负数表示一次性读入。默认会把数据切分成小块拷贝,以免占用太多内存。
注意:拷贝是从fsrc的当前文件开始。
shutil.copyfile(src, dst)
拷贝文件
shutil.copymode(src, dst)
仅拷贝权限。内容、组、用户均不变
shutil.copystat(src, dst)
拷贝状态的信息,包括:mode bits, atime, mtime, flags
shutil.copy(src, dst)
拷贝文件和权限
shutil.copy2(src, dst)
拷贝文件和状态信息 类似shell命令cp -p
shutil.copytree(src, dst, symlinks=False, ignore=None)
递归的去拷贝文件
shutil.ignore_patterns(*patterns)
copytree的辅助函数,提供glob功能。
例如:copytree(source, destination, ignore=ignore_patterns('*.pyc', 'tmp*'))
shutil.rmtree(path[, ignore_errors[, onerror]])
递归的去删除文件
shutil.move(src, dst)
递归的去移动文件
shutil.make_archive(base_name, format,...)
创建压缩包并返回文件路径,例如:zip、tar
- base_name: 压缩包的文件名,也可以是压缩包的路径。只是文件名时,则保存至当前目录,否则保存至指定路径,
如:www =>保存至当前路径
如:/Users/wupeiqi/www =>保存至/Users/wupeiqi/ - format: 压缩包种类,“zip”, “tar”, “bztar”,“gztar”
- root_dir: 要压缩的文件夹路径(默认当前目录)
- owner: 用户,默认当前用户
- group: 组,默认当前组
- logger: 用于记录日志,通常是logging.Logger对象
#将 /Users/wupeiqi/Downloads/test 下的文件打包放置当前程序目录

import shutil

ret = shutil.make_archive("wwwwwwwwww", 'gztar', root_dir='/Users/wupeiqi/Downloads/test')

#将 /Users/wupeiqi/Downloads/test 下的文件打包放置 /Users/wupeiqi/目录

import shutil

ret = shutil.make_archive("/Users/wupeiqi/wwwwwwwwww", 'gztar', root_dir='/Users/wupeiqi/Downloads/test')
shutil 对压缩包的处理是调用 ZipFile 和 TarFile 两个模块来进行的,详细:
import zipfile

# 压缩

z = zipfile.ZipFile('laxi.zip', 'w')

z.write('a.log')

z.write('data.data')

z.close()

# 解压

z = zipfile.ZipFile('laxi.zip', 'r')

z.extractall()

z.close()
zipfile 压缩解压
import tarfile

# 压缩

tar = tarfile.open('your.tar','w')

tar.add('/Users/wupeiqi/PycharmProjects/bbs2.zip', arcname='bbs2.zip')

tar.add('/Users/wupeiqi/PycharmProjects/cmdb.zip', arcname='cmdb.zip')

tar.close()

# 解压

tar = tarfile.open('your.tar','r')

tar.extractall()  # 可设置解压地址

tar.close()
tarfile 压缩解压
logging
用于便捷记录日志且线程安全的模块
import logging

logging.basicConfig(filename='log.log',

                    format='%(asctime)s - %(name)s - %(levelname)s -%(module)s:  %(message)s',

                    datefmt='%Y-%m-%d %H:%M:%S %p',

                    level=10)

logging.debug('debug')

logging.info('info')

logging.warning('warning')

logging.error('error')

logging.critical('critical')

logging.log(10,'log')
同时将log输出到终端和写入文件
import logging

logger = logging.getLogger('example')

logger.setLevel(logging.DEBUG)

# create file handler which logs even debug messages

fh = logging.FileHandler('log.log')

fh.setLevel(logging.WARNING)

# create console handler with a higher log level

ch = logging.StreamHandler()

ch.setLevel(logging.DEBUG)

# create formatter and add it to the handlers

formatter = logging.Formatter('%(asctime)s - %(name)s - %(levelname)s - %(message)s - %(thread)d')

ch.setFormatter(formatter)

fh.setFormatter(formatter)

# add the handlers to logger

logger.addHandler(ch)

logger.addHandler(fh)

# 'application' code

logger.debug('debug message')

logger.info('info message')

logger.warn('warn message')

logger.error('error message')

logger.critical('critical message')
对于等级:
- CRITICAL = 50
- FATAL = CRITICAL
- ERROR = 40
- WARNING = 30
- WARN = WARNING
- INFO = 20
- DEBUG = 10
- NOTSET = 0
只有大于当前日志等级的操作才会被记录。
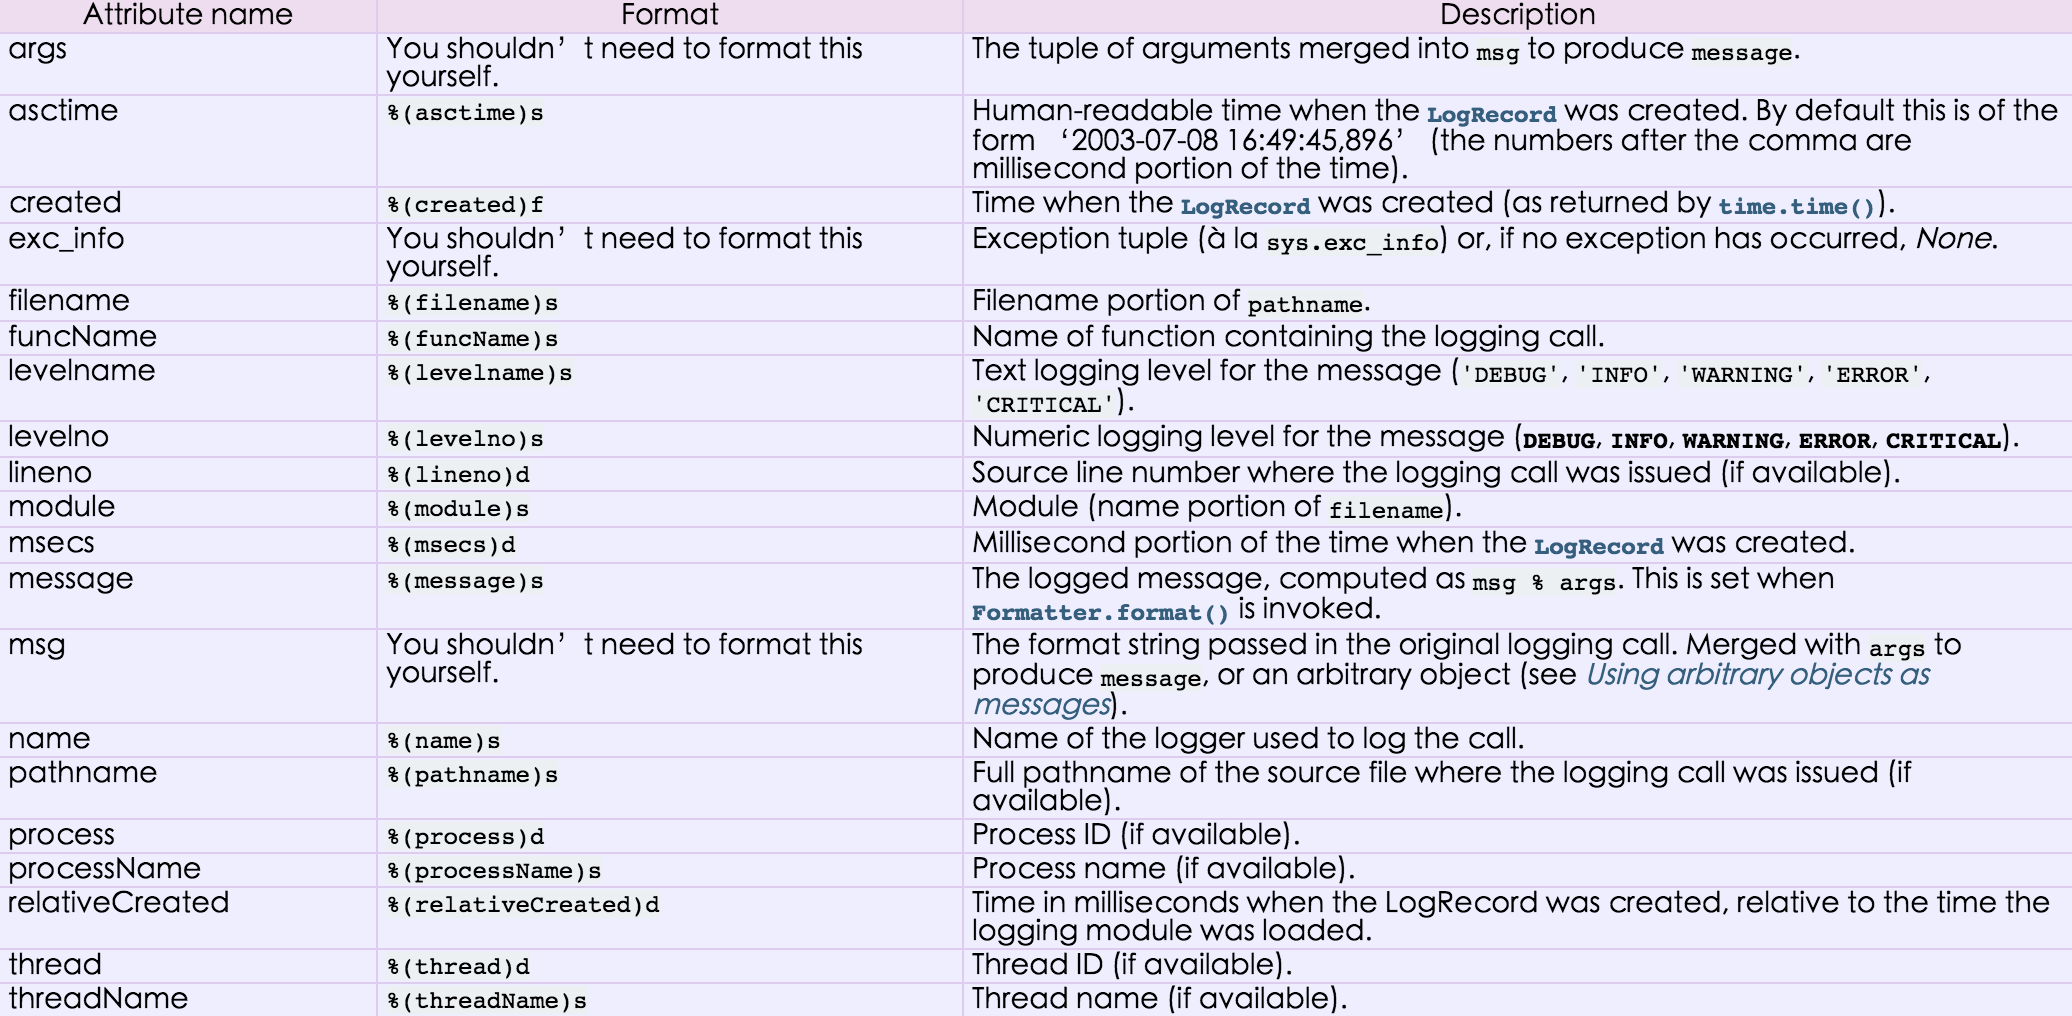
对于格式,有如下属性可是配置:

time
时间相关的操作,时间有三种表示方式:
- 时间戳 1970年1月1日之后的秒,即:time.time()
- 格式化的字符串 2014-11-11 11:11, 即:time.strftime('%Y-%m-%d')
- 结构化时间 元组包含了:年、日、星期等... time.struct_time 即:time.localtime()
import datetime
datetime.date:表示日期的类。常用的属性有year, month, day
datetime.time:表示时间的类。常用的属性有hour, minute, second, microsecond
datetime.datetime:表示日期时间
datetime.timedelta:表示时间间隔,即两个时间点之间的长度
timedelta([days[, seconds[, microseconds[, milliseconds[, minutes[, hours[, weeks]]]]]]])
strftime("%Y-%m-%d")
print time.time()

print time.mktime(time.localtime())

print time.gmtime()    #可加时间戳参数

print time.localtime() #可加时间戳参数

print time.strptime('2014-11-11', '%Y-%m-%d')

print time.strftime('%Y-%m-%d') #默认当前时间

print time.strftime('%Y-%m-%d',time.localtime()) #默认当前时间

print time.asctime()

print time.asctime(time.localtime())

print time.ctime(time.time())

import datetime

'''

datetime.date:表示日期的类。常用的属性有year, month, day

datetime.time:表示时间的类。常用的属性有hour, minute, second, microsecond

datetime.datetime:表示日期时间

datetime.timedelta:表示时间间隔,即两个时间点之间的长度

timedelta([days[, seconds[, microseconds[, milliseconds[, minutes[, hours[, weeks]]]]]]])

strftime("%Y-%m-%d")

'''

import datetime

print datetime.datetime.now()

print datetime.datetime.now() - datetime.timedelta(days=5)

注:相差的日期通过days 获取
    d1 = datetime.datetime(2015,12,10)
    d2 = datetime.datetime(2015,12,1)
    d3 = (d1-d2).days
re
re模块用于对python的正则表达式的操作。
字符:
. 匹配除换行符以外的任意字符
\w 匹配字母或数字或下划线或汉字
\s 匹配任意的空白符
\d 匹配数字
\b 匹配单词的开始或结束
^ 匹配字符串的开始
$ 匹配字符串的结束
次数:
* 重复零次或更多次
+ 重复一次或更多次
? 重复零次或一次
{n} 重复n次
{n,} 重复n次或更多次
{n,m} 重复n到m次
匹配IP:
 t = ''inet 192.168.100.100  netmask 255.255.255.0  broadcast 192.168.255.255'

 re.search(r'(?<![\.\d])(?:\d{1,3}\.){3}\d{1,3}(?![\.\d])',t).group()

 re.search(r'(\d{1,2}|1\d\d|2[0-4]\d|25[0-5])\.(\d{1,2}|1\d\d|2[0-4]\d|25[0-5])\.(\d{1,2}|1\d\d|2[0-4]\d|25[0-5])\.(\d{1,2}|1\d\d|2[0-4]\d|25[0-5])',t).group()

 re.search(r'\b(?:(?:25[0-5]|2[0-4][0-9]|[01]?[0-9][0-9]?)\.){3}(?:25[0-5]|2[0-4][0-9]|[01]?[0-9][0-9]?)\b',t).group()
-------------------------------------------类
一、类定义:
class <类名>:

  <语句>
二、类的方法
在类地内部,使用def关键字可以为类定义一个方法,与一般函数定义不同,类方法必须包含参数self,且为第一个参数。
其中直接定义在类体中的变量叫类变量,而在类的方法中定义的变量叫实例变量。类的属性包括成员变量和方法。
class people:

    #定义基本属性

    name = ''

    age = 0

    #定义私有属性,私有属性在类外部无法直接进行访问

    __weight = 0

    #定义构造方法

    def __init__(self,n,a,w):

        self.name = n

        self.age = a

        self.__weight = w

    def speak(self):

        print("%s is speaking: I am %d years old, weight %s" %(self.name,self.age,self.__weight))

p = people('tom',10,30)

p.speak()
类实例化后,可以使用其属性,实际上,创建一个类之后,可以通过类名访问其属性
如果直接使用类名修改其属性,那么将直接影响到已经实例化的对象
【类属性和实例属性】
1、对于公有的类属性,在类外可以通过类对象和实例对象访问。

class people:

    name = 'jack'  #公有的类属性

    __age = 12     #私有的类属性

p = people()

print p.name             #正确

print people.name        #正确

print p.__age            #错误,不能在类外通过实例对象访问私有的类属性

print people.__age       #错误,不能在类外通过类对象访问私有的类属性复制代码

2、实例属性是不需要在类中显示定义的,比如:

class people:

    name = 'jack'

p = people()

p.age =12

print p.name    #正确

print p.age     #正确

print people.name    #正确

print people.age     #错误

3、在类外对类对象people进行实例化之后,产生了一个实例对象p,然后p.age = 12这句给p添加了一个实例属性age,赋值为12。

这个实例属性是实例对象p所特有的,注意,类对象people并不拥有它(所以不能通过类对象来访问这个age属性)。

当然还可以在实例化对象的时候给age赋值。

class people:

    name = 'jack'

    def __init__(self,name,age):

        self.name = name

        self.age = age

p = people('alex',12)

print p.name         #正确

print p.age          #正确

print people.name    #正确

print people.age     #错误

如果需要在类外修改类属性,必须通过类对象去引用然后进行修改。

如果通过实例对象去引用,会产生一个同名的实例属性,这种方式修改的是实例属性,不会影响到类属性,

并且之后如果通过实例对象去引用该名称的属性,实例属性会强制屏蔽掉类属性,即引用的是实例属性,除非删除了该实例属性。

class people:

    country = 'china'

print people.country

p = people()

print p.country

p.country = 'japan'

print p.country      #实例属性会屏蔽掉同名的类属性

print people.country

del p.country    #删除实例属性

print p.country
python--第六天总结的更多相关文章
- Python第六天 类型转换
Python第六天 类型转换 目录 Pycharm使用技巧(转载) Python第一天 安装 shell 文件 Python第二天 变量 运算符与表达式 input()与raw_inp ...
- 孤荷凌寒自学python第六天 列表的嵌套与列表的主要方法
孤荷凌寒自学python第六天 列表的嵌套与列表的主要方法 (完整学习过程屏幕记录视频地址在文末,手写笔记在文末) (同步的语音笔记朗读:https://www.ximalaya.com/keji/1 ...
- python 第六天
模块 包 我们可以同过包来避免与其它模块的命名冲突,例如,调用在外层 demo.py 调用 demoFile 文件夹中的demo.py 就可以通过 demo.demo 来调用 请注意,每一个包目录下面 ...
- python第六天函数,定义、调用、不带参函数、带参函数等
在python定义函数需要用到的关键字是 def xxxx():,这个关键字就是 defined 的缩写.具体看实例: >>> def hello(): print("你 ...
- python第六天 函数 python标准库实例大全
今天学习第一模块的最后一课课程--函数: python的第一个函数: 1 def func1(): 2 print('第一个函数') 3 return 0 4 func1() 1 同时返回多种类型时, ...
- 系统学习python第六天学习笔记
1.补充 1.列表方法补充 reverse,反转. v1 = [1,2,3111,32,13] print(v1) v1.reverse() print(v1) sort,排序 v1 = [11,22 ...
- python第六天
深浅拷贝,元祖,字典 ,集合的定义以及基本操作方法 深浅拷贝 # 值拷贝:应用场景最多值拷贝:先创建一个列表ls = [1, 'abc', [10]] 再定义 ls1 = ls 此处ls1会直接将 ...
- python第六天(元组、字典、集合)
一.元组(tuple) 作用:存多个值,对比列表来说,元组不可变(是可以当做字典的key的),主要用来读 定义:与列表类型相比,只不过把[ ]换成() age=(11,22,33,44,55)prin ...
- 学习Python第六天
今天我们讲讲数据类型中的集合,博客写得有点糙,后续应该要进行优化优化了........ 集合:无序,不重复的数据组合,主要作用:去重,把一个列表变成集合,就自动去重了 基本语法:S = {1}类型为集 ...
- Python 搭建环境踩过的那些坑
实践出真知,学习 Python 第六天,准备开始尝试写一些 Python 的实例.之前学习过程主要是参照的 廖雪峰老师的教程.搭建环境的过程,被很多坑围绕着. 版本选择 版本选择 Python 3.5 ...
随机推荐
- 解决在V2.0中子组件使用v-model接收来自父组件的值异常
当我们使用父组件向子组件传值,当子组件中是v-model使用该值时会报:[Vue warn]: Avoid mutating a prop directly since the value will ...
- SPARK执行流程
RDD运行原理 1.创建 RDD 对象 2.DAGScheduler模块介入运算,计算RDD之间的依赖关系.RDD之间的依赖关系就形成了DAG 3.每一个JOB被分为多个Stage,划分Stage的一 ...
- 1. 在config.ini文件中加入dm.park.time=1,会使uap中的tomcat启动加快
在config.ini文件中加入dm.park.time=1,会使uap中的tomcat启动加快
- CentOS6.9 网络设置
一.临时设置IP地址 ifconfig eth0 192.168.42.119 broadcast 192.168.42.129 netmask 255.255.255.0 二.上述方法只能临时生效, ...
- twisted的DelayedCall
>>> l=[,,,,] >>> del l[:]#只是删除列表的部分元素,列表仍然存在 >>> l [, ] #reactor循环执行的函数de ...
- js 只允许输入数字
<input id="credit" type="text" class="nummber" onkeyup="value= ...
- WPF ListView即时更新
1.ListView 的 ItemSource 使用 BindingList < T >: 注:由于 List < T > 没有实现 INotifyPropertyChange ...
- BBS-基于用户认证组建和Ajax实现登陆验证
功能1: 基于用户认证组件和Ajax实现登录验证(图片验证码) 总结: 1 一次请求伴随多次请求 2 PIL 3 session存储 4 验证码刷新 步骤: 1.配置静态文件夹 settings.py ...
- 26个Jquery使用小技巧(转)
下面列出了一些Jquery使用技巧.比如有禁止右键点击.隐藏搜索文本框文字.在新窗口中打开链接.检测浏览器.预加载图片.页面样式切换.所有列等 高.动态控制页面字体大小.获得鼠标指针的X值Y值.验证元 ...
- 微信定时获取token
为了使第三方开发者能够为用户提供更多更有价值的个性化服务,微信公众平台开放了许多接口,包括自定义菜单接口.客服接口.获取用户信息接口.用户分组接口.群发接口等,开发者在调用这些接口时,都需要传入一个相 ...
