springboot深入学习(二)-----profile配置、运行原理、web开发
profile配置
通常企业级应用都会区分开发环境、测试环境以及生产环境等等。spring提供了全局profile配置的方式,使得在不同环境下使用不同的applicaiton.properties,走不同的配置。
模板:application-{profile}.properties
示例:


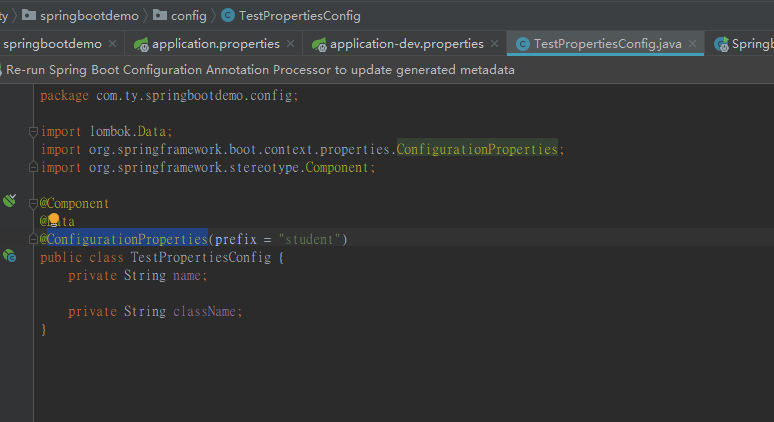
程序会根据application.properties文件中配置的spring.profiles.active=xxx的值,找到对应的application-xxx.properties中具体的属性值
当springboot项目打成jar包之后,可以直接通过命令方式执行,如下:
java -jar xxx.jar --spring.profiles.active=test
这样就是将当前项目运行模式调整为test,从而找到不同的application-xxx.properties文件。
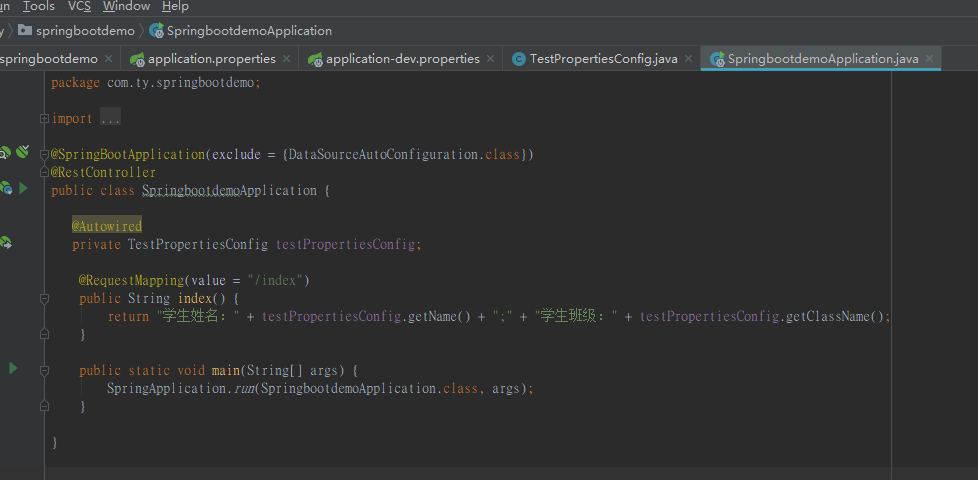
springboot运行原理
springboot关于自动配置的源码在spring-boot-autoconfigure.jar中,查看源码可以到此包。
@SpringBootApplication的核心功能其实是由@EnableAutoConfiguration注解提供,源码如下:
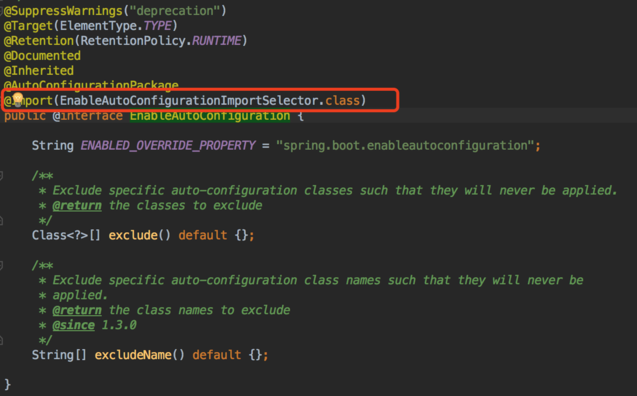
原理这块这篇文章讲的不错:https://www.cnblogs.com/shamo89/p/8184960.html
spring boot的web开发
springboot提供了spring-boot-starter-web对web开发予以支持,主要嵌入了tomcat以及springmvc的相关依赖。
1、静态资源访问
Spring Boot默认提供静态资源⽬录位置需置于classpath下,⽬录名需符合如下规则:
- /static
- /public
- /resources
- /META-INF/resources
2、web页面
通常我们需要返回一个页面,springboot默认的模板配置路径为: src/main/resources/templates 。springboot推荐使用模板引擎,不推荐使用jsp,并且使用jsp还相对麻烦。
thymeleaf模板引擎
在springboot中,jsp不推荐使用,因为jsp在内嵌的servlet的容器上运行有一些问题,内嵌的tomcat不支持以jar形式运行jsp。最为推荐的则是thymeleaf,提供了完美的springmvc的支持。
Thymeleaf是⼀个XML/XHTML/HTML5模板引擎,可⽤于Web与⾮Web环境中的应⽤开发。
A、引入jar包
<dependency>

<groupId>org.springframework.boot</groupId>

<artifactId>spring-boot-starter-thymeleaf</artifactId>

</dependency>
B、页面中引入thymeleaf
<html xmlns:th="http://www.thymeleaf.org">
C、访问model中的数据
<span th:text="${singlePerson.name}">name</span>
D、model数据迭代
<div class="panel-body">

    <ul class="list-group">

    <li class="list-group-item" th:each="person:${people}">

      <span th:text="${person.name}">name</span>

      <span th:text="${person.age}">age</span>

    </li>

    </ul>

</div>
E、数据判断
<div th:if="${not #lists.isEmpty(people)}">

    <div class="panel-body">

        <ul class="list-group">

        <li class="list-group-item" th:each="person:${people}">

          <span th:text="${person.name}">name</span>

          <span th:text="${person.age}">age</span>

        </li>

        </ul>

    </div>

</div>
F、js中获取model数据
<script th:inline="javascript">

    var single = [[${singlePerson}]];

    console.log(single.name + "/" + single.age);

</script>
通过<script th:inline="javascript">才能使js直接获取到model中的数据;[[${}]]获取model中的数据
如果需要修改Thymeleaf的相关默认配置,只需要在application.properties文件中修改以下属性即可,默认配置如下:
# Enable template caching.

spring.thymeleaf.cache=true

# Check that the templates location exists.

spring.thymeleaf.check-template-location=true

# Content-Type value.

spring.thymeleaf.content-type=text/html

# Enable MVC Thymeleaf view resolution.

spring.thymeleaf.enabled=true

# Template encoding.

spring.thymeleaf.encoding=UTF-8

# Comma-separated list of view names that should be excluded from resolution.

spring.thymeleaf.excluded-view-names=

# Template mode to be applied to templates. See also StandardTemplateModeHandlers.

spring.thymeleaf.mode=HTML5

# Prefix that gets prepended to view names when building a URL.

spring.thymeleaf.prefix=classpath:/templates/

# Suffix that gets appended to view names when building a URL.

spring.thymeleaf.suffix=.html spring.thymeleaf.template-resolver-order= # Order of

the template resolver in the chain. spring.thymeleaf.view-names= # Comma-separated

list of view names that can be resolved.
统一异常处理
springboot中默认定义了异常处理页面,如果我们访问的url出现错误,springboot会自动将我们的请求转发到/error中,会出现如下的界面:
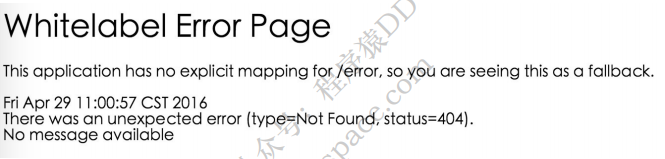
这个页面太草率了,你当然可以自己去实现:
//创建全局的异常处理类

@ControllerAdvice

class GlobalExceptionHandler {

    public static final String DEFAULT_ERROR_VIEW = "error";

    //针对不同的异常单独处理,这里则统一处理了

    @ExceptionHandler(value = Exception.class)

    public ModelAndView defaultErrorHandler(HttpServletRequest req, Exception e) throws Exception {

        ModelAndView mav = new ModelAndView();

        mav.addObject("exception", e);

        mav.addObject("url", req.getRequestURL());

        mav.setViewName(DEFAULT_ERROR_VIEW);

        return mav;

    }

}
自己实现error.html
<!DOCTYPE html>

<html>

<head lang="en">

<meta charset="UTF-8" />

<title>统⼀异常处理</title>

</head>

<body>

<h1>Error Handler</h1>

<div th:text="${url}"></div>

<div th:text="${exception.message}"></div>

</body>

</html>
效果如下:

如果你返回的不是页面,而是json报错信息,也可以支持,如下:
异常信息类:
public class ErrorInfo<T> {

    public static final Integer OK = 0;

    public static final Integer ERROR = 100;

    private Integer code;

    private String message;

    private String url;

    private T data;

    // 省略getter和setter

}
自定义异常:
public class MyException extends Exception {

    public MyException(String message) {

        super(message);

    }

}
controller:
@Controller

public class HelloController {

    @RequestMapping("/json")

    public String json() throws MyException {

        throw new MyException("发⽣错误2");

    }

}
全局异常处理类:
@ControllerAdvice

public class GlobalExceptionHandler {

    @ExceptionHandler(value = MyException.class)

    @ResponseBody

    public ErrorInfo<String> jsonErrorHandler(HttpServletRequest req, MyException e) throws Exception {

        ErrorInfo<String> r = new ErrorInfo<>();

        r.setMessage(e.getMessage());

        r.setCode(ErrorInfo.ERROR);

        r.setData("Some Data");

        r.setUrl(req.getRequestURL().toString());

        return r;

    }

}
运行效果如下:
{

    code: 100,

    data: "Some Data",

    message: "发⽣错误2",

    url: "http://localhost:8080/json"

}
如何接收xml的请求参数
大部分开发过程中使用的请求参数无非就是json、string等,但是xml偶尔也会遇到,那么遇到xml的请求参数如何处理呢?
思路:在本人的spring系列文章中,曾提到springmvc是怎么将请求参数绑定到处理方法的入参中的,里面涉及到一个叫做HttpMessageConverter的东西,那么思路就来了,只要在收到请求后将参数解析成对应的对象即可。
1、引入MappingJackson2XmlHttpMessageConverter
<dependency>

<groupId>com.fasterxml.jackson.dataformat</groupId>

<artifactId>jackson-dataformat-xml</artifactId>

</dependency>
2、定义对象与对象之间的关系
假设请求xml是这样的格式:
<User>

    <name>aaaa</name>

    <age>10</age>

</User>
@Data

@NoArgsConstructor

@AllArgsConstructor

//上面三个都是lombok的注解,注解名字也非常清晰了

@JacksonXmlRootElement(localName = "User")

public class User {

    @JacksonXmlProperty(localName = "name")

    private String name;

    @JacksonXmlProperty(localName = "age")

    private Integer age;

}
3、创建接口
@Controller

public class UserController {

    //@PostMapping = @RequestMapping(method = RequestMethod.POST)

    //consumes指定处理请求的提交内容类型(Content-Type),例如application/json, text/html;

    //produces指定返回的内容类型,仅当request请求头中的(Accept)类型中包含该指定类型才返回

    @PostMapping(value = "/user",consumes = MediaType.APPLICATION_XML_VALUE,produces = MediaType.APPLICATION_XML_VALUE)

    @ResponseBody

    public User create(@RequestBody User user) {

        user.setName("didispace.com : " + user.getName());

        user.setAge(user.getAge() + 100);

        return user;

    }

}
整合spring security
我们在编写Web应用时,经常需要对⻚⾯做⼀些安全控制,⽐如:对于没有访问权限的用户需要转到登录表单页面。要实现访问控制的方法多种多样,可以通过Aop、拦截器实现,也可以通过框架实现(如:Apache Shiro、Spring Security)。
controller:
@Controller

public class HelloController {

    @RequestMapping("/")

    public String index() {

        return "index";

    }

    @RequestMapping("/hello")

    public String hello() {

        return "hello";

    }

  @RequestMapping("/login")
  public String login() {
    return "login";
  }

}
index.html
<!DOCTYPE html>

<html xmlns="http://www.w3.org/1999/xhtml" xmlns:th="http://www.thymeleaf.org"

xmlns:sec="http://www.thymeleaf.org/thymeleaf-extras-springsecurity3">

<head>

    <title>Spring Security入门</title>

</head>

<body>

    <h1>欢迎使用Spring Security!</h1>

    <p>点击 <a th:href="@{/hello}">这里</a> 打个招呼吧</p>

</body>

</html>
hello.html
<!DOCTYPE html>

<html xmlns="http://www.w3.org/1999/xhtml" xmlns:th="http://www.thymeleaf.org"

xmlns:sec="http://www.thymeleaf.org/thymeleaf-extras-springsecurity3">

<head>

    <title>Hello World!</title>

</head>

<body>

    <h1>Hello world!</h1>

</body>

</html>
login.html
<!DOCTYPE html>

<html xmlns="http://www.w3.org/1999/xhtml"

xmlns:th="http://www.thymeleaf.org"

xmlns:sec="http://www.thymeleaf.org/thymeleaf-extras-springsecurity3">

<head>

    <title>Spring Security Example </title>

</head>

<body>

    <div th:if="${param.error}">

        用户名或密码错误

    </div>

    <div th:if="${param.logout}">

        您已注销成功

    </div>

    <form th:action="@{/login}" method="post">

        <div>

            <label> 用户名 : <input type="text" name="username"/>

            </label>

        </div>

        <div>

            <label> 密 码 : <input type="password" name="password"/>

            </label>

        </div>

        <div><input type="submit" value="登录"/></div>

    </form>

</body>

</html>
添加依赖:
<dependency>

    <groupId>org.springframework.boot</groupId>

    <artifactId>spring-boot-starter-security</artifactId>

</dependency>
spring security配置:
@Configuration

@EnableWebSecurity

public class WebSecurityConfig extends WebSecurityConfigurerAdapter {

    @Override

    protected void configure(HttpSecurity http) throws Exception {

        http

        .authorizeRequests()

        .antMatchers("/", "/home").permitAll()

        .anyRequest().authenticated()

        .and()

        .formLogin()

        .loginPage("/login")

        .permitAll()

        .and()

        .logout()

        .permitAll();

    }

    @Autowired

    public void configureGlobal(AuthenticationManagerBuilder auth) throws Exception{

        auth

        .inMemoryAuthentication()

        .withUser("user").password("password").roles("USER");

    }

}
- 通过 @EnableWebSecurity 注解开启Spring Security的功能
- 继承 WebSecurityConfigurerAdapter ,并重写它的方法来设置一些web安全的细节
- configure(HttpSecurity http) 方法
- 通过 authorizeRequests() 定义哪些URL需要被保护、哪些不需要被保护。例如以上代码指定了 / 和 /home 不需要任何认证就可以访问,其他的路径都必须通过身份验证。
- 通过 formLogin() 定义当需要用户登录时候,转到的登录页面。
- configureGlobal(AuthenticationManagerBuilder auth) 方法,在内存中创建了一个用户,该用户的名称为user,密码为password,用户角色为USER。
springboot深入学习(二)-----profile配置、运行原理、web开发的更多相关文章
- AgileEAS.NET SOA 中间件平台5.2版本下载、配置学习(二):配置WinClient分布式运行环境
一.前言 AgileEAS.NET SOA 中间件平台是一款基于基于敏捷并行开发思想和Microsoft .Net构件(组件)开发技术而构建的一个快速开发应用平台.用于帮助中小型软件企业建立一条适合市 ...
- SpringBoot系列(十二)过滤器配置详解
SpringBoot(十二)过滤器详解 往期精彩推荐 SpringBoot系列(一)idea新建Springboot项目 SpringBoot系列(二)入门知识 springBoot系列(三)配置文件 ...
- JavaWeb(二)jsp运行原理,九大内置对象
JSP运行原理: 每个JSP页面在第一次被访问时,WEB容器都会把请求交给JSP引擎(即一个Java程序)去处理.JSP引擎先将JSP翻译成一个_jspServlet(实质上也是一个servlet) ...
- JavaWeb学习 (二十一)————基于Servlet+JSP+JavaBean开发模式的用户登录注册
一.Servlet+JSP+JavaBean开发模式(MVC)介绍 Servlet+JSP+JavaBean模式(MVC)适合开发复杂的web应用,在这种模式下,servlet负责处理用户请求,jsp ...
- JavaWeb学习 (二十)————JavaWeb的两种开发模式
一.JSP+JavaBean开发模式 1.1.jsp+javabean开发模式架构 jsp+javabean开发模式的架构图如下图(图1-1)所示
- springboot深入学习(四)-----tomcat配置、websocket
一.更改servlet服务器 springboot中默认可以集成多种servlet容器,当引入如下依赖时: springboot默认以tomcat作为项目的servlet容器,如果用户想要替换tomc ...
- SpringBoot的学习二:整合Redis,JPA,Mybatis
Redis介绍: 是一个开源的使用ANSI C语言编写.支持网络.可基于内存亦可持久化的日志型.Key-Value数据库,并提供多种语言的API 特性: Redis 与其他 key - value 缓 ...
- 学习IIS & MVC的运行原理 (转)
我一直疑惑于以下问题,从客户端发出一个请求,请求到达服务器端是怎样跟iis衔接起来的,而iis又是怎样读取我发布的代码的,并返回服务器上的文件.这其中是怎样的一个处理过程. 1:当你从浏览器中输入一个 ...
- 学习IIS & MVC的运行原理
我一直疑惑于以下问题,从客户端发出一个请求,请求到达服务器端是怎样跟iis衔接起来的,而iis又是怎样读取我发布的代码的,并返回服务器上的文件.这其中是怎样的一个处理过程. 1:当你从浏览器中输入一个 ...
随机推荐
- 转移动APP测试实践
http://blog.csdn.net/hgstclyh/article/details/53115325
- Visual C++ 6.0 创建C语言程序
1 文件-->新建-->”文件“选项卡-->C++ Source File. 2 输入文件名.选择文件位置,点击确定,弹出编辑器窗口. 3 在编辑器窗口中,输入C程序代码,然后保存. ...
- html5文件读取+按钮样式重置+文件内容预览
FileReader读取文件详细介绍请访问:http://www.cnblogs.com/xyyt/p/9066882.html FileReader提供了如下方法: readAsArrayBuffe ...
- 【python】入门指南:控制语句
条件控制 if,if-else,if-elseif-else #!/bin/python a = 'test' if a == 'test': print('a is %s' %(a)) else: ...
- AVAudioSession应用指南
转coco-LG audiosession负责调节你的app和ios系统里的音频行为.一旦加载了audiosession你可以获得一个audiosession的单例.你可以配置这个audiosessi ...
- f5 SNMP配置
1.选择监控终端 2.配置团体名称:
- Qt: 记事本源代码
界面编程之实例学习,系统记事本是个极好的参考,初学Delphi及后之c#,皆以记事本为参考,今以Qt学习,亦是如此. 期间搭建开发环境,复习c++知识,寻找模块对应功能,不一而足:现刻录其模块代码,以 ...
- Redis 与Spring-data-redis 整合后封装的工具类
此工具类方法是使用了redis 与spring 整合后,才可以使用的工具类,将 spring-data-redis 一些我们开发中常用的方法进行了封装,方便我们日常开发中进行调用: package c ...
- day 31 表单标签,CSS
一. HTML表单标签 HTML表单用于搜集不同类型的用户输入,然后把数据提交给服务器处理. 常用的表单标签: 标签 作用 form 所有表单标签的根标签 input 输入标签,包括单行输入框.密码框 ...
- 【RabbitMQ】——5种队列(转)
原文地址:https://blog.csdn.net/u012654963/article/details/76417613 应用RabbitMQ,我们可以根据需求选择5种队列之一. 一.简单队列 P ...