Spring葵花宝典
一 Spring简介
Spring是一个轻量级的控制反转(IoC)和面向切面(AOP)的容器框架
为了解决企业应用开发的复杂性而创建
二 Spring功能
1. 方便解耦 简化开发
Spring就是一个大工厂 专门负责生成Bean 可以将所有对象创建和依赖关系维护交给Spring管理
2. AOP编程的支持
Spring提供面向切面编程 可以方便的实现对程序进行权限拦截 运行监控等功能
3. 声明式事务的支持
只需要通过配置就可以完成对事务的管理 而无需手动编程
4. 方便程序的测试
Spring对Junit4支持 可以通过注解方便的测试Spring程序
5. 方便集成各种优秀框架
Spring不排斥各种优秀的开源框架 其内部提供了对各种优秀框架的支持
6. 降低JavaEE API的使用难度
对JavaEE开发中一些难用的API(JDBC JavaMail WebService等) 都提供了封装 使这些API应用难度大大降低
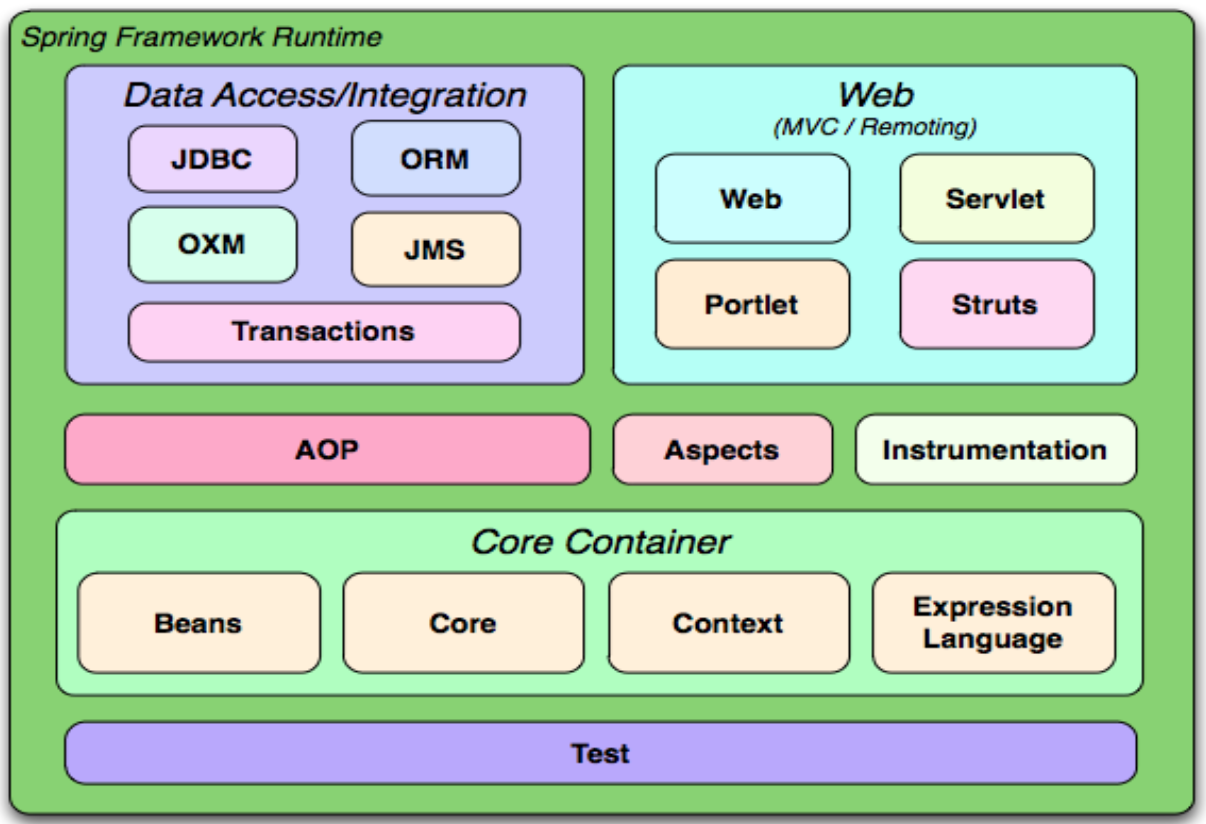
三 Spring体系结构
四 Spring初体验
pom.xml
<?xml version="1.0" encoding="UTF-8"?>

<project xmlns="http://maven.apache.org/POM/4.0.0"

         xmlns:xsi="http://www.w3.org/2001/XMLSchema-instance"

         xsi:schemaLocation="http://maven.apache.org/POM/4.0.0 http://maven.apache.org/xsd/maven-4.0.0.xsd">

    <modelVersion>4.0.0</modelVersion>

    <groupId>com.hy.spring</groupId>

    <artifactId>spring-demo</artifactId>

    <version>1.0-SNAPSHOT</version>

    <!-- 定义依赖版本号 -->

    <properties>

        <junit.version>4.12</junit.version>

        <spring.version>5.0.5.RELEASE</spring.version>

    </properties>

    <!-- 管理jar版本号 -->

    <dependencyManagement>

        <dependencies>

            <!-- junit -->

            <dependency>

                <groupId>junit</groupId>

                <artifactId>junit</artifactId>

                <version>${junit.version}</version>

            </dependency>

            <!-- spring -->

            <dependency>

                <groupId>org.springframework</groupId>

                <artifactId>spring-context</artifactId>

                <version>${spring.version}</version>

            </dependency>

            <dependency>

                <groupId>org.springframework</groupId>

                <artifactId>spring-beans</artifactId>

                <version>${spring.version}</version>

            </dependency>

            <dependency>

                <groupId>org.springframework</groupId>

                <artifactId>spring-webmvc</artifactId>

                <version>${spring.version}</version>

            </dependency>

            <dependency>

                <groupId>org.springframework</groupId>

                <artifactId>spring-jdbc</artifactId>

                <version>${spring.version}</version>

            </dependency>

            <dependency>

                <groupId>org.springframework</groupId>

                <artifactId>spring-aspects</artifactId>

                <version>${spring.version}</version>

            </dependency>

            <dependency>

                <groupId>org.springframework</groupId>

                <artifactId>spring-jms</artifactId>

                <version>${spring.version}</version>

            </dependency>

            <dependency>

                <groupId>org.springframework</groupId>

                <artifactId>spring-context-support</artifactId>

                <version>${spring.version}</version>

            </dependency>

        </dependencies>

    </dependencyManagement>

    <dependencies>

        <!-- junit -->

        <dependency>

            <groupId>junit</groupId>

            <artifactId>junit</artifactId>

        </dependency>

        <!-- spring -->

        <dependency>

            <groupId>org.springframework</groupId>

            <artifactId>spring-context</artifactId>

        </dependency>

        <dependency>

            <groupId>org.springframework</groupId>

            <artifactId>spring-beans</artifactId>

        </dependency>

        <dependency>

            <groupId>org.springframework</groupId>

            <artifactId>spring-webmvc</artifactId>

        </dependency>

        <dependency>

            <groupId>org.springframework</groupId>

            <artifactId>spring-jdbc</artifactId>

        </dependency>

        <dependency>

            <groupId>org.springframework</groupId>

            <artifactId>spring-aspects</artifactId>

        </dependency>

        <dependency>

            <groupId>org.springframework</groupId>

            <artifactId>spring-jms</artifactId>

        </dependency>

        <dependency>

            <groupId>org.springframework</groupId>

            <artifactId>spring-context-support</artifactId>

        </dependency>

    </dependencies>

    <build>

        <plugins>

            <!-- 编译 -->

            <plugin>

                <groupId>org.apache.maven.plugins</groupId>

                <artifactId>maven-compiler-plugin</artifactId>

                <version>3.7.0</version>

                <configuration>

                    <source>1.8</source>

                    <target>1.8</target>

                    <encoding>UTF-8</encoding>

                </configuration>

            </plugin>

        </plugins>

    </build>

</project>
2. 接口
public interface IUserService {

    void insertUser();

}
3. 实现类
public class UserService implements IUserService {

    @Override

    public void insertUser() {

        System.out.println("UserService insert ok");

    }

}
4. 装配Bean resources/beans.xml
<?xml version="1.0" encoding="UTF-8"?>

<beans xmlns="http://www.springframework.org/schema/beans"

       xmlns:xsi="http://www.w3.org/2001/XMLSchema-instance"

       xsi:schemaLocation="http://www.springframework.org/schema/beans

       http://www.springframework.org/schema/beans/spring-beans-4.2.xsd">

    <bean id="userService" class="com.hy.spring.service.UserService" />

</beans>
5. Spring控制反转创建实例
@Test

public void test01() {

    ApplicationContext context = new ClassPathXmlApplicationContext("beans.xml");

    IUserService service = (UserService) context.getBean("userService");

    service.insertUser();

}
五 IoC
Inversion of Control 控制反转
将原本在程序中手动创建对象的控制权 交由Spring框架管理
1. xml装配
a. new实现类
<?xml version="1.0" encoding="UTF-8"?>

<beans xmlns="http://www.springframework.org/schema/beans"

       xmlns:xsi="http://www.w3.org/2001/XMLSchema-instance"

       xsi:schemaLocation="http://www.springframework.org/schema/beans

       http://www.springframework.org/schema/beans/spring-beans-4.2.xsd">

    <!-- 第一种装配方式 new实现类 -->

    <bean id="userService1" class="com.hy.spring.service.UserService" />

</beans>
b. 静态工厂方法
public class UserServiceFactory1 {

    public static UserService createUserService() {

        return new UserService();

    }

}
<?xml version="1.0" encoding="UTF-8"?>

<beans xmlns="http://www.springframework.org/schema/beans"

       xmlns:xsi="http://www.w3.org/2001/XMLSchema-instance"

       xsi:schemaLocation="http://www.springframework.org/schema/beans

       http://www.springframework.org/schema/beans/spring-beans-4.2.xsd">

    <!-- 第二种装配方式 静态工厂方法 -->

    <bean id="userService2" class="com.hy.spring.factory.UserServiceFactory1" factory-method="createUserService" />

</beans>
c. 实例工厂方法
public class UserServiceFactory2 {

    public UserService createUserService() {

        return new UserService();

    }

}
<?xml version="1.0" encoding="UTF-8"?>

<beans xmlns="http://www.springframework.org/schema/beans"

       xmlns:xsi="http://www.w3.org/2001/XMLSchema-instance"

       xsi:schemaLocation="http://www.springframework.org/schema/beans

       http://www.springframework.org/schema/beans/spring-beans-4.2.xsd">

    <!-- 第三种装配方式 实例工厂方法 -->

    <bean id="factory2" class="com.hy.spring.factory.UserServiceFactory2" />

    <bean id="userService3" factory-bean="factory2" factory-method="createUserService" />

</beans>
2. 注解装配
a. 开启注解 配置扫描的位置
<?xml version="1.0" encoding="UTF-8"?>

<beans xmlns="http://www.springframework.org/schema/beans"

       xmlns:xsi="http://www.w3.org/2001/XMLSchema-instance"

       xmlns:context="http://www.springframework.org/schema/context"

       xsi:schemaLocation="http://www.springframework.org/schema/beans

       http://www.springframework.org/schema/beans/spring-beans-4.2.xsd

       http://www.springframework.org/schema/context

       http://www.springframework.org/schema/context/spring-context.xsd">

    <!-- 开启注解 -->

    <context:annotation-config />

    <!-- 扫描的位置 -->

    <context:component-scan base-package="com.hy.spring" />

</beans>
b. @Component
1> @Component 取代 <bean class="" /> -> ApplicationContext#getBean(Class clazz)
2> @Component("id") 取代 <bean id="" class="" /> -> ApplicationContext#getBean(String id)
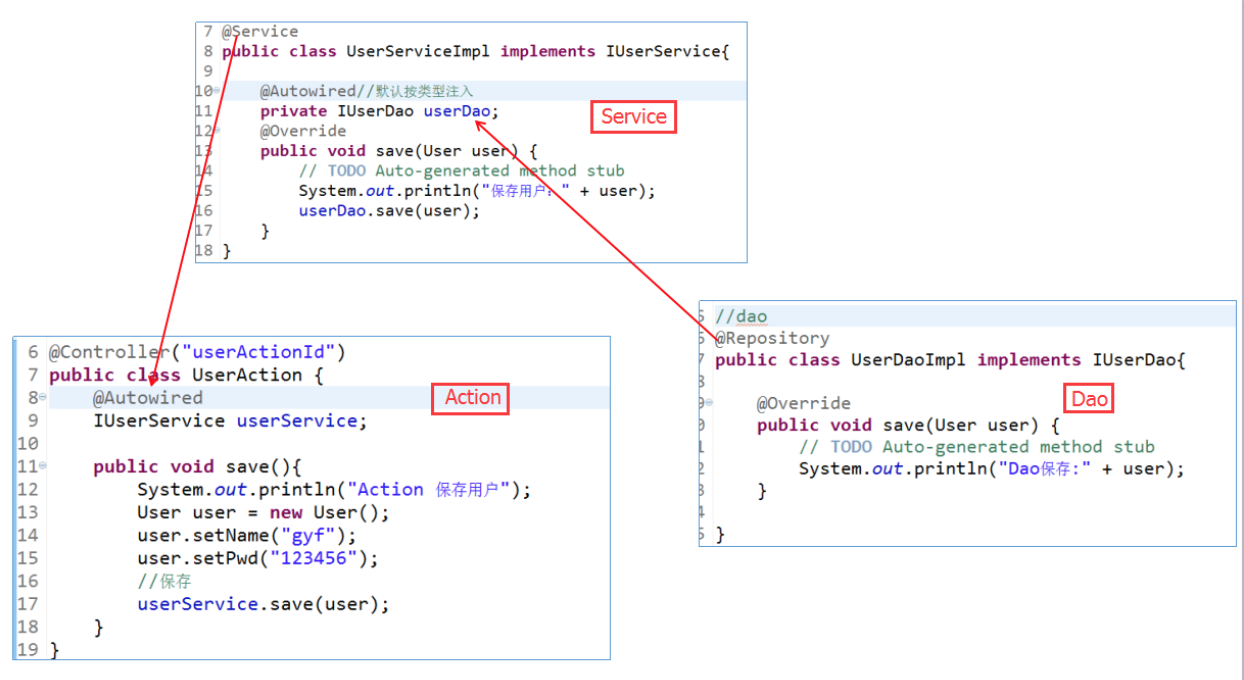
3> 在实际Web开发中 提供3个@Component衍生注解(功能一样) 请使用衍生注解
@Repository -> dao层
@Service -> service层
@Controller -> web层
六 DI
Dependency Injection 依赖注入
在Spring框架负责创建Bean对象时 动态的将依赖对象注入到Bean
1. xml注入
普通数据<value> 引用数据<ref>
a. 属性setter方法注入
<?xml version="1.0" encoding="UTF-8"?>

<beans xmlns="http://www.springframework.org/schema/beans"

       xmlns:xsi="http://www.w3.org/2001/XMLSchema-instance"

       xsi:schemaLocation="http://www.springframework.org/schema/beans

       http://www.springframework.org/schema/beans/spring-beans-4.2.xsd">

    <bean id="userService" class="com.hy.spring.service.UserService" />

    <bean id="userServiceX" class="com.hy.spring.service.UserServiceX">

        <!-- 依赖注入数据 调用属性的set方法 -->

        <property name="name" value="nike" />

        <property name="service" ref="userService" />

        <!-- Array -->

        <property name="arg0">

            <array>

                <value>高考</value>

                <value>加油</value>

            </array>

        </property>

        <!-- List -->

        <property name="arg1">

            <list>

                <value>1</value>

                <value>2</value>

                <value>3</value>

            </list>

        </property>

        <!-- Set -->

        <property name="arg2">

            <set>

                <value>1.23</value>

            </set>

        </property>

        <!-- Map -->

        <property name="arg3">

            <map>

                <entry key="age" value="10" />

            </map>

        </property>

        <!-- Properties -->

        <property name="arg4">

            <props>

                <prop key="name">hy</prop>

            </props>

        </property>

    </bean>

</beans>
b. 构造方法注入
<?xml version="1.0" encoding="UTF-8"?>

<beans xmlns="http://www.springframework.org/schema/beans"

       xmlns:xsi="http://www.w3.org/2001/XMLSchema-instance"

       xsi:schemaLocation="http://www.springframework.org/schema/beans

       http://www.springframework.org/schema/beans/spring-beans-4.2.xsd">

    <bean id="userService" class="com.hy.spring.service.UserService" />

    <bean id="userServiceX" class="com.hy.spring.service.UserServiceX">

        <!-- 依赖注入数据 通过构造方法 方式一 -->

        <constructor-arg name="name" value="nike" />

        <constructor-arg name="service" ref="userService" />

    </bean>

</beans>
<?xml version="1.0" encoding="UTF-8"?>

<beans xmlns="http://www.springframework.org/schema/beans"

       xmlns:xsi="http://www.w3.org/2001/XMLSchema-instance"

       xsi:schemaLocation="http://www.springframework.org/schema/beans

       http://www.springframework.org/schema/beans/spring-beans-4.2.xsd">

    <bean id="userService" class="com.hy.spring.service.UserService" />

    <bean id="userServiceX" class="com.hy.spring.service.UserServiceX">

        <!-- 依赖注入数据 通过构造方法 方式二 -->

        <constructor-arg index="0" value="nike" type="java.lang.String" />

        <constructor-arg index="1" ref="userService" type="com.hy.spring.service.UserService" />

    </bean>

</beans>
c. p命名空间注入
<?xml version="1.0" encoding="UTF-8"?>

<beans xmlns="http://www.springframework.org/schema/beans"

       xmlns:xsi="http://www.w3.org/2001/XMLSchema-instance"

       xmlns:p="http://www.springframework.org/schema/p"

       xsi:schemaLocation="http://www.springframework.org/schema/beans

       http://www.springframework.org/schema/beans/spring-beans-4.2.xsd">

    <bean id="userService" class="com.hy.spring.service.UserService" />

    <!-- 依赖注入数据 通过p命名空间 -->

    <bean id="userServiceX" class="com.hy.spring.service.UserServiceX" p:name="nike" p:service-ref="userService" />

</beans>
2. 注解注入
a. 开启注解 配置扫描的位置
<?xml version="1.0" encoding="UTF-8"?>

<beans xmlns="http://www.springframework.org/schema/beans"

       xmlns:xsi="http://www.w3.org/2001/XMLSchema-instance"

       xmlns:context="http://www.springframework.org/schema/context"

       xsi:schemaLocation="http://www.springframework.org/schema/beans

       http://www.springframework.org/schema/beans/spring-beans-4.2.xsd

       http://www.springframework.org/schema/context

       http://www.springframework.org/schema/context/spring-context.xsd">

    <!-- 开启注解 -->

    <context:annotation-config />

    <!-- 扫描的位置 -->

    <context:component-scan base-package="com.hy.spring" />

</beans>
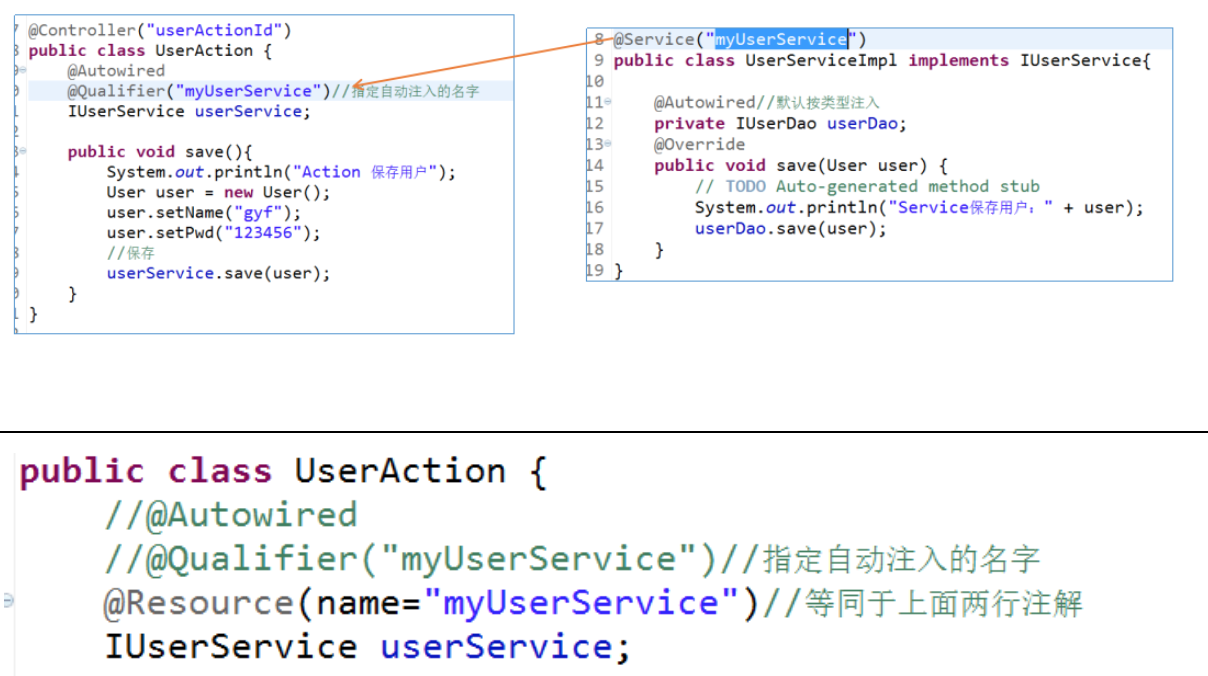
b. @Autowired
1> @Autowired -> 自动根据类型注入
2> @Autowired + @Qualifier("id") = @Resource(name = "id") -> 自动根据id注入
七 加载Spring容器的三种方式
1. 类路径获得配置文件
@Test

public void test01() {

    // 类路径获得配置文件 classes路径 target中查看

    ApplicationContext context = new ClassPathXmlApplicationContext("beans.xml");

    IUserService service = (UserService) context.getBean("userService");

    System.out.println("IUserService = " + service);

}
2. 文件系统路径获得配置文件
@Test

public void test02() {

    // 文件系统路径获得配置文件 绝对路径

    String path = "//Users/HUANGYI/Desktop/Java/spring-demo/src/main/resources/beans.xml";

    ApplicationContext context = new FileSystemXmlApplicationContext(path);

    IUserService service = (UserService) context.getBean("userService");

    System.out.print("IUserService = " + service);

}
3. BeanFactory 已过时
八 Bean的作用域
resources/beans.xml <bean scope="singleton" /> 或 注解 @Scope("singleton")
1. singleton 默认值 在Spring IoC容器中仅存在一个Bean实例 Bean以单例方式存在
2. prototype 每次从容器中调用Bean时 都返回一个新的实例 即每次调用getBean()时 相当于执行new Bean()
3. request 每次HTTP请求都会创建一个新的Bean 仅适用于WebApplicationContext环境
4. session 同一个Session共享一个Bean 不同Session使用不同Bean 仅适用于WebApplicationContext环境
九 AOP
Aspect Oriented Programming 面向切面
通过预编译方式和运行期动态代理实现程序功能统一维护的一种技术
1. 功能
a. 对业务逻辑各部分进行隔离 从而使业务逻辑各部分之间的耦合度降低 提高程序的可重用性 同时提高了开发效率
b. 采取横向抽取机制 取代了传统纵向继承体系重复性代码
c. 使用纯Java实现 不需要专门的编译过程和类加载器 在运行期通过代理方式向目标类织入增强代码
d. 常用于事务管理 性能监视 安全检查 缓存 日志...
2. 实现原理
底层采用代理模式进行实现 有两种实现方式
3. 术语
Target: 目标 需要被代理的类
JoinPoint: 连接点 可能被拦截到的方法
Pointcut: 切入点 已经被增强的连接点
Advice: 通知 增强代码
Weaving: 织入 把通知Advice应用到目标对象Target来创建代理对象Proxy的过程
Proxy: 代理
Aspect: 切面 切入点Pointcut和通知Advice的结合
4. 使用AspectJ进行AOP的开发
AspectJ是一个基于Java语言的AOP框架 Spring2.0开始 Spring引入对AspectJ的支持 AspectJ扩展了Java语言 提供了一个专门的编译器 在编译时提供横向代码的织入 新版本Spring框架 建议使用AspectJ进行AOP的开发
a. xml方式
1> 接口
public interface IUserService {

    void insertUser();

    void deleteUser(int id);

    String selectUser(int id);

}
2> 业务类
public class UserService implements IUserService {

    @Override

    public void insertUser() {

        System.out.println("UserService insert ok");

    }

    @Override

    public void deleteUser(int id) {

        int i = id / 0; //模拟异常

    }

    @Override

    public String selectUser(int id) {

        return "HUANGYI";

    }

}
3> 切面类
public class Aspect {

    /**

     * 前置通知 在方法执行前执行 如果通知抛出异常 阻止方法运行

     * @param joinPoint 连接点

     */

    public void before(JoinPoint joinPoint) {

        System.out.println("前置通知 JoinPoint = " + joinPoint.toString());

    }

    /**

     * 后置通知 方法正常返回后执行 可以获得方法返回值 如果方法中抛出异常 通知无法执行

     * @param joinPoint 连接点

     * @param ret 方法返回值

     */

    public void afterReturning(JoinPoint joinPoint, Object ret) {

        System.out.println("后置通知 ret = " + ret + " JoinPoint = " + joinPoint.toString());

    }

    /**

     * 环绕通知 方法执行前后分别执行 可以阻止方法的执行 必须手动执行目标方法

     * @param proceedingJoinPoint ProceedingJoinPoint

     * @return 方法返回值

     * @throws Throwable 异常

     */

    public Object around(ProceedingJoinPoint proceedingJoinPoint) throws Throwable {

        System.out.println("环绕通知 - 前");

        Object object = proceedingJoinPoint.proceed();

        System.out.println("环绕通知 - 后 ");

        return object + "!!!";

    }

    /**

     * 异常通知 方法抛出异常后执行 如果方法没有抛出异常 无法执行

     * @param joinPoint 连接点

     * @param throwable 异常

     */

    public void afterThrowing(JoinPoint joinPoint, Throwable throwable) {

        System.out.println("异常通知 Throwable = " + throwable.getMessage() + " JoinPoint = " + joinPoint.toString());

    }

    /**

     * 最终通知 方法执行完毕后执行 无论方法中是否出现异常

     * @param joinPoint 连接点

     */

    public void after(JoinPoint joinPoint) {

        System.out.println("最终通知 JoinPoint = " + joinPoint.toString());

    }

}
4> 装配Bean resources/beans.xml
<?xml version="1.0" encoding="UTF-8"?>

<beans xmlns="http://www.springframework.org/schema/beans"

       xmlns:xsi="http://www.w3.org/2001/XMLSchema-instance"

       xmlns:aop="http://www.springframework.org/schema/aop"

       xsi:schemaLocation="http://www.springframework.org/schema/beans

       http://www.springframework.org/schema/beans/spring-beans-4.2.xsd

       http://www.springframework.org/schema/aop

       http://www.springframework.org/schema/aop/spring-aop.xsd">

    <!-- 业务类 -->

    <bean id="userService" class="com.hy.spring.service.UserService" />

    <!-- 切面类 -->

    <bean id="aspect" class="com.hy.spring.aspect.Aspect" />

    <!-- proxy-target-class true=CGLIB代理 -->

    <aop:config proxy-target-class="true">

        <aop:aspect ref="aspect">

            <!-- expression(表达式): 切点表达式 -->

            <!-- * com.hy.spring.service..*.*(..)

                    * = 任意返回值

                    com.hy.spring.service. = com.hy.spring.service包和所有子包

                    .*.* = .任意类.任意方法名

                    (..) = 任意参数 -->

            <aop:pointcut id="pointcut" expression="execution(* com.hy.spring.service..*.*(..))" />

            <!-- 前置通知 -->

            <aop:before pointcut-ref="pointcut" method="before" />

            <!-- 后置通知 returning ret=方法返回值的参数名 -->

            <aop:after-returning pointcut-ref="pointcut" method="afterReturning" returning="ret" />

            <!-- 环绕通知 -->

            <aop:around pointcut-ref="pointcut" method="around" />

            <!-- 异常通知 throwing throwable=异常的参数名 -->

            <aop:after-throwing pointcut-ref="pointcut" method="afterThrowing" throwing="throwable" />

            <!-- 最终通知 -->

            <aop:after pointcut-ref="pointcut" method="after" />

        </aop:aspect>

    </aop:config>

</beans>
5> 测试
public class XTest {

    @Test

    public void test01() {

        ApplicationContext context = new ClassPathXmlApplicationContext("beans.xml");

        IUserService service = (IUserService) context.getBean("userService");

        service.insertUser();

    }

    @Test

    public void test02() {

        ApplicationContext context = new ClassPathXmlApplicationContext("beans.xml");

        IUserService service = (IUserService) context.getBean("userService");

        service.selectUser(1);

    }

    @Test

    public void test03() {

        ApplicationContext context = new ClassPathXmlApplicationContext("beans.xml");

        IUserService service = (IUserService) context.getBean("userService");

        service.deleteUser(1);

    }

}
b. 注解方式
1> 开启注解 配置扫描的位置
<?xml version="1.0" encoding="UTF-8"?>

<beans xmlns="http://www.springframework.org/schema/beans"

       xmlns:xsi="http://www.w3.org/2001/XMLSchema-instance"

       xmlns:aop="http://www.springframework.org/schema/aop"

       xmlns:context="http://www.springframework.org/schema/context"

       xsi:schemaLocation="http://www.springframework.org/schema/beans

       http://www.springframework.org/schema/beans/spring-beans-4.2.xsd

       http://www.springframework.org/schema/aop

       http://www.springframework.org/schema/aop/spring-aop.xsd

       http://www.springframework.org/schema/context

       http://www.springframework.org/schema/context/spring-context.xsd">

    <!-- 开启AOP注解 -->

    <aop:aspectj-autoproxy />

    <!-- 扫描的位置 -->

    <context:component-scan base-package="com.hy.spring" />

    <!-- proxy-target-class true=CGLIB代理 -->

    <aop:config proxy-target-class="true" />

</beans>
2> 接口
public interface IUserService {

    void insertUser();

    void deleteUser(int id);

    String selectUser(int id);

}
3> 业务类
@Service("userService")

public class UserService implements IUserService {

    @Override

    public void insertUser() {

        System.out.println("UserService insert ok");

    }

    @Override

    public void deleteUser(int id) {

        int i = id / 0; //模拟异常

    }

    @Override

    public String selectUser(int id) {

        return "HUANGYI";

    }

}
4> 切面类
@Component

@org.aspectj.lang.annotation.Aspect

public class Aspect {

    /**

     * 声明公共切入点

     * expression(表达式): 切点表达式

     * * com.hy.spring.service..*.*(..)

     * * = 任意返回值

     * com.hy.spring.service. = com.hy.spring.service包和所有子包

     * .*.* = .任意类.任意方法名

     * (..) = 任意参数

     */

    @Pointcut("execution(* com.hy.spring.service..*.*(..))")

    public void pointcut() {}

    /**

     * 前置通知 在方法执行前执行 如果通知抛出异常 阻止方法运行

     * @param joinPoint 连接点

     */

    @Before("execution(* com.hy.spring.service..*.*(..))")

    public void before(JoinPoint joinPoint) {

        System.out.println("前置通知 JoinPoint = " + joinPoint.toString());

    }

    /**

     * 后置通知 方法正常返回后执行 可以获得方法返回值 如果方法中抛出异常 通知无法执行

     * @param joinPoint 连接点

     * @param ret 方法返回值

     */

    @AfterReturning(value = "pointcut()", returning = "ret")

    public void afterReturning(JoinPoint joinPoint, Object ret) {

        System.out.println("后置通知 ret = " + ret + " JoinPoint = " + joinPoint.toString());

    }

    /**

     * 环绕通知 方法执行前后分别执行 可以阻止方法的执行 必须手动执行目标方法

     * @param proceedingJoinPoint ProceedingJoinPoint

     * @return 方法返回值

     * @throws Throwable 异常

     */

    @Around(value = "pointcut()")

    public Object around(ProceedingJoinPoint proceedingJoinPoint) throws Throwable {

        System.out.println("环绕通知 - 前");

        Object object = proceedingJoinPoint.proceed();

        System.out.println("环绕通知 - 后 ");

        return object + "!!!";

    }

    /**

     * 异常通知 方法抛出异常后执行 如果方法没有抛出异常 无法执行

     * @param joinPoint 连接点

     * @param throwable 异常

     */

    @AfterThrowing(value = "pointcut()", throwing = "throwable")

    public void afterThrowing(JoinPoint joinPoint, Throwable throwable) {

        System.out.println("异常通知 Throwable = " + throwable.getMessage() + " JoinPoint = " + joinPoint.toString());

    }

    /**

     * 最终通知 方法执行完毕后执行 无论方法中是否出现异常

     * @param joinPoint 连接点

     */

    @After(value = "pointcut()")

    public void after(JoinPoint joinPoint) {

        System.out.println("最终通知 JoinPoint = " + joinPoint.toString());

    }

}
5> 测试
public class XTest {

    @Test

    public void test01() {

        ApplicationContext context = new ClassPathXmlApplicationContext("beans.xml");

        IUserService service = (IUserService) context.getBean("userService");

        service.insertUser();

    }

    @Test

    public void test02() {

        ApplicationContext context = new ClassPathXmlApplicationContext("beans.xml");

        IUserService service = (IUserService) context.getBean("userService");

        service.selectUser(1);

    }

    @Test

    public void test03() {

        ApplicationContext context = new ClassPathXmlApplicationContext("beans.xml");

        IUserService service = (IUserService) context.getBean("userService");

        service.deleteUser(1);

    }

}
5. 使用AOP进行事务配置 框架整合时讲解
Spring葵花宝典的更多相关文章
- Spring第三天
Spring第三天 整体课程安排(3天+2天): 第一天:Spring框架入门.IoC控制反转的配置管理.Spring Web集成.Spring Junit集成. 第二天:Spring AOP面向切面 ...
- springcloud(一):大话Spring Cloud
研究了一段时间spring boot了准备向spirng cloud进发,公司架构和项目也全面拥抱了Spring Cloud.在使用了一段时间后发现Spring Cloud从技术架构上降低了对大型系统 ...
- 一、Spring Cloud介绍
springcloud 介绍 研究了一段时间spring boot了准备向spirng cloud进发,公司架构和项目也全面拥抱了Spring Cloud.在使用了一段时间后发现Spring Clou ...
- Spring cloud整体框架
研究了一段时间spring boot了准备向spirng cloud进发,公司架构和项目也全面拥抱了Spring Cloud.在使用了一段时间后发现Spring Cloud从技术架构上降低了对大型系统 ...
- Spring Cloud-微服务架构集大成者
本文不是讲解如何使用Spring Cloud的教程,而是探讨Spring Cloud是什么,以及它诞生的背景和意义. 1 背景 2008年以后,国内互联网行业飞速发展,我们对软件系统的需求已经不再是过 ...
- 国内最全的Spring Boot系列之二
历史文章 <国内最全的Spring Boot系列之一> 视频&交流平台 SpringBoot视频:http://t.cn/R3QepWG Spring Cloud视频:http:/ ...
- (转)springcloud(一):大话Spring Cloud
http://www.ityouknow.com/springcloud/2017/05/01/simple-springcloud.html 研究了一段时间Spring Boot了准备向Spring ...
- 200. Spring Boot JNDI:在Tomcat中怎么玩JNDI?
[视频&交流平台] àSpringBoot视频:http://t.cn/R3QepWG à SpringCloud视频:http://t.cn/R3QeRZc à Spring Boot源 ...
- 195. Spring Boot 2.0数据库迁移:Flyway
[视频&交流平台] àSpringBoot视频:http://t.cn/R3QepWG à SpringCloud视频:http://t.cn/R3QeRZc à Spring Boot源码: ...
随机推荐
- Zookeeper分布式过程协同技术 - 群首选举
Zookeeper分布式过程协同技术 - 群首选举 群首概念 群首为集群中服务器选择出来的一个服务器,并被集群认可.设置群首目的在与对客户端所发起的状态变更请求进行排序,包括:create.setDa ...
- 深度学习“四大名著”发布!Python、TensorFlow、机器学习、深度学习四件套!
Python 程序员深度学习的"四大名著": 这四本书着实很不错!我们都知道现在机器学习.深度学习的资料太多了,面对海量资源,往往陷入到"无从下手"的困惑出境. ...
- 【asp.net core 系列】14 .net core 中的IOC
0.前言 通过前面几篇,我们了解到了如何实现项目的基本架构:数据源.路由设置.加密以及身份验证.那么在实现的时候,我们还会遇到这样的一个问题:当我们业务类和数据源越来越多的时候,我们无法通过普通的构造 ...
- win7旗舰版安装 oracle 10g 不能进入图形界面的问题
前阵子重装了系统,把dell机器自带的win7 64位(家庭版已升级旗舰版,装ORACLE正常)换回了32位系统,前两天因为一些软件开发的问题,需要把以前做的一个系统重新架起来,数据库用的是oracl ...
- Centos7安装部署openstack--nova计算服务
一.概述 使用OpenStack计算服务来托管和管理云计算系统.OpenStack计算服务是基础设施即服务(IaaS)系统的主要部分,模块主要由Python实现. OpenStack计算组件请求Ope ...
- Centos 下 Jenkins2.6 + Git + Maven Shell一件部署与备份
使用Jenkins2.6 集成Maven与Git插件做持续集成,同时编写Shell脚本备份与发布(需要稍微知道点Linux/毕竟基于Centos PS:本人Linux也是菜鸡) - 下载Jenkins ...
- centos7 升级系统后,启动界面出现多个选项
需要删除多余内核 yum list kernel.x86_64 出现多个 执行yum remove kernel-3.10.0-957.10.1.e17.x86_64,会提示找不到对应的包 我也不知道 ...
- Azure Data Box
一,引言 最近博主又要面临考试了,随笔又再次缓慢更新,说起考试,之前在微软的 ms learn的课程上有接触到一个叫 Azure Data Box的,刚好今天也花了一个多小时看了一下相关文档,下面就正 ...
- html5中二进制对象Blob的使用——Blob与ArrayBuffer、TypeArray和String的相互转换
在网页开发中遇到这样一个问题,在使用select的时候,想让里面的文字水平居中.首先想到的是text-align:center;但是发现在Chrome浏览器下不兼容,需要使用到text-align-l ...
- HBase写入异常RejectedExecutionException
HBase在大数据量并发写入时,写一段时间后HBase监控界面出现告警,写入程序日志里频繁出现异常java.util.concurrent.RejectedExecutionException: 从异 ...