【SpringBoot1.x】SpringBoot1.x 启动配置原理 和 自定义starter
SpringBoot1.x 启动配置原理 和 自定义starter
启动配置原理
启动过程主要为:
new SpringApplication(sources)创建 SpringApplication 对象springApplication.run()运行Spring应用程序,创建并刷新一个新的应用环境- 整个过程使用了事件监听机制
创建 SpringApplication 对象
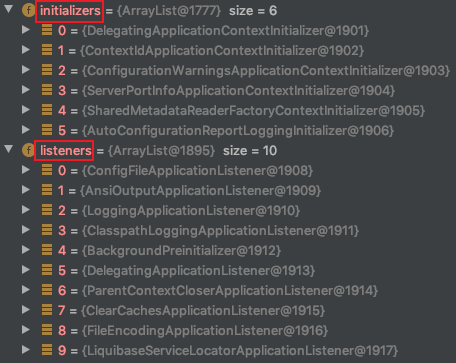
SpringApplication.run(StartStarterApplication.class, args);public static ConfigurableApplicationContext run(Object[] sources, String[] args) {return new SpringApplication(sources).run(args);}public SpringApplication(Object... sources) {initialize(sources);}private void initialize(Object[] sources) {// 保存主配置类信息if (sources != null && sources.length > 0) {this.sources.addAll(Arrays.asList(sources));}// 判断当前是否是一个 Web Appthis.webEnvironment = deduceWebEnvironment();// 从类路径下找到 META_INF/spring.factories 配置文件的 ApplicationContextInitializer,然后保存起来setInitializers((Collection) getSpringFactoriesInstances(ApplicationContextInitializer.class));// 从类路径下找到 META_INF/spring.factories 配置文件的 ApplicationListener,然后保存起来setListeners((Collection) getSpringFactoriesInstances(ApplicationListener.class));// 从多个配置类中找到有 main() 的主配置类this.mainApplicationClass = deduceMainApplicationClass();}
运行Spring应用程序,创建并刷新一个新的应用环境
public ConfigurableApplicationContext run(String... args) {StopWatch stopWatch = new StopWatch();stopWatch.start();ConfigurableApplicationContext context = null;FailureAnalyzers analyzers = null;configureHeadlessProperty();// 从类路径下的 META_INF/spring.factories 中获取 SpringApplicationRunListenersSpringApplicationRunListeners listeners = getRunListeners(args);// 回调所有的 SpringApplicationRunListener.starting()listeners.starting();try {// 封装命令行参数ApplicationArguments applicationArguments = new DefaultApplicationArguments(args);// 准备环境// 准备环境完成后,回调 SpringApplicationRunListener.environmentPrepared() 表示环境准备完成ConfigurableEnvironment environment = prepareEnvironment(listeners, applicationArguments);// 打印 Spring 标志Banner printedBanner = printBanner(environment);// 创建 ApplicationContext,决定创建 web 的ioc,还是普通的 ioccontext = createApplicationContext();analyzers = new FailureAnalyzers(context);// 准备上下文环境,将 environment 保存到 ioc 中,而且调用 applyInitializers()// 这个方法将 回调之前保存的所有的 ApplicationContextInitializer 的 initialize()// 和 回调之前保存的所有的 SpringApplicationRunListener 的 contextPrepared()// 准备上下文环境完成后,回调之前保存的所有的 SpringApplicationRunListener 的 contextLoaded()// 控制台打印:使用 PID 6894 在 192.168.0.103 上启动 主配置类prepareContext(context, environment, listeners, applicationArguments, printedBanner);// 刷新容器,即 ioc 容器初始化,如果是 web app 还会创建嵌入式的 TomcatrefreshContext(context);// 从 ioc 容器中获取所有的 ApplicationRunner 和 CommandLineRunner 进行回调afterRefresh(context, applicationArguments);// 所有的 SpringApplicationRunListener 回调 finished()listeners.finished(context, null);stopWatch.stop();if (this.logStartupInfo) {new StartupInfoLogger(this.mainApplicationClass).logStarted(getApplicationLog(), stopWatch);}// 整个 SpringBoot 应用启动完成以后返回启动的 ioc 容器return context;}catch (Throwable ex) {handleRunFailure(context, listeners, analyzers, ex);throw new IllegalStateException(ex);}}
事件监听机制
ApplicationContextInitializer、SpringApplicationRunListener 配置在 META-INF/spring.factories 中。
ApplicationRunner、CommandLineRunner 放在 ioc 容器中。
HelloApplicationContextInitializer:
public class HelloApplicationContextInitializer implements ApplicationContextInitializer<ConfigurableApplicationContext> {@Overridepublic void initialize(ConfigurableApplicationContext applicationContext) {System.out.println("ApplicationContextInitializer...initialize..."+applicationContext);}}
HelloSpringApplicationRunListener:
public class HelloSpringApplicationRunListener implements SpringApplicationRunListener {// 必须有一个构造器public HelloSpringApplicationRunListener(SpringApplication application, String[] arg) {}@Overridepublic void starting() {System.out.println("SpringApplicationRunListener...starting...");}@Overridepublic void environmentPrepared(ConfigurableEnvironment environment) {System.out.println("SpringApplicationRunListener...environmentPrepared.." + environment);Object o = environment.getSystemProperties().get("os.name");System.out.println("SpringApplicationRunListener...environmentPrepared.. os.name "+o);}@Overridepublic void contextPrepared(ConfigurableApplicationContext context) {System.out.println("SpringApplicationRunListener...contextPrepared...");}@Overridepublic void contextLoaded(ConfigurableApplicationContext context) {System.out.println("SpringApplicationRunListener...contextLoaded...");}@Overridepublic void finished(ConfigurableApplicationContext context, Throwable exception) {System.out.println("SpringApplicationRunListener...finished...");}}
将它们配置在 META-INF/spring.factories 中:
src/main/resources/META-INF/spring.factories
org.springframework.context.ApplicationContextInitializer=\cn.parzulpan.listener.HelloApplicationContextInitializerorg.springframework.boot.SpringApplicationRunListener=\cn.parzulpan.listener.HelloSpringApplicationRunListener
HelloApplicationRunner:
@Componentpublic class HelloApplicationRunner implements ApplicationRunner {@Overridepublic void run(ApplicationArguments args) throws Exception {System.out.println("ApplicationRunner...run...." + args);}}
HelloCommandLineRunner:
@Componentpublic class HelloCommandLineRunner implements CommandLineRunner {@Overridepublic void run(String... args) throws Exception {System.out.println("CommandLineRunner...run..."+ Arrays.asList(args));}}
将它们放置在 ioc 容器中。
运行主配置类,观察打印输出,可以得到上面的结论。
自定义 starter
SpringBoot 最大的特点就是引入非常多的场景启动器,想使用那个场景就可以直接整合。
它也支持自定义场景启动器,比如 mybatis-spring-boot-starter。
编写自动配置需要的必有项:
@Configuration // 指定这个类是一个配置类@ConditionalOnXXX // 在指定条件成立的情况下自动配置类生效@AutoConfigureAfter // 指定自动配置类的顺序@Bean // 给容器中添加组件@ConfigurationPropertie // 结合相关 xxxProperties 类来绑定相关的配置@EnableConfigurationProperties // 让 xxxProperties 生效并加入到容器中
自动配置类要能加载将需要启动就加载的自动配置类,配置在 META‐INF/spring.factories 中
# Auto Configureorg.springframework.boot.autoconfigure.EnableAutoConfiguration=\org.mybatis.spring.boot.autoconfigure.MybatisAutoConfiguration
模式总结:
- 启动器只用来做依赖导入
xx-spring-boot-starter - 编写一个自动配置模块
xx-spring-boot-starter-autoconfigurer - 启动器依赖自动配置模块,别人使用只需要引入启动器
- 官方命名空间:
spring-boot-starter-模块名, 自定义命名空间:模块名-spring-boot-starter
自定义步骤
前期准备:创建一个空项目 custom-starter ,向其加入一个 Maven 工厂
parzulpan-spring-boot-starter 模块,在加入一个 springboot 类型的 parzulpan-spring-boot-starte 模块。
启动器模块:
<?xml version="1.0" encoding="UTF-8"?><project xmlns="http://maven.apache.org/POM/4.0.0"xmlns:xsi="http://www.w3.org/2001/XMLSchema-instance"xsi:schemaLocation="http://maven.apache.org/POM/4.0.0 http://maven.apache.org/xsd/maven-4.0.0.xsd"><modelVersion>4.0.0</modelVersion><groupId>cn.parzulpan</groupId><artifactId>parzulpan-spring-boot-starter</artifactId><version>1.0-SNAPSHOT</version><!-- 启动器 --><dependencies><!-- 依赖自动配置模块 --><dependency><groupId>cn.parzulpan</groupId><artifactId>parzulpan-spring-boot-starter-configurer</artifactId><version>0.0.1-SNAPSHOT</version></dependency></dependencies></project>
自动配置模块:
<?xml version="1.0" encoding="UTF-8"?><project xmlns="http://maven.apache.org/POM/4.0.0" xmlns:xsi="http://www.w3.org/2001/XMLSchema-instance"xsi:schemaLocation="http://maven.apache.org/POM/4.0.0 https://maven.apache.org/xsd/maven-4.0.0.xsd"><modelVersion>4.0.0</modelVersion><parent><groupId>org.springframework.boot</groupId><artifactId>spring-boot-starter-parent</artifactId><version>1.5.22.RELEASE</version><relativePath/> <!-- lookup parent from repository --></parent><groupId>cn.parzulpan</groupId><artifactId>parzulpan-spring-boot-starter-configurer</artifactId><version>0.0.1-SNAPSHOT</version><name>parzulpan-spring-boot-starter-configurer</name><description>parzulpan starter configurer</description><properties><project.build.sourceEncoding>UTF‐8</project.build.sourceEncoding><project.reporting.outputEncoding>UTF‐8</project.reporting.outputEncoding><java.version>1.8</java.version></properties><dependencies><!-- 引入spring‐boot‐starter,它是所有 starter 的基本配置 --><dependency><groupId>org.springframework.boot</groupId><artifactId>spring-boot-starter</artifactId></dependency></dependencies></project>
编写业务类 HelloService:
package cn.parzulpan;/*** @Author : parzulpan* @Time : 2020-12* @Desc : HelloService*/public class HelloService {HelloServiceProperties helloServiceProperties;public HelloServiceProperties getHelloServiceProperties() {return helloServiceProperties;}public void setHelloServiceProperties(HelloServiceProperties helloServiceProperties) {this.helloServiceProperties = helloServiceProperties;}public String sayHelloName(String name) {return helloServiceProperties.getPrefix() + " - " + name + " - " + helloServiceProperties.getSuffix();}}
编写属性类 HelloServiceProperties:
/*** @Author : parzulpan* @Time : 2020-12* @Desc : HelloService 属性类*/@ConfigurationProperties(prefix = "parzulpan.hello")public class HelloServiceProperties {private String prefix; // 前置语private String suffix; // 后置语public String getPrefix() {return prefix;}public void setPrefix(String prefix) {this.prefix = prefix;}public String getSuffix() {return suffix;}public void setSuffix(String suffix) {this.suffix = suffix;}}
编写配置文件 src/main/resources/META-INF/spring.factories:
org.springframework.boot.autoconfigure.EnableAutoConfiguration=\cn.parzulpan.HelloServiceAutoConfiguration
编写自动配置类 HelloServiceAutoConfiguration:
/*** @Author : parzulpan* @Time : 2020-12* @Desc : HelloService 自动配置类*/@Configuration@ConditionalOnWebApplication // web app 才有效@EnableConfigurationProperties(HelloServiceProperties.class) // 让 HelloServiceProperties 生效并加入到容器中public class HelloServiceAutoConfiguration {@AutowiredHelloServiceProperties helloServiceProperties;@Beanpublic HelloService helloService() {HelloService helloService = new HelloService();helloService.setHelloServiceProperties(helloServiceProperties);return helloService;}}
将这两个模块分别 install 到本地,然后测试使用,创建一个 SpringBoot Web 项目 custom-starter-test ,引入自定义 starter。测试源码
<!-- 引入自定义 starter --><dependency><groupId>cn.parzulpan</groupId><artifactId>parzulpan-spring-boot-starter</artifactId><version>1.0-SNAPSHOT</version></dependency>
编写配置文件 application.properties:
parzulpan.hello.prefix=PARZULPANparzulpan.hello.suffix=HELLO WORLD
编写控制类:
/*** @Author : parzulpan* @Time : 2020-12* @Desc :*/@RestControllerpublic class HelloController {@AutowiredHelloService helloService;// http://localhost:8080/hello@GetMapping("/hello")public String hello() {return helloService.sayHelloName("curry");}}
练习和总结
【SpringBoot1.x】SpringBoot1.x 启动配置原理 和 自定义starter的更多相关文章
- Spring Boot 自动配置的原理、核心注解以及利用自动配置实现了自定义 Starter 组件
本章内容 自定义属性快速入门 外化配置 自动配置 自定义创建 Starter 组件 摘录:读书是读完这些文字还要好好用心去想想,写书也一样,做任何事也一样 图 2 第二章目录结构图 第 2 章 Spr ...
- SpringBoot的启动配置原理
一.启动流程 创建SpringApplication对象 public class SpringApplication { public SpringApplication(Class... prim ...
- springboot 启动配置原理【转】【补】
创建应用 几个重要的事件回调机制 , 配置在META-INF/spring.factories ApplicationContextInitializer SpringApplicationRunL ...
- SpringBoot之旅第六篇-启动原理及自定义starter
一.引言 SpringBoot的一大优势就是Starter,由于SpringBoot有很多开箱即用的Starter依赖,使得我们开发变得简单,我们不需要过多的关注框架的配置. 在日常开发中,我们也会自 ...
- SpringBoot启动源码及自定义starter
为什么springboot工程能够在mian方法中完成启动呢?需要大家掌握的有几个点:1.SPISPI在springboot中是去读取META-INF/spring.factories目录的配置文件内 ...
- springboot启动配置原理之二(运行run方法)
public ConfigurableApplicationContext run(String... args) { StopWatch stopWatch = new StopWatch(); s ...
- springboot启动配置原理之一(创建SpringApplication对象)
几个重要的事件回调机制 配置在META-INF/spring.factories ApplicationContextInitializer SpringApplicationRunListener ...
- 七、Spring Boot 启动配置原理
几个重要的事件回调机制 配置在META-INF/spring.factories ApplicationContextInitializer SpringApplicationRunListener ...
- Spring boot 启动配置原理
配置在META-INF/spring.factories 有几个主要的类 ApplicationContextInitializer 创建SpringAplication SpringAppli ...
随机推荐
- 中间件面试专题:kafka高频面试问题
- 【学习笔记】动态 dp 入门简易教程
序列 dp 引入:最大子段和 给定一个数列 \(a_1, a_2, \cdots, a_n\)(可能为负),求 \(\max\limits_{1\le l\le r\le n}\left\{\sum_ ...
- thinkphp thinkphp6 安装JWT
第一步:composer安装 composer require firebase/php-jwt 下图是执行成功 cd 进入项目目录的vendor 找到firebase 看到下面有一个php-jw ...
- oracle查年度周末日期
1.查年度周末日期sql SELECT distinct TRUNC(TO_DATE('2019-01-01','yyyy-mm-dd')+ rownum,'iw')+ 5 AS sat, TRUNC ...
- Object.assign 之后 点对象 找不到
export function CopyObject(val) { return JSON.parse(JSON.stringify(val)); }
- 云图说 | 云上资源管控有神器!关于IAM,你想知道的都在这里!
摘要:统一身份认证(Identity and Access Management,简称IAM)是华为云上帮助您安全控制华为云资源访问权限的基础服务.通过本期云图说,您可以初步了解IAM的基本功能. 从 ...
- ES6中的Promise和Generator详解
目录 简介 Promise 什么是Promise Promise的特点 Promise的优点 Promise的缺点 Promise的用法 Promise的执行顺序 Promise.prototype. ...
- Web服务器-并发服务器-协程 (3.4.2)
@ 目录 1.分析 2.代码 关于作者 1.分析 随着网站的用户量越来愈多,通过多进程多线程的会力不从心 使用协程可以缓解这一问题 只要使用gevent实现 2.代码 from socket impo ...
- pandas的学习5-导入导出数据
import pandas as pd ''' pandas可以读取与存取的资料格式有很多种,像csv.excel.json.html与pickle等-, 详细请看官方说明文件 ''' # read ...
- Centos7__Scrapy + Scrapy_redis 用Docker 实现分布式爬虫
原理:其实就是用到redis的优点及特性,好处自己查--- 1,scrapy 分布式爬虫配置: settings.py BOT_NAME = 'first' SPIDER_MODULES = ['fi ...