ribbon源码之客户端
客户端模块的核心功能是提供统一的用户请求操作接口。
接口定义
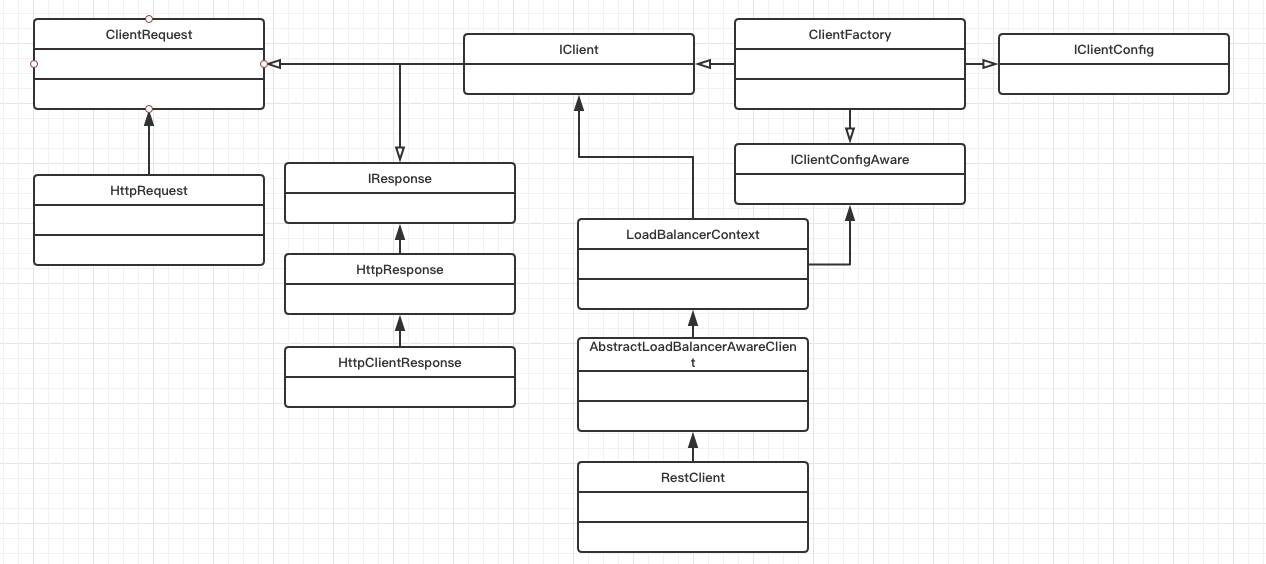
客户端模块的核心是IClient接口,定义了客户端网络请求的方法。
public interface IClient<S extends ClientRequest, T extends IResponse> {

    public T execute(S request, IClientConfig requestConfig) throws Exception;

}
ClientRequest为客户端定义的请求体,存储了请求uri、loadbalancer的key,是否重试、配置。
public class ClientRequest implements Cloneable {

    protected URI uri;

    protected Object loadBalancerKey = null;

    protected Boolean isRetriable = null;

    protected IClientConfig overrideConfig;

}
IResponse为客户端定义的响应内容的接口。
public interface IResponse extends Closeable

{

   public Object getPayload() throws ClientException;

   public boolean hasPayload();

   public boolean isSuccess();

   public URI getRequestedURI();

   public Map<String, ?> getHeaders();

}
IClientConfigAware定义了需要使用IClientConfig初始化IClient的方法。
public interface IClientConfigAware {

    public abstract void initWithNiwsConfig(IClientConfig clientConfig);

}
ribbon基于http请求,相关类和接口,HttpRequest为http请求;HttpResponse为http请求返回结果;Restclient是基于jesery的IClient实现。
类图

客户端工厂类
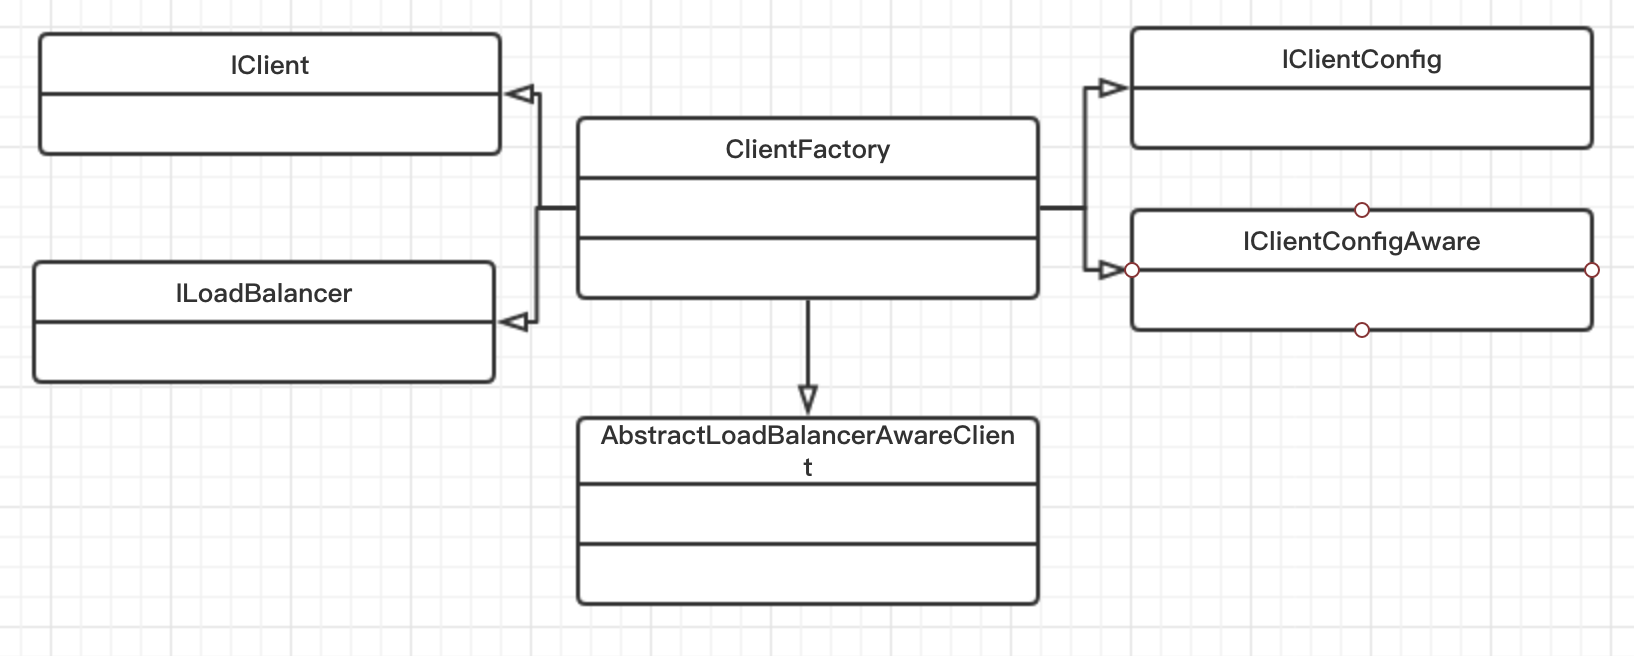
客户端模块提供了一个客户端工厂类(ClientFactory)用于通过配置文件来创建IClient实例和负载均衡器(ILoadBalancer)实例。
public static synchronized IClient getNamedClient(String name) {//根据配置获取iclient实例,默认使用DefaultClientConfigImpl配置类。

        return getNamedClient(name, DefaultClientConfigImpl.class);

    }
public static synchronized IClient getNamedClient(String name, Class<? extends IClientConfig> configClass) {
   ...
        return createNamedClient(name, configClass);
   ...
}
public static synchronized IClient createNamedClient(String name, Class<? extends IClientConfig> configClass) throws ClientException {
   IClientConfig config = getNamedConfig(name, configClass);//实例化配置类
    return registerClientFromProperties(name, config);//通过配置文件创建iclient
}
public static synchronized ILoadBalancer getNamedLoadBalancer(String name) {
   return getNamedLoadBalancer(name, DefaultClientConfigImpl.class);
}
public static synchronized ILoadBalancer getNamedLoadBalancer(String name, Class<? extends IClientConfig> configClass) {
   ...
            lb = registerNamedLoadBalancerFromProperties(name, configClass);
   ...
}
public static synchronized IClient<?, ?> registerClientFromProperties(String restClientName, IClientConfig clientConfig) throws ClientException {

        IClient<?, ?> client = null;

        ILoadBalancer loadBalancer = null;

        ...

            String clientClassName = (String) clientConfig.getProperty(CommonClientConfigKey.ClientClassName);//通过配置文件获取client的实现类

            client = (IClient<?, ?>) instantiateInstanceWithClientConfig(clientClassName, clientConfig); //通过配置文件创建client实例

            boolean initializeNFLoadBalancer = Boolean.parseBoolean(clientConfig.getProperty(

                    CommonClientConfigKey.InitializeNFLoadBalancer, DefaultClientConfigImpl.DEFAULT_ENABLE_LOADBALANCER).toString());

            if (initializeNFLoadBalancer) {//如果需要初始化负载均衡器,则通过配置文件创建一个负载均衡器

                loadBalancer  = registerNamedLoadBalancerFromclientConfig(restClientName, clientConfig);

            }

            if (client instanceof AbstractLoadBalancerAwareClient) {//如果client实现AbstractLoadBalancerAwareClient,则注入负载均衡器

                ((AbstractLoadBalancerAwareClient) client).setLoadBalancer(loadBalancer);

            }

        ...return client;

    }
public static ILoadBalancer registerNamedLoadBalancerFromclientConfig(String name, IClientConfig clientConfig) throws ClientException {
   ...
   ILoadBalancer lb = null;
   ...
        String loadBalancerClassName = (String) clientConfig.getProperty(CommonClientConfigKey.NFLoadBalancerClassName);//
        lb = (ILoadBalancer) ClientFactory.instantiateInstanceWithClientConfig(loadBalancerClassName, clientConfig);
        ...
        return lb;
   ...
}
//初始化指定的class类
public static Object instantiateInstanceWithClientConfig(String className, IClientConfig clientConfig)
          throws InstantiationException, IllegalAccessException, ClassNotFoundException {
       Class clazz = Class.forName(className);
       if (IClientConfigAware.class.isAssignableFrom(clazz)) {//如果指定的iclient实现了IClientConfigAware,ClientFactory在创建时会使用IClientConfig进行初始化。
          IClientConfigAware obj = (IClientConfigAware) clazz.newInstance();
          obj.initWithNiwsConfig(clientConfig);
          return obj;
       } else {
          try {
              if (clazz.getConstructor(IClientConfig.class) != null) {
                 return clazz.getConstructor(IClientConfig.class).newInstance(clientConfig);
              }
          } catch (Throwable e) { // NOPMD
          }
       }
       return clazz.newInstance();
   }
使用客户端工厂类(ClientFactory)涉及的配置:
| 属性 | 实现 | 默认值 |
| clientname.ribbon.ClientClassName | client使用的IClient实现类 | com.netflix.niws.client.http.RestClient |
| clientname.ribbon.InitializeNFLoadBalancer | 是否初始化负载均衡器 | true |
| clientname.ribbon.NFLoadBalancerClassName | 负载均衡器的实现类 | com.netflix.loadbalancer.ZoneAwareLoadBalancer |
类图

客户端实现类
AbstractLoadBalancerAwareClient实现了通过负载均衡器进行请求调用。LoadBalancerCommand对负载均衡器操作进行了模版,对请求调用提供了回调函数。
public T executeWithLoadBalancer(final S request, final IClientConfig requestConfig) throws ClientException {

        LoadBalancerCommand<T> command = buildLoadBalancerCommand(request, requestConfig);

     ...return command.submit(

                new ServerOperation<T>() {

                    @Override

                    public Observable<T> call(Server server) {

                        URI finalUri = reconstructURIWithServer(server, request.getUri());

                        S requestForServer = (S) request.replaceUri(finalUri);//设置最终的调用uri。

                        try {

                            return Observable.just(AbstractLoadBalancerAwareClient.this.execute(requestForServer, requestConfig));

                        } //调用execute方法执行请求调用。

                        catch (Exception e) {

                            return Observable.error(e);

                        }

                    }

                })

                .toBlocking()

                .single();

        ...

    }
LoadBalancerCommand调用了负载均衡器获得了一个server,然后调用回调函数执行请求。此外还提供了各个关键节点的监听器和异常重试机制。
public Observable<T> submit(final ServerOperation<T> operation) {

        final ExecutionInfoContext context = new ExecutionInfoContext();

        if (listenerInvoker != null) {//执行回调接口

            try {

                listenerInvoker.onExecutionStart();

            } catch (AbortExecutionException e) {

                return Observable.error(e);

            }

        }

        final int maxRetrysSame = retryHandler.getMaxRetriesOnSameServer();

        final int maxRetrysNext = retryHandler.getMaxRetriesOnNextServer();

        Observable<T> o =

                (server == null ? selectServer() : Observable.just(server))//调用负载均衡器获得目标server

                .concatMap(new Func1<Server, Observable<T>>() {

                    ...return operation.call(server).doOnEach(new Observer<T>() {

                                            ....

                                        });

                    ...

                        if (maxRetrysSame > 0)

                            o = o.retry(retryPolicy(maxRetrysSame, true));

                        return o;

                    }

                });

        if (maxRetrysNext > 0 && server == null)

            o = o.retry(retryPolicy(maxRetrysNext, false));

        return o.onErrorResumeNext(new Func1<Throwable, Observable<T>>() {

            @Override

            public Observable<T> call(Throwable e) {

                if (context.getAttemptCount() > 0) {

                    if (maxRetrysNext > 0 && context.getServerAttemptCount() == (maxRetrysNext + 1)) {

                        e = new ClientException(ClientException.ErrorType.NUMBEROF_RETRIES_NEXTSERVER_EXCEEDED,

                                "Number of retries on next server exceeded max " + maxRetrysNext

                                + " retries, while making a call for: " + context.getServer(), e);

                    }

                    else if (maxRetrysSame > 0 && context.getAttemptCount() == (maxRetrysSame + 1)) {

                        e = new ClientException(ClientException.ErrorType.NUMBEROF_RETRIES_EXEEDED,

                                "Number of retries exceeded max " + maxRetrysSame

                                + " retries, while making a call for: " + context.getServer(), e);

                    }

                }

                if (listenerInvoker != null) {

                    listenerInvoker.onExecutionFailed(e, context.toFinalExecutionInfo());

                }

                return Observable.error(e);

            }

        });

    }
private Observable<Server> selectServer() {

        return Observable.create(new OnSubscribe<Server>() {

            @Override

            public void call(Subscriber<? super Server> next) {

                try {

                    Server server = loadBalancerContext.getServerFromLoadBalancer(loadBalancerURI, loadBalancerKey);

                    next.onNext(server);

                    next.onCompleted();

                } catch (Exception e) {

                    next.onError(e);

                }

            }

        });

    }
子类 HttpRequest用于http请求,内部定义了http请求的各个内容,并且使用了builder模式。
public class HttpRequest extends ClientRequest {protected CaseInsensitiveMultiMap httpHeaders = new CaseInsensitiveMultiMap();//head参数

    protected Multimap<String, String> queryParams = ArrayListMultimap.create();//query参数

    private Object entity;//消息体

    protected Verb verb;//http请求的method:post get head delete等。默认get

}
类图
ribbon源码之客户端的更多相关文章
- ribbon源码(1) 概述
ribbon的核心功能是提供客户端在进行网络请求时负载均衡的能力.主要有以下几个模块: 负载均衡器模块 负载均衡器模块提供了负载均衡能力,详细参见ribbon源码之负载均衡器. 配置模块 配置模块管理 ...
- 【一起学源码-微服务】Ribbon源码五:Ribbon源码解读汇总篇~
前言 想说的话 [一起学源码-微服务-Ribbon]专栏到这里就已经全部结束了,共更新四篇文章. Ribbon比较小巧,这里是直接 读的spring cloud 内嵌封装的版本,里面的各种config ...
- ribbon源码(2) 负载均衡器
负载均衡器对外提供负载均衡的功能,本质上是是维护当前服务的服务器列表和服务器状态,通过负载均衡算法选取合适的服务器地址. 用户可以通过实现ILoadBalancer来实现自己的负载均衡器,ribbon ...
- centos精简系统 源码安装客户端git
CentOS的yum源中git版本比较低,需要最新版本git,只能自己编译安装,现在记录下编译安装的内容,留给自己备忘. 对于精简型的centos系统,会缺少很多依赖包和插件,要源码安装客户端git, ...
- Netty源码解析—客户端启动
Netty源码解析-客户端启动 Bootstrap示例 public final class EchoClient { static final boolean SSL = System.getPro ...
- Netty 源码学习——客户端流程分析
Netty 源码学习--客户端流程分析 友情提醒: 需要观看者具备一些 NIO 的知识,否则看起来有的地方可能会不明白. 使用版本依赖 <dependency> <groupId&g ...
- Ribbon源码分析(二)-- 服务列表的获取和负载均衡算法分析
上一篇博客(https://www.cnblogs.com/yangxiaohui227/p/12614343.html)分享了ribbon如何实现对http://product/info/这个链接重 ...
- 读书笔记-Ribbon源码分析
@LoadBalanced注解用来给RestTemplate做标记,以使用负载均衡的客户端来配置. 通过搜索LoadBalancerClient可以发现,LoadBalancerClient是Spri ...
- 【一起学源码-微服务】Ribbon 源码一:Ribbon概念理解及Demo调试
前言 前情回顾 前面文章已经梳理清楚了Eureka相关的概念及源码,接下来开始研究下Ribbon的实现原理. 我们都知道Ribbon在spring cloud中担当负载均衡的角色, 当两个Eureka ...
随机推荐
- java如何简单的将一个三位正整数分解成三个数
public class Leet { public static void main(String[] args) { Scanner scanner = new Scanner(System.in ...
- 【踩坑笔记】layui之单选和复选框不显示
直接上代码,下面前端页面代码,使用layui框架: <div class="layui-form-item"> <div class="lay ...
- 第一篇scrum冲刺博客--Interesting-Corps
第一篇scrum冲刺博客 一.Alpha阶段各成员任务 鲍鱼铭 任务名称 预计时间 主页页面和探测空间设计及布局实现 6h 主页页面跳转社区功能及社区设计及布局实现 6h 搜索页面跳转.设计及布局实现 ...
- 第7篇scrum冲刺(5.27)
一.站立会议 1.照片 2.工作安排 成员 昨天已完成的工作 今天的工作安排 困难 陈芝敏 学习云开发,云函数调用以及数据的前后端传递 今天实现云词库搭建,随机获取并显示,对云开发有更深的认识 ...
- 如何下载gitbub中的单个文件
1.进入Github文件夹,打开对应文件: 2.右键单击Raw,然后目标另存为即可.
- 重拾Java Web应用的基础体系结构
目录 一.背景 二.Web应用 2.1 HTML 2.2 HTTP 2.3 URL 2.4 Servlet 2.4.1 编写第一个Servlet程序 2.5 JSP 2.6 容器 2.7 URL映射到 ...
- 经典DP动规 0-1背包问题 二维与一维
先上代码 b站讲解视频 灯神讲背包 #include <iostream> #include <cstring> #include <algorithm> usin ...
- Android开发之数据存储——SharedPreferences基础知识详解,饿补学会基本知识,开发者必会它的用法。
一.数据存储选项:Data Storage --Storage Options[重点] 1.Shared Preferences Store private primitive data in key ...
- 《神经网络的梯度推导与代码验证》之vanilla RNN的前向传播和反向梯度推导
在本篇章,我们将专门针对vanilla RNN,也就是所谓的原始RNN这种网络结构进行前向传播介绍和反向梯度推导.更多相关内容请见<神经网络的梯度推导与代码验证>系列介绍. 注意: 本系列 ...
- 有手就行 虚拟机上安装Linux
VMware上装Linux CentOS 初学一步步来
