菜鸟之路——机器学习之决策树个人理解及Python实现
最近开始学习机器学习,以下会记录我学习中遇到的问题以及我个人的理解
决策树算法,网上很多介绍,在这不复制粘贴。下面解释几个关键词就好。
信息熵(entropy):就是信息不确定性的多少 H(x)=-ΣP(x)log2[P(x)]。变量的不确定性越大,熵就越大。
信息获取量(Information Gain):这是ID3算法中定义的一个选择属性判断结点的算法。Gain(A)=H(D)-HA(D)。就是本的信息熵与下一级的信息熵之差。用来确定信息获取量的多少,信息获取量最多的即选择为本级的判断属性。就这样一层一层的算,一层一层的判断。
决策树的原理很简答,表达也很直观,Python中的sklearn库能够直接实现
 from sklearn.feature_extraction import DictVectorizer

 import csv

 from sklearn import preprocessing

 from sklearn import tree

 from sklearn.externals.six import StringIO

 allElectronicsData=open (r'AllElectronics.csv','rt')  #'rb'是读取二进制文件,'rt'是读取文本文件  r‘’是让字符串里面的转义字符失效

 reader=csv.reader(allElectronicsData)

 headers=next(reader)   #读取下一行数据

 print("headers:",headers)

 #将表格转化为特征向量字典列表和标签列表

 FeatureList=[] #储存特征向量字典列表

 LableList=[]   #储存标签列表

 for row in reader:

     LableList.append(row[len(row)-1])

     rowDict={}

     for i in range(1,len(row)-1):

         rowDict[headers[i]]=row[i]

     FeatureList.append(rowDict)

 print("LableList:",LableList)

 print("FeatureList:",FeatureList)

 #将上述列表转化为sklearn可处理的形式。也就是每个属性每个元素都表示出来,有为1 ,没有为0

 vec=DictVectorizer()

 dummyX=vec.fit_transform(FeatureList) .toarray()#转化为矩阵

 print("dummyX",dummyX)

 print(vec.get_feature_names())

 lb=preprocessing.LabelBinarizer()

 dummyY = lb.fit_transform(LableList)

 print("dummyY",dummyY)

 #直接利用sklearn里面的tree分类器进行创建model

 clf=tree.DecisionTreeClassifier(criterion='entropy')#创建分类器,criterion是选取算法,entropy信息熵

 clf=clf.fit(dummyX,dummyY)

 print("clf:",clf)

 #保存为dot文件,可用graphviz画出决策树

 with open("allElectronics.dot",'w') as f:

     f=tree.export_graphviz(clf,feature_names=vec.get_feature_names(),out_file=f)

 #预测

 newRowX=dummyX[0,:]   #取一个之前数据的第一行

 newRowX[0]=1

 newRowX[2]=0    #修改第一个属性,也就是弄出来个新的数据,这的0,1,还是上面解释的,此属性有就是1,没有就是0

 print("newRowX:",newRowX)

 newRowX=[newRowX]   #一定要注意这个,predict的输入必须是个二位数据

 predictedY = clf.predict(newRowX)

 print("predictedY: " + str(predictedY))
里面有我注解的解释,此源码来自于麦子学院课程视频。
运行之后的结果为:
headers: ['RID', 'age', 'income', 'student', 'credit_rating', 'class_buys_computer']
LableList: ['no', 'no', 'yes', 'yes', 'yes', 'no', 'yes', 'no', 'yes', 'yes', 'yes', 'yes', 'yes', 'no']
FeatureList: [{'age': 'youth', 'income': 'high', 'student': 'no', 'credit_rating': 'fair'}, {'age': 'youth', 'income': 'high', 'student': 'no', 'credit_rating': 'excellent'}, {'age': 'middle_aged', 'income': 'high', 'student': 'no', 'credit_rating': 'fair'}, {'age': 'senior', 'income': 'medium', 'student': 'no', 'credit_rating': 'fair'}, {'age': 'senior', 'income': 'low', 'student': 'yes', 'credit_rating': 'fair'}, {'age': 'senior', 'income': 'low', 'student': 'yes', 'credit_rating': 'excellent'}, {'age': 'middle_aged', 'income': 'low', 'student': 'yes', 'credit_rating': 'excellent'}, {'age': 'youth', 'income': 'medium', 'student': 'no', 'credit_rating': 'fair'}, {'age': 'youth', 'income': 'low', 'student': 'yes', 'credit_rating': 'fair'}, {'age': 'senior', 'income': 'medium', 'student': 'yes', 'credit_rating': 'fair'}, {'age': 'youth', 'income': 'medium', 'student': 'yes', 'credit_rating': 'excellent'}, {'age': 'middle_aged', 'income': 'medium', 'student': 'no', 'credit_rating': 'excellent'}, {'age': 'middle_aged', 'income': 'high', 'student': 'yes', 'credit_rating': 'fair'}, {'age': 'senior', 'income': 'medium', 'student': 'no', 'credit_rating': 'excellent'}]
dummyX [[0. 0. 1. 0. 1. 1. 0. 0. 1. 0.]
[0. 0. 1. 1. 0. 1. 0. 0. 1. 0.]
[1. 0. 0. 0. 1. 1. 0. 0. 1. 0.]
[0. 1. 0. 0. 1. 0. 0. 1. 1. 0.]
[0. 1. 0. 0. 1. 0. 1. 0. 0. 1.]
[0. 1. 0. 1. 0. 0. 1. 0. 0. 1.]
[1. 0. 0. 1. 0. 0. 1. 0. 0. 1.]
[0. 0. 1. 0. 1. 0. 0. 1. 1. 0.]
[0. 0. 1. 0. 1. 0. 1. 0. 0. 1.]
[0. 1. 0. 0. 1. 0. 0. 1. 0. 1.]
[0. 0. 1. 1. 0. 0. 0. 1. 0. 1.]
[1. 0. 0. 1. 0. 0. 0. 1. 1. 0.]
[1. 0. 0. 0. 1. 1. 0. 0. 0. 1.]
[0. 1. 0. 1. 0. 0. 0. 1. 1. 0.]]
['age=middle_aged', 'age=senior', 'age=youth', 'credit_rating=excellent', 'credit_rating=fair', 'income=high', 'income=low', 'income=medium', 'student=no', 'student=yes']
dummyY [[0]
[0]
[1]
[1]
[1]
[0]
[1]
[0]
[1]
[1]
[1]
[1]
[1]
[0]]
clf: DecisionTreeClassifier(class_weight=None, criterion='entropy', max_depth=None,
max_features=None, max_leaf_nodes=None,
min_impurity_decrease=0.0, min_impurity_split=None,
min_samples_leaf=1, min_samples_split=2,
min_weight_fraction_leaf=0.0, presort=False, random_state=None,
splitter='best')
newRowX: [1. 0. 0. 0. 1. 1. 0. 0. 1. 0.]
predictedY: [1]
此外可用Graphviz画出决策图。
这就用到了代码中生成的dot文件,在cmd命令中运行以下命令

主要是dot -T pdf input.dot -o output.pdf这个命令。(Graphviz的安装方法网上多的是,记得添加环境变量)
生成pdf 的截图为
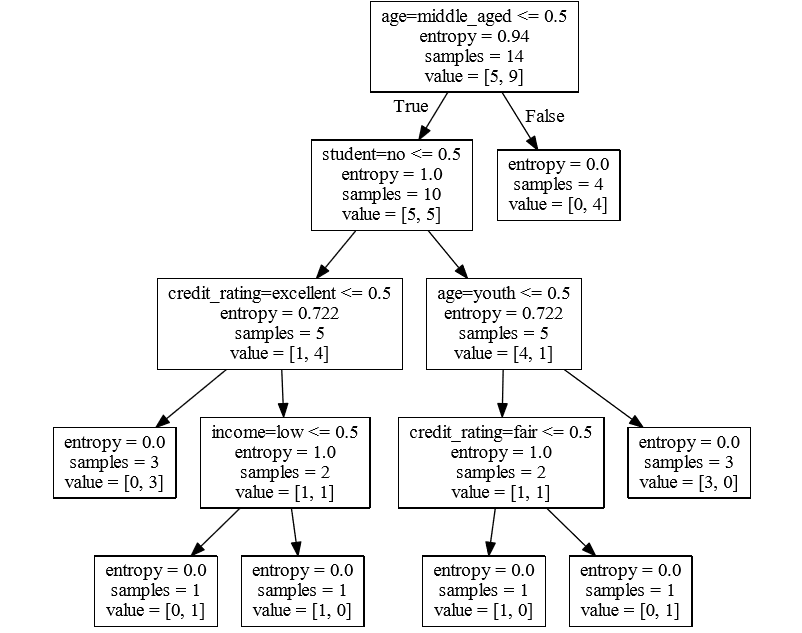
看着更直观
我编程过程中遇到几个问题,课程里面的源码不能直接运行。报错
ValueError: Expected 2D array, got 1D array instead:
array=[1. 0. 0. 0. 1. 1. 0. 0. 1. 0.].
Reshape your data either using array.reshape(-1, 1) if your data has a single feature or array.reshape(1, -1) if it contains a single sample.
如果不要第50行,就是newRowX是一维数组,而predict方法的输入量必须是二维的数组。所以加上newRowX=[newRowX],将newRowX再用[]包括,使之变为二维的数组即可。
另外注意第七行'rb'和'rt'的区别,如果用'rb'就会报错
_csv.Error: iterator should return strings, not bytes (did you open the file in text mode?)
以上就是我学习过程中遇到的问题和个人理解了。
菜鸟之路——机器学习之决策树个人理解及Python实现的更多相关文章
- 菜鸟之路——机器学习之非线性回归个人理解及python实现
关键词: 梯度下降:就是让数据顺着梯度最大的方向,也就是函数导数最大的放下下降,使其快速的接近结果. Cost函数等公式太长,不在这打了.网上多得是. 这个非线性回归说白了就是缩小版的神经网络. py ...
- 菜鸟之路——机器学习之线性回归个人理解及Python实现
这一节很简单,都是高中讲过的东西 简单线性回归:y=b0+b1x+ε.b1=(Σ(xi-x–)(yi-y–))/Σ(xi-x–)ˆ2 b0=y--b1x- 其中ε取 为均值为0的正态 ...
- 机器学习之决策树(ID3)算法与Python实现
机器学习之决策树(ID3)算法与Python实现 机器学习中,决策树是一个预测模型:他代表的是对象属性与对象值之间的一种映射关系.树中每个节点表示某个对象,而每个分叉路径则代表的某个可能的属性值,而每 ...
- 菜鸟之路——机器学习之KNN算法个人理解及Python实现
KNN(K Nearest Neighbor) 还是先记几个关键公式 距离:一般用Euclidean distance E(x,y)√∑(xi-yi)2 .名字这么高大上,就是初中学的两点间的距离 ...
- 菜鸟之路——机器学习之BP神经网络个人理解及Python实现
关键词: 输入层(Input layer).隐藏层(Hidden layer).输出层(Output layer) 理论上如果有足够多的隐藏层和足够大的训练集,神经网络可以模拟出任何方程.隐藏层多的时 ...
- 菜鸟之路——机器学习之SVM分类器学习理解以及Python实现
SVM分类器里面的东西好多呀,碾压前两个.怪不得称之为深度学习出现之前表现最好的算法. 今天学到的也应该只是冰山一角,懂了SVM的一些原理.还得继续深入学习理解呢. 一些关键词: 超平面(hyper ...
- 菜鸟之路——机器学习之HierarchicalClustering层次分析及个人理解
这个算法.我个人感觉有点鸡肋.最终的表达也不是特别清楚. 原理很简单,从所有的样本中选取Euclidean distance最近的两个样本,归为一类,取其平均值组成一个新样本,总样本数少1:不断的重复 ...
- 菜鸟之路——机器学习之Kmeans聚类个人理解及Python实现
一些概念 相关系数:衡量两组数据相关性 决定系数:(R2值)大概意思就是这个回归方程能解释百分之多少的真实值. Kmeans聚类大致就是选择K个中心点.不断遍历更新中心点的位置.离哪个中心点近就属于哪 ...
- 菜鸟之路——Linux基础::计算机网络基础,Linux常用系统命令,Linux用户与组权限
最近又重新安排了一下我的计划.准备跟着老男孩的教程继续学习,感觉这一套教程讲的很全面,很详细.比我上一套机器学习好的多了. 他的第一阶段是Python基础,第二阶段是高等数学基础,主要将机器学习和深度 ...
随机推荐
- Swift_销毁
Swift_销毁 点击查看源码 销毁 func test() { class SomeClass { //类销毁时 通知此方法 deinit { print("销毁") } } v ...
- JavaScript高级程序设计(复制变量值、传递参数)
复制变量值 一个变量向另一个变量复制基本类型值和引用类型值时,是存在不同的. 一个变量向另一个变量复制基本类型的值,会在变量的对象上创建一个新值,然后把该值复制到为新变量分配的位置上. var num ...
- 剑指Offer_编程题之从尾到头打印链表
题目描述 输入一个链表,从尾到头打印链表每个节点的值.
- chromium之message_pump_win之三
上一篇分析MessagePumpForUI,参考chromium之message_pump_win之二 MessagePumpForIO,同MessagePumpForUI,也是要实现三个函数 // ...
- python的基本知识
1. python的简介 python的创始⼈人为吉多·范罗苏姆(Guido van Rossum).1989年年的圣诞节期间,吉多· 范罗苏姆为了了在阿姆斯特丹丹打发时间,决⼼心开发⼀个新的脚 ...
- 大数据学习--day09(this、static)
this.static this 关键字 类不可以定义 this 属性 , 但是每个类都有一个 隐藏起来的 this 属性 . 每个对象被创建了 , 都会给其属性分配空间 , 也会给 this ...
- 『Linux基础 - 2 』操作系统,Linux背景知识和Ubuntu操作系统安装
这篇笔记记录了以下几个知识点: 1.目前常见的操作系统及分类,虚拟机 2.Linux操作系统背景知识,Windows和Linux两个操作系统的对比 3.在虚拟机中安装Ubuntu系统的详细步骤 OS( ...
- Python(9-18天总结)
day9:函数:def (形参): 函数体 函数名(实参)形参:在函数声明位置的变量 1. 位置参数 2. 默认值参数 3. 混合 位置, 默认值 4. 动态传参, *args 动态接收位置参数, * ...
- centos7 杂记
yum 源 https://www.cnblogs.com/renpingsheng/p/7845096.html 安装nginx php mysql https://www.cnblogs.com/ ...
- Docker开篇之HelloWorld
按照程序世界的惯例,我们应该以HelloWorld的程序为起点开始介绍.那么接下来我们就看看Docker的HelloWorld是如何运行的. 安装 Docker CE 由于我的系统是OSX,个人推荐使 ...