8、Web Service-IDEA-jaxws规范下的 spring整合CXF
前提:开发和之前eclipse的开发有很大的不同!
1、服务端的实现
1、新建项目
此时创建的是web项目
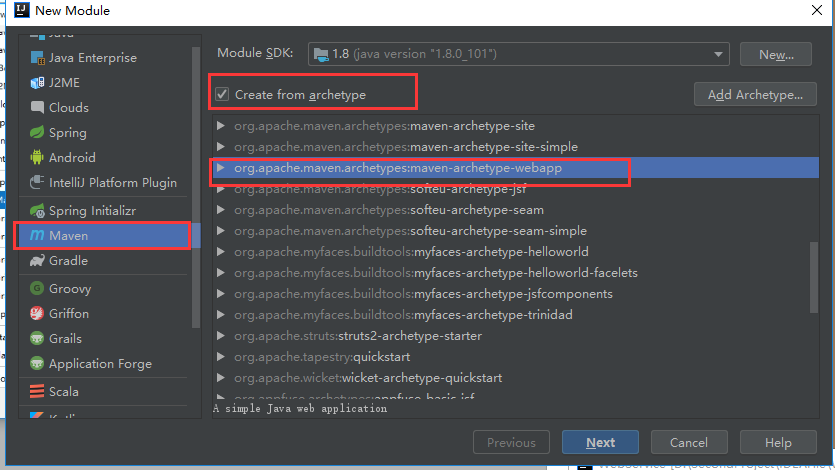
2、此时创建的项目是不完整的需要开发人员手动补充完整
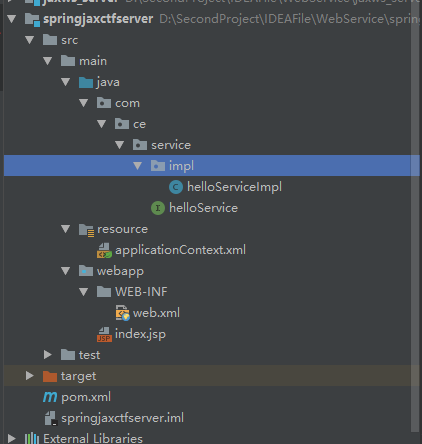
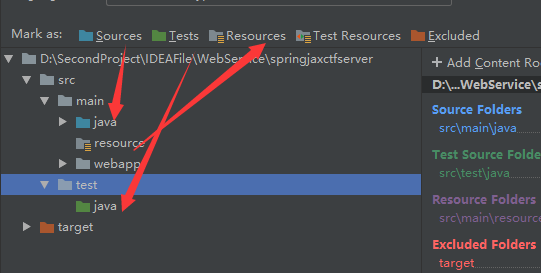
3、对文件夹的设置(满满的软件使用方法)
helloService.java
package com.ce.service;

import javax.jws.WebService;

@WebService

public interface helloService {

    public String hello(String name);

}
接口的实现类:
package com.ce.service.impl;

import com.ce.service.helloService;

public class helloServiceImpl implements helloService {

    @Override

    public String hello(String name) {

       return "你好 : " + name;

    }

}
关键的是web.xml文件的配置:
这里的url-pattern是一个切点(知道就好了)
<?xml version="1.0" encoding="UTF-8"?>

<web-app xmlns:xsi="http://www.w3.org/2001/XMLSchema-instance" xmlns="http://xmlns.jcp.org/xml/ns/javaee" xsi:schemaLocation="http://xmlns.jcp.org/xml/ns/javaeehttp://xmlns.jcp.org/xml/ns/javaee/web-app_3_1.xsd" version="3.1">

  <display-name>cxf</display-name>

  <servlet>

    <servlet-name>CXFServlet</servlet-name>

    <servlet-class>org.apache.cxf.transport.servlet.CXFServlet</servlet-class>

  </servlet>

  <servlet-mapping>

    <servlet-name>CXFServlet</servlet-name>

    <!--将作为前缀的一部分-->

    <url-pattern>/cr/*</url-pattern>

  </servlet-mapping>

  <context-param>

    <param-name>contextConfigLocation</param-name>

    <param-value>classpath:/applicationContext.xml</param-value>

  </context-param>

  <listener>

    <listener-class>org.springframework.web.context.ContextLoaderListener</listener-class>

  </listener>

</web-app>
spring的配置文件
applicationContext.xml
这里需要引入约束
<?xml version="1.0" encoding="UTF-8"?>

<beans  xmlns="http://www.springframework.org/schema/beans"

        xmlns:context="http://www.springframework.org/schema/context"

        xmlns:xsi="http://www.w3.org/2001/XMLSchema-instance"

        xmlns:cxf="http://cxf.apache.org/core"

        xmlns:jaxws="http://cxf.apache.org/jaxws"

        xmlns:jaxrs="http://cxf.apache.org/jaxrs"

        xsi:schemaLocation="

http://www.springframework.org/schema/beans

http://www.springframework.org/schema/beans/spring-beans.xsd

http://www.springframework.org/schema/context

http://www.springframework.org/schema/spring-context.xsd

http://cxf.apache.org/core

http://cxf.apache.org/schema/core.xsd

http://cxf.apache.org/jaxws

http://cxf.apache.org/schemas/jaxws.xsd

http://cxf.apache.org/jaxrs

http://cxf.apache.org/schemas/jaxrs.xsd">
<!--服务地址-->
<jaxws:server address="/hello">

    <!--服务类-->

    <jaxws:serviceBean>

        <bean class="com.ce.service.impl.helloServiceImpl"></bean>

    </jaxws:serviceBean>

</jaxws:server>

</beans>
添加tomcat进行运行项目:
在同tomcat文件夹中加入jar(坑位)
否则启动就会立即进行报错


2、客户端
1、新建项目

2、工程目录

3、pom文件的依赖
pom文件的依赖与服务的相同
4、applicationContext.xml
<?xml version="1.0" encoding="UTF-8"?>

<beans  xmlns="http://www.springframework.org/schema/beans"

        xmlns:context="http://www.springframework.org/schema/context"

        xmlns:xsi="http://www.w3.org/2001/XMLSchema-instance"

        xmlns:cxf="http://cxf.apache.org/core"

        xmlns:jaxws="http://cxf.apache.org/jaxws"

        xmlns:jaxrs="http://cxf.apache.org/jaxrs"

        xsi:schemaLocation="

http://www.springframework.org/schema/beans

http://www.springframework.org/schema/beans/spring-beans.xsd

http://www.springframework.org/schema/context

http://www.springframework.org/schema/spring-context.xsd

http://cxf.apache.org/core

http://cxf.apache.org/schema/core.xsd

http://cxf.apache.org/jaxws

http://cxf.apache.org/schemas/jaxws.xsd

http://cxf.apache.org/jaxrs

http://cxf.apache.org/schemas/jaxrs.xsd">

<!--客户端配置-->

<!--

服务地址

服务接口类型

-->

<jaxws:client id="helloService"

  serviceClass="com.ce.service.helloService"
  address="http://localhost:8082/cr/hello">
</jaxws:client>

</beans>
测试类:
package com.ce;

import com.ce.service.helloService;

import org.junit.Test;

import org.junit.runner.RunWith;

import org.springframework.test.context.ContextConfiguration;

import org.springframework.test.context.junit4.SpringJUnit4ClassRunner;

import javax.annotation.Resource;

@RunWith(SpringJUnit4ClassRunner.class)

@ContextConfiguration("classpath:applicationContext.xml")

public class Client {

    //注入对象

    @Resource

    private com.ce.service.helloService helloService;

    @Test

    public void test(){

        //查看接口的代理对象类型

        System.out.println(helloService.getClass());

        //远程访问服务的的方法

        String mr = helloService.hello("Mr");

        System.out.println(mr);

    }

}
此时测试可以得到答案!!!
8、Web Service-IDEA-jaxws规范下的 spring整合CXF的更多相关文章
- 分析下为什么spring 整合mybatis后为啥用不上session缓存
因为一直用spring整合了mybatis,所以很少用到mybatis的session缓存. 习惯是本地缓存自己用map写或者引入第三方的本地缓存框架ehcache,Guava 所以提出来纠结下 实验 ...
- 2017年2月16日 分析下为什么spring 整合mybatis后为啥用不上session缓存
因为一直用spring整合了mybatis,所以很少用到mybatis的session缓存. 习惯是本地缓存自己用map写或者引入第三方的本地缓存框架ehcache,Guava 所以提出来纠结下 实验 ...
- Web Service 之JAX-WS 与CXF实现
Web Service的实现方式有很多种,本篇介绍的是基于JAX-WS(纯Java)实现的,然后借由CXF工具生成Javabean. 第一步:创建一个Java工程,编写CalService接口,此接口 ...
- Apache CXF实现Web Service(1)——不借助重量级Web容器和Spring实现一个纯的JAX-WS web service
废话少说,先在Eclipse中新建一个Java Project (可以不是WTP的Dynamic Web Project) 选择Java Project 再看pom.xml 我们使用cxf 3.1.4 ...
- 什么情况下应该使用Web Service?
现在我将列举三种情况,在这三种情况下,你将会发现使用Web service会带来极大的好处.此后,我还会举出不应该使用Web service的一些情况. 跨越防火墙的通信 如果你的应用程序有成千上万的 ...
- Web Service(1.8)
“基于 XMLWeb Service 的 Java API”(JAX-WS)通过使用注释来指定与 Web Service 实现相关联的元数据以及简化 Web Service 的开发.注释描述如何将 ...
- 【Java学习笔记】如何写一个简单的Web Service
本Guide利用Eclipse以及Ant建立一个简单的Web Service,以演示Web Service的基本开发过程: 1.系统条件: Eclipse Java EE IDE for Web De ...
- Java:Web Service初入门
前言 Web Service技术在我第一次接触,又没有实际使用时完全不理解这是什么.以为是一种类似Spring,Shiro的编程框架.后来渐渐理解,WS(即Web Service缩写)是一种通用的接口 ...
- Web Service学习小结(概念性回忆)-希望你们会喜欢
Web Service的出现带来了很多系统工程直接相互的调用.无疑让代码的隐藏得到了好的封装. Web Service 它的主要的组成要素: SOAP:(Simple Object Access P ...
随机推荐
- Java异步转同步
参考原文: <http://blog.csdn.net/veson__/article/details/53898890>
- 使用webClient实现图片同步,异步下载
WebClient.DownloadFile 方法 将具有指定 URI 的资源下载到本地文件. 命名空间:System.Net 程序集:System(在 system.dll 中) 同步实现参考代码: ...
- 前端(七):ES6一些新特性
一.变量 1.var关键字的弊端 var关键字的弊端:1.可以重复声明变量:2.无法限制变量修改:3.没有块级作用域,只有函数作用域. <html lang="en"> ...
- K:大数加法
相关介绍: 在java中,整数是有最大上限的.所谓大数是指超过整数最大上限的数,例如18 452 543 389 943 209 789 324 233和8 123 534 323 432 323 ...
- BZOJ3512:DZY Loves Math IV
传送门 Sol 好神仙的题目.. 一开始就直接莫比乌斯反演然后就 \(GG\) 了 orz 题解 permui 枚举 \(n\),就是求 \(\sum_{i=1}^{n}S(i,m)\) 其中\(S( ...
- Bzoj3277:串
题面 传送门 Sol 广义\(sam\) 每个\(sam\)的状态开\(set\)记录属于哪些串 \(parent\)树上启发式合并\(set\) 然后每个串就在上面走,通过不停地跳\(parent\ ...
- 转:在使用angularjs过程,ng-repeat中track by的作用
转载:链接 <div ng-repeat="links in slides"> <div ng-repeat="link in links track ...
- JavaScript的进阶之路(五)理解数组1
数组是值得有序结合,每个值叫做一个元素,每个元素的位置称为索引,索引从0开始. 在JavaScript中,数组是对象的特殊形式.继承自Array.prototype中的属性,有丰富的数组操作方法. 通 ...
- [转]Linux芯片级移植与底层驱动(基于3.7.4内核)
1. SoC Linux底层驱动的组成和现状 为了让Linux在一个全新的ARM SoC上运行,需要提供大量的底层支撑,如定时器节拍.中断控制器.SMP启动.CPU hotplug以及底层的G ...
- MUI框架-07-HBuilder+夜神安卓模拟器
MUI框架-07-HBuilder+夜神安卓模拟器 有时候我们在 HBuilder 里面 web 浏览器预览我们的 MUI 项目界面时,总感觉这个 web 浏览器随便拖拉比例,大小可调,但它毕竟是浏览 ...