MkDocs
Overview
MkDocs is a fast, simple and downright gorgeous static site generator that's geared towards building project documentation. Documentation source files are written in Markdown, and configured with a single YAML configuration file.
Host anywhere
MkDocs builds completely static HTML sites that you can host on GitHub pages, Amazon S3, or anywhere else you choose.
Great themes available
There's a stack of good looking themes available for MkDocs. Choose between the built in themes: mkdocs and readthedocs, select one of the 3rd party themes in the MkDocs wiki, or build your own.
Preview your site as you work
The built-in dev-server allows you to preview your documentation as you're writing it. It will even auto-reload and refresh your browser whenever you save your changes.
Easy to customize
Get your project documentation looking just the way you want it by customizing the theme.
Installation
Install with a Package Manager
If you have and use a package manager (such as apt-get, dnf, homebrew, yum, etc.) to install packages on your system, then you may want to search for a "MkDocs" package and, if a recent version is available, install it with your package manager (check your system's documentation for details). That's it, you're done! Skip down to Getting Started.
If your package manager does not have a recent "MkDocs" package, you can still use your package manager to install "Python" and "pip". Then you can use pip to install MkDocs.
Manual Installation
In order to manually install MkDocs you'll need Python installed on your system, as well as the Python package manager, pip. You can check if you have these already installed from the command line:
$ python --version

Python 2.7.2

$ pip --version

pip 1.5.2
MkDocs supports Python versions 2.6, 2.7, 3.3, 3.4, 3.5 and pypy.
Installing Python
Install Python by downloading an installer appropriate for your system from python.org and running it.
Note
If you are installing Python on Windows, be sure to check the box to have Python added to your PATH if the installer offers such an option (it's normally off by default).

Installing pip
If you're using a recent version of Python, the Python package manager, pip, is most likely installed by default. However, you may need to upgrade pip to the lasted version:
pip install --upgrade pip
If you need to install pip for the first time, download get-pip.py. Then run the following command to install it:
python get-pip.py
Installing MkDocs
Install the mkdocs package using pip:
pip install mkdocs
You should now have the mkdocs command installed on your system. Run mkdocs --version to check that everything worked okay.
$ mkdocs --version

mkdocs, version 0.15.3
Note
If you are using Windows, some of the above commands may not work out-of-the-box.
A quick solution may be to preface every Python command with python -m like this:
python -m pip install mkdocs

python -m mkdocs
For a more permanent solution, you may need to edit your PATH environment variable to include the Scripts directory of your Python installation. Recent versions of Python include a script to do this for you. Navigate to your Python installation directory (for example C:\Python34\), open the Tools, then Scripts folder, and run the win_add2path.py file by double clicking on it. Alternatively, you can download the script and run it (python win_add2path.py).
Getting Started
Getting started is super easy.
mkdocs new my-project

cd my-project
Take a moment to review the initial project that has been created for you.
There's a single configuration file named mkdocs.yml, and a folder named docs that will contain your documentation source files. Right now the docs folder just contains a single documentation page, named index.md.
MkDocs comes with a built-in dev-server that lets you preview your documentation as you work on it. Make sure you're in the same directory as the mkdocs.yml configuration file, and then start the server by running the mkdocs serve command:
$ mkdocs serve

INFO    -  Building documentation...

INFO    -  Cleaning site directory

[I 160402 15:50:43 server:271] Serving on http://127.0.0.1:8000

[I 160402 15:50:43 handlers:58] Start watching changes

[I 160402 15:50:43 handlers:60] Start detecting changes
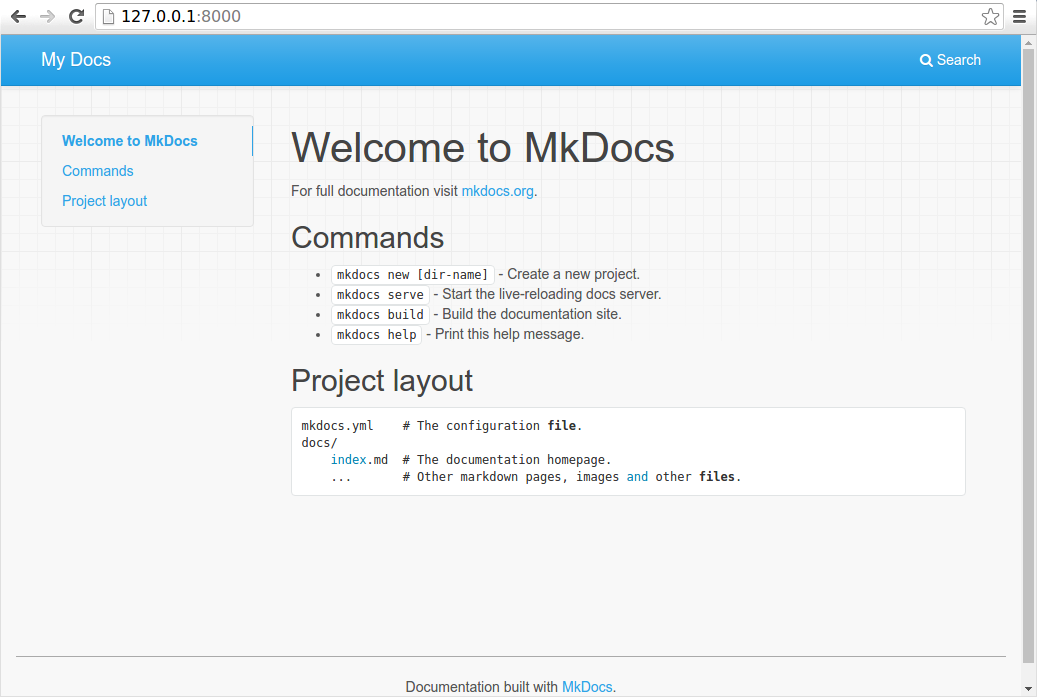
Open up http://127.0.0.1:8000/ in your browser, and you'll see the default home page being displayed:
The dev-server also supports auto-reloading, and will rebuild your documentation whenever anything in the configuration file, documentation directory, or theme directory changes.
Open the docs/index.md document in your text editor of choice, change the initial heading to MkLorum, and save your changes. Your browser will auto-reload and you should see your updated documentation immediately.
Now try editing the configuration file: mkdocs.yml. Change the site_name setting to MkLorum and save the file.
site_name: MkLorum
Your browser should immediately reload, and you'll see your new site name take effect.

Adding pages
Now add a second page to your documentation:
curl 'https://jaspervdj.be/lorem-markdownum/markdown.txt' > docs/about.md
As our documentation site will include some navigation headers, you may want to edit the configuration file and add some information about the order, title, and nesting of each page in the navigation header by adding a pages setting:
site_name: MkLorum

pages:

    - Home: index.md

    - About: about.md
Save your changes and you'll now see a navigation bar with Home and About items on the left as well as Search, Previous, and Next items on the right.
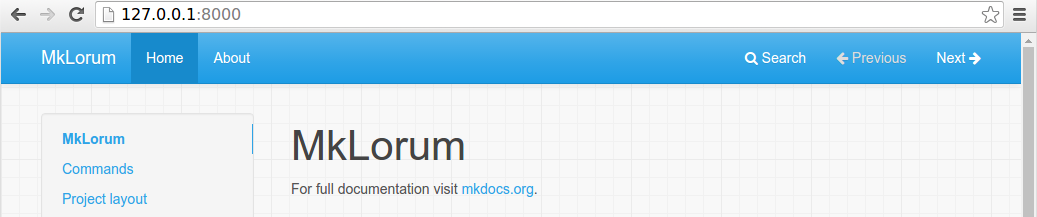
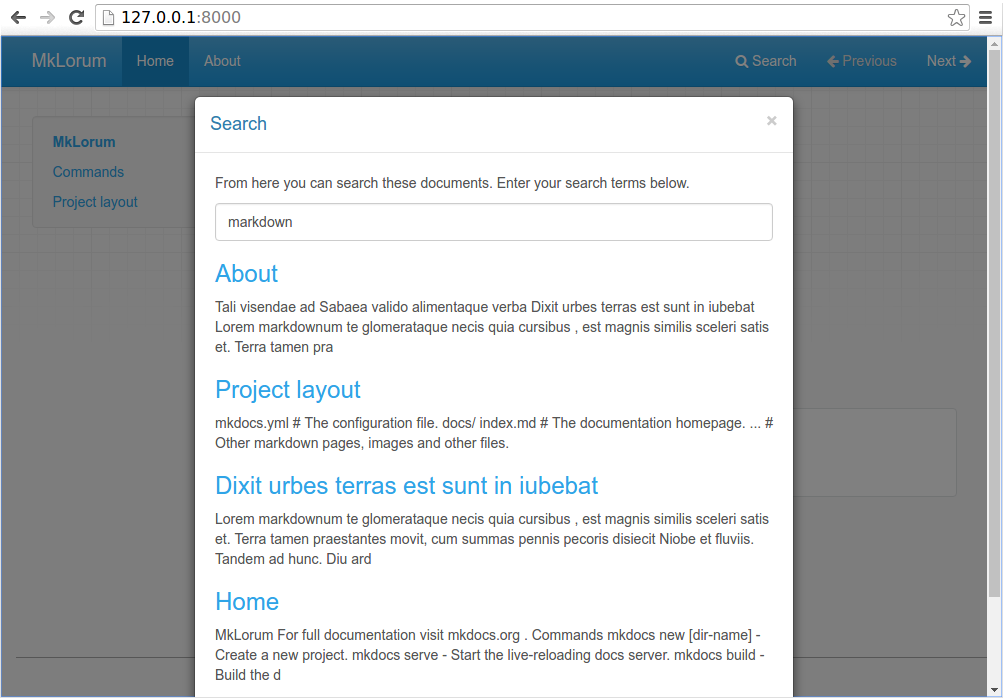
Try the menu items and navigate back and forth between pages. Then click on Search. A search dialog will appear, allowing you to search for any text on any page. Notice that the search results include every occurrence of the search term on the site and links directly to the section of the page in which the search term appears. You get of all that with no effort or configuration on your part!
Theming our documentation
Now change the configuration file to alter how the documentation is displayed by changing the theme. Edit the mkdocs.yml file and add a theme setting:
site_name: MkLorum

pages:

    - Home: index.md

    - About: about.md

theme: readthedocs
Save your changes, and you'll see the ReadTheDocs theme being used.
Changing the Favicon Icon
By default, MkDocs uses the MkDocs favicon icon. To use a different icon, create an img subdirectory in your docs_dir and copy your custom favicon.ico file to that directory. MkDocs will automaticaly detect and use that file as your favicon icon.
Building the site
That's looking good. You're ready to deploy the first pass of your MkLorum documentation. First build the documentation:
mkdocs build
This will create a new directory, named site. Take a look inside the directory:
$ ls site

about  fonts  index.html  license  search.html

css    img    js          mkdocs   sitemap.xml
Notice that your source documentation has been output as two HTML files named index.html and about/index.html. You also have various other media that's been copied into the site directory as part of the documentation theme. You even have a sitemap.xml file and mkdocs/search_index.json.
If you're using source code control such as git you probably don't want to check your documentation builds into the repository. Add a line containing site/ to your .gitignore file.
echo "site/" >> .gitignore
If you're using another source code control tool you'll want to check it's documentation on how to ignore specific directories.
After some time, files may be removed from the documentation but they will still reside in the site directory. To remove those stale files, just run mkdocs with the --clean switch.
mkdocs build --clean
Other Commands and Options
There are various other commands and options available. For a complete list of commands, use the --help flag:
mkdocs --help
To view a list of options available on a given command, use the --help flag with that command. For example, to get a list of all options available for the build command run the following:
mkdocs build --help
Deploying
The documentation site that you just built only uses static files so you'll be able to host it from pretty much anywhere. GitHub project pages and Amazon S3 may be good hosting options, depending upon your needs. Upload the contents of the entire sitedirectory to wherever you're hosting your website from and you're done. For specific instructions on a number of common hosts, see the Deploying your Docs page.
Getting help
To get help with MkDocs, please use the discussion group, GitHub issues or the MkDocs IRC channel #mkdocs on freenode.
MkDocs的更多相关文章
- MKDOCS在线文档编辑器
http://www.mkdocs.org/ api接口文档编写 ,效果非常不错
- 使用Mkdocs构建你的项目文档
使用Mkdocs构建你的项目文档 环境搭建 安装必需软件 作者是在windows下安装的,如果是linux或mac用户,官网有更详细的安装说明. windows 10 x64 当然还有广大的windo ...
- MkDocs项目文档生成器
简介 安装 我的配置 Chocolatey 简介 - Windows的包管理器 官方网址 安装 注意事项 Python 简介 安装 Pip 简介-Python的包管理器 升级 MkDocs的安装 使用 ...
- 文档发布工具mkdocs
mkdocs是Python的一个对 Markdown 友好的文档生成器.,小巧精美. MkDocs is a fast, simple and downright gorgeous static si ...
- 为什么不使用github的wiki而是使用mkdocs做文档管理?
为什么不使用github的wiki而是使用mkdocs做文档管理? 目前 KSFramework 是使用mkdocs来做在线文档 而非使用github的wiki,这是为什么呢? 在windows下搭建 ...
- mkdocs 生成帮助文档
简介 MkDocs 可以同时编译多个markdown文件,形成书籍一样的文件.有多种主题供你选择,很适合项目使用. MkDocs 是快速,简单和华丽的静态网站生成器,可以构建项目文档.文档源文件在 M ...
- windows上使用mkdocs搭建静态博客
windows上使用mkdocs搭建静态博客 之前尝试过用HEXO搭建静态博客,最近发现有个叫mkdocs的开源项目也是搭建静态博客的好选择,而且它支持markdown格式,下面简要介绍一下mkdoc ...
- [tools]python的mkdocs模块分分钟将md搞成一个网站
docusaurus: facebook出的一个文档生成器,用起来感觉没那么友善 hugo: 这个很棒 python的mkdocs模块: 用起来最简单 python的这个模块可以分分钟将一坨md假设成 ...
- Mkdocs 搭建
1. 利用pip安装mkdocs sudo pip install mkdocs 2.如果报pip不存在 或是 报权限错误,要不是pip没有安装,就是python里某个库没有关联上,这时候需要重新安装 ...
随机推荐
- 调用kylin的restAPI接口构建cube
调用kylin的restAPI接口构建cube 参考:http://kylin.apache.org/docs/howto/howto_build_cube_with_restapi.html 1. ...
- .net List方法属性及作用
List的方法和属性 方法或属性 作用 Capacity 用于获取或设置List可容纳元素的数量.当数量超过容量时,这个值会自动增长.您可以设置这个值以减少容量,也可以调用trin()方法来减少容量以 ...
- leetcode 移除元素
给定一个数组 nums 和一个值 val,你需要原地移除所有数值等于 val 的元素,返回移除后数组的新长度. 不要使用额外的数组空间,你必须在原地修改输入数组并在使用 O(1) 额外空间的条件下完成 ...
- ASP.NET WebAPI 测试文档 (Swagger)
ASP.NET WebAPI使用Swagger生成测试文档 SwaggerUI是一个简单的Restful API测试和文档工具.简单.漂亮.易用(官方demo).通过读取JSON配置显示API .项目 ...
- (转)Struts2返回JSON数据的具体应用范例
转载自 yshjava的个人博客主页 <Struts2返回JSON数据的具体应用范例> 早在我刚学Struts2之初的时候,就想写一篇文章来阐述Struts2如何返回JSON数据的原理和具 ...
- CF834D The Bakery
题目链接:戳我 题意:将一个长度为n的序列分为k段,使得总价值最大.一段区间的价值表示为区间内不同数字的个数 \(n<=35000,k<=50\) 开始想的转移方程是这个样子的--\(dp ...
- RabbitMq初探——消息均发
消息均发 前言 由前文 RabbitMq初探——消息分发 可知,rabbitmq自带分发机制——消息会按顺序的投放到该队列下的多个消费者,例如1,3,5投放消费者C1,2,4,6投放消费者C2. 这就 ...
- 446. Arithmetic Slices II - Subsequence
A sequence of numbers is called arithmetic if it consists of at least three elements and if the diff ...
- Elasticsearch(八)【NEST高级客户端--分析器】
分析 分析是将文本(如任何电子邮件的正文)转换为添加到反向索引中进行搜索的tokens或terms的过程. 分析由analyzer执行,分析器可以是内置分析器或每个索引定义的定制分析器. 书写分析器测 ...
- [flex] as3.0 实现基于air的简单浏览器
<?xml version="1.0" encoding="utf-8"?> <s:WindowedApplication xmlns:fx= ...