Struts2,Spring3,Hibernate4整合--SSH框架
Struts2,Spring3,Hibernate4整合--SSH框架(学习中)
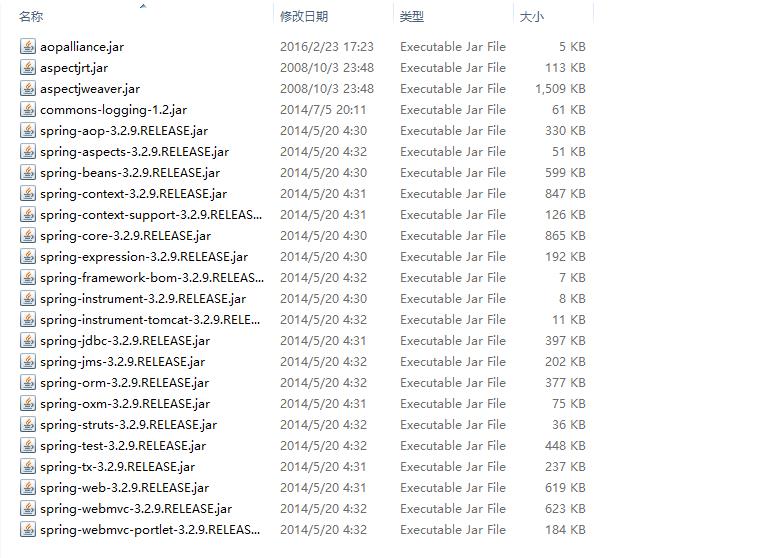
一、包的导入
1、Spring包

2、Hibernate 包

3、struts 包 (还欠 struts2-spring-plugin-2.3.28.jar 的包)

4、数据库方面的包及junt4的包

二、配置文件
1、beans.xml (具体要注意的已经注释到 xml 中了,目前整合了Spring 与 hibernate4 )
<?xml version="1.0" encoding="UTF-8"?>

<beans xmlns="http://www.springframework.org/schema/beans"

       xmlns:xsi="http://www.w3.org/2001/XMLSchema-instance"

       xmlns:context="http://www.springframework.org/schema/context"

       xmlns:tx="http://www.springframework.org/schema/tx"

       xmlns:aop="http://www.springframework.org/schema/aop"

       xsi:schemaLocation="http://www.springframework.org/schema/beans

      http://www.springframework.org/schema/beans/spring-beans.xsd

      http://www.springframework.org/schema/context

      http://www.springframework.org/schema/context/spring-context.xsd

      http://www.springframework.org/schema/tx

      http://www.springframework.org/schema/tx/spring-tx.xsd

      http://www.springframework.org/schema/aop

      http://www.springframework.org/schema/aop/spring-aop.xsd">

    <!-- 打开Spring 的 Annotation 支持-->

    <context:annotation-config/>

    <!-- 设定Annotation 到 哪里 找-->

    <context:component-scan base-package="org.cs"/>

    <!-- 打开Spring 的 Aop 代理 -->

    <aop:aspectj-autoproxy/>

    <!-- 使用 DBCP 创建 dateSource -->

    <bean id="dataSource" class="org.apache.commons.dbcp2.BasicDataSource" destroy-method="close">

        <property name="driverClassName" value="${jdbc.driverClassName}" />

        <property name="url" value="${jdbc.url}" />

        <property name="username" value="${jdbc.username}" />

        <property name="password" value="${jdbc.password}" />

        <!-- 配置 hibernate -->

        <!-- 配置连接池的初始值 为 1-->

        <property name="initialSize" value="1"/>

        <!-- 配置最小空闲时 -->

        <property name="minIdle" value="1"/>

        <!-- 最大连接池 -->

        <property name="maxTotal" value="100"/>

        <!-- 配置最大空闲时-->

        <property name="maxIdle" value="20"/>

        <!-- 配置等待时间-->

        <property name="maxWaitMillis" value="1000" />

    </bean>

    <context:property-placeholder location="classpath:jdbc.properties"/>

    <!--  整合 hibernate4 创建 SessionFactory 工厂 -->

    <bean id="sessionFactory" class="org.springframework.orm.hibernate4.LocalSessionFactoryBean">

        <!-- 注入 数据源 -->

        <property name="dataSource" ref="dataSource"/>

        <!-- 设置 Spring 在哪里找 实体类 -->

        <property name="packagesToScan">

            <value>org.cs.Model</value>

        </property>

        <!-- 配置 hibernate -->

        <property name="hibernateProperties">

            <!--<value>hibernate.dialect=org.hibernate.dialect.HSQLDialect</value>-->

            <props>

                <prop key="hibernate.dialect">org.hibernate.dialect.MySQLDialect</prop>

                <prop key="hibernate.show_sql">true</prop>

                <prop key="hibernate.hbm2ddl.auto">update</prop>

                <prop key="hibernate.format_sql">false</prop>

            </props>

        </property>

    </bean>

    <!-- 配置 Spring 的事务管理 -->

    <!-- 创建事务管理器 -->

    <bean id="transactionManager"

          class="org.springframework.orm.hibernate4.HibernateTransactionManager">

        <property name="sessionFactory" ref="sessionFactory"/>

    </bean>

    <!-- 配置 AOP -->

    <aop:config>

        <!-- 设置 aop:pointcut 表示 哪些 包.方法 需要加入事务-->

        <aop:pointcut id="allMethods"

                      expression="execution(* org.cs.Service.*.*(..))"/>

        <!-- 设置 aop:pointcut 表示 具体 需要加入事物的 方法-->

        <aop:advisor advice-ref="txAdvice" pointcut-ref="allMethods"/>

    </aop:config>

    <!-- 配置那些方法需要加入事务处理 -->

    <tx:advice id="txAdvice" transaction-manager="transactionManager">

        <tx:attributes>

            <!-- 让所有方法加入事务 -->

            <tx:method name="*" propagation="REQUIRED" read-only="true"/>

            <tx:method name="add*" propagation="REQUIRED"/>

            <tx:method name="update*" propagation="REQUIRED"/>

            <tx:method name="save*" propagation="REQUIRED"/>

            <tx:method name="del*" propagation="REQUIRED"/>

        </tx:attributes>

    </tx:advice>

</beans>
2、struts.xml (实现 Spring 与 Struts2 的整合 )
<?xml version="1.0" encoding="UTF-8" ?>

<!DOCTYPE struts PUBLIC

	"-//Apache Software Foundation//DTD Struts Configuration 2.3//EN"

	"http://struts.apache.org/dtds/struts-2.3.dtd">

<struts>

    <!-- 设置 url 后缀-->

    <constant name="struts.action.extension" value="action,do"/>

    <!-- 当 struts的配置文件修改后,系统是否自动重新加载该文件,默认值为false(生 产环境下使用),开发阶段最好打开 -->

    <constant name="struts.configuration.xml.reload" value="true"/>

    <!-- 表示 Action 由 Spring 依赖注入来注入-->

    <constant name="struts.objectFactory" value="org.apache.struts2.spring.StrutsSpringObjectFactory"/>

    <!-- xxxAction 使用 struts 配置 -->

    <package name="default" namespace="/" extends="struts-default">

        <!--<!– 配置拦截器 , 要在 action 配置 后才生效–>-->

        <!--<interceptors>-->

            <!--<!– 这种 方式 在 action 中需要 配置 defaultStack –>-->

            <!--<!–<interceptor name="HelloInterceptor" class="Interceptor.HelloInterceptor"/>–>-->

            <!--<!– 这种方式 只需要在 action 中 配置 HelloStack –>-->

            <!--<interceptor name="HelloInterceptor" class="Interceptor.HelloInterceptor"/>-->

            <!--<interceptor-stack name="HelloStack">-->

                <!--<interceptor-ref name="defaultStack"/>-->

                <!--<interceptor-ref name="HelloInterceptor"/>-->

            <!--</interceptor-stack>-->

        <!--</interceptors>-->

        <!-- 全局结果集 -->

        <global-results>

            <result name="error">/WEB-INF/Exception/MyException.jsp</result>

            <result name="exception">/WEB-INF/Exception/MyException.jsp</result>

        </global-results>

        <!-- 异常抛出 配置-->

        <global-exception-mappings>

            <exception-mapping exception="Exception.MyException" result="exception"></exception-mapping>

        </global-exception-mappings>

        <!-- 基于 通配符 的 方式 , 由于整合了Spring ,class = "应该是Spring所注入的对象"-->

        <action name="*_*" class="{1}Action" method="{2}">

            <!-- 拦截器 生效 ,需要有继承 defaultStack -->

            <!--<interceptor-ref name="HelloInterceptor"/>-->

            <!--<interceptor-ref name="defaultStack"/>-->

            <!--<interceptor-ref name="HelloStack"/>-->

            <result name="success">/WEB-INF/jsp/{1}/{2}.jsp</result>

            <!-- 重定向 type = "redirect" -->

            <result type="redirect" name="redirect">/${url}</result>

        </action>

    </package>

</struts>
3、web.xml (创建 Spring 的 监听器,Struts2 的 过滤器)
<?xml version="1.0" encoding="UTF-8"?>

<web-app xmlns="http://xmlns.jcp.org/xml/ns/javaee"

         xmlns:xsi="http://www.w3.org/2001/XMLSchema-instance"

         xsi:schemaLocation="http://xmlns.jcp.org/xml/ns/javaee http://xmlns.jcp.org/xml/ns/javaee/web-app_3_1.xsd"

         version="3.1">

    <!-- 创建Spring 的监听器-->

    <listener>

    <listener-class>org.springframework.web.context.ContextLoaderListener</listener-class>

    </listener>

    <!-- Spring 的监听器通过这个上下文参数 获取 beans.xml 位置 -->

    <context-param>

    <param-name>contextConfigLocation</param-name>

    <param-value>classpath*:beans.xml</param-value>

    </context-param>

    <!-- OpenSessionInViewFilter 过滤器 (连接 表现层与Dao层 数据交互)-->

    <filter>

        <filter-name>openSessionInViewerFilter</filter-name>

        <filter-class>org.springframework.orm.hibernate4.support.OpenSessionInViewFilter</filter-class>

    </filter>

    <filter-mapping>

        <filter-name>openSessionInViewerFilter</filter-name>

        <url-pattern>/*</url-pattern>

    </filter-mapping>

    <!-- Struts 过滤器 -->

    <filter>

        <filter-name>struts2</filter-name>

        <filter-class>org.apache.struts2.dispatcher.ng.filter.StrutsPrepareAndExecuteFilter</filter-class>

    </filter>

    <filter-mapping>

        <filter-name>struts2</filter-name>

        <url-pattern>/*</url-pattern>

    </filter-mapping>

</web-app>
三、总结:
赶时间做出来的,还没写完整(目前整合了hibernate4 与 Spring ,快断网了。。),如果有错的地方请大家指出,方便大家一起学习。
SSH 框架整合 完成了,有点激动。。
这只是基础的SSH整合,接下来我会分享具体的项目设计,希望大家一起学习,方便指出不足之处。
传送门 :
github:https://github.com/ShunC/Invest
Struts2,Spring3,Hibernate4整合--SSH框架的更多相关文章
- 【Struts2+Spring3+Hibernate3】SSH框架整合实现CRUD_1.2
作者: hzboy192@192.com Blog: http://my.csdn.net/peng_hao1988 版本总览:http://blog.csdn.net/peng_hao1988/ar ...
- 【Struts2+Spring3+Hibernate3】SSH框架整合实现CRUD_1.3
作者: hzboy192@192.com Blog: http://my.csdn.net/peng_hao1988 版本总览:http://blog.csdn.net/peng_hao1988/ar ...
- 使用Maven搭建Struts2+Spring3+Hibernate4的整合开发环境
做了三年多的JavaEE开发了,在平时的JavaEE开发中,为了能够用最快的速度开发项目,一般都会选择使用Struts2,SpringMVC,Spring,Hibernate,MyBatis这些开源框 ...
- Maven搭建Struts2+Spring3+Hibernate4框架
做了三年多的JavaEE开发了,在平时的JavaEE开发中,为了能够用最快的速度开发项目,一般都会选择使用Struts2,SpringMVC,Spring,Hibernate,MyBatis这些开源框 ...
- Maven02——回顾、整合ssh框架、分模块开发、私服
1 回顾 1.1 Maven的好处 节省空间 对jar包做了统一管理 依赖管理 一键构建 可跨平台 应用在大型项目可提高开发效率 1.2 Maven安装部署配置 1.3 Maven的仓库 本地仓库 远 ...
- Maven项目整合SSH框架
---------------------siwuxie095 Maven 项目整合 SSH 框架 创建 ...
- maven学习记录三——maven整合ssh框架
6 整合ssh框架 6.1 依赖传递 只添加了一个struts2-core依赖,发现项目中出现了很多jar, 这种情况 叫 依赖传递 6.2 依赖版本冲突的解决 1. 第 ...
- Maven 整合SSH框架
1. 传递依赖冲突 1.1 传递依赖:A(项目)依赖B,B依赖C(1.1版本),B是A的直接依赖,C是A的传递依赖; A(项目)又依赖D,D依赖C(1.2版本),此时,C有两个版本,产生冲突; 1.2 ...
- Maven 整合 SSH 框架
前面的一系列文章中,我们总结了三大框架:Struts2,Hibernate,Spring 的基本知识.本篇就姑且尝试着使用 Maven 这个项目构建工具来将这三个框架整合一起.说到这里,如果有对 Ma ...
随机推荐
- ZetCode PyQt4 tutorial Drag and Drop
#!/usr/bin/python # -*- coding: utf-8 -*- """ ZetCode PyQt4 tutorial This is a simple ...
- python3 scrapy 使用selenium 模拟浏览器操作
零. 在用scrapy爬取数据中,有写是通过js返回的数据,如果我们每个都要获取,那就会相当麻烦,而且查看源码也看不到数据的,所以能不能像浏览器一样去操作他呢? 所以有了-> Selenium ...
- 前后端分离之让前端开发脱离接口束缚(mock)
情景: 领导:小吴啊,最近在忙什么啊? 前吴:(心想:我擦勒,难道划水被领导发现了?也不能怪我啊,后台的哥们接口还没给呢,但要是实话实说不就对不起后台哥们了吗?) ...
- Axis开发Web Service
可以自动生成代码的 一.Axis环境的安装 1.安装环境 J2SE SDK 1.4,Tomcat 5.0,eclipse 3.2. 2.到 http://xml.apache.org 网站下载Axis ...
- vim自定义配置之自动括号
BundlenInstall安装auto-pairs vimConfig/plugin/auto-pairs-setting.vim let g:autopairsflymode=
- java工具类-邮件发送
mail-1.4.jar package com.huawei.it.citools.mail; import java.util.Date;import java.util.List;import ...
- Java 字符串 String
什么是Java中的字符串 在 Java 中,字符串被作为 String 类型的对象处理. String 类位于 java.lang 包中.默认情况下,该包被自动导入所有的程序. 创建 String 对 ...
- modelsim 的高效使用
大概的思路: 1.往modelsim 添加仿真库. 2.将Verilog 文件,testbench文件提出.建好文件夹.比如uart仿真: uart_sim文件夹下:rtl文件夹,test_bench ...
- Web服务的实质介绍
web应用的实质 众所周知,对于所有的Web应用,本质上其实就是一个socket服务端,用户的浏览器其实就是一个socket客户端 Web应用程序是一种可以通过Web访问的应用程序,程序的最大好处是用 ...
- 利用MessageFormat实现短信模板的匹配
其实没什么技术含量,因为老是想不起来,所以在此文做下记录. 通常我们的应用系统中都会有很多短信的发送,或者是信息邮件等的推送,而这些信息却有着相同的共性,比如只是用户名换了下. 像下面这条,除了红色字 ...
