tkinter组件详解之Label
tkinter组件详解之Label
Label组件用于在屏幕上显示文本或图像。最红呈现出的结果是由背景和前景叠加构成的。
函数定义:Label(master=None, cnf={}, **kw)
背景
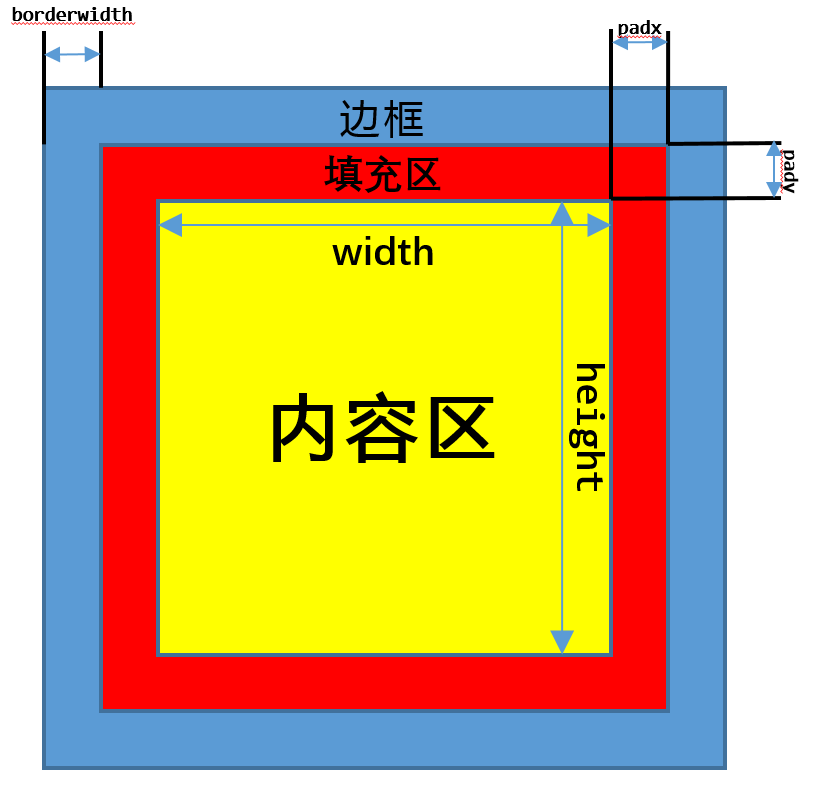
背景由三部分构成:内容、填充区、边框
内容区的参数:width、height,用于指定区域的大小,单位依据前景的具体内容而变化(前景内容是文字--->单位:字符,前景内容是图片--->单位:像素)
填充区的参数:padx、pady,用于指定内容与边框之间的距离,单位:像素
边框区的参数:relief,用于指定边框区的样式( 可选值为:flat(默认),sunken,raised,groove,ridge )
borderwidth:用于指定边框的宽度,单位:像素
下面用一张图来说明背景区:
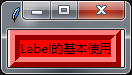
设置Label的背景属性
import tkinter as tk

win = tk.Tk()

win.title("Label的基本使用")

label = tk.Label(win, text="Label的基本使用", background="red",

                 padx=0, pady=0, borderwidth=10, relief="ridge")

label.pack()

win.mainloop()
import tkinter as tk

win = tk.Tk()

win.title("Label的基本使用")

label = tk.Label(win, text="Label的基本使用", background="red",

                 padx=50, pady=50, borderwidth=10, relief="ridge")

label.pack()

win.mainloop()
| 代码一 | 代码二 |
|---|---|
 |
 |
|
前景
前景分为文本和图片两部分
文本
文本参数:font=(font_name, size),指定字体和字体大小
justify = "center(默认)left/right/" ,指定文本的对齐方式
foreground = "指定的颜色" ,指定文字的颜色
text = "文本内容",指定文本的内容(静态的)
anchor = " n/s/w/e/ne/nw/sw/se/center(默认) ",指定文本在背景内容区的位置(n:北、w:西、e:东、s:南)
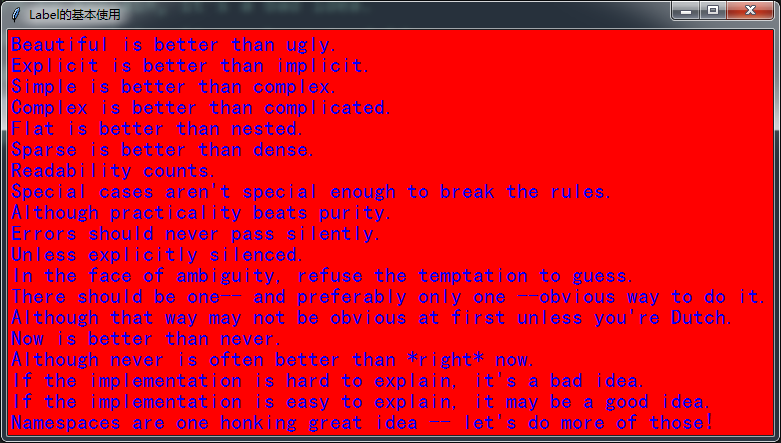
设置文本的属性
import tkinter as tk

win = tk.Tk()

win.title("Label的基本使用")

text = """Beautiful is better than ugly.

Explicit is better than implicit.

Simple is better than complex.

Complex is better than complicated.

Flat is better than nested.

Sparse is better than dense.

Readability counts.

Special cases aren't special enough to break the rules.

Although practicality beats purity.

Errors should never pass silently.

Unless explicitly silenced.

In the face of ambiguity, refuse the temptation to guess.

There should be one-- and preferably only one --obvious way to do it.

Although that way may not be obvious at first unless you're Dutch.

Now is better than never.

Although never is often better than *right* now.

If the implementation is hard to explain, it's a bad idea.

If the implementation is easy to explain, it may be a good idea.

Namespaces are one honking great idea -- let's do more of those!"""

label = tk.Label(win, text=text, background="red",

                 font=("黑体", 16), justify="left", foreground="blue")

label.pack()

win.mainloop()
图片
图片参数: image = normal_image(仅支持GIF, PPM/PGM格式的图片),通常需要从Pillow库中引入Image和ImageTk,使用如下语句来转换为支持的图片格式。
from PIL import Image

from PIL import ImageTk

import tkinter

# imagePath为图片保存的路径

img = Image.open(imagePath)

img = ImageTk.PhotoImage(img)
compound = "bottom/top/left/right/center/None(默认)",bottom/top/left/right表示图片显示在文本的下/上/左/右,center表示文本显示在图片的上面
设置图片属性
import tkinter as tk

import os

from PIL import Image

from PIL import ImageTk

win = tk.Tk()

win.title("Label的基本使用")

print(os.getcwd())

image_path = os.path.join(os.getcwd(), r"image\03.jpg")

img = Image.open(image_path)

img = ImageTk.PhotoImage(img)

label = tk.Label(win, text="Hello Python", font=("黑体", 26), foreground="blue",

                 image=img, compound="center")

label.pack()

win.mainloop()

参数列表
| activebackground | 设置当 Label 处于活动状态(通过 state 选项设置状态)的背景色 |
|---|---|
| activeforeground | 设置当 Label 处于活动状态(通过 state 选项设置状态)的前景色 |
| anchor | 控制文本(或图像)在 Label 中显示的位置 |
| background | 设置背景颜色 |
| bitmap | 指定显示到 Label 上的位图 |
| borderwidth | 指定 Label 的边框宽度 |
| cursor | 指定当鼠标在 Label 上飘过的时候的鼠标样式 |
| disabledforeground | 指定当 Label 不可用的时候前景色的颜色 |
| font | 指定 Label 中文本的字体 |
| foreground | 设置 Label 的文本和位图的颜色 |
| highlightbackground | 指定当 Label 没有获得焦点的时候高亮边框的颜色 |
| highlightcolor | 指定当 Label 获得焦点的时候高亮边框的颜色 |
| highlightthickness | 指定高亮边框的宽度 |
| image | 指定 Label 显示的图片 |
| justify | 定义如何对齐多行文本 |
| padx,pady | 指定 Label 水平方向,垂直方向上的额外间距 |
| relief | 指定边框样式 |
| takefocus | 如果是 True,该 Label 接受输入焦点 |
| text | 指定 Label 显示的文本 |
| textvariable | Label 显示 Tkinter 变量(通常是一个 StringVar 变量)的内容,如果变量被修改,Label 的文本会自动更新 |
| underline | 跟 text 选项一起使用,用于指定哪一个字符画下划线 |
| wraplength | 决定 Label 的文本应该被分成多少行 |
| height | 设置 Label 的高度 |
| state | 指定 Label 的状态 |
| width | 设置 Label 的宽度 |
tkinter组件详解之Label的更多相关文章
- vue.js基础知识篇(6):组件详解
第11章:组件详解 组件是Vue.js最推崇也最强大的功能之一,核心目标是可重用性. 我们把组件代码按照template.style.script的拆分方式,放置到对应的.vue文件中. 1.注册 V ...
- Echars 6大公共组件详解
Echars 六大组件详解 : title tooltip toolbox legend dataZoom visualMap 一.title标题详解 myTitleStyle = { color ...
- Android中Intent组件详解
Intent是不同组件之间相互通讯的纽带,封装了不同组件之间通讯的条件.Intent本身是定义为一个类别(Class),一个Intent对象表达一个目的(Goal)或期望(Expectation),叙 ...
- Android笔记——四大组件详解与总结
android四大组件分别为activity.service.content provider.broadcast receiver. ------------------------------- ...
- Angular6 学习笔记——组件详解之组件通讯
angular6.x系列的学习笔记记录,仍在不断完善中,学习地址: https://www.angular.cn/guide/template-syntax http://www.ngfans.net ...
- Angular6 学习笔记——组件详解之模板语法
angular6.x系列的学习笔记记录,仍在不断完善中,学习地址: https://www.angular.cn/guide/template-syntax http://www.ngfans.net ...
- admin组件详解
admin组件详解 先根据admin组件启动流程复习下django项目启动至请求过来发生的事 1将admin组件注册进app 2django项目启动 3在运行到定制的admin时执行其下面的apps文 ...
- OpenStack各组件详解和通信流程
一.openstack由来 openstack最早由美国国家航空航天局NASA研发的Nova和Rackspace研发的swift组成.后来以apache许可证授权,旨在为公共及私有云平台建设.open ...
- Tomcat系列之服务器的安装与配置以及各组件详解
Tomcat系列之服务器的安装与配置以及各组件详解 大纲 一.前言 二.安装与配置Tomcat 三.Tomcat 目录的结构 四.Tomcat 配置文件 注,本文的测试的操作系统为CentOS 6.4 ...
随机推荐
- 图解IDEA中配置Maven并创建Maven的Web工程
打开IDEA,File->Settings,如下图所示: 2.在Settings中按照如下进行配置,如下图所示:
- BUU easyre
拖入ida中shift+F12查找字符串就可以看到flag
- POJ 3669 Meteor Shower BFS求最小时间
Meteor Shower Time Limit: 1000MS Memory Limit: 65536K Total Submissions: 31358 Accepted: 8064 De ...
- Linux双网卡绑定bond详解--单网卡绑定多个IP
Linux双网卡绑定bond详解 1 什么是bond 网卡bond是通过多张网卡绑定为一个逻辑网卡,实现本地网卡的冗余,带宽扩容和负载均衡,在生产场景中是一种常用的技术.Kernels 2.4.12及 ...
- docker-compose 快速部署Prometheus之服务端并监控ceph cluster 使用钉钉webhook 报警
现在环境是这样: ceph 4台: 192.168.100.21 ceph-node1 192.168.100.22 ceph-node2 192.168.100.23 ceph-node3 1 ...
- Easy_Re
这题比较简单,一波常规的操作之后直接上ida(小白的常规操作在以前的博客里都有所以这里不在赘述了),ida打开之后查看一下, 这里应该就是一个入口点了,接着搜索flag字符串, 上面的黄色的部分转换成 ...
- CVE-2019-0708—微软RDP远程桌面代码执行漏洞复现
0x01 2019年9月7日凌晨,msf上更新了0708的漏洞利用程序. 顿时安全群和朋友圈就爆炸了 - 奈何接到HW攻击队任务,又在家过了个中秋,0708才在今天更新. 0x02 环境 Window ...
- 19 包含min函数的栈
题目描述 定义栈的数据结构,请在该类型中实现一个能够得到栈最小元素的min函数. 思路:一个栈存普通元素,一个最小栈存放目前位置最小的元素,只在压入的时候判断是否为空以及最小元素,其他情况正常处理 ...
- Day4 - G - 确定比赛名次 HDU - 1285
有N个比赛队(1<=N<=500),编号依次为1,2,3,....,N进行比赛,比赛结束后,裁判委员会要将所有参赛队伍从前往后依次排名,但现在裁判委员会不能直接获得每个队的比赛成绩,只知道 ...
- mysql limit查询入门