jenkins构建docker镜像上传到harbor并发布到kubernetes
很早之前写过一篇jenkins集成docker的文章,使用的是CloudBees Docker Build and Publish plugin插件。这篇文章是直接使用shell脚本做的,主要是这次有一个需求是检测harbor仓库里面是否已经存在要构建的镜像,如果存在就放弃构建,如果不存在则构建镜像并上传到harbor仓库,我这里是通过请求harbor的api来检测的。
整个过程大致分为四个步骤,画了一个简单的图:
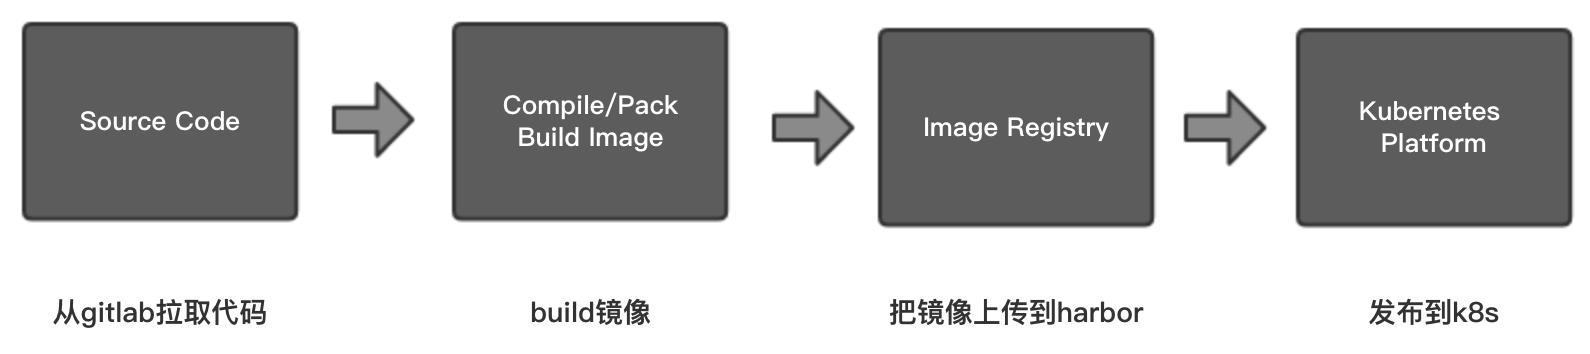
1、在jenkins上构建一个自由风格的软件项目。
2、源码管理使用git。
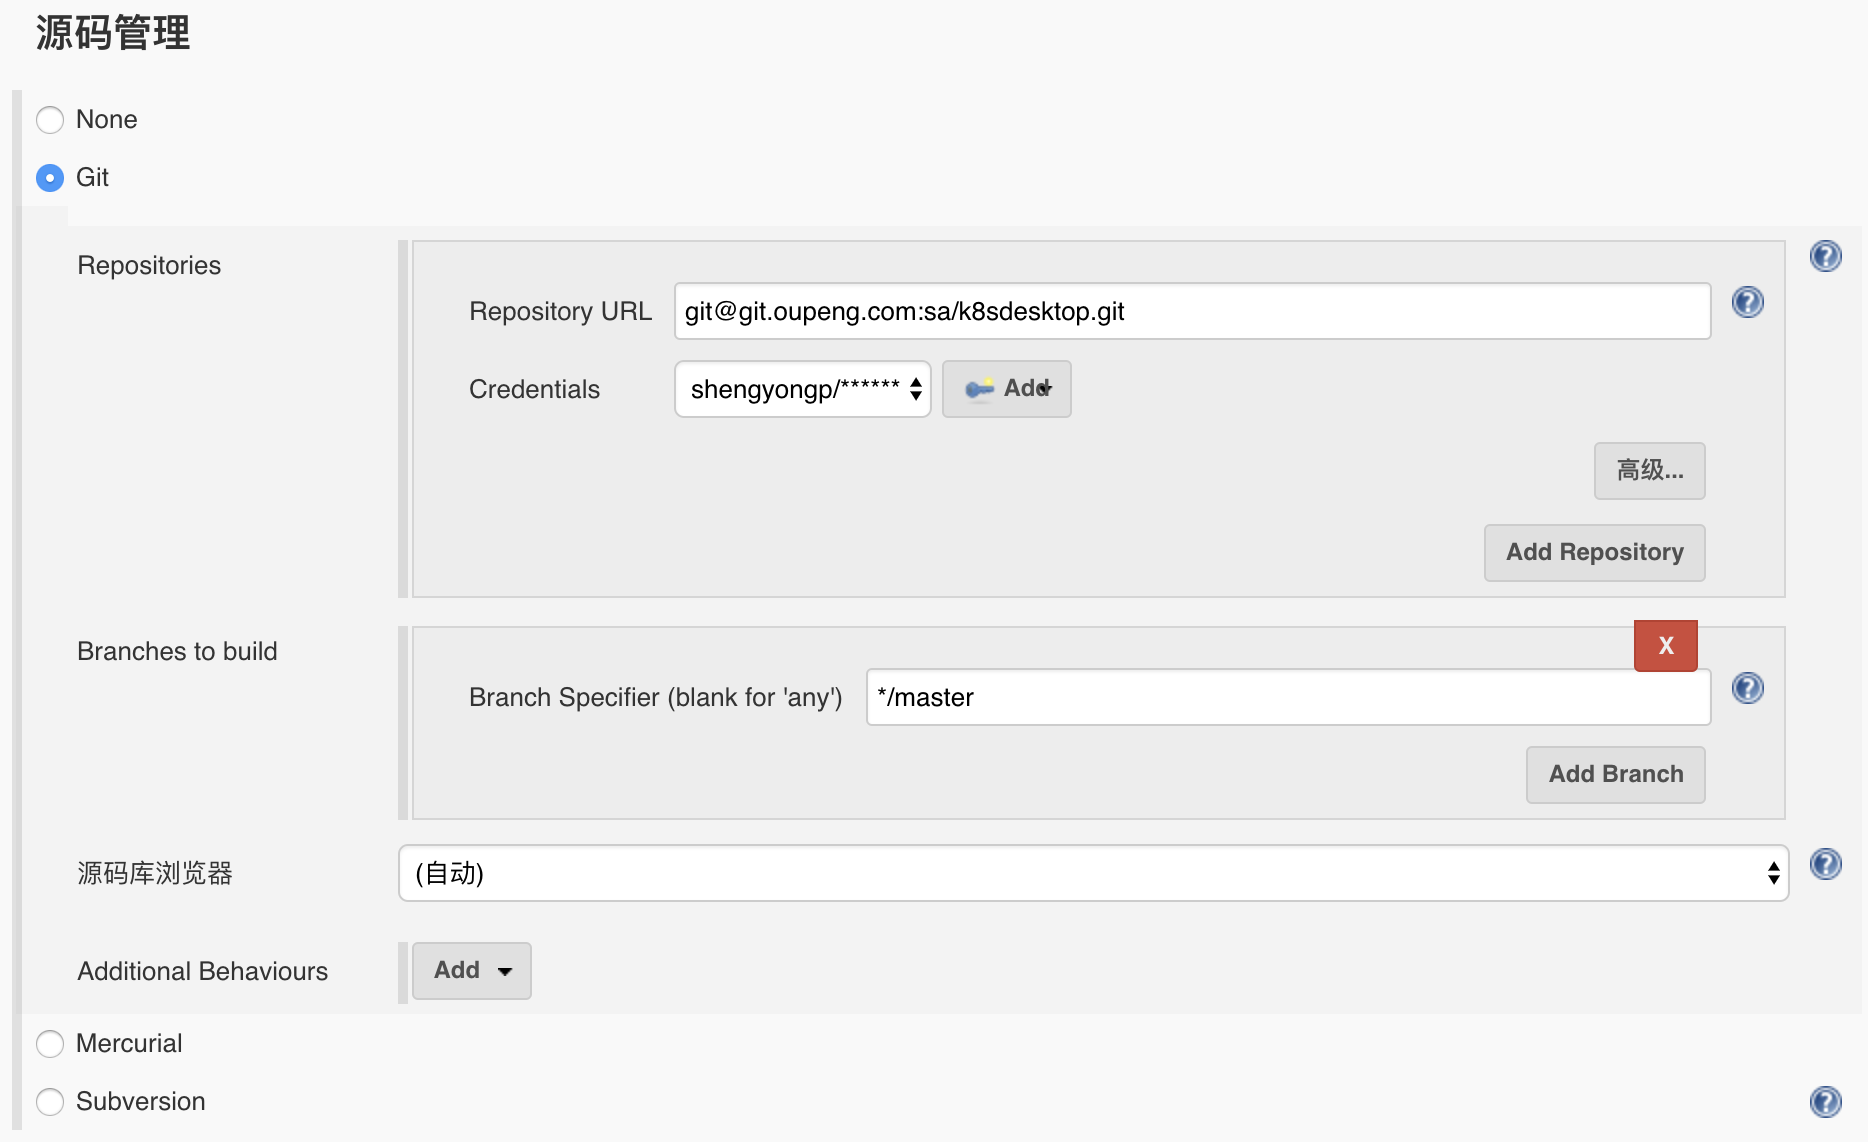
这里的账号是gitlab上的账号。
3、构建触发器,我这里使用的是Poll SCM定时检测,即每隔一段时间检测一次代码是否有更新。

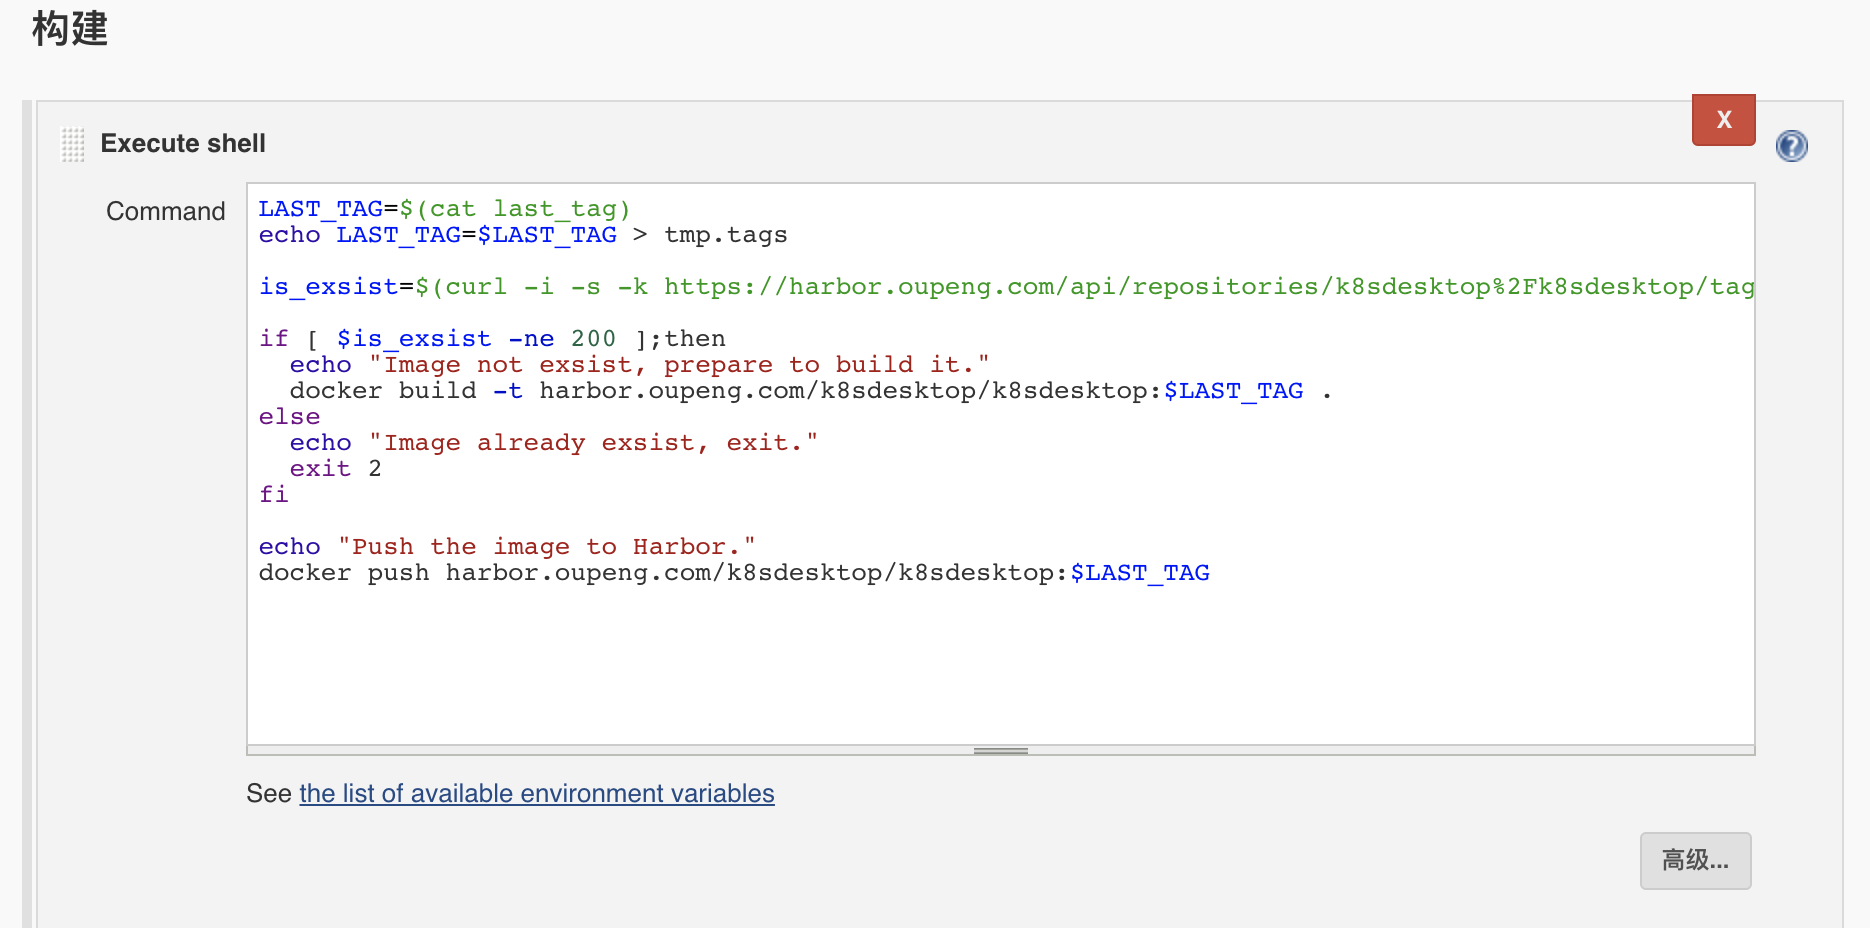
4、添加构建步骤。
这个过程是这样:
- 读取自定义tag,并赋值给一个变量。
- 检测harbor仓库上是否有该镜像。如果没有则构建镜像并上传到harbor,如果有则退出。
- 通用ssh发布到kubernetes。
需要单独说一下的是,我这里需要使用自定义tag,我使用一个插件Environment Injector Plugin将这个变量变成jenkins环境变量,让其能在jenkins上调用。

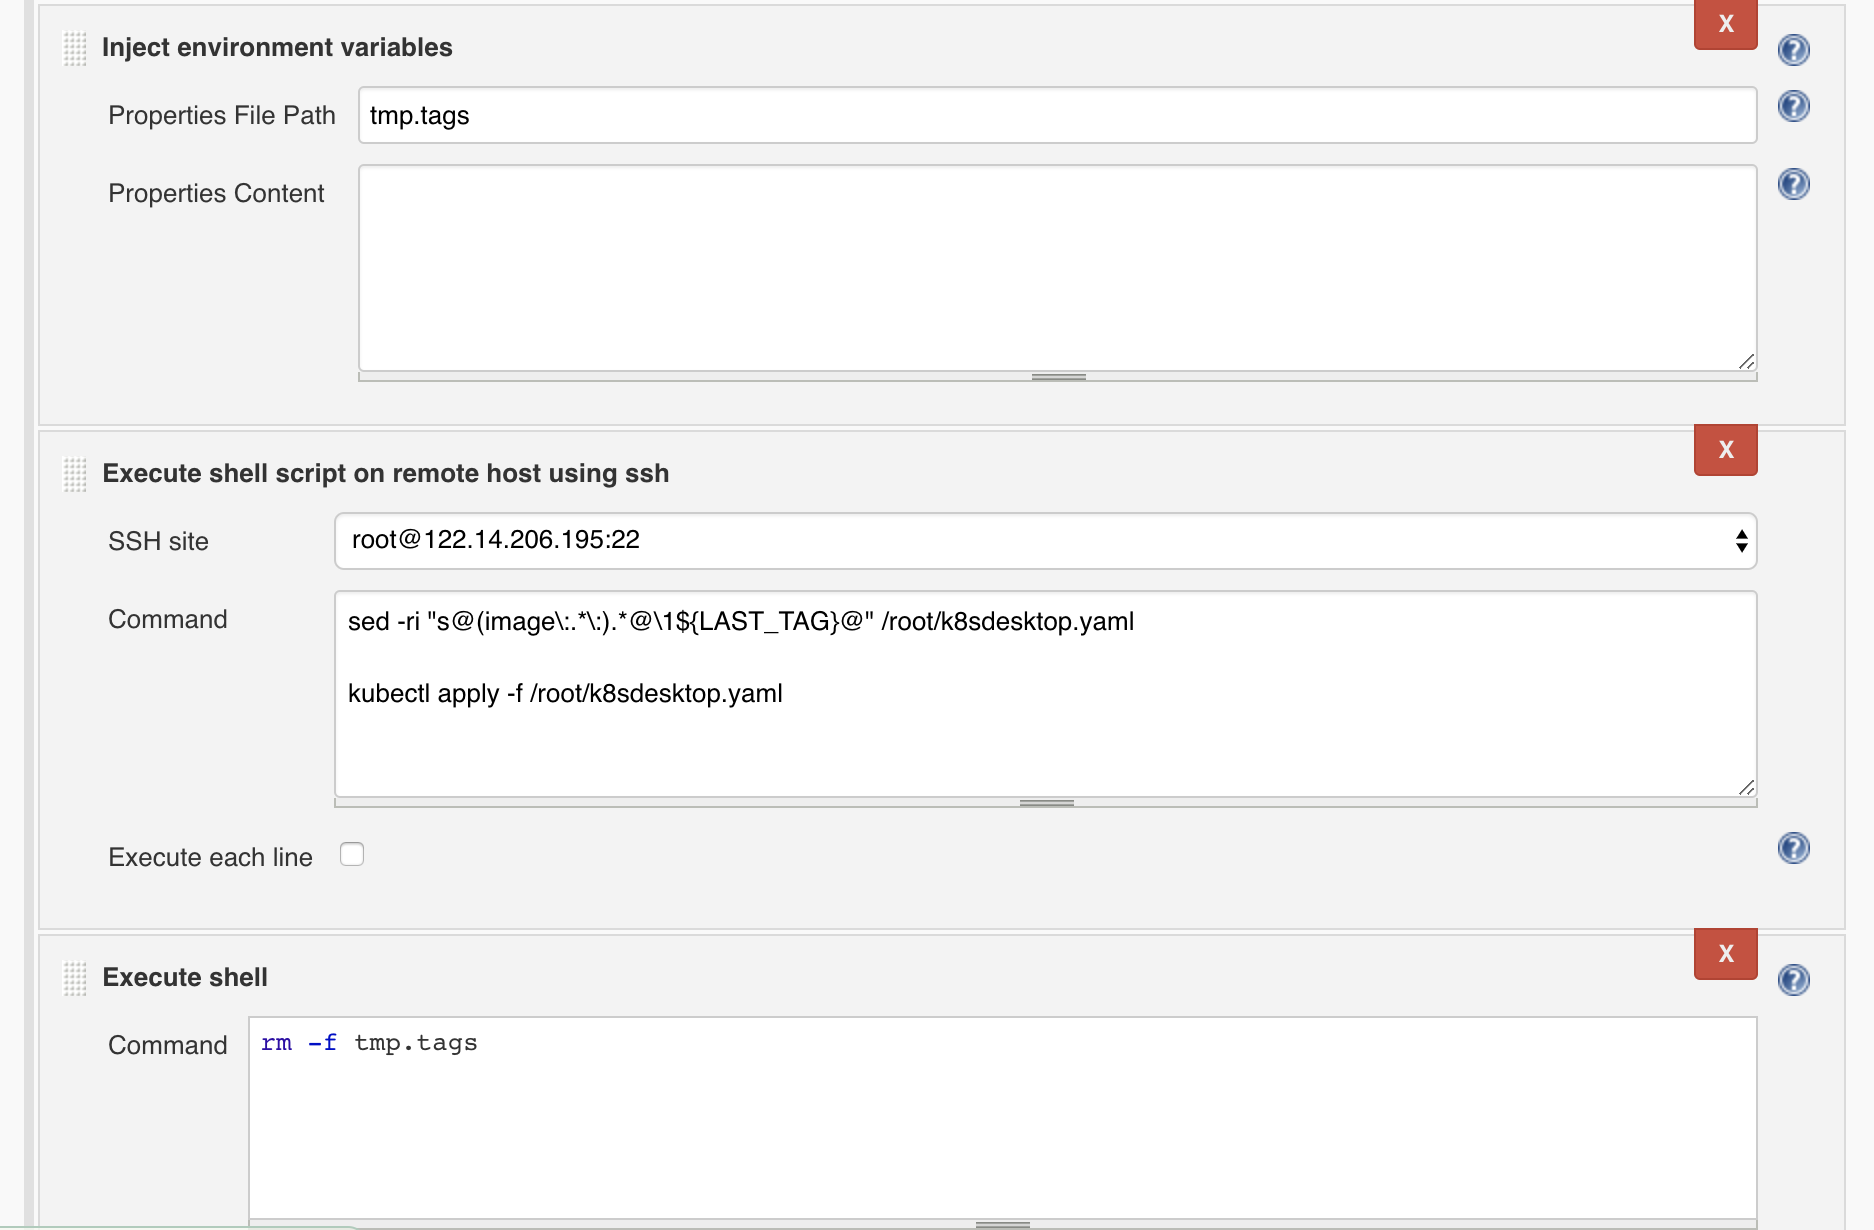
另外,ssh到远程机器上执行命令需要添加授权。系统设置 -> SSH remote hosts
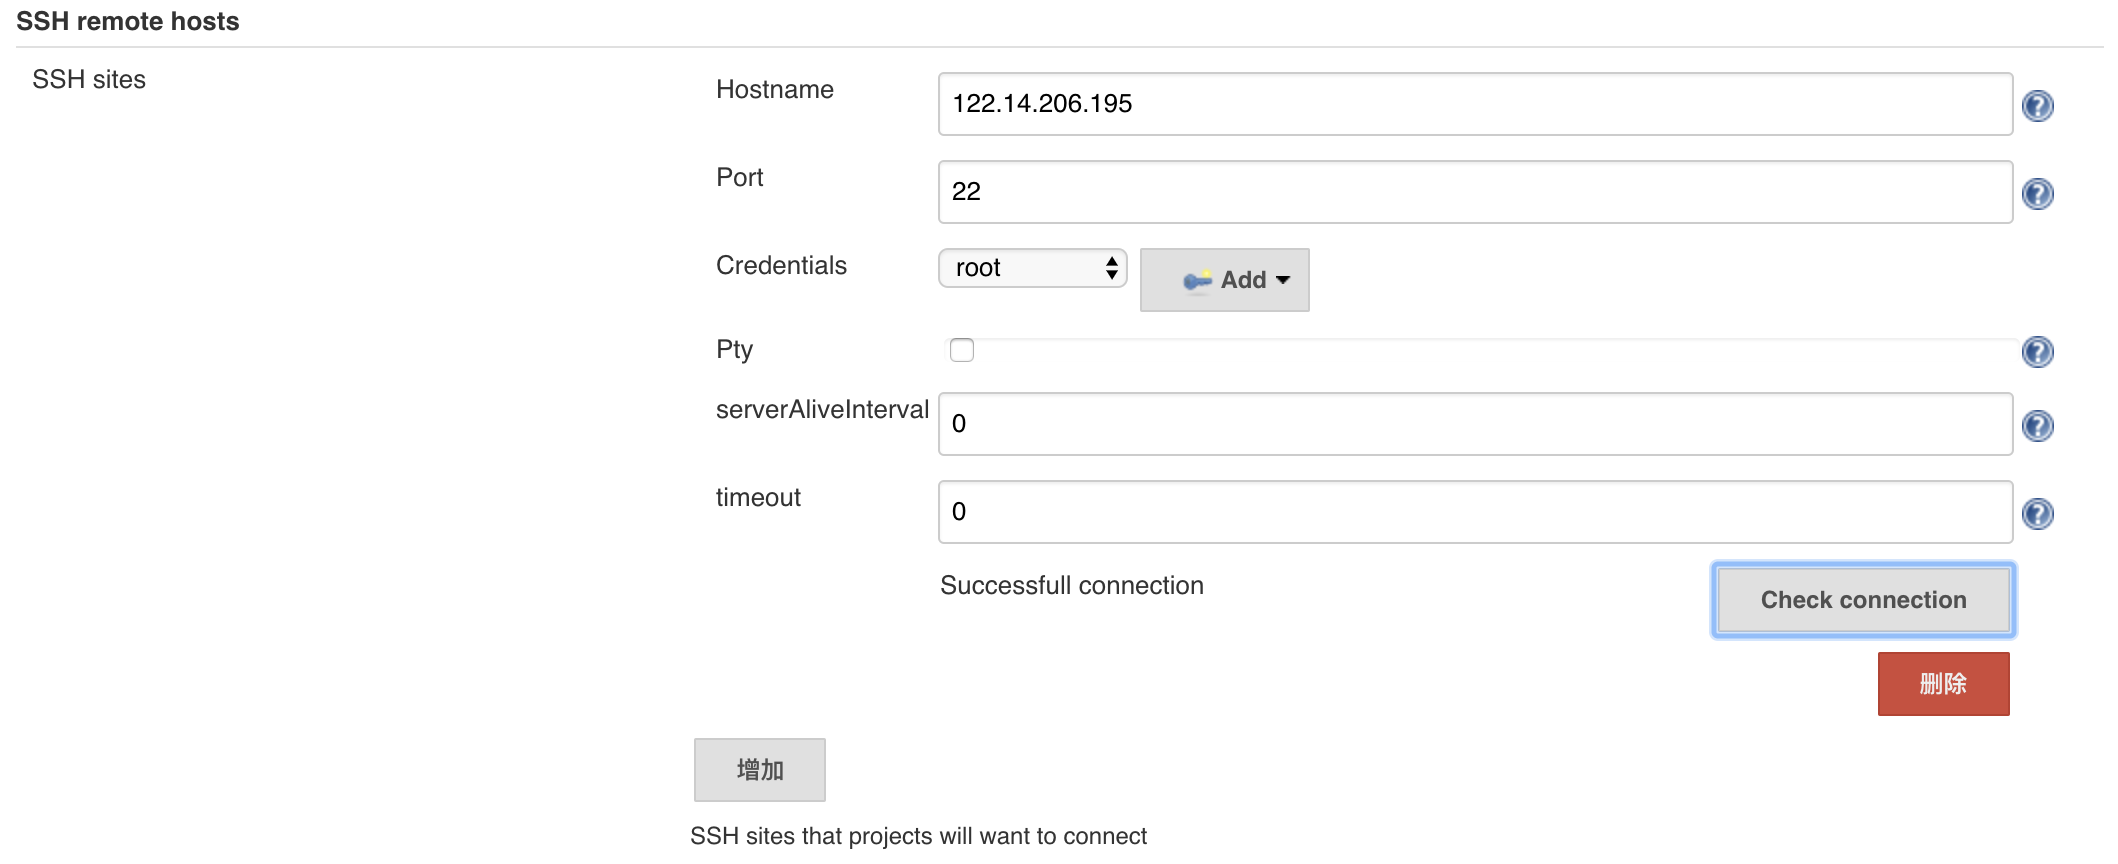
这里的账号是ssh连接的远程主机的用户和私钥(或者账号和密码)。
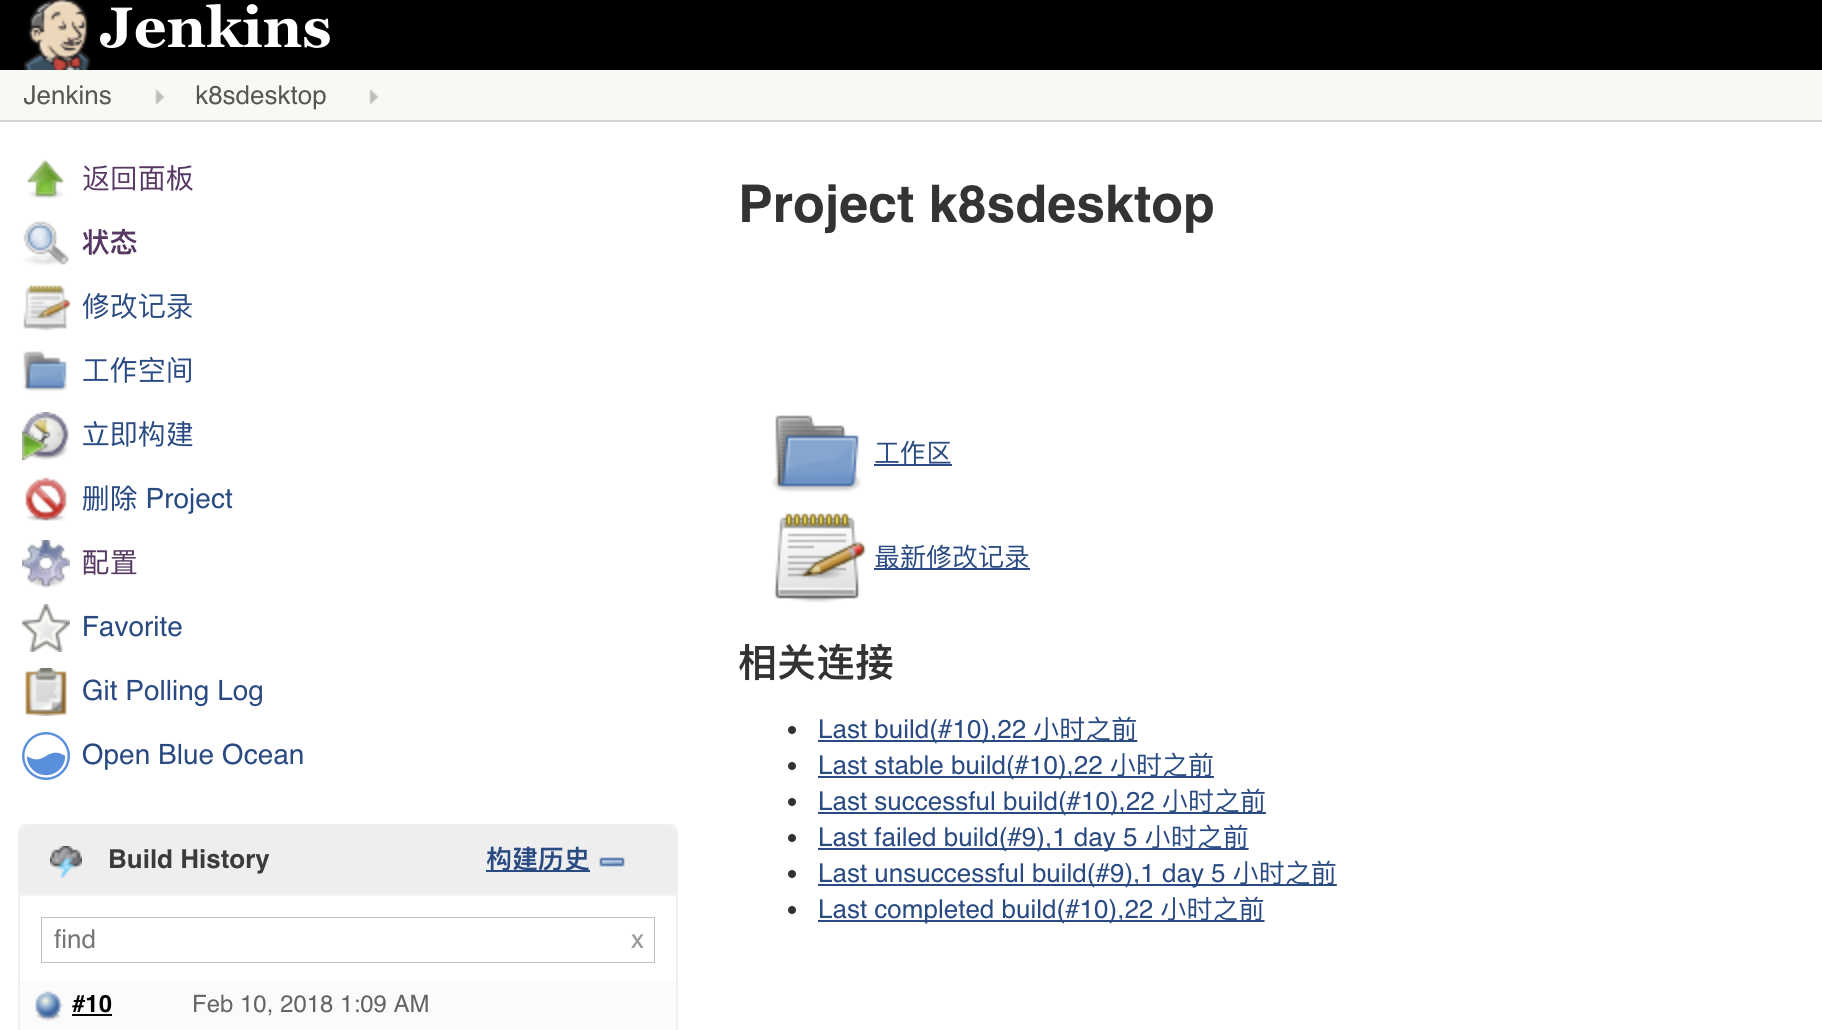
5、到这里整个过程基本完成了,进入项目,尝试构建。
控制台输出,由于太长我就直接贴文字了:
Started by user shengyongp

[EnvInject] - Loading node environment variables.

Building in workspace /var/lib/tomcat8/.jenkins/workspace/k8sdesktop

 > git rev-parse --is-inside-work-tree # timeout=10

Fetching changes from the remote Git repository

 > git config remote.origin.url git@git.oupeng.com:sa/k8sdesktop.git # timeout=10

Fetching upstream changes from git@git.oupeng.com:sa/k8sdesktop.git

 > git --version # timeout=10

using GIT_ASKPASS to set credentials

 > git fetch --tags --progress git@git.oupeng.com:sa/k8sdesktop.git +refs/heads/*:refs/remotes/origin/*

 > git rev-parse refs/remotes/origin/master^{commit} # timeout=10

 > git rev-parse refs/remotes/origin/origin/master^{commit} # timeout=10

Checking out Revision 7593b720066259d291a31a8eb25121c260dd6e00 (refs/remotes/origin/master)

 > git config core.sparsecheckout # timeout=10

 > git checkout -f 7593b720066259d291a31a8eb25121c260dd6e00

Commit message: "update"

 > git rev-list --no-walk 7593b720066259d291a31a8eb25121c260dd6e00 # timeout=10

[k8sdesktop] $ /bin/sh -xe /tmp/tomcat8-tomcat8-tmp/jenkins6696265847877639661.sh

+ cat last_tag

+ LAST_TAG=0.0.5

+ echo LAST_TAG=0.0.5

+ curl -i -s -k https://harbor.oupeng.com/api/repositories/k8sdesktop%2Fk8sdesktop/tags/0.0.5

+ awk {print $2}

+ head -1

+ is_exsist=404

+ [ 404 -ne 200 ]

+ echo Image not exsist, prepare to build it.

Image not exsist, prepare to build it.

+ docker build -t harbor.oupeng.com/k8sdesktop/k8sdesktop:0.0.5 .

Sending build context to Docker daemon  60.25MB

Step 1/10 : FROM alpine:3.7

 ---> 3fd9065eaf02

Step 2/10 : MAINTAINER "weiduan"

 ---> Using cache

 ---> d7053b014ba5

Step 3/10 : RUN rm /etc/apk/repositories

 ---> Using cache

 ---> a73bff2a847a

Step 4/10 : ADD /sources/repositories /etc/apk/repositories

 ---> Using cache

 ---> dfbb18dfbfbd

Step 5/10 : RUN apk add --no-cache python3 supervisor nginx python3-dev build-base linux-headers pcre-dev openldap-dev     && pip3 install --no-cache-dir uwsgi django django-auth-ldap PyMySQL

 ---> Using cache

 ---> 9b318af7da67

Step 6/10 : ADD sources/ /data

 ---> Using cache

 ---> 600dcbcc0935

Step 7/10 : WORKDIR /data

 ---> Using cache

 ---> 4b4b2687ac2f

Step 8/10 : RUN ln -s /usr/lib/python3.6/site-packages/django/contrib/admin/static/admin /data/k8sdesktop/static/     && rm -f /etc/nginx/nginx.conf /etc/supervisord.conf /usr/bin/python     && mkdir -p /etc/nginx/sites-enabled /var/log/uwsgi /run/nginx     && ln -s /usr/bin/python3 /usr/bin/python     && ln -s /data/supervisord.conf /etc/     && ln -s /data/nginx.conf /etc/nginx/     && ln -s /data/k8sdesktop.conf /etc/nginx/sites-enabled/

 ---> Using cache

 ---> 4f3f962c0635

Step 9/10 : EXPOSE 80

 ---> Using cache

 ---> 2604a91e376d

Step 10/10 : ENTRYPOINT ["supervisord", "-n"]

 ---> Using cache

 ---> dde892e6136a

Successfully built dde892e6136a

Successfully tagged harbor.oupeng.com/k8sdesktop/k8sdesktop:0.0.5

+ echo Push the image to Harbor.

Push the image to Harbor.

+ docker push harbor.oupeng.com/k8sdesktop/k8sdesktop:0.0.5

The push refers to repository [harbor.oupeng.com/k8sdesktop/k8sdesktop]

950915917e6f: Preparing

7d26b9ed8228: Preparing

82a138967623: Preparing

ba67b311ae84: Preparing

68b0d545b5ec: Preparing

cd7100a72410: Preparing

cd7100a72410: Waiting

68b0d545b5ec: Layer already exists

cd7100a72410: Layer already exists

950915917e6f: Pushed

ba67b311ae84: Pushed

7d26b9ed8228: Pushed

82a138967623: Pushed

0.0.5: digest: sha256:43efbc46adef6eb7644ebaa7fe2c46dd91cfc6be9926457f276fc001e2c6543e size: 1574

[EnvInject] - Injecting environment variables from a build step.

[EnvInject] - Injecting as environment variables the properties file path 'tmp.tags'

[EnvInject] - Variables injected successfully.

[SSH] script:

LAST_TAG="0.0.5"

sed -ri "s@(image\:.*\:).*@\1${LAST_TAG}@" /root/k8sdesktop.yaml

kubectl apply -f /root/k8sdesktop.yaml

[SSH] executing...

deployment "k8sdesktop-deployment" unchanged

service "k8sdesktop-deployment" unchanged

[SSH] completed

[SSH] exit-status: 0

[k8sdesktop] $ /bin/sh -xe /tmp/tomcat8-tomcat8-tmp/jenkins7903574837135018812.sh

+ rm -f tmp.tags

Finished: SUCCESS
jenkins构建docker镜像上传到harbor并发布到kubernetes的更多相关文章
- Docker:使用Jenkins构建Docker镜像
Docker 彭东稳 1年前 (2016-12-27) 10709次浏览 已收录 0个评论 一.介绍Jenkins Jenkins是一个开源项目,提供了一种易于使用的持续集成系统,使开发者从 ...
- 如何将docker 镜像上传到docker hub仓库
如何将docker 镜像上传到docker hub仓库 目录 如何将docker 镜像上传到docker hub仓库 背景 1.注册docker hub账号 2.docker hub上创建仓库 3.d ...
- Docker 镜像上传到docker hub仓库
1 先创建docker hub 帐号 ,并创建仓库 https://hub.docker.com/ 首先你需要一个docker hub 帐号,记住username,password,email .后面 ...
- docker镜像上传到阿里云
目前上传本地镜像到网上有多种途径,一个是上传到hub上,一个是阿里云镜像仓库,还要其他服务器. 上传到hub上实在是太慢了,我的服务器用的是阿里云,所以选择上传到阿里云镜像仓库中. 前提条件:linu ...
- 方法1:使用Jenkins构建Docker镜像 --SpringCloud
前提意义: SpringCloud微服务里包含多个文件夹,拉取仓库的所有代码,然后过根据选项参数使用maven编译打包指定目录的jar,然后再根据这个目录的Dockerfile文件制作Docker镜像 ...
- 方法2:使用Jenkins构建Docker镜像 --SpringCloud
前提意义: SpringCloud微服务里包含多个文件夹,拉取仓库的所有代码,然后过根据选项参数使用maven编译打包指定目录的jar,然后再根据这个目录的Dockerfile文件制作Docker镜像 ...
- 本地docker镜像上传到腾讯云镜像仓库。
和上篇上传到Docker Hub类似,只是登录时切换成腾讯云镜像仓库地址(ccr.ccs.tencentyun.com/longdbtencentdocker/publongdb)即可. docker ...
- 本地docker镜像上传Docker Hub,并且在腾讯云上pull该镜像,最后运行成功。
1:在docker hub 上注册一个账号(本人直接能注册,有的说不能),然后创建自己的仓库. 2:登录docker hub ( longdbdocker --hub账号,longdb --仓库名称) ...
- docker镜像上传阿里云仓库
推送至阿里云镜像:1.首先在阿里云上选择容器镜像服务,创建命名空间以及镜像仓库2. docker login --username=zhangshitongsky@163.com registry.c ...
随机推荐
- c# Login UI with background picture animation
准备4张图片 UI control: <Grid x:Class="Test1.MainBgAd" xmlns="http://schemas.microsoft. ...
- 20155311《网络对抗》MSF基础应用
20155311<网络对抗>MSF基础应用 实验过程 实验系统 靶机1:Windows XP Professional SP2 ,IP地址:192.168.136.129 靶机2:Wind ...
- 20155311高梓云《网络对抗》逆向及Bof基础
20155311高梓云<网络对抗>逆向及Bof基础 实践目标 本次实践的对象是一个名为pwn1的linux可执行文件. 该程序正常执行流程是:main调用foo函数,foo函数会简单回显任 ...
- [Oracle]跨越 DBLINK 访问表时,数据缓存在何处的Data Buffer 中?
结论是存储在 remote 端,这其实也很好理解.在远端能高效率地计算,当然应当在远端完成缓存和检索. ■ Before query execution via DBLINK: =========== ...
- mfc Radio Buttons
添加单选按钮 关联变量 调试宏TRACE BOOL类型 一.添加一组单选按钮 二.添加第二组单选按钮 三.关联变量 四.单选按钮运用 void CMY_Dialog::OnBnClickedButto ...
- mfc 虚函数
知识点 类虚函数概念 类虚函数定义virtual 一.虚函数 简单地说,那些被virtual关键字修饰的成员函数,就是虚函数. 二.虚函数定义 定义:在某基类中声明为 virtual 并在一个或多个派 ...
- proftpd启动失败提示unable to determine IP address of “xxx.com”
proftpd启动失败提示unable to determine IP address of “xxx.com”这种proftpd启动失败的原因是无法解析后面主机的IP地址,解决方法是在DNS列表中增 ...
- linux下ipython无法保存历史记录
在Centos7下使用ipython时,发现有个warning,提示无法保存历史记录 [root@localhost pip-]# ipython /usr/local/lib/python3./si ...
- Git版本库的创建(Ubuntu)
在Ubuntu上学习Git随笔. 一. git 仓库的安装 git 在终端用git命令查看Ubuntu是否安装git版本库,如果没有安装,最新版本(Ubuntu18.04)会提示用下面命令进行安装. ...
- springboot 前后端分离开发 从零到整(一、环境的搭建)
第一次写文章,有什么错误地方请大家指正,也请大家见谅. 这次为大家分享我做毕业设计的一个过程,之前没有接触过springboot,一直做的都是Javaweb和前端,做了几个前后端分离的项目.现在听说s ...