第二十七章 springboot + zipkin(brave-okhttp实现)
本文截取自:http://blog.csdn.net/liaokailin/article/details/52077620
一、前提
1、zipkin基本知识:附8 zipkin
2、启动zipkin server:
2.1、在官网下载服务jar,http://zipkin.io/pages/quickstart.html,之后使用命令启动服务jar即可。
nohup java -jar zipkin-server-1.5.1-exec.jar &
之后,查看与该jar同目录下的nohup.out日志文件,发现其实该jar也是由springboot打成的,且内置的tomcat的启动端口是9411,如下:

2.2、打开浏览器,http://ip:9411/(host为服务启动的host)。
二、代码实现
1、service1
1.1、pom.xml
         <dependency>

             <groupId>io.zipkin.brave</groupId>

             <artifactId>brave-core</artifactId>

             <version>3.9.0</version>

         </dependency>

         <dependency>

             <groupId>io.zipkin.brave</groupId>

             <artifactId>brave-spancollector-http</artifactId>

             <version>3.9.0</version>

         </dependency>

         <dependency>

             <groupId>io.zipkin.brave</groupId>

             <artifactId>brave-web-servlet-filter</artifactId>

             <version>3.9.0</version>

         </dependency>

         <dependency>

             <groupId>io.zipkin.brave</groupId>

             <artifactId>brave-okhttp</artifactId>

             <version>3.9.0</version>

         </dependency>
1.2、ZipkinConfig
 package com.xxx.service1.zipkin;

 import org.springframework.context.annotation.Bean;

 import org.springframework.context.annotation.Configuration;

 import com.github.kristofa.brave.Brave;

 import com.github.kristofa.brave.EmptySpanCollectorMetricsHandler;

 import com.github.kristofa.brave.Sampler;

 import com.github.kristofa.brave.SpanCollector;

 import com.github.kristofa.brave.http.DefaultSpanNameProvider;

 import com.github.kristofa.brave.http.HttpSpanCollector;

 import com.github.kristofa.brave.okhttp.BraveOkHttpRequestResponseInterceptor;

 import com.github.kristofa.brave.servlet.BraveServletFilter;

 import okhttp3.OkHttpClient;

 /**

  * zipkin配置

  */

 @Configuration

 public class ZipkinConfig {

     @Bean

     public SpanCollector spanCollector() {

         HttpSpanCollector.Config spanConfig = HttpSpanCollector.Config.builder()

                                               .compressionEnabled(false)//默认false,span在transport之前是否会被gzipped。

                                               .connectTimeout(5000)//5s,默认10s

                                               .flushInterval(1)//1s

                                               .readTimeout(6000)//5s,默认60s

                                               .build();

         return HttpSpanCollector.create("http://ip:9411",

                                         spanConfig,

                                         new EmptySpanCollectorMetricsHandler());

     }

     @Bean

     public Brave brave(SpanCollector spanCollector) {

         Brave.Builder builder = new Brave.Builder("service1");//指定serviceName

         builder.spanCollector(spanCollector);

         builder.traceSampler(Sampler.create(1));//采集率

         return builder.build();

     }

     @Bean

     public BraveServletFilter braveServletFilter(Brave brave) {

         /**

          * 设置sr、ss拦截器

          */

         return new BraveServletFilter(brave.serverRequestInterceptor(),

                                       brave.serverResponseInterceptor(),

                                       new DefaultSpanNameProvider());

     }

     @Bean

     public OkHttpClient okHttpClient(Brave brave){

         /**

          * 设置cs、cr拦截器

          */

         return new OkHttpClient.Builder()

                    .addInterceptor(new BraveOkHttpRequestResponseInterceptor(brave.clientRequestInterceptor(),

                                                                              brave.clientResponseInterceptor(),

                                                                              new DefaultSpanNameProvider()))

                    .build();

     }

 }
说明:
- HttpSpanCollector:span信息收集器
- Brave:基本实例,注意传入的参数是serviceName
- BraveServletFilter:设置sr(server receive),ss(server send)拦截器
- OkHttpClient:构建client实例,添加拦截器,设置cs(client send),cr(client receive)拦截器
1.3、ZipkinBraveController
 package com.xxx.service1.zipkin;

 import org.springframework.beans.factory.annotation.Autowired;

 import org.springframework.web.bind.annotation.RequestMapping;

 import org.springframework.web.bind.annotation.RestController;

 import io.swagger.annotations.Api;

 import io.swagger.annotations.ApiOperation;

 import okhttp3.OkHttpClient;

 import okhttp3.Request;

 import okhttp3.Response;

 @Api("zipkin brave api")

 @RestController

 @RequestMapping("/zipkin/brave/service1")

 public class ZipkinBraveController {

     @Autowired

     private OkHttpClient okHttpClient;

     @ApiOperation("trace第一步")

     @RequestMapping("/test1")

     public String myboot() throws Exception {

         Thread.sleep(100);//100ms

         Request request = new Request.Builder().url("http://localhost:8032/zipkin/brave/service2/test2").build();

         /*

          * 1、执行execute()的前后,会执行相应的拦截器(cs,cr)

          * 2、请求在被调用方执行的前后,也会执行相应的拦截器(sr,ss)

          */

         Response response = okHttpClient.newCall(request).execute();

         return response.body().string();

     }

 }
1.4、application.properties
server.port=8031
2、service2
2.1、pom.xml、ZipkinConfig与service1相似,config部分需要换掉serviceName为"service2"
2.2、controller
 package com.xxx.service2.zipkin;

 import org.springframework.beans.factory.annotation.Autowired;

 import org.springframework.web.bind.annotation.RequestMapping;

 import org.springframework.web.bind.annotation.RequestMethod;

 import org.springframework.web.bind.annotation.RestController;

 import io.swagger.annotations.Api;

 import io.swagger.annotations.ApiOperation;

 import okhttp3.OkHttpClient;

 import okhttp3.Request;

 import okhttp3.Response;

 @Api("zipkin brave api")

 @RestController

 @RequestMapping("/zipkin/brave/service2")

 public class ZipkinBraveController {

     @Autowired

     private OkHttpClient okHttpClient;

     @ApiOperation("trace第二步")

     @RequestMapping(value="/test2",method=RequestMethod.GET)

     public String myboot() throws Exception {

         Thread.sleep(200);//100ms

         Request request3 = new Request.Builder().url("http://localhost:8033/zipkin/brave/service3/test3").build();

         Response response3 = okHttpClient.newCall(request3).execute();

         String response3Str = response3.body().string();

         Request request4 = new Request.Builder().url("http://localhost:8034/zipkin/brave/service4/test4").build();

         Response response4 = okHttpClient.newCall(request4).execute();

         String response4Str = response4.body().string();

         return response3Str + "-" +response4Str;

     }

 }
2.3、application.properties
server.port=8032
3、service3
3.1、pom.xml、ZipkinConfig与service1相似,config部分需要换掉serviceName为"service3"
3.2、controller
 package com.xxx.service3.zipkin;

 import org.springframework.web.bind.annotation.RequestMapping;

 import org.springframework.web.bind.annotation.RequestMethod;

 import org.springframework.web.bind.annotation.RestController;

 import io.swagger.annotations.Api;

 import io.swagger.annotations.ApiOperation;

 @Api("zipkin brave api")

 @RestController

 @RequestMapping("/zipkin/brave/service3")

 public class ZipkinBraveController {

     @ApiOperation("trace第三步")

     @RequestMapping(value="/test3",method=RequestMethod.GET)

     public String myboot() throws Exception {

         Thread.sleep(300);//100ms

         return "service3";

     }

 }
3.3、application.properties
1 server.port=8033
4、service4
4.1、pom.xml、ZipkinConfig与service1相似,config部分需要换掉serviceName为"service4"
4.2、controller
 package com.xxx.service4.zipkin;

 import org.springframework.web.bind.annotation.RequestMapping;

 import org.springframework.web.bind.annotation.RequestMethod;

 import org.springframework.web.bind.annotation.RestController;

 import io.swagger.annotations.Api;

 import io.swagger.annotations.ApiOperation;

 @Api("zipkin brave api")

 @RestController

 @RequestMapping("/zipkin/brave/service4")

 public class ZipkinBraveController {

     @ApiOperation("trace第4步")

     @RequestMapping(value = "/test4", method = RequestMethod.GET)

     public String myboot() throws Exception {

         Thread.sleep(400);//100ms

         return "service4";

     }

 }
4.3、application.properties
server.port=8034
三、测试
swagger访问localhost:8031/zipkin/brave/service1/test1,之后查看zipkin webUI即可。
结果:
1、查看调用依赖:

2、查看调用时间对比

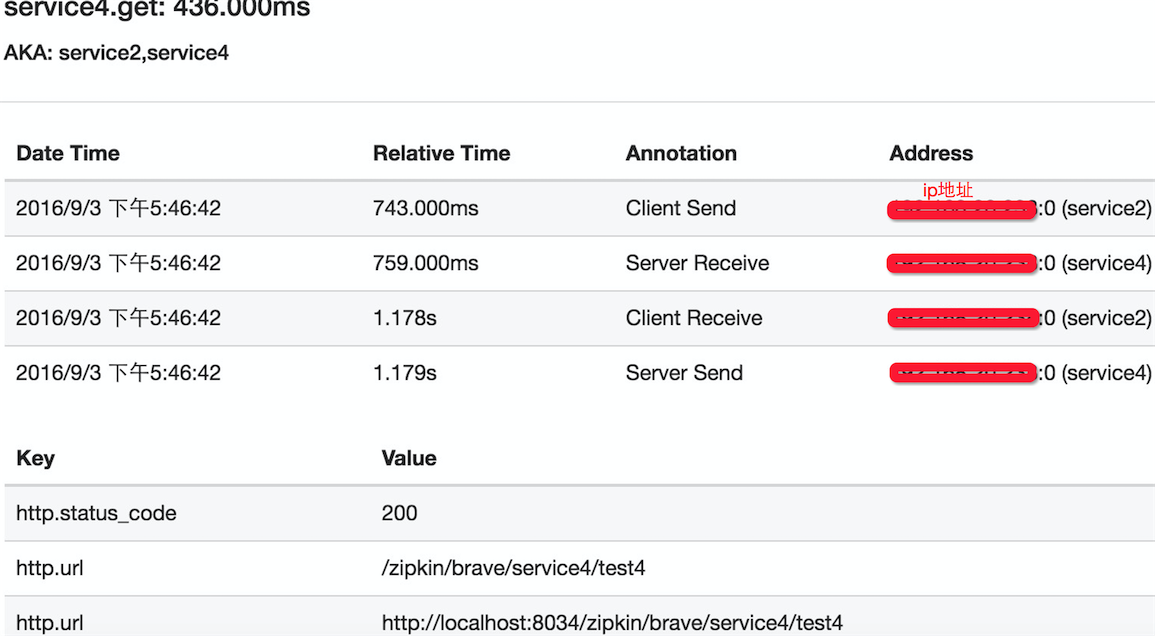
点击第4个span,查看调用详情:

第二十七章 springboot + zipkin(brave-okhttp实现)的更多相关文章
- 第二十八章 springboot + zipkin(brave定制-AsyncHttpClient)
brave本身没有对AsyncHttpClient提供类似于brave-okhttp的ClientRequestInterceptor和ClientResponseInterceptor,所以需要我们 ...
- 第二十九章 springboot + zipkin + mysql
zipkin的数据存储可以存在4个地方: 内存(仅用于测试,数据不会持久化,zipkin-server关掉,数据就没有了) 这也是之前使用的 mysql 可能是最熟悉的方式 es Cassandra ...
- 《Linux命令行与shell脚本编程大全》 第二十七章 学习笔记
第二十七章:shell脚本编程进阶 监测系统统计数据 系统快照报告 1.运行时间 uptime命令会提供以下基本信息: 当前时间 系统运行的天数,小时数,分钟数 当前登录到系统的用户数 1分钟,5分钟 ...
- Gradle 1.12用户指南翻译——第二十七章. Ear 插件
其他章节的翻译请参见: http://blog.csdn.net/column/details/gradle-translation.html 翻译项目请关注Github上的地址: https://g ...
- “全栈2019”Java多线程第二十七章:Lock获取lock/释放unlock锁
难度 初级 学习时间 10分钟 适合人群 零基础 开发语言 Java 开发环境 JDK v11 IntelliJ IDEA v2018.3 文章原文链接 "全栈2019"Java多 ...
- “全栈2019”Java第二十七章:流程控制语句中循环语句for
难度 初级 学习时间 10分钟 适合人群 零基础 开发语言 Java 开发环境 JDK v11 IntelliJ IDEA v2018.3 文章原文链接 "全栈2019"Java第 ...
- 【第二十七章】 springboot + zipkin(brave-okhttp实现)
本文截取自:http://blog.csdn.net/liaokailin/article/details/52077620 一.前提 1.zipkin基本知识:附8 zipkin 2.启动zipki ...
- SpringBoot | 第二十七章:监控管理之Actuator使用
前言 随着我们服务越来越多,部署的环境也越来越繁多时,由于各服务都部署在不同的机器上,每当出现问题或者异常时,想快速进行问题的定位就变的麻烦了.所以,本章节开始,开始讲解SpringBoot的监控相关 ...
- 第三十七章 springboot+docker(手动部署)
一.下载centos镜像 docker pull hub.c.163.com/library/centos:latest docker tag containId centos:7 docker ru ...
随机推荐
- Python3 贝叶斯分类
# -*- coding: utf-8 -*- """ Created on Tue Jan 16 20:11:07 2018 @author: markli " ...
- [同步脚本]mysql-elasticsearch同步
公司项目搜索部分用的elasticsearch,那么这两个之间的数据同步就是一个问题. 网上找了几个包,但都有各自的缺点,最后决定还是自己写一个脚本,大致思路如下: 1.在死循环中不断的select指 ...
- VMware vsphere Hypervisor、VMware vsphere和VMware Workstation小记
VMware Workstation软件需要依赖于宿主操作系统之上. VMware vSphere是VMware公司推出一套服务器虚拟化解决方案,它是可以直接独立安装和运行在祼机上的系统. VMwar ...
- 【BZOJ-1913】signaling信号覆盖 极角排序 + 组合
1913: [Apio2010]signaling 信号覆盖 Time Limit: 20 Sec Memory Limit: 64 MBSubmit: 1232 Solved: 506[Subm ...
- Codeforces Round #272 (Div. 2) B. Dreamoon and WiFi dp
B. Dreamoon and WiFi 题目连接: http://www.codeforces.com/contest/476/problem/B Description Dreamoon is s ...
- slf4j 和 log4j合用的(Maven)配置
简述: 添加logger的日志输出,下面是配置信息供备忘 步骤: 1. 在Maven的porn.xml 文件中添加dependency如下 <dependency> <group ...
- 让IIS支持10万并发
适用的IIS版本:IIS 7.0, IIS 7.5, IIS 8.0 适用的Windows版本:Windows Server 2008, Windows Server 2008 R2, Windows ...
- LPC43xx SGPIO Configuration -- Why not use GPDMA ?
LPC43xx SGPIO Configuration The LPC43xx SGPIO peripheral is used to move samples between USB and the ...
- C#网络编程技术FastSocket实战项目演练
一.FastSocket课程介绍 .NET框架虽然微软提供了socket通信的类库,但是还有很多事情要自己处理,比如TCP协议需要处理分包.组包.粘包.维护连接列表等,UDP协议需要处理丢包.乱序,而 ...
- 基于ASP.NET WebAPI OWIN实现Self-Host项目实战
引用 寄宿ASP.NET Web API 不一定需要IIS 的支持,我们可以采用Self Host 的方式使用任意类型的应用程序(控制台.Windows Forms 应用.WPF 应用甚至是Windo ...
